IP Pool
The IP pool is a set of available IP addresses that you can pass on to customers and resellers, or utilize them for your own websites. IP addresses may be designated as either dedicated, meaning that the target subscriber becomes the only owner of this address, or shared, meaning that this address is shared among many subscribers.
Next in this section we will describe the concepts of IP addresses and how they are allocated in Plesk for web hosting purposes.
About IP Addresses
An IP address is a number that uniquely identifies each device, such as a computer, on a network. The use of IP addresses makes it possible for computers to find other computers on a network and communicate with them.
There are two formats of IP addresses:
-
IP version 4. These 32-bit network addresses look like
192.168.1.1. They are currently used by most network devices. The number of IPv4 addresses is limited and the last remaining portions of vacant IP addresses have already been allocated to Internet service providers. -
IP version 6. These 128-bit network addresses look like
2001:0db8:85a3:0000:0000:8a2e:0370:7334. IPv6 is the new standard that was developed to address the exhaustion of IPv4 network addresses.
When Plesk is deployed in IPv6-enabled networks, it can operate simultaneously on IPv4 and IPv6 addresses. Providers can add IPv4 and IPv6 addresses to the server IP pool, allocate them to resellers, and create subscriptions based on them.
Each hosting subscription can be allocated:
- One IPv4 address.
- One IPv6 address.
- One IPv4 + one IPv6 address (dual-stack subscriptions).
Note: Each subscription that needs to host FTP shares accessible by Internet users without password authorization (Anonymous FTP) must be assigned at least one dedicated IPv4 address.
Requirements for Operating on IPv6
The following requirements must be met to ensure the proper operation of Plesk in IPv6-enabled networks:
- The Plesk-managed server must be assigned at least one static IPv4 address. This is required for connections to the Plesk licensing servers and application catalogs.
- When running in virtual environments, Virtuozzo containers 4.6 or later must be used.
To see the list of Linux operating systems that support this feature, refer to the release notes to Plesk.
Hiding IP Addresses
It is possible to hide one or more IP addresses registered in Plesk from the Plesk interface. IPs that are hidden will not be displayed in Tools & Settings > IP Addresses, and will not be available for assignment when creating subscriptions.
To hide one or more IP addresses:
- Connect to the Plesk server using an RDP, VNC, or any other remote access client you prefer.
- Open the file
C:\Program Files (x86)\Parallels\Plesk\admin\conf\panel.inifor editing (create the file if necessary) and add the following lines to it:
[ip]
blacklist="<IP addresses to be hidden>"
Type in the IP address or addresses you want to hide as a comma-delimited list. You can list both IPv4 and IPv6 IP addresses to be hidden. For example:
[ip]
blacklist="192.168.1.10, 2002:5bcc:18fd:c:f482:d057:9ccf:993D"- Log in to Plesk, go to Tools & Settings > IP Addresses, and click Reread IP.
- To make one or more hidden IP addresses visible in the Plesk interface, remove them from the list and re-read IPs.
Hiding an IP address already assigned to one or more subscriptions will result in the "The IP address is already used for hosting" error. The IP address will be marked as "blacklisted" in Tools & Settings > IP Addresses, but will be available in the Plesk interface.
Allocation to Resellers and Hosting Customers
The following is an overview of how IP addresses are allocated in Plesk:
- IP addresses are added to the server IP pool.
After installation, Plesk reads all assigned IP addresses from the operating system configuration and adds them to the server IP pool. When you obtain new IP addresses that you would like to use on the server, you should add them through Plesk to that pool, as Plesk might not recognize manual modifications you make to the network configuration files.
Note: If you are running Plesk in a Virtuozzo container, you can add IP addresses only on the Virtuozzo hardware node.
When adding addresses to the server IP pool (in Tools & Settings > IP Addresses > Add IP Address), you select how they should be allocated - either as dedicated or shared:
- A dedicated IP address can be assigned to a single reseller. Dedicated IP addresses are required for hosting e-commerce sites with SSL encryption and sites that host FTP shares that are accessible without password authorization.
Note: The Server Name Indication (SNI) makes it possible to enable SSL protection for sites on shared IP addresses; however, this might not work for all hosting servers and users' browsers. For more information, see the section SSL and Shared IP Addresses. On Windows platforms, it is also possible to protect a group of websites with one certificate. See the section SSL and Shared IP Addresses (Windows) for more details.
- A shared IP address can be literally shared among several reseller accounts and sites. Sharing of addresses helps to use scarce IPv4 address resources efficiently, but it should not be needed for IPv6 addresses.
- A dedicated IP address can be assigned to a single reseller. Dedicated IP addresses are required for hosting e-commerce sites with SSL encryption and sites that host FTP shares that are accessible without password authorization.
- When setting up reseller plans (in Service Plans > Reseller Plans > Add Plan > IP Addresses tab), you select IP addresses that should be allocated to resellers:
- For shared IP addresses, you can manually select which addresses should be allocated.
- For dedicated IP addresses, you can only specify the number of addresses that should be allocated: When you create a reseller account, a vacant dedicated IP address from the server pool is automatically selected by Plesk and allocated to the reseller.
- When signing up new customers (in Customers > Add Customer) or creating subscriptions for your own needs (in Subscriptions > Add Subscription), you can select IP addresses that should be allocated. All shared and dedicated addresses available from the server IP pool are listed in a menu.
About Using Plesk with Dynamic IP Pools
Plesk examines its IP pool during the web server start and removes IP addresses that do not exist in the system. This does not allow administrators to allocate non-existing IP addresses to services or subscriptions.
Managing the Server IP Pool
To view the IP addresses you have at your disposal:
- Go to Tools & Settings > IP Addresses (in the Tools & Resources group).
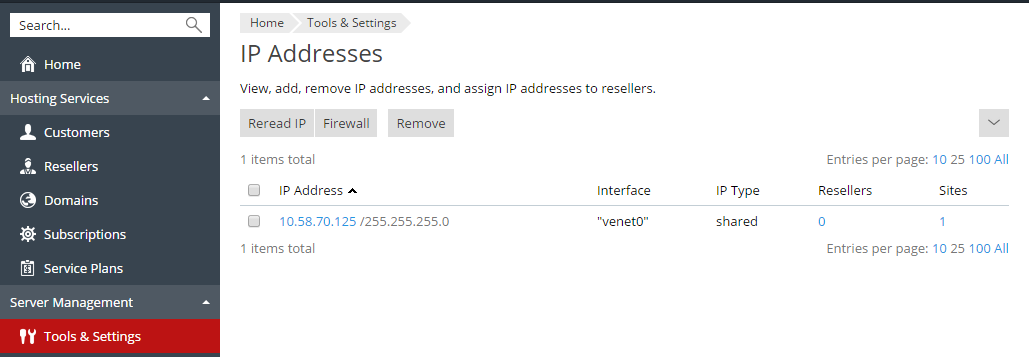
Your IP addresses are listed and the following supplementary information is given:
- The IP address, Subnet Mask and Interface columns show which IP addresses are on which network interfaces.
- The Resellers column shows the number of user accounts whom you assigned a given IP address. To view the users by names, click the respective number in the Resellers column.
- The Sites column shows a number of websites hosted on an IP address. To view the domain names of these websites, click the respective number in the Sites column.
- To update the list of IP addresses and their status, click Reread IP.
You might need to do this if you manually added IP addresses to the network interface in the server operating system, or when operating in Virtuozzo containers.
To add a IP address to the server:
- Go to Tools & Settings > IP Addresses (in the Tools & Resources group), and click Add IP Address.
- Select the network interface for the new IP from the Interface menu. All network cards installed on your server are shown in this menu.
- Enter the IP address and subnet mask in the corresponding box. For example,
123.123.123.123/16or2002:7b7b:7b7b::1/64. - Select the type of the new IP address, shared or dedicated.
- From the drop-down box, select the default SSL certificate to use for the new IP address. You can select the following certificates:
- Default certificate - the certificate that comes with the Plesk distribution package. However, this certificate is not recognized by web browsers as it is not signed by a Certificate Authority (a warning message appears). The default certificate is used to provide access to Plesk via the https protocol (https://server-name-or-IP-address:8443/).
- Other certificates - the certificates (self-signed or signed by a Certificate Authority) that you added to the repository of SSL certificates. About adding certificates, see Customer's Guide, section Securing Connections with SSL Certificates.
- If your server is running Windows operating system, select the FTP over SSL checkbox if you want to enable the ability to use secure FTP connection (FTP over SSL) for the domain on a dedicated IP address.
Note: To enable secure FTP connections, the FTP server installed on your Plesk server must support FTP over SSL. For example, Gene6, Serv-U FTP, IIS FTP 7.x servers support FTP over SSL.
- Click OK.
To remove an IP address from the server:
- Go to Tools & Settings > IP Addresses (in the Resources group).
- Select the respective checkbox and click Remove, confirm removal and click OK.
To assign an IP address to a reseller:
- Go to Tools & Settings > IP Addresses (in the Resources group), and click the corresponding number in the Resellers column, then click Assign.
- Select the account you need and click OK.
To revoke an IP address from a reseller:
- Go to Tools & Settings > IP Addresses (in the Resources group), and click the corresponding number in the Resellers column.
- Select the respective checkbox and click Remove.
- Confirm removal and click OK.
Since users can refer to a web resource on your server by typing an IP address and there can be several websites hosted on that address, Plesk needs to know which of the sites to show in such cases. Plesk automatically assigns the first website created on an IP address as the default website; however, you can select any other website and make it default.
To assign a default website (default domain) for an IP address:
- Go to Tools & Settings > IP Addresses (in the Resources group), and click the IP address you need.
- In the Default site menu, select the site you need and click OK.
To change an IP address allocation type (shared, dedicated) or assign another SSL certificate to an IP address:
- Go to Tools & Settings > IP Addresses (in the Resources group), and click the IP address you need.
- Select the required IP address allocation type and SSL certificate, and click OK.