Creating a Promo
You can create your own promo by editing the panel.ini configuration file.
To create a promo:
- Open the configuration file
%plesk_dir%\admin\conf\panel.inion the Plesk-managed server. If the file does not exist, create it. - Add the line
[promos]to the file. - Specify the parameters of your promo by adding lines like "
<promo_name>.<parameter>=<value>" after the line[promos]. You can use the following parameters:- active. Shows if your promo will appear by default or not. Boolean.
- icon. URL of an icon that will be shown in the promo.
- title. Title of the promo.
- text. The promo description.
- buttonUrl. The URL that opens upon clicking the promo button.
- buttonText. The caption of the promo button.
- hideText. Text of the link for hiding the promo.
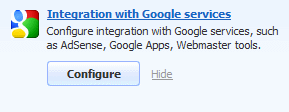
For example, you want to create a promo that looks like the following (this is the Plesk default Google Integration Promo):

You need to add the following lines to the
panel.ini:[promos]
custom.googleIntegration.active=true
custom.googleIntegration.icon=http://www.softicons.com/download/internet-cons/webset-icons-by-graphicriver/png/48/google.png
custom.googleIntegration.title=integration with Google Services
custom.googleIntegration.text=Configure integration with Google Services, such as AdSense, Google Apps, Webmaster tools.
custom.googleIntegration.buttonUrl=https://plesk.server:8443/plesk/server/google-tools/
custom.googleIntegration.buttonText=Configure
custom.googleIntegration.hideText=Hide
- Save the file.