DKIM, SPF, and DMARC Protection
Plesk supports a number of anti-spam solutions for validation of mail messages identity:
- DKIM (DomainKeys Identified Mail) is a method used to associate a domain name identity with an outgoing message and to validate a domain name identity associated with an incoming message through cryptographic authentication.
- SPF (Sender Policy Framework) is a method used to prevent sender address forgery, i.e. using fake sender addresses. It allows mail server to check that incoming mail from a domain comes from a host authorized by that domain’s administrator. In addition, Plesk uses SRS (Sender Rewriting Scheme), so that forwarded messages can pass SPF checking.
- DMARC (Domain-based Message Authentication, Reporting and Conformance) is a technology to extend the capabilities of the SPF and DKIM methods. The DMARC policy defines how the receiver should treat email messages depending on the results of DKIM and SPF checking.
The mail server requirements for these solutions are as follows:
| Mail Server | DKIM | SPF | SRS | DMARC |
|---|---|---|---|---|
| Postfix (Linux) | ➕ | ➕ | ➕ | ➕ |
| Qmail | ➕ | ➕ | ➖ | ➕ |
| MailEnable Professional | ➕ | ➕ | ➖ | ➖ |
| MailEnable Standard | Version 9.16 or later | ➖ | ➖ | ➖ |
| SmarterMail | ➕ | ➕ | ➕ | ➕ |
| IceWarp | ➕ | ➕ | ➕ | ➖ |
In this table, ‘+’ means that the solution is supported by all versions that are supported by Plesk Onyx. ‘-‘ means that the solution is not supported.
DKIM
DKIM (DomainKeys Identified Mail) provides a method used to validate a domain name identity that is associated with a message. It lets an organization to take responsibility for a sent message by attaching an automatically generated digital signature to it and uses cryptographic techniques to validate authorization for the signature presence.
To provide the DKIM support, Plesk uses the functionality of an external library (Linux) or of the mail server supplied with Plesk (Windows).
Warning: If you use an external DNS service, DKIM signing will work for outgoing messages, but the receiving mail server will not be able to validate these messages. As a workaround, you can switch off Plesk DNS server and add a corresponding DKIM-related DNS record on the external DNS service. In this case, the receiving server will be able to validate the messages. Learn how to enable DKIM email signing for domains that use an external DNS server.
Enabling or disabling DKIM on the Server
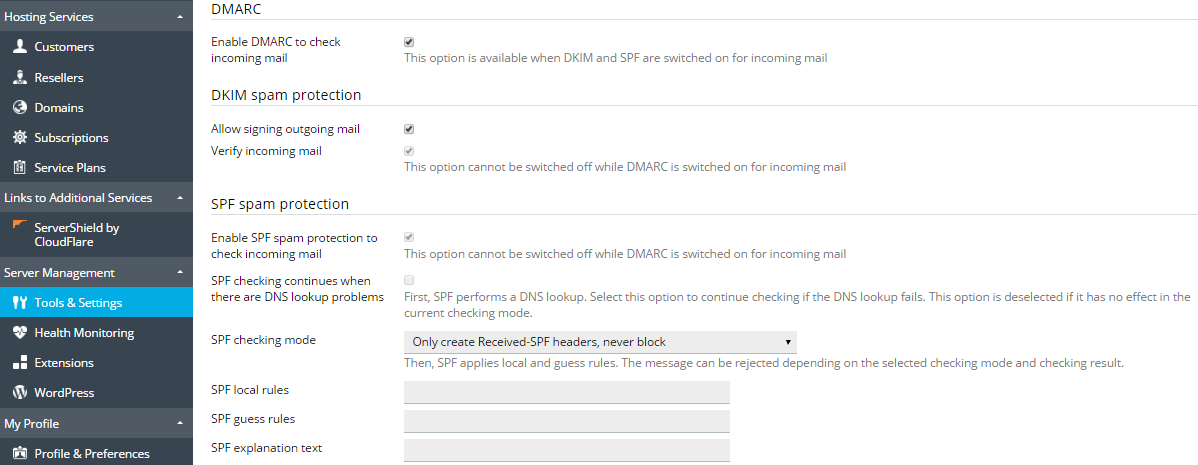
To enable the DKIM functionality on your server, go to Tools & Settings > Mail Server Settings (in the Mail group) and scroll down to the DKIM spam protection section. The following options allow you to manage DKIM on your server:
- Allow signing outgoing mail. This option enables customers to switch on the DKIM signing of outgoing mail on a per-domain basis. It does not automatically enable signing of all outgoing email messages. To use DKIM, users must switch it on for individual domains.
- Verify incoming mail (Plesk for Linux). This option switches on DKIM checking for all incoming mail. All messages are checked, and if the check fails, are marked with a special header.
Note that each option can be selected independently. You can choose to enable signing of outgoing mail, checking of incoming mail, or both.
Note: You cannot disable DKIM checking for incoming mail if DMARC is enabled.
Enabling DKIM after Plesk Upgrade
When you upgrade Plesk from versions prior to Plesk Onyx, DomainKeys is automatically replaced with DKIM. If the DomainKeys functionality was enabled in Plesk, DKIM will be enabled too.
Enabling DKIM Email Signing for a Domain
If DKIM signing is enabled on the server (see the Enabling or disabling DKIM on the Server section above), customers can sign outgoing mail for their domains.
To enable DKIM signing of outgoing mail for an individual domain:
- Open the corresponding subscription for managing.
- Go to the Mail tab > Mail Settings.
- Select the domain and click Activate/Deactivate Services.
- Select Enable for DKIM spam protection system to sign outgoing email messages and click OK.
Note: The DNS service must be activated on a domain.
After you have activated DKIM for a domain, Plesk adds the following two records to the DNS zone of the domain:
-
default._domainkey.<example.com>- contains the public part of the generated key. -
_ domainkey.<example.com>- contains the DKIM policy.
SPF and SRS
SPF (Sender Policy Framework) is a method used to prevent sender address forgery, i.e. using fake sender addresses. SPF allows a domain’s administrator to set a policy that authorizes particular hosts to send mail from the domain. A receiving mail server checks that the incoming mail from a domain comes from a host authorized by that domain’s administrator. SPF is based on the rules specified by the administrator in the sender’s DNS zone.
In Plesk, you can set up an SPF policy for outgoing mail by specifying rules in a DNS record. Additionally, on Linux, you can enable SPF to check incoming mail.
When SPF is set up, the mail server checks incoming mail using the following algorithm steps:
-
Read local rules.
Local rules are the rules used by the spam filter. An example local rule can be the following:
a:test.plesk.com. -
Search for the sender’s DNS SPF record (if any).
An example SPF record can be the following:
example.com. TXT v=spf1 +a +mx -all -
Concatenate the local rules and the SPF record into the resulting policy.
In our example, the resulting policy will be
example.com. TXT v=spf1 +a +mx +a:test.plesk.com -all.Note: If the mail server detects no SPF record, the resulting policy will comprise the local rules only.
-
Check mail against the policy resulting from the previous step.
-
Read guess rules.
Guess rules are the global rules that override the SPF record. An example guess rule can be the following:
v=spf1 +a/24 +mx/24 +ptr ?all. -
Check mail against the guess rules only.
-
Compare the results of the two checks: the one made against the resulting policy (step 4) and the one made against the guess rules only (the previous step). Apply the check whose result is more permissive.
See more information on SPF check statuses.
To set up an SPF policy for outgoing mail:
Go to Tools & Settings > DNS Template and edit the TXT DNS record related to SPF. This DNS record is always present in the server-wide DNS template. Here is an example of SPF record created by Plesk:
example.com. TXT v=spf1 +a +mx +a:test.plesk.com -all
The parts of this record mean the following:
| Part | Description |
|---|---|
v=spf1 |
The domain uses SPF of the version 1. |
+a |
All the hosts from the “A” records are authorized to send mail. |
+mx |
All the hosts from the “MX” records are authorized to send mail. |
+a:test.plesk.com |
The domain test.plesk.com is authorized to send mail. |
-all |
All other domains are not authorized to send mail. |
Read more about the syntax of SPF DNS records. The policy notation is available at RFC7208.
To enable SPF to check incoming mail on a Linux-based server:
-
Go to Tools & Settings > Mail Server Settings (in the Mail group). The server-wide mail preferences screen will open on the Settings tab.
-
In the SPF spam protection section, select the Enable SPF spam protection to check incoming mail checkbox.
-
Select SPF checking continues when there are DNS lookup problems if you want SPF to continue checking if a DNS lookup fails. In this case, if the host cannot be resolved or no SPF-related records are found, the SPF guess rules may be applied.
-
Select an option from the SPF checking mode drop-down box to specify how to deal with email when SPF applies local and guess rules:
- Only create Received SPF-headers, never block - to accept all incoming messages regardless of SPF check results.
- Use temporary error notices when you have DNS lookup problems - to accept all incoming messages regardless of SPF check results, even if SPF check failed due to DNS lookup problems.
- Reject mail if SPF resolves to “fail” (deny) - to reject messages from senders who are not authorized to use the domain in question.
- Reject mail if SPF resolves to “softfail” - to reject the messages from senders who cannot be identified by SPF system as authorized or are not authorized because the domain has no SPF records published.
- Reject mail if SPF resolves to “neutral” - to reject the messages from senders who cannot be identified by SPF system as authorized or are not authorized because the domain has no SPF records published.
- Reject mail if SPF does not resolve to “pass” - to reject the messages that do not pass SPF check for any reason (for example, when sender’s domain does not implement SPF and SPF checking returns the “unknown” status).
-
To specify local rules, type the rules you need in the SPF local rules box.For example: include:spf.trusted-forwarder.org.
For more information on SPF rules, visit http://tools.ietf.org/html/rfc4408.
-
You can also specify the guess rules in the SPF guess rules box.
For example: v=spf1 +a/24 +mx/24 +ptr ?all
-
To specify an arbitrary error notice that is returned to the SMTP sender when a message is rejected, type it into the SPF explanation text box.
If no value is specified, the default text will be used as a notification.
-
To complete the setup, click OK.
To disable SPF checking for incoming mail:
- Go to Tools & Settings > Mail Server Settings (in the Mail group). The server-wide mail preferences screen will open on the Settings tab.
- In the SPF spam protection section, clear the Enable SPF spam protection to check incoming mail checkbox.
Note: On a Linux-based server, you cannot disable SPF checking for incoming mail if DMARC is enabled.
Using SRS
Additionally to SPF, some mail servers in Plesk support SRS (Sender Rewriting Scheme), a mechanism for rewriting sender addresses when an email is forwarded in such a way that the forwarded email continues to be SPF compliant. SRS helps to make sure that messages are delivered in case of using SPF.
SRS is used automatically when messages are forwarded from Plesk-hosted mailboxes.
To provide the SRS functionality, Plesk uses the capabilities of an external library (Linux) or of the mail server software (Windows).
DMARC
DMARC (Domain-based Message Authentication, Reporting and Conformance) is a technology to extend the capabilities of the SPF and DKIM sender policies. The DMARC policy defines how the receiver should treat email messages depending on the results of DKIM and SPF checking. This technology is based on the rules specified in the sender’s DNS zone.
In Plesk, you can set up a DMARC policy for outgoing mail by specifying rules in a DNS record. Additionally, you can enable DMARC to check incoming mail on a Linux-based server (using any mail server supported by Plesk) or on a Windows-based server (using SmarterMail only).
To set up a custom DMARC policy for outgoing mail:
Go to Tools & Settings > DNS Template and edit the DNS records related to the DMARC policy. These DNS records are always present in the server-wide DNS template. (By contrast, DNS records related to DKIM are added to DNS zones of individual domains when you activate DKIM on the domain.)
For example, the Plesk default DMARC policy is defined in the following record:
_dmarc.<domain>. TXT v=DMARC1; p=none
This policy recommends that the receiving mail server does not delete messages even if they failed checking. You can specify a stricter policy. However, note that the receiving server is free to apply its own policy to incoming mail.
Hosting customers can edit the policies for individual domains.
For information on DMARC, including policy notations, refer to https://datatracker.ietf.org/doc/rfc7489/.
To enable DMARC to check incoming mail:
- Go to Tools & Settings > Mail Server Settings (in the Mail group). The server-wide mail preferences screen will open on the Settings tab.
- In the DMARC section, select the Enable DMARC to check incoming mail checkbox. On a Linux-based server, this option is available only when DKIM and SPF are enabled for incoming mail.