Monitoring
summary: Monitoring (former Advanced Monitoring) helps to keep your Plesk running smoothly by tracking the server resource usage and notifying you when one or more resource usage reaches a predefined threshold.
In this topic, you will learn how to keep track of server resource usage via Monitoring, and also how to configure Monitoring notifications.
Monitoring is installed in Plesk Obsidian by default and has two modes. When you go to Monitoring for the first time, you need to chose which mode to use and activate:
-
Built-in Monitoring. We call it just “Monitoring”.
Monitoring works in tandem with the Grafana extension and uses Grafana to display server metrics as graphs. If you choose Built-in Monitoring, it will prompt you to install the Grafana extension.
Note: The current topic describes the Built-in Monitoring features.

-
360 Monitoring. A new feature offered by the cloud service Plesk 360.
360 Monitoring works in integration with Plesk and has two dashboards: the external one in Plesk 360 and the internal one in your Plesk. If you choose 360 Monitoring, it will prompt you to connect your Plesk to Plesk 360 and then activate 360 Monitoring.
Note: 360 Monitoring works in Plesk Obsidian 18.0.36 and later.

If you have multiple servers or want to monitor website availability, we recommend that you activate 360 Monitoring. To decide which mode suits you better, see the comparison between Built-in Monitoring and 360 Monitoring.
Note: You can, however, switch between the two modes at any time.
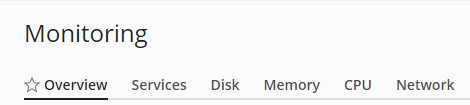
Tracking Monitoring Graphs
Monitoring is located in the Navigation Pane. The monitored resources and services are separated into five categories, each one is shown on its own tab.
By default, the “Overview” tab shows the graphs of the most critical parameters but you can replace them with those of your choice.
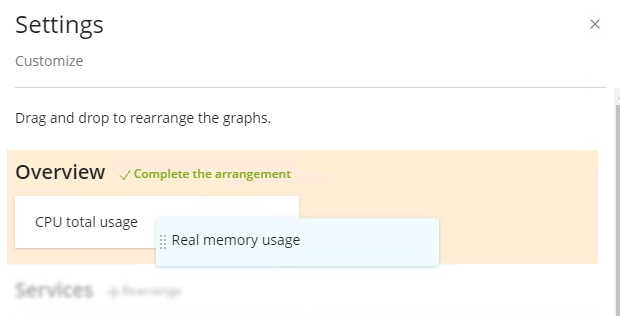
To customize the “Overview” tab:
-
Go to Monitoring and click Settings > Customize.
-
Choose the graphs you want to display on the “Overview” tab and/or change their layout:
- To choose a graph to display,
click the icon next to its name.
- To stop displaying a graph,
click the icon next to its name.
- To change the graph layout, next to “Overview”, click “Rearrange” and drag and drop the graph names. Once finished, click “Complete the arrangement”.
Note: You can always bring back the default graph layout of all Monitoring tabs. To do so, click Restore defaults.
- To choose a graph to display,
click the
-
Once you have finished customizing the “Overview” tab, click OK.
The values Monitoring displays
reflect the resource usage at the moment the page was loaded and not the current resource usage.
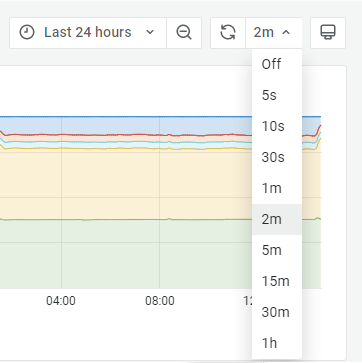
You can select how often Monitoring auto-refreshes its data: for example, each five seconds or each hour.
You can also turn off auto-refresh and refresh the data manually by clicking the  icon.
By default, Monitoring auto-refreshes its data every two minutes.
icon.
By default, Monitoring auto-refreshes its data every two minutes.
Note: Monitoring data does not change in real time. If your server is permanently loaded, you will not see the conformity between Monitoring and a system resource usage monitor (for example, top in Linux or Task Manager in Windows).
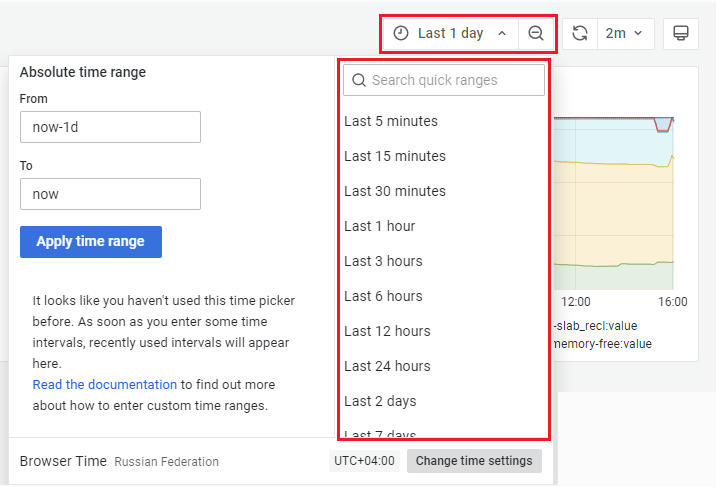
By default, all graphs on all Monitoring tabs show data generated in a day. It may be useful to change the default time range to find out the following:
- How the parameters change with time.
- The time ranges when the resource usage is maximal or minimal.
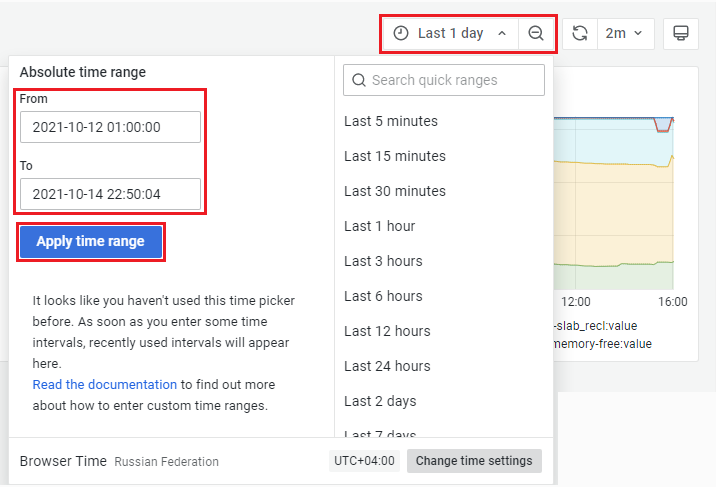
To change the time range for which the Monitoring graphs show data:
-
Go to Monitoring and choose the tab for which you want to change the time range.
-
Next to the
icon, click on the time period, which is “Last 1 day” by default. -
Change the time range by doing the following:
-
Selecting a predefined time range, for example, “Last 5 minutes”, “Last 1 hour”, or another one.
-
Specifying a custom time range. For example, from October 12, 2021, 01:00:00 to October 14, 2021, 22:50:04.
To specify a custom time range, below “Absolute time range” in the “From” and “To” fields, specify the required date and time and then click Apply time range.
See more information on how to specify a custom time range.
-
Note: Monitoring does not save any changes you make in its graphs. For example, if you select the “Last 6 hours” time range and turn off auto-refresh, Monitoring will return to its default graph settings once you refresh the browser page.
Tracking Monitoring Notifications
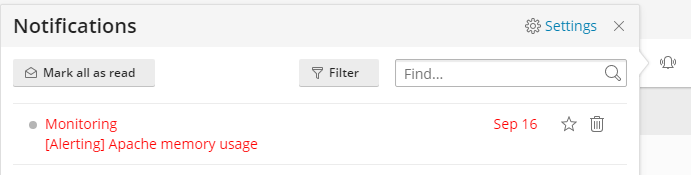
You can track server health not only by looking at the graphs but also by paying attention to Monitoring notifications and alerts.
Monitoring shows notifications in the Plesk interface when the resource usage exceeds its threshold and/or returns to its normal value.
The notifications are shown not for all resources but only for those that are turned on and have their thresholds set in Monitoring settings.
Certain resources already have their notifications turned on and their thresholds set by default. When resource usage exceeds the default threshold, the resource is close to its critical value and this high load can be potentially problematic.
If you do not have experience in server administration, we recommend that you keep the default Monitoring configuration. The preconfigured thresholds and enabled notifications are optimal. Otherwise, you can set your own thresholds and turn on and off notifications for particular resources.
Note: You can also manage the Monitoring configuration via the CLI. Learn how to do so in Plesk for Linux and Plesk for Windows.
To set custom thresholds and/or turn on and off notifications for particular resources:
-
Go to Monitoring and click Settings.
-
Here you can do the following:
- Turn on and off notifications for particular resources.
- Customize thresholds.
You can customize a threshold only for a resource that is turned on. If necessary, turn it on and then set the threshold. Certain resources can have two thresholds: the absolute one (in units of measurement) and the relative one (in percent). In this case, choose the preferred threshold first and then set its value.
-
Click Apply to save settings.
You can also turn off all Monitoring notifications for all resources.
To turn off notifications for all resources:
- In the upper right corner of the screen, click the icon and then click “Settings” next to the icon.
- Enable or disable one or multiple Monitoring notifications:
- The resource usage value is back to normal.
- The resource usage threshold has been exceeded.
- The Monitoring agent has detected an issue.
 icon and then click “Settings” next to the
  icon.
icon.Updating Monitoring After the Hardware Change
During its installation, Monitoring captures the hardware configuration of your Plesk server. Afterwards, Monitoring automatically checks for any changes in the server hardware once a day.
If you have just updated your server hardware and do not want to wait until Monitoring automatically reflects the changes, you can do it yourself manually.
To update Monitoring after the hardware change:
- Go to Monitoring and click Settings.
- Click Detect Hardware Changes.
Differences Between Built-in Monitoring and 360 Monitoring
The table below shows the comparison between the two Monitoring modes: Built-in Monitoring and 360 Monitoring.
| Service/Parameter | Built-in Monitoring | 360 Monitoring |
|---|---|---|
| Delivered | Internally by the Plesk extensions. | Externally by the remote cloud service Plesk 360. |
| Works if Plesk is down | No. | Yes. |
| Number of servers it can monitor | One Plesk server. | Multiple servers. |
| Can monitor servers without Plesk installed | No, does not exist without Plesk. | Yes. |
| Monitors website availability | No. | Yes. |
| Dashboards | One in Plesk. | The internal one in Plesk and the external one in Plesk 360. The external dashboard in Plesk 360 shows data from all servers and websites you monitor in one place. |
| Notifications and thresholds | Yes. | Yes. |
| Sends notifications to | Your email address. | Multiple communication channels: your email address, cellphone (via SMS), other devices (via Pushbullet and/or Pushover), Slack, and so on. |
| Price and licensing | Free, no license. |
|
(Plesk for Linux) Limiting the Number of Websites 360 Monitoring Monitors per Server
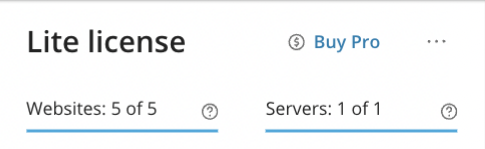
360 Monitoring can monitor multiple websites across multiple servers. The exact number depends on your license type and additional websites and servers you pay for within your license (if any).
By default, the license does not limit the number of websites to monitor per server. For example, if you have the limit of 20 websites and 4 servers, 360 Monitoring can monitor 20 websites hosted on one server or 5 websites hosted on each of 4 servers. Either way, the limit of 20 websites is reached.
If you are a hosting provider who sells 360 Monitoring to customers, you can limit the number of websites to monitor per server. This will prevent one or more customers’ servers from using up the whole license limit.
To limit the number of websites 360 Monitoring monitors per server:
-
Open the panel.ini file for editing, which is located at
/usr/local/psa/admin/conf/panel.ini.You can also edit the file in the Plesk interface using the Panel.ini Editor extension.
-
Add lines of the following pattern to the
panel.inifile and save it:[ext-monitoring] cloudMaxWebsites = <the desired website limit>
For example, if
cloudMaxWebsites = 5, 360 Monitoring will not monitor more than 5 websites per server even if the license limit is not reached.
Note: Your customers can remove the website limit if they can edit the panel.ini file (via the Panel.ini Editor extension
or using the SSH access to the server). To preserve your changes in panel.ini,
forbid root SSH access to the Plesk server and blacklist the Panel.ini Editor extension.
(Plesk for Linux) Hiding the 360 Monitoring License Panel From Customers
360 Monitoring has a panel that shows the license type and its limits. Namely, the number of servers and websites you and your customers can monitor within your license. By default, this license panel is visible.
If you are a hosting provider who sells 360 Monitoring to customers, you may want to hide this panel from them. Customers cannot manage the license limits and this information is of no use to them.
To hide the 360 Monitoring license panel from customers:
-
Open the panel.ini file for editing, which is located at
/usr/local/psa/admin/conf/panel.ini.You can also edit the file in the Plesk interface using the Panel.ini Editor extension.
-
Add the following lines to the
panel.inifile and save it:[ext-monitoring] cloudShowLicensePanel = false
Note: Your customers can bring the licence panel back if they can edit the panel.ini file (via the Panel.ini Editor extension
or using the SSH access to the server). To preserve your changes in panel.ini,
forbid root SSH access to the Plesk server and blacklist the Panel.ini Editor extension.