Securing Connections with the SSL It! Extension
summary: The SSL It! extension helps you secure hosted websites with both free and paid SSL/TLS certificates.
In this topic, you will learn how to get free SSL/TLS certificates, how to buy paid certificates, how to upload certificates from a file, and how to secure hosted websites with any of those.
You will also learn how to harden the connections to hosted websites, and how to gauge the effectiveness of the SSL protection of hosted websites. If you are a Plesk administrator, you will also learn how to configure what SSL/TLS certificates are available to your customers from the SSL It! interface.
The SSL It! extension offers a single interface for keeping your websites secured with SSL/TLS certificates from the trusted certificate authorities (CAs) Let’s Encrypt and DigiCert (Symantec, GeoTrust, and RapidSSL brands) or with any other SSL/TLS certificate of your choice. Using the extension, you can also do the following:
- Enhance the security of your website’s visitors via redirects from HTTP to HTTPS.
- Protect your website’s visitors by prohibiting web browsers from accessing the website via insecure HTTP connections.
- Protect the privacy of your website’s visitors and improve the website performance with OCSP Stapling.
- Make connections encrypted with SSL/TLS certificates more secure using protocols and ciphers generated by Mozilla.
Getting started with SSL It!
Take into account the following:
- The SSL It! extension is installed by default.
- To take advantage of all SSL It! features, make sure that the latest versions of the DigiCert SSL and Let’s Encrypt extensions are also installed.
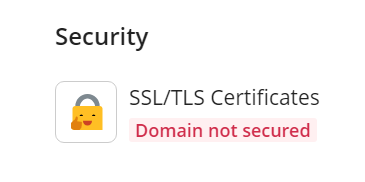
To manage an SSL/TLS certificate of a domain, go to Websites & Domains > your domain. You can see the current security status of the domain under “SSL/TLS Certificates”:
Securing websites with SSL/TLS certificates
With the SSL It! extension, you can secure websites with free and paid SSL/TLS certificates (at the moment they are from DigiCert only) and also with SSL/TLS certificates you already own.
To secure a website with a free SSL/TLS certificate from Let’s Encrypt:
-
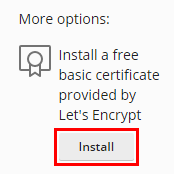
Go to Websites & Domains > your domain > SSL/TLS Certificates.
-
Under “More options”, click Install:

-
Specify the email address that will be used for urgent notices and lost key recovery.
-
Select what you want to secure in addition to the main domain:
-
Secure the main domain name. Secure only the main domain. If you want to secure only the webmail, you can clear the checkbox.
-
Secure the wildcard domain (including www and webmail). Secure the www subdomain and/or domain aliases, and the webmail.
-
Include a “www” subdomain for the domain and each selected alias. Secure the www subdomain and/or domain aliases.
-
Secure webmail on this domain. Secure the webmail.
-
Assign the certificate to the mail domain. Secure the mail server connections for this domain. Useful if the mail server is not protected with an SSL/TLS certificate, or if the certificate securing the mail server cannot be verified.
If you have the www subdomain and/or domain aliases, we recommend that you also select the Include a “www” subdomain for the domain and each selected alias checkbox.
-
-
Click Get it free.
An SSL/TLS certificate from Let’s Encrypt will be issued and automatically installed.
Note: If you secure a domain with an SSL/TLS certificate from Let’s Encrypt and then add new domains, subdomains, domain aliases, or webmail to the subscription, you can have SSL It! automatically secure them by reissuing the SSL/TLS certificate from Let’s Encrypt. To do so, go to Websites & Domains > your domain > SSL/TLS Certificates and turn on the Keep websites secured option.
To get a paid SSL/TLS certificate:
-
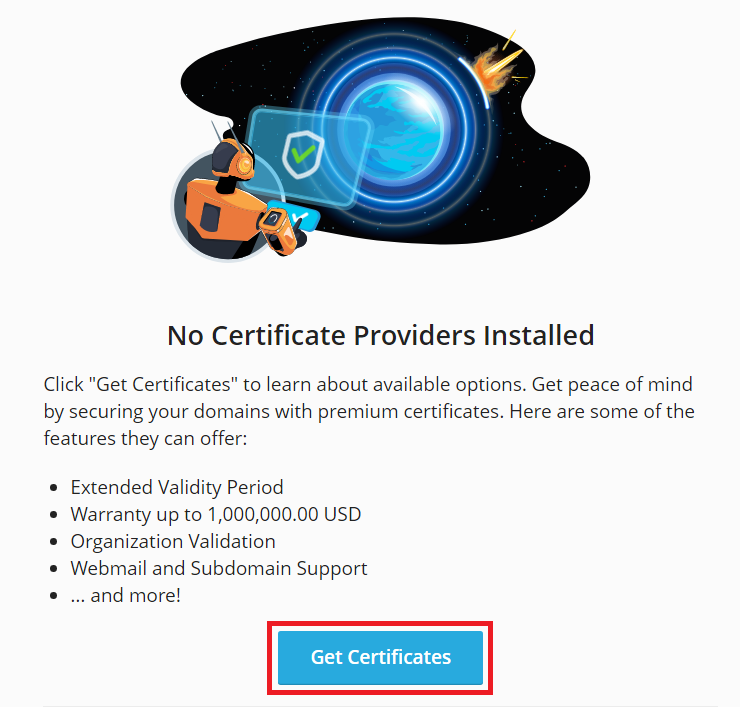
Go to Websites & Domains > your domain > SSL/TLS Certificates.
-
To get the list of available certificates, click Get Certificates:
-
Select the SSL/TLS certificate you want to buy and click the Buy button in the certificate’s form.
Note: To find an appropriate certificate, you can do the following:
- Filter the available certificates. You can apply the Recommended, Wildcard, and For organization use filter sets.
- Read more about a certificate (its validity period, validation type, and so on) by clicking the Learn more button in the certificate’s form.
-
In the Plesk Online Store pop-up window, fill in your address, payment information, and then buy the certificate.
-
Сlose the pop-up window.
-
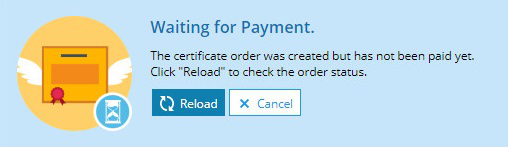
Wait until Plesk updates the payment status or update it manually by clicking Reload. Plesk automatically updates the payment status once per hour.
-
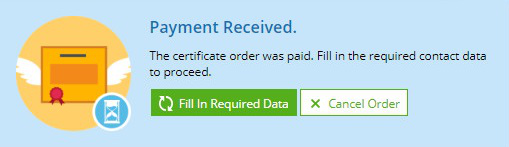
Once the payment has been processed, click Fill In Required Data.
-
Fill in the required contact information, and then click OK.
Plesk now automatically creates a certificate signing request (CSR) and then receives and installs the SSL/TLS certificate. It may take some time depending on the type of the SSL/TLS certificate. You can update the SSL/TLS certificate status manually clicking Reload or you can just wait until Plesk does it automatically (Plesk checks the SSL/TLS certificate status once per hour).
Note: Certain types of SSL/TLS certificates (for example, EV) require additional actions on your part. You may need to answer a phone call or an email and also submit necessary documents so that the CA could validate your application.
Once the SSL/TLS certificate is installed, the Websites & Domains > your domain > SSL/TLS Certificates screen will show the information about the installed SSL/TLS certificate (name, certificate authority, email address, and so on), secured components, and other options (“Redirect from http to https”, “HSTS”, and so on).
Securing Websites via CLI
You can also secure websites with wildcard SSL/TLS certificates via the CLI. Execute the following CLI commands:
plesk ext sslit --certificate -issue -domain <domain_name> -registrationEmail <email> -secure-domain -wildcard
and then
plesk ext sslit --certificate -issue <domain_name> -registrationEmail <email> -continue
The first command creates a wildcard certificate order, while the second one completes the order and issues the certificate.
Uploading SSL/TLS certificates
You may want to upload an SSL/TLS certificate in the following cases:
- You already have a certificate that you want to use to secure your domain.
- You want to install a certificate you cannot get via SSL It!.
To upload an SSL/TLS certificate:
-
Go to Websites & Domains > your domain > SSL/TLS Certificates and then click Upload.
-
Locate the
.pemfile of the SSL/TLS certificate you want to upload and then click Open.
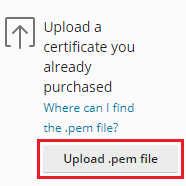
The SSL/TLS certificate will be automatically installed on the domain.
Renewing installed SSL/TLS certificates
To make sure that your website is continuously secured, you need to timely renew the installed SSL/TLS certificate. The SSL It! extension can help you with that.
SSL It! automatically renews free SSL/TLS certificates from Let’s Encrypt and DigiCert 30 days in advance of their expiration.
SSL It! cannot automatically renew paid SSL/TLS certificates. However, you can do the following:
- Reissue them manually.
- Have SSL It! automatically replace expired SSL/TLS certificates with free ones from Let’s Encrypt.
To reissue paid SSL/TLS certificates:
-
Go to Websites & Domains > your domain secured with a paid SSL/TLS certificate that is going to expire > SSL/TLS Certificates.
-
Click Reissue Certificate. Then you will be automatically redirected to Plesk Online Store.
-
In the Plesk Online Store pop-up window, fill in your address, payment information, and then buy the certificate.
-
Сlose the pop-up window.
-
Wait until Plesk updates the payment status or update it manually by clicking Reload. Plesk automatically updates the payment status once per hour.
-
Once the payment has been processed, click Fill In Required Data.
-
Fill in the required contact information, and then click OK.
Plesk now automatically creates a certificate signing request (CSR) and then receives and installs the SSL/TLS certificate. It may take some time depending on the type of the SSL/TLS certificate. You can update the SSL/TLS certificate status manually clicking Reload or you can just wait until Plesk does it automatically (Plesk checks the SSL/TLS certificate status once per hour).
To automatically replace paid expired SSL/TLS certificates with free ones from Let’s Encrypt:
- Go to Websites & Domains > your domain secured with a paid SSL/TLS certificate that is going to expire > SSL/TLS Certificates.
- Turn on Keep websites secured.
Now when your paid SSL/TLS certificate expires, SSL It! automatically issues a free SSL/TLS certificate from Let’s Encrypt to secure domains, subdomains, domain aliases, and webmail belonging to the subscription. It usually happens no later than one hour after the SSL/TLS certificate expires.
Unassigning SSL/TLS certificates
- Go to Websites & Domains > your domain whose SSL/TLS certificate you want to unassign > SSL/TLS Certificates.
- Click Unassign Certificate, and then click OK.
Enhancing security of your websites and encrypted server connections
Merely securing a website with a valid SSL/TLS certificate from a trusted CA is not enough to get all-round protection. SSL is a complex technology, which has a number of features (key encryption algorithm, secure ciphers, HSTS, and much more) that can do the following:
- Enhance the security of your website’s visitors.
- Improve your website performance.
- Harden the security of all server’s encrypted connections
Enabling these features can improve your websites’ search engine rankings:
- Redirect from http to https sets up a permanent, SEO-safe 301 redirect from the insecure HTTP to the secure HTTPS version of the website and/or webmail.
- HSTS prohibits web browsers from accessing the website via insecure HTTP connections.
- OSCP makes the web server request the status of the website’s certificate (can be good, revoked, or unknown) from the CA instead of the visitor’s browser.
- TLS versions and ciphers by Mozilla harden connections secured with SSL/TLS certificates (website, mail, Plesk, and so on).
Caution: Before turning these features on, make sure that your website can be accessed via HTTPS without any issues. Otherwise, visitors may have trouble accessing your website.
Note: If you have already set up HSTS or OCSP stapling in your web server manually, delete these customizations before turning on HSTS or OCSP stapling in SSL It!.
To enhance the security of your websites and encrypted server connections:
-
Secure your website with a valid SSL/TLS certificate from a trusted CA.
-
Go to Websites & Domains > your domain > SSL/TLS Certificates.
-
If you have upgraded to Plesk Obsidian from earlier Plesk versions, turn on Redirect from http to https. The redirect will be also applied for webmail by default. On clean Plesk Obsidian installations, the redirect for the domain and webmail is already turned on by default.
Note: If your webmail is not secured with a valid SSL/TLS certificate or you do not have any webmail, click the slider bars icon, clear the Apply to webmail checkbox, and then click Apply.
-
Note: If your SSL/TLS certificate expires earlier than the Max-age period but you still want to use HSTS, we recommend that you turn on “Keep websites secured”. Then when the SSL/TLS certificate expires, SSL It! will automatically issue a free one from Let’s Encrypt to secure domains, subdomains, domain aliases, and webmail belonging to the subscription. The website will be continuously secured and HSTS will continue working.
-
Turn on OCSP Stapling.
Once you have hardened the SSL security of your website and your server, you can evaluate the SSL security of your website.
Note: You can also enable HSTS and OCSP via the CLI. For example, to enable HSTS for the domain example.com that has already been secured with an SSL/TLS certificate, run the following command:
plesk ext sslit --hsts -enable -domain example.com -max-age 6months
To enable OCSP for the same domain, run the following command:
plesk ext sslit --ocsp-stapling -enable -domain example.com
To learn more about using SSL It! via the CLI, run the plesk ext sslit --help command.
Enabling HSTS
Turn on HSTS.
Make sure that the SSL/TLS certificate that secures your website will be valid during the Max-age period. Do the same for subdomains and the webmail subdomain.
Warning: If the SSL/TLS certificate expires earlier than the Max-age period and HSTS is turned on, visitors won’t be able to access your website.
If your subdomains are not secured with valid SSL/TLS certificates or you do not have any subdomains, clear the Include subdomains checkbox.
If your webmail subdomain is not secured with a valid SSL/TLS certificate or you do not have any webmail, clear the Include webmail checkbox.
Click Enable HSTS.
Enabling TLS Versions and Сiphers by Mozilla
- Go to Extensions > the My Extensions tab > click Open next to SSL It!
- Click Settings.
- Under TLS versions and ciphers by Mozilla, turn on the toggle.
- Keep Intermediate (recommended), and then click Enable & Sync.
- To stay current, click Sync now once every few months.
Known issues and limitations
- OCSP stapling works only for websites served by nginx with Apache or solely nginx. If your websites are served by Apache only, you do not need to turn on “OCSP Stapling”.
- OCSP stapling may not work for SSL/TLS certificates from certain vendors (for example, free certificates from DigiCert) if the complete trust chain is not in place. To check if your certificate supports OCSP stapling, run the SSL Labs test on your SSL configuration.
- Automatic sync of TLS versions and ciphers by Mozilla is currently not supported.
Evaluating the SSL security of your website
Popular search engines (for example, Google) rank websites with better SSL protection higher. In the SSL It! extension, you can run one of the most popular testing service, Qualys SSL Labs, to do the following:
- Check how good the SSL protection of your website is.
- See what can be improved.
- Get A+, the highest possible score (after hardening SSL protection if necessary).
To evaluate the SSL security of your website:
- Go to Websites & Domains > your domain > SSL/TLS Certificates.
- Click Run SSL Labs Test.
The Qualys SSL Labs website will be opened in a new tab and the test will be automatically started. Wait until the test is finished to receive your grade. This may take up to several minutes.
If you secured your website with a valid SSL/TLS certificate from a trusted CA, and you turned on all security-enhancing features provided by SSL It!, you are most likely to get the A+ score.
Customizing the list of SSL/TLS certificates offered by SSL It!
SSL It! makes it possible to order SSL/TLS certificates from a variety of vendors. You can choose which of them will be visible in the SSL It! interface for you, your customers, and resellers. This is done by installing (enabling) or removing (disabling) SSL It! plugin extensions that facilitate integration between SSL It! and a specific vendor.
Add the ability to order SSL/TLS certificates from a specific vendor:
- Go to Extensions and type the name of the plugin extension corresponding to the desired vendor in the search field.
- Install the extension. If the extension is already installed, make sure that it is not disabled and enable it if necessary.
You, your customers, and resellers will now see the certificates sold by that vendor in the SSL It! interface.
Remove the ability to order SSL/TLS certificates from a specific vendor:
- Go to Extensions > My Extensions and locate the plugin extension corresponding to the desired vendor.
- Remove or disable the extension.
You, your customers, and resellers will no longer see the certificates sold by that vendor in the SSL It! interface. This will not impact customers who have already bought SSL/TLS certificates from that vendor.
SSL It! enhanced probability of certificates’ issue
SSL It! has a default feature that significantly decreases a number of cases when Let’s Encrypt SSL/TLS certificates cannot be issued because of incompatible domain configurations.
When you get an SSL/TLS certificate from Let’s Encrypt, its servers need to validate that you control the domain names in the certificate.
To do so, Let’s Encrypt uses so-called “challenges”: Let’s Encrypt gives a token file that Plesk places to http://<your_domain>/.well-known/acme-challenge/<token>.
We call this directory the common challenge directory. The certificate issue will fail if this directory is not accessible. It may happen because of the following configurations:
- The directory was protected with a password.
- The website that you want to secure was blocked by the “Deny access to the website” feature.
- Incorrect MIME types, and so on.
When installed, SSL It! ensures that the common challenge directory is supported and accessible even if certain incompatible configurations are detected. The feature “common challenge directory support” is enabled by default in Plesk for Linux and Windows.
If necessary, you can turn off the feature via the CLI by running the following command:
plesk ext sslit --common-challenge-dir –disable
However, we recommend that you keep the common challenge directory support on.
If you have updated to SSL It! 1.4.0 from earlier versions, the common challenge directory support will be turned on automatically
unless the use-common-challenge-dir setting was disabled in panel.ini.
If the option was disabled, you need to turn on the support manually by running the following command:
plesk ext sslit --common-challenge-dir –enable
Starting with SSL It! 1.4.0 the use-common-challenge-dir setting is deprecated.
Preventing customers’ failed attempts to issue wildcard Let’s Encrypt certificates
By default, issue of wildcard Let’s Encrypt certificates is available for all domains your customers own. However, the issuance can succeed or fail depending on the DNS configuration of the domains. In SSL It!, you can hide the ability to issue wildcard Let’s Encrypt certificates for domains that cannot be automatically secured with these certificates.
SSL It! can automatically issue wildcard Let’s Encrypt certificates only for domains that use Plesk as the primary DNS server or a third-party DNS service synced with Plesk. If a DNS service is not synced with Plesk, SSL It! cannot secure domains with wildcard Let’s Encrypt certificates. Customers’ attempts to issue wildcard Let’s Encrypt certificates are bound to fail, which leads to customer support tickets. To reduce your support workload, you can hide the ability to issue wildcard Let’s Encrypt certificates for domains whose DNS records are not hosted in Plesk.
To prevent customers’ failed attempts to issue wildcard Let’s Encrypt certificates:
-
Go to Extensions > the “My Extensions” tab > click Open next to SSL It!.
-
At the top of the screen, click “Settings” and then select “Domains with the specified nameservers”.
-
In the textbox below, specify the nameservers of the domains whose DNS records are hosted in Plesk or in a third-party DNS service synced with Plesk (DigitalOcean DNS, Amazon Route 53, or Azure DNS).
Separate nameservers with commas. To specify nameservers of all domains whose DNS records are hosted in Plesk, you can use the
<domain>placeholder:ns1.<domain>, ns2.<domain>
-
Click Save.

Customers can now issue wildcard Let’s Encrypt certificates only for domains that can be automatically secured.
You can also hide the ability to issue wildcard Let’s Encrypt certificates via the CLI. To do so, run the command of the following pattern:
plesk ext sslit --wildcard-configuration -enable –nameservers 'ns1.<domain>,ns2.<domain>'
To see more details, run the plesk ext sslit --help command.
Limiting the ability to order paid SSL/TLS certificates
It is possible to limit customers’ ability to order paid SSL/TLS certificates from certain vendors, or to hide the “Get Certificates” button. Customers will still be able to secure their websites with SSL/TLS certificates from Let’s Encrypt.
Limit the ability to order paid SSL/TLS certificates from one or more vendors:
-
Under “[extensions]”, add the following line:
blacklist = <comma-separated list of IDs of SSL It! plugin extensions>
For example, to limit the ability to order SSL/TLS certificates from Symantec (DigiCert), add the following lines:
[extensions]
blacklist = symantec
Limiting the ability to order paid SSL/TLS certificates from a certain vendor will not impact customers who have already bought SSL/TLS certificates from them. To restore
the ability to order paid SSL/TLS certificates from a vendor, remove the IDs of the corresponding SSL It! plugin extension from the blacklist by editing the panel.ini file again.
Hide the “Get Certificates” button:
-
Under
[ext-sslit], add the following line:showGetMoreCertificatesLink = false
Hiding the “Get Certificates” button will not impact customers who have already bought SSL/TLS certificates, and it will also not affect the ability
of customers to secure their websites with SSL/TLS certificates from Let’s Encrypt. Additionally, if the Sectigo extension is installed on the server,
customers will have the ability to order paid certificates from Sectigo despite the “Get Certificates” button being hidden. To make the button visible,
remove the line by editing the panel.ini file again.