监控 Plesk Autoinstall 服务器
维护 Plesk Autoinstall 服务器的本地镜像能够帮助在安装或更新多台 Plesk 服务器时避免浪费时间和流量在一次又一次下载相同文件上。可通过 HTTP 使用本地镜像,在安装或升级过程中可将本地镜像指定作为 Plesk 包的下载源。
本地镜像 Repository 的先决条件
- 用于镜像的虚拟主机需禁用所有的脚本处理程序(php、pl、cgi、py、fcgi 等等)。
- 用于镜像的虚拟主机或目录应设置选项
+FollowSymLinks。 - 除非指定其它源,否则必须保证可从正在运行脚本的机器或从目的机器访问以下项:
-
rsync://rsync.autoinstall.plesk.com/autoinstall用于 Plesk for Linux, -
rsync://autoinstall-win.plesk.com/autoinstall用于Plesk for Windows.
-
- 在正运行脚本的机器上必须在以下扩展的支持下编译 PHP(请参阅 http://www.php.net/manual/en/ssh2.installation.php):
- ssh2_connect,
- simplexml,
- XML DOM.
- Plesk for Windows 和 Plesk for Linux 镜像不能放置同一个文件夹。必须在不同路径创建镜像。
配置本地镜像 Repository
-
下载和解压 Plesk Mirror Setup 工具
# wget https://support.plesk.com/hc/en-us/article_attachments/12388062580887/mirrorctl-3.1.4.zip
# unzip mirrorctlv2.0.1.zip
# cd mirrorctl
-
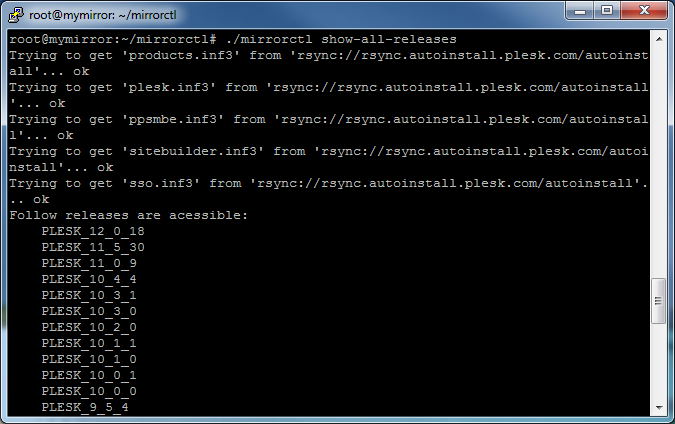
检查可用的产品版本
使用
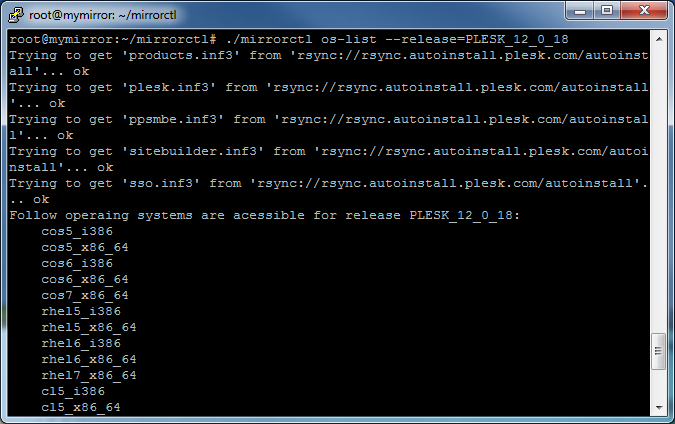
show-all-releases命令查看可用的产品以及使用os-list命令查看某个产品支持的操作系统:# ./mirrorctl show-all-releases
# ./mirrorctl os-list --release=PLESK_12_0_18
-
选择要被镜像的产品版本
使用
cfg --addandcfg --remove编辑要被镜像的一系列产品版本。# ./mirrorctl cfg --add --release=PLESK_12_0_18 --os=cos5_i386 # ./mirrorctl cfg --add --win --release=PANEL_12_0_18_WIN --cfg-file=./plesk_win_mirror
-
保存本地镜像 repository 的配置到一个文件
使用
cfg --export保存已创建的配置到一个文件:# ./mirrorctl cfg --export --path=./
配置将被保存到指定位置的文件
mirror.xml。<?xml version="1.0" encoding="UTF-8"?> <xml> <release name="PLESK_12_0_18" version="12.0.18"> <os name="cos5_i386"/> </release> </xml>
若要从一个文件加载被保存的配置,请使用
cfg --import:# ./mirrorctl cfg --import --cfg-file=./mirror.xml
-
创建镜像 repository
首先,为镜像创建一个目录:
# mkdir /var/www/html/mirror/
# mkdir /var/www/html/mirror_windows/
然后,使用
update命令同步镜像和官方 repository:# ./mirrorctl update --path=/var/www/html/mirror/ # ./mirrorctl update --win --path=/var/www/html/mirror_windows/ --cfg-file=./plesk_win_mirror
注解: 该 repository 只能用于安装在镜像配置中指定的产品版本和操作系统。该 repository 不能通过 autoinstaller 工具安装所有其他版本。
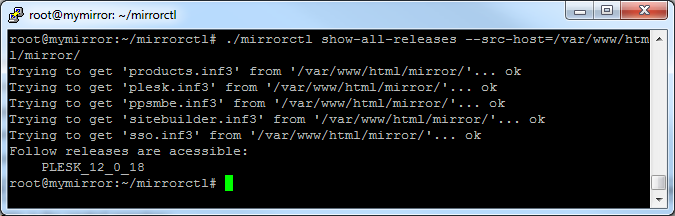
查看在已创建的 repository 中可用的一系列产品版本:
# ./mirrorctl show-all-releases --src-host=/var/www/html/mirror/
# ./mirrorctl show-all-releases --win --src-host=/var/www/html/mirror_windows/
本地镜像 repository 现在可用于安装和升级 Plesk。
使用本地镜像 Repository
可通过以下方式使用镜像:
-
通过更改 DNS 解析并设置镜像 web 主机以确保
https://autoinstall.plesk.com(Plesk Linux) 或http://autoinstall-win.plesk.com/(Windows) 将指向镜像; -
通过在启动 autoinstaller 的机器上于
SOURCE变量(位于/root/.autoinstallerrc文件中)中指定镜像的 URL;[root@container ~]# cat /root/.autoinstallerrc SOURCE=http://uri.of.local.mirror/here/
-
通过当在交互模式下启动 autoinstaller 时在
--source选项中指定镜像 URL。
维护远程镜像 Repositories
Plesk Mirror Setup 工具能够管理位于同一文件系统以及远程服务器上的 repositories。若要指定远程源和远程目的镜像,请使用 --path 和 --src-host 选项。
使用 --path 指定远程目的镜像:
-
使用某个用户、密码和主机:
--path=user:UserSecurePassword@mymirror.tld:344/var/www/html/
--path=user:UserSecurePassword@192.168.100.100:22/var/www/html/
--path=root:RootSecurePassword@localhost:/var/www/html/
-
使用 SSH 密钥验证(需要私用和公共密钥):
--path=192.168.100.100:/var/www/html/
如果当前用户默认的 RSA 对 (id_rsa & id_rsa_pub) 不存在,将会使用默认的 DSA 对 (id_dsa & id_dsa.pub) from
$HOME/.ssh/文件夹。--path=user@mymirror.tld:344/var/www/html/
-
使用某个 SSH 密钥作为 mirrorctl 工具的额外选项:
--path=root@mymirror.tld:344/var/www/html/ --private-key=~/.ssh/id_mirror --public-key=~/.ssh/id_mirror.pub
使用 --src-host 指定远程源镜像:
-
通过 SSH 协议使用 rsync:
--src-host=test@192.168.100.100:/var/www/html/test-mirror/
--src-host=mytestmirror.tld:/var/www/html/test-mirror/
- 在以上示例中,禁止指定用户密码或 SSH 端口 (22)。
- 如果选择了
--src-host选项,启动该工具的用户必须为其设置 SSH 密钥验证,以能够在通过--src-host选项指定的用户名下连接到该选项下指定的主机。 - 如果选择了
--src-host选项和--path选项,在--path选项中指定的用户必须为其设置 SSH 密钥验证,已能够从在--path选项中指定的主机连接到在--src-host选项下指定的主机(在以通过--src-host选项指定的用户名下)。
-
在源主机上使用 rsync 守护进程:
--src-host=rsync://mytestmirror.tld:873/testmirror
rsync 配置的示例:
# head /etc/rsyncd.conf
[testmirror]
path = /var/www/html/test-mirror/
comment = Test repository
# cat /etc/xinetd.d/rsync
service rsync
{
# disable = yes
socket_type = stream
wait = no
user = root
server = /usr/bin/rsync
server_args = --daemon
log_on_failure += USERID
}
示例 1:设置定期更新本地镜像 repository
目标:确保有选定产品版本的镜像是最新的。
-
通过添加所需的产品版本和操作系统来创建镜像配置:
# /home/user/mirrorctl/mirrorctl cfg --add --release=PLESK_12_0_18 --os=cos5_i386 --cfg-file=/var/www/html/mirror/myconfig.xml
# /home/user/mirrorctl/mirrorctl cfg --add --release=PLESK_12_0_18 --os=rhel5_i386 --cfg-file=/var/www/html/mirror/myconfig.xml
# /home/user/mirrorctl/mirrorctl cfg --add --release=PLESK_11_5_30 --os=cos5_i386 --cfg-file=/var/www/html/mirror/myconfig.xml
# /home/user/mirrorctl/mirrorctl cfg --add --win --release=PANEL_12_0_18_WIN --cfg-file=/var/www/html/mirror/windows_myconfig.xml
-
配置 crontab 以自动更新镜像:
$ crontab -l
# m h dom mon dow command
59 23 * * * cd /home/user/mirrorctl/ && ./mirrorctl update --path=/var/www/html/mirror/ --cfg-file=/var/www/html/mirror/myconfig.xml > ./mirror-cron.log 2>&1
59 22 * * * cd /home/user/mirrorctl/ && ./mirrorctl update --win --path=/var/www/html/mirror_windows/ --cfg-file=/var/www/html/mirror/windows_myconfig.xml > ./mirror-cron-win.log 2>&1
示例 2:添加新的操作系统
目标:添加某个产品版本的其它操作系统到镜像:
-
导入您之前使用 mirrorctl 工具创建的 repository 的当前配置:
# ./mirrorctl cfg --import --path=/var/www/html/mirror/ --cfg-file=myconfig
-
为某个产品版本添加新操作系统:
# ./mirrorctl cfg --add --release=PLESK_12_0_18 --os=deb6.0_i386 --cfg-file=myconfig
-
同步镜像:
# ./mirrorctl update --path=/var/www/html/mirror/ --cfg-file=myconfig
示例 3:下载某个操作系统/版本
目标:从官方 repository 下载用于某个产品版本的某个操作系统到镜像,不下载其它被镜像的版本/操作系统。
-
生成只包含您想要下载的操作系统/产品版本的配置文件:
# ./mirrorctl cfg --add --release=PLESK_12_0_18 --os=cos5_i386 --cfg-file=./temp-config
# ./mirrorctl cfg --add --release=PLESK_12_0_18 --os=cos5_x86_64 --cfg-file=./temp-config
-
使用 push 命令下载指定的操作系统到现有的 repository:
# ./mirrorctl push --path=/var/www/html/mirror/ --cfg-file==./temp-config
示例 4:创建镜像以测试新的产品版本
目标:为一个新的产品版本创建测试镜像,测试该版本,并只上传测试的版本(没有我还未测试过的最新官方更新)到主要的 repository。
-
为新的产品版本支持的所有操作系统创建测试镜像:
# ./mirrorctl cfg --add --release=PLESK_12_0_18 --os=all --cfg-file=./test-config
# ./mirrorctl update --path=/var/www/html/test-mirror/ --cfg-file=./test-config
-
测试新版本;
-
上传整个产品版本到主要的 repository:
# ./mirrorctl push --src-host=/var/www/html/test-mirror/ --path=/var/www/html/mirror/ --cfg-file=./test-config
警告: 如果选择了 --src-host 选项,将从官方 repository 上传新的产品版本,而该产品版本可能与您已测试过的不是同一版本。
示例 5:为新操作系统测试产品版本而创建镜像
目标:为带有最新更新的已被镜像的产品版本创建一系列指定操作系统的测试镜像,测试这些操作系统然后上传经测试的操作系统到主要的 repository。
-
创建测试镜像,测试选定产品版本可用的多个操作系统:
# ./mirrorctl cfg --add --release=PLESK_12_0_18 --os=cos5_i386 --cfg-file=./test-config
# ./mirrorctl cfg --add --release=PLESK_12_0_18 --os=cos5_x86_64--cfg-file=./test-config
# ./mirrorctl update --path=/var/www/html/test-mirror/ --cfg-file=./test-config
-
从上面创建的测试镜像获取一系列可用的产品版本和操作系统:
# ./mirrorctl show-all-releases --src-host=/var/www/html/test-mirror/
# ./mirrorctl os-list --release=PLESK_12_0_18 --src-host=/var/www/html/test-mirror/
-
从测试镜像生成仅包含要被添加到主要镜像的版本和操作系统的新配置文件:
# ./mirrorctl cfg --add --release=PLESK_12_0_18 --os=cos5_i386 --src-host=/var/www/html/test-mirror/ --cfg-file=push.xml
-
查看已创建的配置文件以确定测试 repository 中的版本/操作系统的可用性:
# ./mirrorctl cfg --check --src-host=/var/www/html/test-mirror/ --cfg-file=push.xml
-
从测试镜像上传选定的版本和操作系统到主要的 repository:
# ./mirrorctl push --src-host=/var/www/html/test-mirror/ --path=/var/www/html/mirror/ --cfg-file=push.xml
警告: 如果选择了 --src-host 选项,将从官方 repository 上传新的产品版本,而该产品版本可能与您已测试过的不是同一版本。
警告: 如果选择了 --cfg-file 选项,将会使用默认的配置文件 BUILD/config.xml (与工具所在的目录相关)。也就是说,将只会从该配置文件上传版本/操作系统到主要的 repository。
警告: 如果指定 --cfg-file 选项不正确,将会使用针对 push 命令指定的配置文件。