Konfigurieren eines Smarthosts oder Relayhosts
Bemerkung
Die Begriffe Smarthost und Relayhost werden normalerweise synonym verwendet. Wir halten uns im Folgenden an den Begriff Smarthost.
Inhalt
You can configure a server-wide smarthost in Plesk Obsidian 18.0.64 or later. You can configure a smarthost at the domain level in Plesk Obsidian 18.0.76 or later.
Themen in diesem Artikel:
Wann ist die Verwendung eines Smarthosts sinnvoll?
Wie wird ein Smarthost in Plesk konfiguriert?
Wie wirkt sich die Konfiguration eines Smarthosts auf eine bestehende manuelle Konfiguration aus?
Wie werden die Konfigurationsdateien der E-Mail-Dienste beim Einrichten eines Smarthosts in Plesk geändert?
You can send emails from Plesk using its local SMTP server. However, some hosting providers block outgoing mail from local SMTP servers. Even when they allow it, email deliverability may be poor and messages can end up in spam. To avoid these issues, configure a smarthost.
A smarthost is a mail server that accepts messages from any sender and forwards them to their final destination. A smarthost acts as an intermediary to improve email deliverability and reduce the chances of messages being marked as spam.
When you send an email through a smarthost, the message appears to originate from the smarthost’s IP address. If the smarthost has a strong sending reputation, your email is more likely to reach the recipient’s inbox instead of being marked as spam. For this reason, we recommend using a reputable SMTP relay service as your smarthost (for example, SendGrid, Mailgun, Mailjet, or similar providers).
Previously, you could configure a smarthost only manually. In Plesk Obsidian 18.0.64 and later, you can configure a smarthost in the Plesk graphical interface and via the CLI.
Configuring a Server-Wide Smarthost
You can configure a smarthost for the whole server. This works in Plesk for Linux with Postfix and Plesk for Windows with either MailEnable or SmarterMail.
Vorsicht
Falls Sie bereits einen Smarthost manuell konfiguriert haben, wird durch die Aktivierung der Smarthost-Funktion in Plesk Ihre bestehende Konfiguration überschrieben. Bevor Sie die Funktion aktivieren, sollten Sie sich zuerst diesen Abschnitt durchlesen.
Bemerkung
Bei einigen SMTP-Relay-Diensten (z. B. SendGrid) funktioniert die E-Mail-Weiterleitung nicht mehr, wenn ein Smarthost konfiguriert ist.
To configure a server-wide smarthost:
Choose a reputable SMTP relay service (for example, SendGrid, Mailgun, Mailjet, or similar providers) and create an account there.
Melden Sie sich in Plesk an.
Gehen Sie zu Tools & Einstellungen > Smarthost (unter „E-Mail“).
Aktivieren Sie das Kontrollkästchen „Benutzern E-Mail via Smarthost schicken“.
-
Geben Sie im entsprechenden Feld die IP-Adresse oder den Hostnamen eines Smarthosts an (zum Beispiel
192.0.2.1odersmtp.sendgrid.net).Bemerkung
In Plesk für Linux können Sie MX- oder SRV-Lookups deaktivieren, indem Sie den Hostnamen oder die IP-Adresse in eckige Klammern setzen, zum Beispiel
[example.com]. Details finden Sie in der Postfix-Dokumentation (im Abschnitt überrelayhost). Wenn Ihr SMTP-Relay-Dienst eine SMTP-Authentifizierung erfordert (was bei den meisten Diensten der Fall ist), aktivieren Sie das Kontrollkästchen „Authentifizierung erforderlich“.
-
Wenn Sie im vorherigen Schritt die Option „Authentifizierung erforderlich“ ausgewählt haben, geben Sie die Anmeldedaten für die Authentifizierung bei Ihrem SMTP-Relay-Dienst an.
Wenn der Dienst die grundlegende Authentifizierung unterstützt, geben Sie den Benutzernamen und das Passwort in den entsprechenden Feldern an. Falls der Dienst die Authentifizierung über API-Schlüssel unterstützt, geben Sie im Feld „Benutzername“ den Standardbenutzernamen an, der für API-Schlüssel im Dienst verwendet wird (bei SendGrid lautet der Benutzername beispielsweise
apikey). Geben Sie im Feld „Passwort“ den API-Schlüsselwert an. -
(For SmarterMail only) In the „Encrypted connection“ section, select whether to encrypt the credentials transmitted to the SMTP relay service. Choose if the encrypted connection is TLS, SSL, or not required.
Bemerkung
If you choose a connection type that the SMTP relay service does not support (for example, SSL instead of TLS), the smarthost will refuse the connection.
-
(Optional) Sie können prüfen, ob die Verbindung zum Smarthost hergestellt werden kann. Klicken Sie dazu auf Verbindung überprüfen.
If you selected “Encrypted connection” in the previous step, Plesk tests the connection not only for encryption but also for a valid SSL/TLS certificate. If the connection is encrypted but the SSL/TLS certificate is not trusted (for example, expired or self‑signed), the smarthost will refuse the connection.
Bemerkung
Sie können das oben beschriebene Standardverhalten ändern und die Verbindung zulassen, auch wenn sie nicht durch ein gültiges SSL/TLS-Zertifikat geschützt ist.
Klicken Sie auf OK.
-
Aktualisieren Sie die SPF- und andere zugehörige DNS-Einträge in der DNS-Vorlage und in den DNS-Zonen bestehender Domains. SMTP-Relay-Dienste liefern die Informationen zu den vorzunehmenden DNS-Änderungen.
Sie haben den Smarthost nun in Plesk konfiguriert. Die meisten kommerziellen SMTP-Relay-Dienste erfordern jedoch auch eine Domain-Authentifizierung (kann auch als Domain-Verifizierung bezeichnet werden). Dies ist der Fall für die folgenden SMTP-Relay-Dienste: SendGrid, Mailjet und Mailgun
Melden Sie sich im Konto Ihres SMTP-Relay-Dienstes an und authentifizieren Sie alle in Plesk gehosteten Domains. Die genauen Schritte dazu finden Sie in der Dokumentation Ihres Dienstes.
Senden Sie eine Test-E-Mail an einen externen E-Mail-Dienst (z. B. Gmail) und vergewissern Sie sich, dass die E-Mail im Posteingang angezeigt wird.
Sie haben den Smarthost nun sowohl in Plesk als auch in Ihrem SMTP-Relay-Dienst konfiguriert. Ihr Smarthost ist jetzt eingerichtet und wird ausgeführt.
Configuring Smarthost for a Domain
You can configure a smarthost for an individual domain. This works in Plesk for Linux with Postfix and Plesk for Windows with either MailEnable or SmarterMail.
To configure a smarthost for a domain:
Choose a reputable SMTP relay service (for example, SendGrid, Mailgun, Mailjet, or similar providers) and create an account there.
Melden Sie sich in Plesk an.
Go to Websites & Domains > [domain_name] > Mail > Smarthost.
Aktivieren Sie das Kontrollkästchen „Benutzern E-Mail via Smarthost schicken“.
-
Geben Sie im entsprechenden Feld die IP-Adresse oder den Hostnamen eines Smarthosts an (zum Beispiel
192.0.2.1odersmtp.sendgrid.net).Bemerkung
In Plesk für Linux können Sie MX- oder SRV-Lookups deaktivieren, indem Sie den Hostnamen oder die IP-Adresse in eckige Klammern setzen, zum Beispiel
[example.com]. Details finden Sie in der Postfix-Dokumentation (im Abschnitt überrelayhost). Wenn Ihr SMTP-Relay-Dienst eine SMTP-Authentifizierung erfordert (was bei den meisten Diensten der Fall ist), aktivieren Sie das Kontrollkästchen „Authentifizierung erforderlich“.
-
Wenn Sie im vorherigen Schritt die Option „Authentifizierung erforderlich“ ausgewählt haben, geben Sie die Anmeldedaten für die Authentifizierung bei Ihrem SMTP-Relay-Dienst an.
Wenn der Dienst die grundlegende Authentifizierung unterstützt, geben Sie den Benutzernamen und das Passwort in den entsprechenden Feldern an. Falls der Dienst die Authentifizierung über API-Schlüssel unterstützt, geben Sie im Feld „Benutzername“ den Standardbenutzernamen an, der für API-Schlüssel im Dienst verwendet wird (bei SendGrid lautet der Benutzername beispielsweise
apikey). Geben Sie im Feld „Passwort“ den API-Schlüsselwert an. (Optional) Sie können prüfen, ob die Verbindung zum Smarthost hergestellt werden kann. Klicken Sie dazu auf Verbindung überprüfen.
Klicken Sie auf OK.
-
Update the SPF record in the DNS zone of the domain you configured. This ensures the SMTP relay service is authorized to send mail for this domain.
Sie haben den Smarthost nun in Plesk konfiguriert. Die meisten kommerziellen SMTP-Relay-Dienste erfordern jedoch auch eine Domain-Authentifizierung (kann auch als Domain-Verifizierung bezeichnet werden). Dies ist der Fall für die folgenden SMTP-Relay-Dienste: SendGrid, Mailjet und Mailgun
Go to your SMTP relay service account and authenticate the domain you just configured smarhost for in Plesk. For exact steps on how to do so, refer to the documentation of your service.
Senden Sie eine Test-E-Mail an einen externen E-Mail-Dienst (z. B. Gmail) und vergewissern Sie sich, dass die E-Mail im Posteingang angezeigt wird.
Sie haben den Smarthost nun sowohl in Plesk als auch in Ihrem SMTP-Relay-Dienst konfiguriert. Ihr Smarthost ist jetzt eingerichtet und wird ausgeführt.
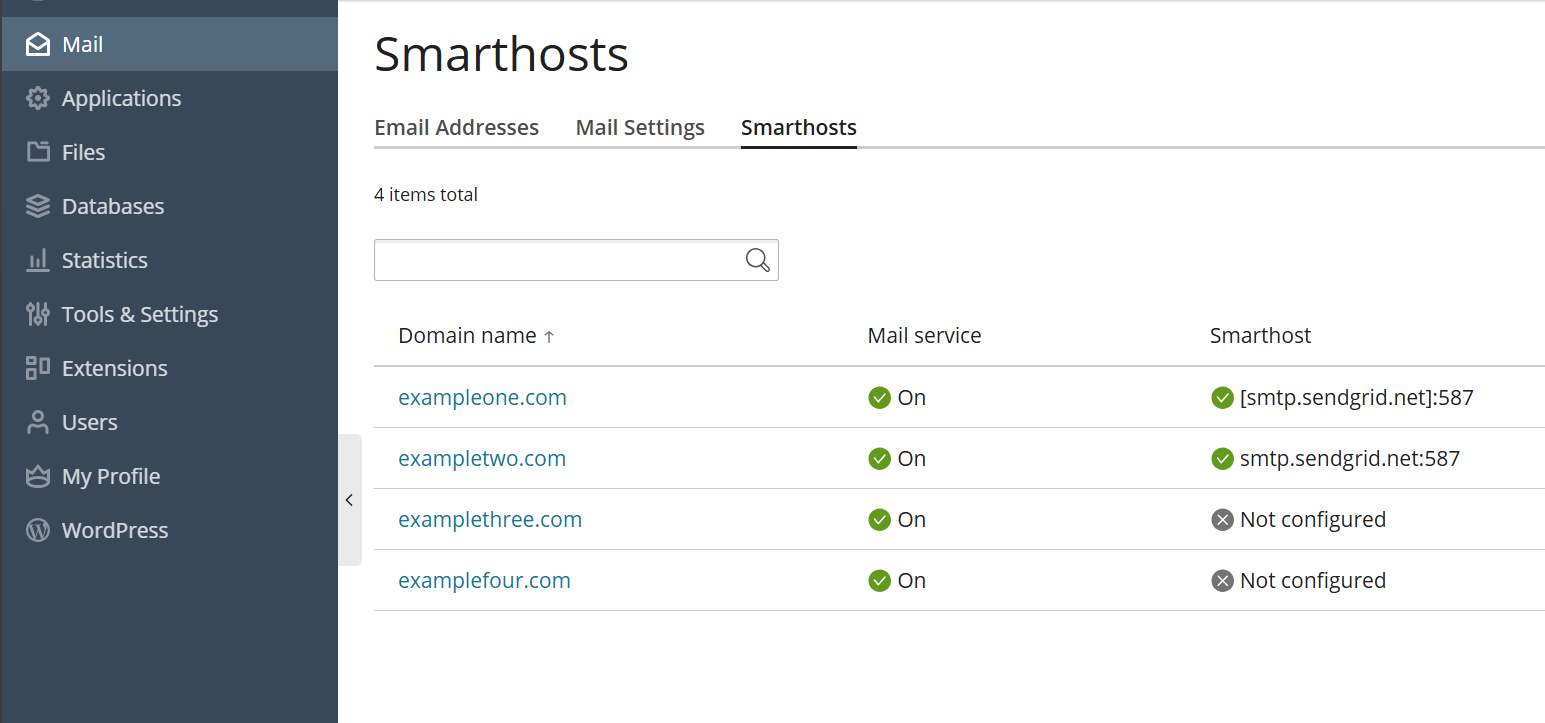
If you want to check which domains have an active smarthost, go to Mail> Smarthosts.
Konfigurieren eines Smarthosts nach einer vorherigen manuellen Konfiguration
Wenn Sie bereits einen Smarthost manuell konfiguriert haben, wird durch die Aktivierung der Smarthost-Funktion in Plesk Ihre bestehende Konfiguration überschrieben. Obwohl in Plesk die gängigste Konfiguration angewendet wird, die für die meisten Smarthost-Dienste geeignet ist, müssen Sie die Konfiguration möglicherweise an Ihren Smarthost anpassen.
Wenn Sie bereits einen Smarthost manuell konfiguriert haben, empfehlen wir Ihnen den folgenden Algorithmus:
Vergleichen Sie beide Smarthost-Konfigurationen: Ihre manuelle und die von Plesk.
Entfernen Sie die Parameter, die über Plesk kontrolliert werden sollen, aus Ihrer manuellen Konfiguration.
Behalten Sie zusätzliche Parameter bei, die nicht von Plesk abgedeckt werden.
Um Ihnen den Vergleich beider Konfigurationen zu erleichtern, beschreiben wir in Folge, wie die Smarthost-Funktion im Detail aussieht und welche Konfigurationsdateien sie auf welche Weise beeinflusst.
(Plesk für Linux) Smarthost-Konfiguration mit Postfix
Bemerkung
Domain‑level smarthosts take priority over the server‑wide smarthost configured in Plesk.
When you enable the smarthost feature, Plesk performs a few actions under the hood.
For server-wide smarthost:
-
Plesk adds lines of the following pattern to the
/etc/postfix/main.cfconfiguration file:# Sets an external SMTP relayhost with a port number relayhost - [Your-SMTP-server-IP-or-hostname]:587 # Turns on authentication smtp_sasl_auth_enable = yes # Sets the username and password required for authentication smtp_sasl_password_maps = /var/spool/postfix/plesk/relay_secrets # Prohibits anonymous authentication methods. smtp_sasl_security_options = noanonymous
-
Plesk then checks that
/etc/postfix/main.cfcontains no duplicate directives, which can break the configuration:cat /etc/postfix/main.cf | grep -E "relayhost|smtp_sasl_auth_enable|smtp_sasl_password_maps|smtp_sasl_security_options"
-
Plesk configures the API authentication to the SMTP relay service of your choice via the
/etc/postfix/sasl_passwdfile. For example, with the SendGrid service, the following line will be added:[smtp.sendgrid.net]:2525 apikey:<your-SendGrid-API-key-value>
-
Finally, Plesk reloads the Postfix service to apply the changes:
systemctl reload postfix
For a domain-specific smarthost:
-
If no server-wide smarthost has been previously configured, Plesk adds the required baseline Postfix directives to the
/etc/postfix/main.cfconfiguration file and also adds per-domain routing and credentials (no globalrelayhostis needed):# Turns on authentication smtp_sasl_auth_enable = yes # Sets the username and password required for authentication smtp_sasl_password_maps = hash:/var/spool/postfix/plesk/relay_secrets.db # Prohibits anonymous authentication methods. smtp_sasl_security_options = noanonymous # Enables per‑sender authentication and routing smtp_sender_dependent_authentication = yes # Maps sender addresses to specific relay hosts sender_dependent_relayhost_maps = hash:/var/spool/postfix/plesk/sender_relay.db
-
Plesk then checks that
/etc/postfix/main.cfcontains no duplicate directives, which can break the configuration:cat /etc/postfix/main.cf | grep -E "smtp_sasl_auth_enable|smtp_sasl_password_maps|smtp_sasl_security_options|smtp_sender_dependent_authentication|sender_dependent_relayhost_maps"
-
Plesck adds or updates the sender‑dependent mapping files used for domain‑level smarthosts
/var/spool/postfix/plesk/sender_relay.db— maps domains to their relay hosts./var/spool/postfix/plesk/relay_secrets.db— stores credentials for the corresponding relay hosts.
For example, with the SendGrid service, Plesk writes entries similar to:
# sender_relay
admin@example.com    [smtp.sendgrid.net]:587

# relay_secrets
[smtp.sendgrid.net]:587    apikey:<your-SendGrid-API-key-value>
-
Finally, Plesk reloads the Postfix service to apply the changes:
systemctl reload postfix
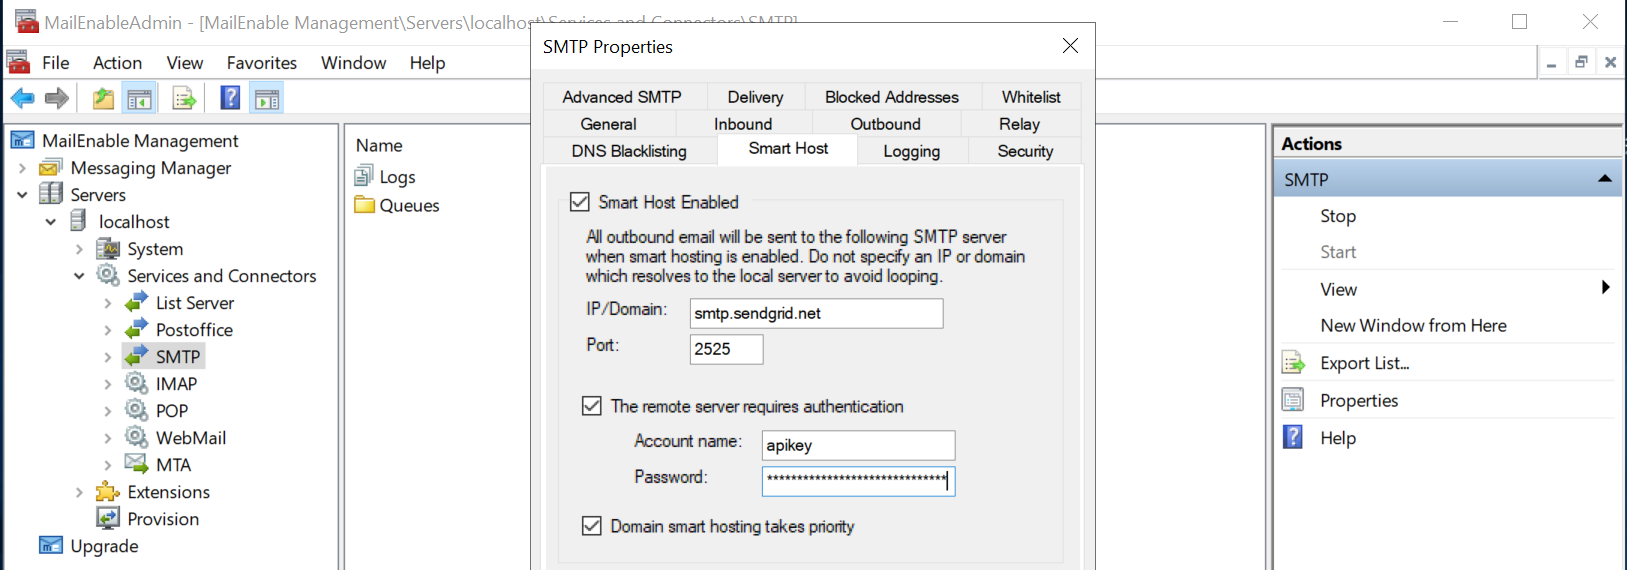
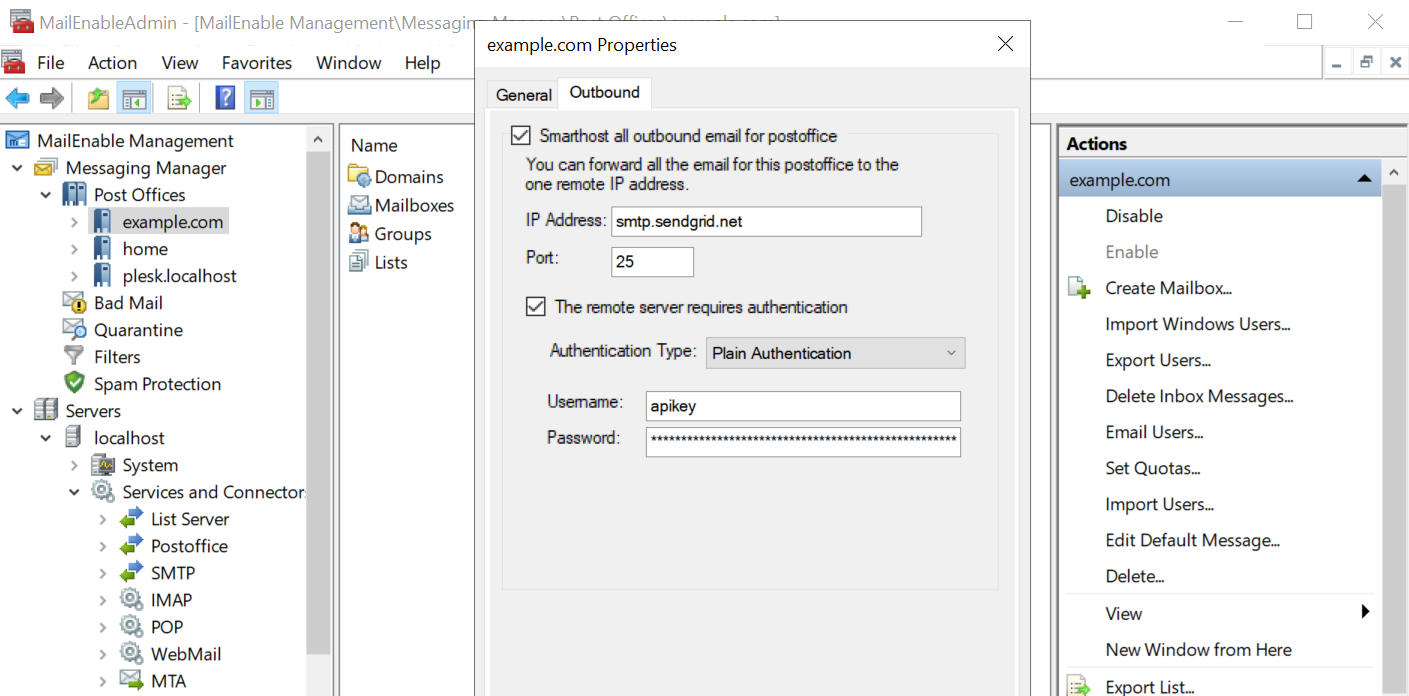
(Plesk für Windows) Smarthost-Konfiguration mit MailEnable
Wenn Sie die Smarthost-Funktion aktivieren, wird in Plesk die MailEnable-Konfiguration angewendet, die auf dem Screenshot unten gezeigt wird. Wir verwenden den SMTP-Relay-Dienst SendGrid als Beispiel.
Im ersten Screenshot ist die serverweite Konfiguration zu sehen, im zweiten die Konfiguration für Domains.
Bemerkung
Domain‑level smarthosts take priority over the server‑wide smarthost configured in Plesk.
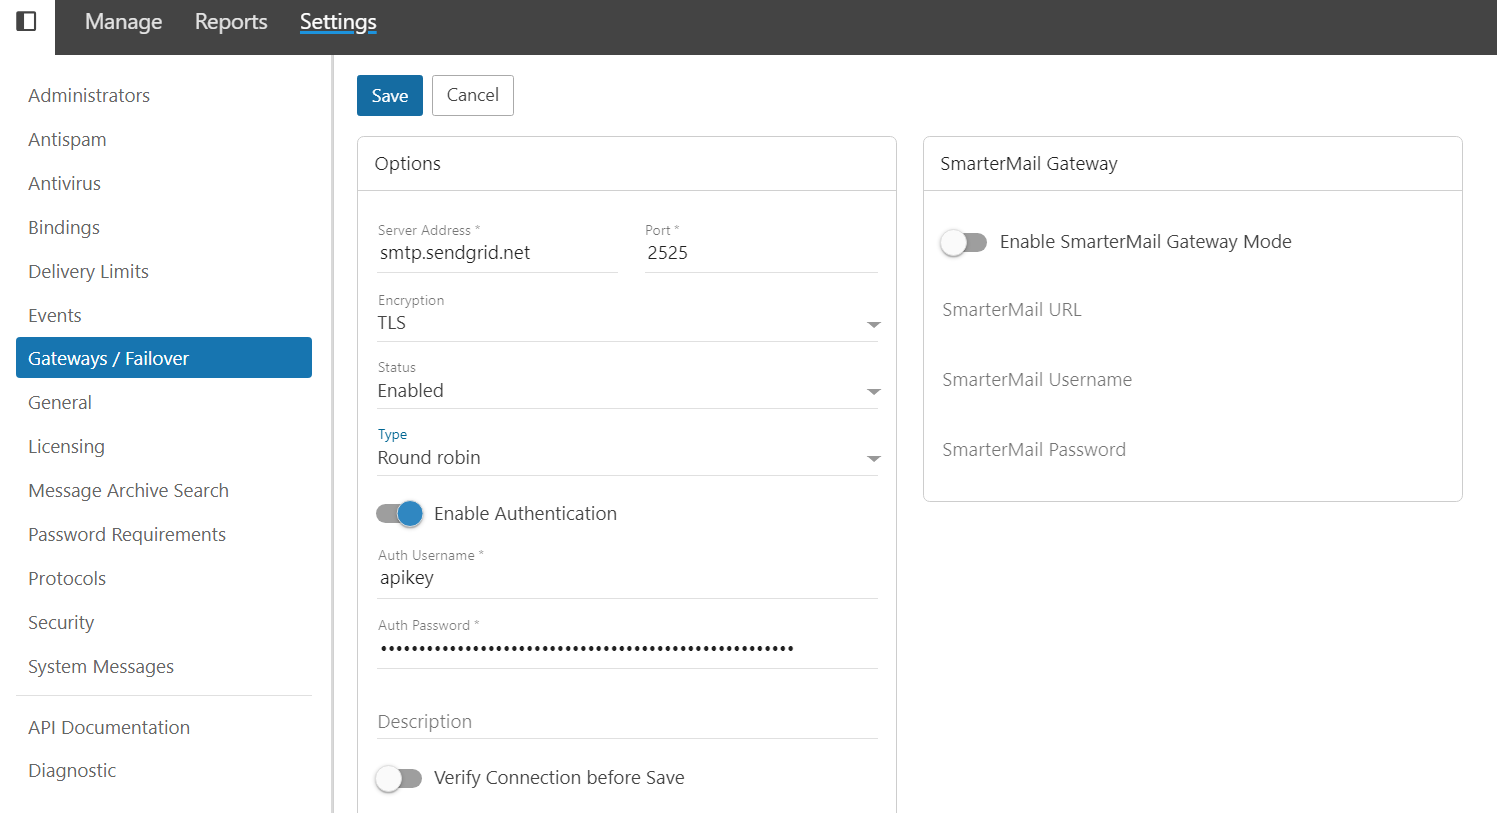
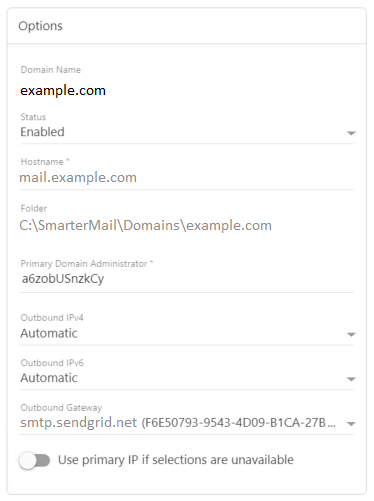
(Plesk für Windows) Smarthost-Konfiguration mit SmarterMail
Wenn Sie die Smarthost-Funktion aktivieren, wird in Plesk die SmarterMail-Konfiguration angewendet, die auf den Screenshots unten gezeigt wird. Wir verwenden den SMTP-Relay-Dienst SendGrid als Beispiel.
Im ersten Screenshot ist die serverweite Konfiguration zu sehen, im zweiten die Konfiguration für Domains.
Bemerkung
Domain‑level smarthosts take priority over the server‑wide smarthost configured in Plesk.
Deaktivieren der Smarthost-Funktion
Sie können die Smarthost-Funktion deaktivieren, indem Sie sie in der grafischen Oberfläche von Plesk ausblenden.
So deaktivieren Sie die Smarthost-Funktion:
-
Öffnen Sie die Datei panel.ini, um sie zu bearbeiten. Sie finden sie hier:
(Plesk für Linux)
/usr/local/psa/admin/conf/panel.ini(Plesk für Windows)
%plesk_dir%admin\conf\panel.ini
Sie können die Datei in der Plesk Oberfläche auch über die Erweiterung Panel.ini Editor bearbeiten.
-
To disable smarthost at the server level, add the following lines to the
panel.inifile, and then save it:[mail] smarthost.server.enabled = false
Die Smarthost-Funktion wird nicht mehr in Tools & Einstellungen angezeigt.
-
To disable smarthost at the domain level, add the following lines to the
panel.inifile, and then save it:[mail] smarthost.domain.enabled = false
The smarthost feature is no longer shown in Websites & Domains > [domain_name] > Mail.
Bemerkung
Sie können die Smarthost-Funktion auch deaktivieren, indem Sie den eingeschränkten Modus aktivieren.