監控 Plesk Autoinstall 伺服器
維護 Plesk Autoinstall 伺服器的本地鏡像能夠幫助在安裝或更新多台 Plesk 伺服器時避免浪費時間和流量在一次又一次下載相同檔上。可通過 HTTP 使用本地鏡像,在安裝或升級過程中可將本地鏡像指定作為 Plesk 包的下載源。
本地鏡像 Repository 的先決條件
- 用於鏡像的虛擬主機需禁用所有的腳本處理常式(php、pl、cgi、py、fcgi 等等)。
- 用於鏡像的虛擬主機或目錄應設定選項
+FollowSymLinks。 - 除非指定其它源,否則必須保證可從正在運行腳本的機器或從目的機器存取以下項:
-
rsync://rsync.autoinstall.plesk.com/autoinstall用於 Plesk for Linux, -
rsync://autoinstall-win.plesk.com/autoinstall用於Plesk for Windows.
-
- 在正運行腳本的機器上必須在以下擴展的支援下編譯 PHP(請參閱 http://www.php.net/manual/en/ssh2.installation.php):
- ssh2_connect,
- simplexml,
- XML DOM.
- Plesk for Windows 和 Plesk for Linux 鏡像不能放置同一個資料夾。必須在不同路徑創建鏡像。
配置本地鏡像 Repository
-
下載和解壓 Plesk Mirror Setup 工具
# wget https://support.plesk.com/hc/en-us/article_attachments/360041549033/mirrorctl-3.1.0.zip
# unzip mirrorctlv2.0.1.zip
# cd mirrorctl
-
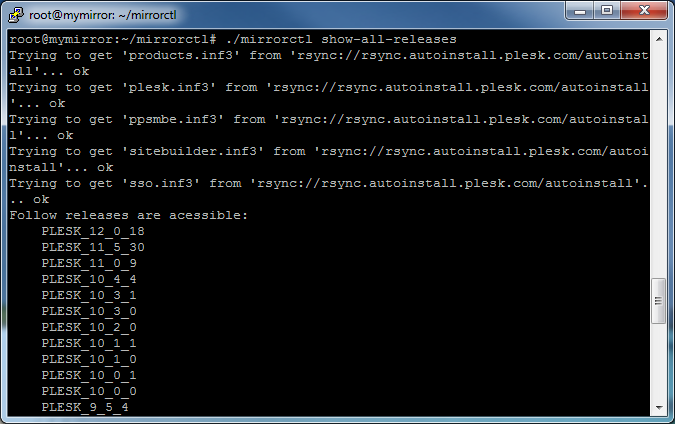
檢查可用的產品版本
使用
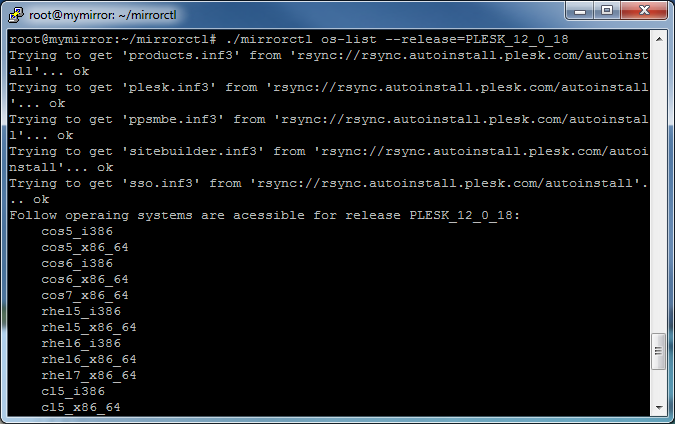
show-all-releases命令查看可用的產品以及使用os-list命令查看某個產品支援的作業系統:# ./mirrorctl show-all-releases
# ./mirrorctl os-list –release=PLESK_12_0_18
-
選擇要被鏡像的產品版本
使用
cfg --addandcfg --remove編輯要被鏡像的一系列產品版本。# ./mirrorctl cfg --add --release=PLESK_12_0_18 --os=cos5_i386 # ./mirrorctl cfg --add --win --release=PANEL_12_0_18_WIN --cfg-file=./plesk_win_mirror
-
保存本地鏡像 repository 的配置到一個檔
使用
cfg --export保存已創建的配置到一個檔:# ./mirrorctl cfg --export --path=./配置將被保存到指定位置的檔
mirror.xml。<?xml version="1.0" encoding="UTF-8"?> <xml> <release name="PLESK_12_0_18" version="12.0.18"> <os name="cos5_i386"/> </release> </xml>
若要從一個檔載入被保存的配置,請使用
cfg --import:# ./mirrorctl cfg --import --cfg-file=./mirror.xml -
創建鏡像 repository
首先,為鏡像創建一個目錄:
# mkdir /var/www/html/mirror/
# mkdir /var/www/html/mirror_windows/
然後,使用
update命令同步鏡像和官方 repository:# ./mirrorctl update --path=/var/www/html/mirror/ # ./mirrorctl update --win --path=/var/www/html/mirror_windows/ --cfg-file=./plesk_win_mirror
備註: 該 repository 只能用於安裝在鏡像配置中指定的產品版本和作業系統。該 repository 不能通過 autoinstaller 工具安裝所有其他版本。
查看在已創建的 repository 中可用的一系列產品版本:
# ./mirrorctl show-all-releases --src-host=/var/www/html/mirror/
# ./mirrorctl show-all-releases --win --src-host=/var/www/html/mirror_windows/
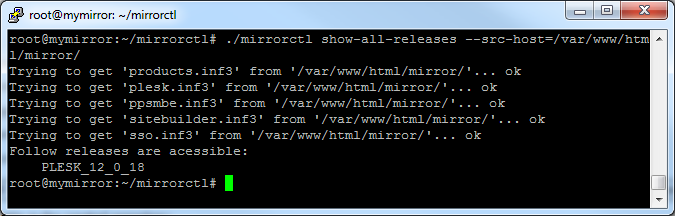
本地鏡像 repository 現在可用於安裝和升級 Plesk。
使用本地鏡像 Repository
可通過以下方式使用鏡像:
-
通過更改 DNS 解析並設定鏡像 web 主機以確保
https://autoinstall.plesk.com(Plesk Linux) 或http://autoinstall-win.plesk.com/(Windows) 將指向鏡像; -
通過在啟動 autoinstaller 的機器上於
SOURCE變數(位於/root/.autoinstallerrc檔中)中指定鏡像的 URL;[root@container ~]# cat /root/.autoinstallerrc SOURCE=http://uri.of.local.mirror/here/
-
通過當在交互模式下啟動 autoinstaller 時在
--source選項中指定鏡像 URL。
維護遠端鏡像 Repositories
Plesk Mirror Setup 工具能夠管理位於同一檔案系統以及遠端伺服器上的 repositories。若要指定遠端源和遠端目的鏡像,請使用 --path 和 --src-host 選項。
使用 --path 指定遠端目的鏡像:
-
使用某個使用者、密碼和主機:
--path=user:UserSecurePassword@mymirror.tld:344/var/www/html/
--path=user:UserSecurePassword@192.168.100.100:22/var/www/html/
--path=root:RootSecurePassword@localhost:/var/www/html/
-
使用 SSH 金鑰驗證(需要私用和公共金鑰):
--path=192.168.100.100:/var/www/html/如果當前用戶默認的 RSA 對 (id_rsa & id_rsa_pub) 不存在,將會使用默認的 DSA 對 (id_dsa & id_dsa.pub) from
$HOME/.ssh/資料夾。--path=user@mymirror.tld:344/var/www/html/ -
使用某個 SSH 金鑰作為 mirrorctl 工具的額外選項:
--path=root@mymirror.tld:344/var/www/html/ --private-key=~/.ssh/id_mirror --public-key=~/.ssh/id_mirror.pub
使用 --src-host 指定遠端源鏡像:
-
通過 SSH 協議使用 rsync:
--src-host=test@192.168.100.100:/var/www/html/test-mirror/
--src-host=mytestmirror.tld:/var/www/html/test-mirror/
- 在以上示例中,禁止指定使用者密碼或 SSH 埠 (22)。
- 如果選擇了
--src-host選項,啟動該工具的用戶必須為其設定 SSH 金鑰驗證,以能夠在通過--src-host選項指定的用戶名下連接到該選項下指定的主機。 - 如果選擇了
--src-host選項和--path選項,在--path選項中指定的使用者必須為其設定 SSH 金鑰驗證,已能夠從在--path選項中指定的主機連接到在--src-host選項下指定的主機(在以通過--src-host選項指定的用戶名下)。
-
在源主機上使用 rsync 守護進程:
--src-host=rsync://mytestmirror.tld:873/testmirror
rsync 配置的示例:
# head /etc/rsyncd.conf
[testmirror]
path = /var/www/html/test-mirror/
comment = Test repository
# cat /etc/xinetd.d/rsync
service rsync
{
# disable = yes
socket_type = stream
wait = no
user = root
server = /usr/bin/rsync
server_args = --daemon
log_on_failure += USERID
}
示例 1:設定定期更新本地鏡像 repository
目標:確保有選定產品版本的鏡像是最新的。
-
通過添加所需的產品版本和作業系統來創建鏡像配置:
# /home/user/mirrorctl/mirrorctl cfg --add --release=PLESK_12_0_18 --os=cos5_i386 --cfg-file=/var/www/html/mirror/myconfig.xml
# /home/user/mirrorctl/mirrorctl cfg --add --release=PLESK_12_0_18 --os=rhel5_i386 --cfg-file=/var/www/html/mirror/myconfig.xml
# /home/user/mirrorctl/mirrorctl cfg --add --release=PLESK_11_5_30 --os=cos5_i386 --cfg-file=/var/www/html/mirror/myconfig.xml
# /home/user/mirrorctl/mirrorctl cfg --add --win --release=PANEL_12_0_18_WIN --cfg-file=/var/www/html/mirror/windows_myconfig.xml
-
配置 crontab 以自動更新鏡像:
$ crontab -l
# m h dom mon dow command
59 23 * * * cd /home/user/mirrorctl/ && ./mirrorctl update --path=/var/www/html/mirror/ --cfg-file=/var/www/html/mirror/myconfig.xml > ./mirror-cron.log 2>&1
59 22 * * * cd /home/user/mirrorctl/ && ./mirrorctl update --win --path=/var/www/html/mirror_windows/ --cfg-file=/var/www/html/mirror/windows_myconfig.xml > ./mirror-cron-win.log 2>&1
示例 2:添加新的作業系統
目標:添加某個產品版本的其它作業系統到鏡像:
-
導入您之前使用 mirrorctl 工具創建的 repository 的當前配置:
# ./mirrorctl cfg --import --path=/var/www/html/mirror/ --cfg-file=myconfig -
為某個產品版本添加新作業系統:
# ./mirrorctl cfg --add --release=PLESK_12_0_18 --os=deb6.0_i386 --cfg-file=myconfig -
同步鏡像:
# ./mirrorctl update --path=/var/www/html/mirror/ --cfg-file=myconfig
示例 3:下載某個作業系統/版本
目標:從官方 repository 下載用於某個產品版本的某個作業系統到鏡像,不下載其它被鏡像的版本/作業系統。
-
生成只包含您想要下載的作業系統/產品版本的設定檔:
# ./mirrorctl cfg --add --release=PLESK_12_0_18 --os=cos5_i386 --cfg-file=./temp-config
# ./mirrorctl cfg --add --release=PLESK_12_0_18 --os=cos5_x86_64 --cfg-file=./temp-config
-
使用 push 命令下載指定的作業系統到現有的 repository:
# ./mirrorctl push --path=/var/www/html/mirror/ --cfg-file==./temp-config
示例 4:創建鏡像以測試新的產品版本
目標:為一個新的產品版本創建測試鏡像,測試該版本,並只上傳測試的版本(沒有我還未測試過的最新官方更新)到主要的 repository。
-
為新的產品版本支援的所有作業系統創建測試鏡像:
# ./mirrorctl cfg --add --release=PLESK_12_0_18 --os=all --cfg-file=./test-config
# ./mirrorctl update --path=/var/www/html/test-mirror/ --cfg-file=./test-config
-
測試新版本;
-
上傳整個產品版本到主要的 repository:
# ./mirrorctl push --src-host=/var/www/html/test-mirror/ --path=/var/www/html/mirror/ --cfg-file=./test-config
警告: 如果選擇了 --src-host 選項,將從官方 repository 上傳新的產品版本,而該產品版本可能與您已測試過的不是同一版本。
示例 5:為新作業系統測試產品版本而創建鏡像
目標:為帶有最新更新的已被鏡像的產品版本創建一系列指定作業系統的測試鏡像,測試這些作業系統然後上傳經測試的作業系統到主要的 repository。
-
創建測試鏡像,測試選定產品版本可用的多個作業系統:
# ./mirrorctl cfg --add --release=PLESK_12_0_18 --os=cos5_i386 --cfg-file=./test-config
# ./mirrorctl cfg --add --release=PLESK_12_0_18 --os=cos5_x86_64--cfg-file=./test-config
# ./mirrorctl update --path=/var/www/html/test-mirror/ --cfg-file=./test-config
-
從上面創建的測試鏡像獲取一系列可用的產品版本和作業系統:
# ./mirrorctl show-all-releases --src-host=/var/www/html/test-mirror/
# ./mirrorctl os-list --release=PLESK_12_0_18 --src-host=/var/www/html/test-mirror/
-
從測試鏡像生成僅包含要被添加到主要鏡像的版本和作業系統的新設定檔:
# ./mirrorctl cfg --add --release=PLESK_12_0_18 --os=cos5_i386 --src-host=/var/www/html/test-mirror/ --cfg-file=push.xml -
查看已創建的設定檔以確定測試 repository 中的版本/作業系統的可用性:
# ./mirrorctl cfg --check --src-host=/var/www/html/test-mirror/ --cfg-file=push.xml -
從測試鏡像上傳選定的版本和作業系統到主要的 repository:
# ./mirrorctl push --src-host=/var/www/html/test-mirror/ --path=/var/www/html/mirror/ --cfg-file=push.xml
警告: 如果選擇了 --src-host 選項,將從官方 repository 上傳新的產品版本,而該產品版本可能與您已測試過的不是同一版本。
警告: 如果選擇了 --cfg-file 選項,將會使用預設的設定檔 BUILD/config.xml (與工具所在的目錄相關)。也就是說,將只會從該設定檔上傳版本/作業系統到主要的 repository。
警告: 如果指定 --cfg-file 選項不正確,將會使用針對 push 命令指定的設定檔。