Konfigurieren eines Smarthosts oder Relayhosts
Bemerkung: Die Begriffe Smarthost und Relayhost werden normalerweise synonym verwendet. Wir halten uns im Folgenden an den Begriff Smarthost.
Inhalt: Sie können einen Smarthost ab Plesk Obsidian 18.0.64 konfigurieren. In diesem Artikel erfahren Sie Folgendes:
- Wann ist die Verwendung eines Smarthosts sinnvoll?
- Wie wird ein Smarthost in Plesk konfiguriert?
- Wie wirkt sich die Konfiguration eines Smarthosts auf eine bestehende manuelle Konfiguration aus?
- Wie werden die Konfigurationsdateien der E-Mail-Dienste beim Einrichten eines Smarthosts in Plesk geändert?
Sie können E-Mails direkt von Plesk aus über seinen lokalen SMTP-Server versenden. Hosting-Provider lassen den Versand von E-Mails über lokale SMTP-Server jedoch möglicherweise nicht zu. Außerdem werden solche E-Mails eventuell nicht zugestellt und können im Spam landen. Um dies zu vermeiden, kann ein Smarthost konfiguriert werden.
Ein Smarthost ist ein Mailserver, der so konfiguriert ist, dass er E-Mails von beliebigen Absendern annimmt und sie dann an das entsprechende Ziel weiterleitet. Ein Smarthost fungiert als Vermittler, um die Wahrscheinlichkeit zu erhöhen, dass E-Mails ihr Ziel erreichen, ohne im Spam zu landen.
Wenn Sie eine E-Mail über einen Smarthost senden, sieht es so aus, als stamme die E-Mail von der IP-Adresse des Smarthosts. Und hat der Smarthost einen guten Ruf, ist es wahrscheinlicher, dass die E-Mail den Posteingang des Empfängers erreicht. Daher ist es empfehlenswert, einen seriösen SMTP-Relay-Dienst als Smarthost zu verwenden (z. B. SendGrid, Mailgun, Mailjet).
Bisher konnte in Plesk kein Smarthost konfiguriert werden. Benutzer mussten den Smarthost manuell nach eigenem Ermessen einrichten.
Ab Plesk Obsidian 18.0.64 können Sie einen Smarthost in der grafischen Oberfläche von Plesk und über die Befehlszeilenschnittstelle konfigurieren.
Konfigurieren eines Smarthosts
Wenn Sie einen Smarthost konfigurieren, gilt dies für den gesamten Server. Die Funktion ist in Plesk für Linux mit Postfix und in Plesk für Windows entweder mit MailEnable oder SmarterMail verfügbar.
Vorsicht: Falls Sie bereits einen Smarthost manuell konfiguriert haben, wird durch die Aktivierung der Smarthost-Funktion in Plesk Ihre bestehende Konfiguration überschrieben. Bevor Sie die Funktion aktivieren, sollten Sie sich zuerst diesen Abschnitt durchlesen.
Bemerkung: Bei einigen SMTP-Relay-Diensten (z. B. SendGrid) funktioniert die E-Mail-Weiterleitung nicht mehr, wenn ein Smarthost konfiguriert ist.
So konfigurieren Sie einen Smarthost:
-
Wählen Sie einen seriösen SMTP-Relay-Dienst aus (z. B. SendGrid, Mailgun, Mailjet) und erstellen Sie dort ein Konto.
-
Gehen Sie zu Tools & Einstellungen > Smarthost (unter „E-Mail“).
-
Aktivieren Sie das Kontrollkästchen „Benutzern E-Mail via Smarthost schicken“.
-
Geben Sie im entsprechenden Feld die IP-Adresse oder den Hostnamen eines Smarthosts an (zum Beispiel
192.0.2.1odersmtp.sendgrid.net).Bemerkung: In Plesk für Linux können Sie MX- oder SRV-Lookups deaktivieren, indem Sie den Hostnamen oder die IP-Adresse in eckige Klammern setzen, zum Beispiel
[example.com]. Details finden Sie in der Postfix-Dokumentation (im Abschnitt überrelayhost). -
Wenn Ihr SMTP-Relay-Dienst eine SMTP-Authentifizierung erfordert (was bei den meisten Diensten der Fall ist), aktivieren Sie das Kontrollkästchen „Authentifizierung erforderlich“.
-
Wenn Sie im vorherigen Schritt die Option „Authentifizierung erforderlich“ ausgewählt haben, geben Sie die Anmeldedaten für die Authentifizierung bei Ihrem SMTP-Relay-Dienst an.
Wenn der Dienst die grundlegende Authentifizierung unterstützt, geben Sie den Benutzernamen und das Passwort in den entsprechenden Feldern an. Falls der Dienst die Authentifizierung über API-Schlüssel unterstützt, geben Sie im Feld „Benutzername“ den Standardbenutzernamen an, der für API-Schlüssel im Dienst verwendet wird (bei SendGrid lautet der Benutzername beispielsweise
apikey). Geben Sie im Feld „Passwort“ den API-Schlüsselwert an. -
Wählen Sie im Abschnitt „Verschlüsselte Verbindung“ aus, ob die an den SMTP-Relay-Dienst übertragenen Anmeldeinformationen verschlüsselt werden sollen. Die jeweiligen Optionen unterscheiden sich zwischen Linux und Windows:
- (Plesk für Linux) Wählen Sie aus, ob die verschlüsselte Verbindung erforderlich ist oder nicht.
- (Plesk für Windows) Wählen Sie aus, ob die verschlüsselte Verbindung erforderlich ist oder nicht. Und wenn ja, wählen Sie den Verschlüsselungstyp: TLS oder SSL.
Bemerkung: Wenn Sie einen Verbindungstyp wählen, der vom SMTP-Relay-Dienst nicht unterstützt wird (z. B. keine Verschlüsselung anstelle von TLS), wird die Verbindung zum Smarthost nicht hergestellt.
-
(Optional) Sie können prüfen, ob die Verbindung zum Smarthost hergestellt werden kann. Klicken Sie dazu auf Verbindung überprüfen.
Wenn Sie im vorherigen Schritt „Verschlüsselte Verbindung“ ausgewählt haben, wird die Verbindung nicht nur auf Verschlüsselung, sondern auch auf ein gültiges SSL/TLS-Zertifikat geprüft. Falls die Verbindung verschlüsselt ist, aber das SSL/TLS-Zertifikat nicht vertrauenswürdig ist (z. B. abgelaufen oder selbst signiert), wird die Verbindung nicht hergestellt.
Bemerkung: Sie können das oben beschriebene Standardverhalten ändern und die Verbindung zulassen, auch wenn sie nicht durch ein gültiges SSL/TLS-Zertifikat geschützt ist.
-
Klicken Sie auf OK.
-
Aktualisieren Sie die SPF- und andere zugehörige DNS-Einträge in der DNS-Vorlage und in den DNS-Zonen bestehender Domains. SMTP-Relay-Dienste liefern die Informationen zu den vorzunehmenden DNS-Änderungen.
Sie haben den Smarthost nun in Plesk konfiguriert. Die meisten kommerziellen SMTP-Relay-Dienste erfordern jedoch auch eine Domain-Authentifizierung (kann auch als Domain-Verifizierung bezeichnet werden). Dies ist der Fall für die folgenden SMTP-Relay-Dienste: SendGrid, Mailjet und Mailgun
-
Melden Sie sich im Konto Ihres SMTP-Relay-Dienstes an und authentifizieren Sie alle in Plesk gehosteten Domains. Die genauen Schritte dazu finden Sie in der Dokumentation Ihres Dienstes.
-
Senden Sie eine Test-E-Mail an einen externen E-Mail-Dienst (z. B. Gmail) und vergewissern Sie sich, dass die E-Mail im Posteingang angezeigt wird.
Sie haben den Smarthost nun sowohl in Plesk als auch in Ihrem SMTP-Relay-Dienst konfiguriert. Ihr Smarthost ist jetzt eingerichtet und wird ausgeführt.
Konfigurieren eines Smarthosts nach einer vorherigen manuellen Konfiguration
Wenn Sie bereits einen Smarthost manuell konfiguriert haben, wird durch die Aktivierung der Smarthost-Funktion in Plesk Ihre bestehende Konfiguration überschrieben. Obwohl in Plesk die gängigste Konfiguration angewendet wird, die für die meisten Smarthost-Dienste geeignet ist, müssen Sie die Konfiguration möglicherweise an Ihren Smarthost anpassen.
Wenn Sie bereits einen Smarthost manuell konfiguriert haben, empfehlen wir Ihnen den folgenden Algorithmus:
- Vergleichen Sie beide Smarthost-Konfigurationen: Ihre manuelle und die von Plesk.
- Entfernen Sie die Parameter, die über Plesk kontrolliert werden sollen, aus Ihrer manuellen Konfiguration.
- Behalten Sie zusätzliche Parameter bei, die nicht von Plesk abgedeckt werden.
- Aktivieren Sie die Smarthost-Funktion in Plesk.
Um Ihnen den Vergleich beider Konfigurationen zu erleichtern, beschreiben wir in Folge, wie die Smarthost-Funktion im Detail aussieht und welche Konfigurationsdateien sie auf welche Weise beeinflusst.
(Plesk für Linux) Smarthost-Konfiguration mit Postfix
Bemerkung: Wenn Sie bereits benutzerdefinierte Smarthosts für Domains konfiguriert haben, haben diese Vorrang vor dem serverweiten Smarthost von Plesk.
Wenn Sie die Smarthost-Funktion aktivieren, werden in Plesk die folgenden Aktionen ausgeführt:
-
Zeilen nach folgendem Muster werden in die Konfigurationsdatei
/etc/postfix/main.cfaufgenommen:# Sets an external SMTP relayhost with a port number relayhost - [Your-SMTP-server-IP-or-hostname]:587 # Turns on TLS encryption smtp_tls_security_level = encrypt # Turns on authentication smtp_sasl_auth_enable = yes # Sets the username and password required for authentication smtp_sasl_password_maps = /var/spool/postfix/plesk/relay_secrets # Prohibits anonymous authentication methods. smtp_sasl_security_options = noanonymous smtp_sasl_tls_security_options = noanonymous
-
Es wird geprüft, ob
/etc/postfix/main.cfdoppelte Anweisungen enthält, die die Konfiguration stören könnten:cat /etc/postfix/main.cf | grep -E "relayhost|smtp_sasl_auth_enable|smtp_sasl_password_maps|smtp_sasl_security_options|smtp_sasl_tls_security_options|smtp_tls_security_level"
-
Die API-Authentifizierung für den SMTP-Relay-Dienst Ihrer Wahl wird über die Datei
/etc/postfix/sasl_passwdkonfiguriert. Für den SendGrid-Dienst wird zum Beispiel die folgende Zeile hinzugefügt:[smtp.sendgrid.net]:2525 apikey:<your-SendGrid-API-key-value>
-
Über das
postmap-Dienstprogramm wird die.db-Konfigurationsdatei erstellt:postmap /etc/postfix/sasl_passwd
-
Der Postfix-Dienst wird neu gestartet, um die Änderungen zu übernehmen:
systemctl reload postfix
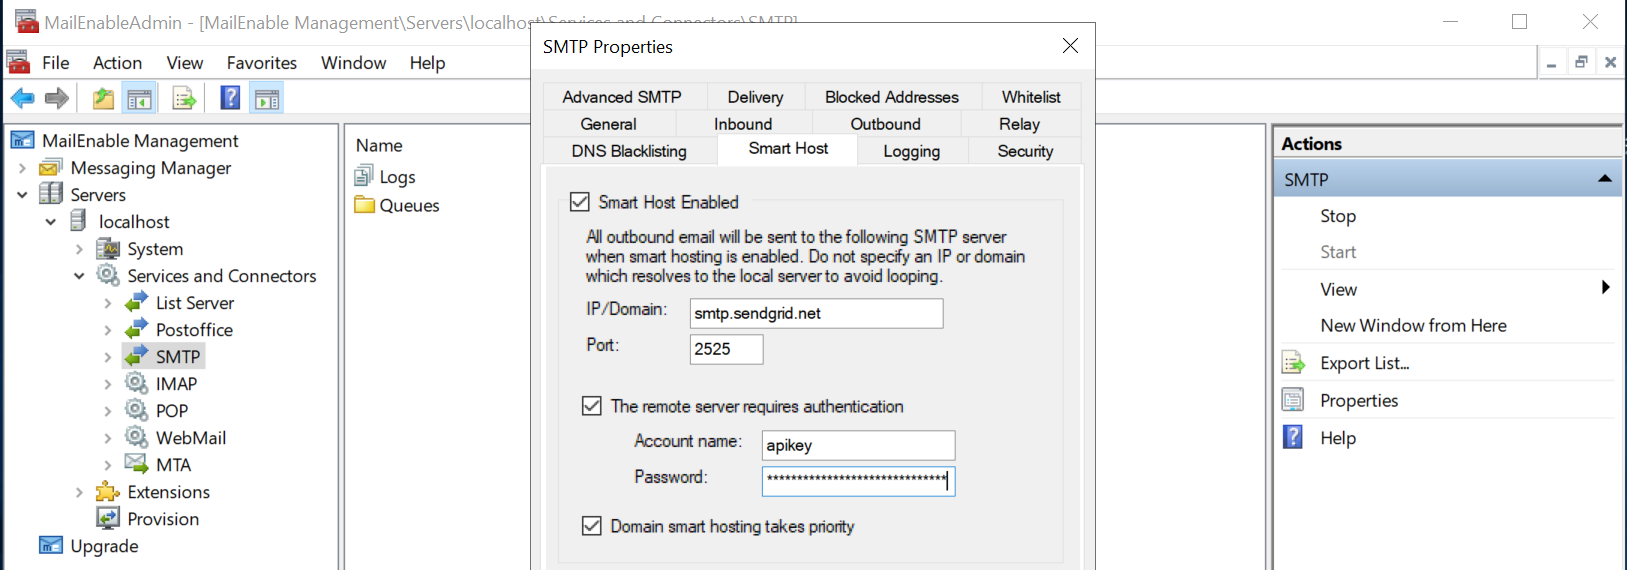
(Plesk für Windows) Smarthost-Konfiguration mit MailEnable
Wenn Sie die Smarthost-Funktion aktivieren, wird in Plesk die MailEnable-Konfiguration angewendet, die auf dem Screenshot unten gezeigt wird. Wir verwenden den SMTP-Relay-Dienst SendGrid als Beispiel.
Bemerkung: Wenn Sie bereits benutzerdefinierte Smarthosts für Domains konfiguriert haben, haben diese Vorrang vor dem serverweiten Smarthost von Plesk.
(Plesk für Windows) Smarthost-Konfiguration mit SmarterMail
Wenn Sie die Smarthost-Funktion aktivieren, wird in Plesk die SmarterMail-Konfiguration angewendet, die auf den Screenshots unten gezeigt wird. Wir verwenden den SMTP-Relay-Dienst SendGrid als Beispiel.
Im ersten Screenshot ist die serverweite Konfiguration zu sehen, im zweiten die Konfiguration für Domains.
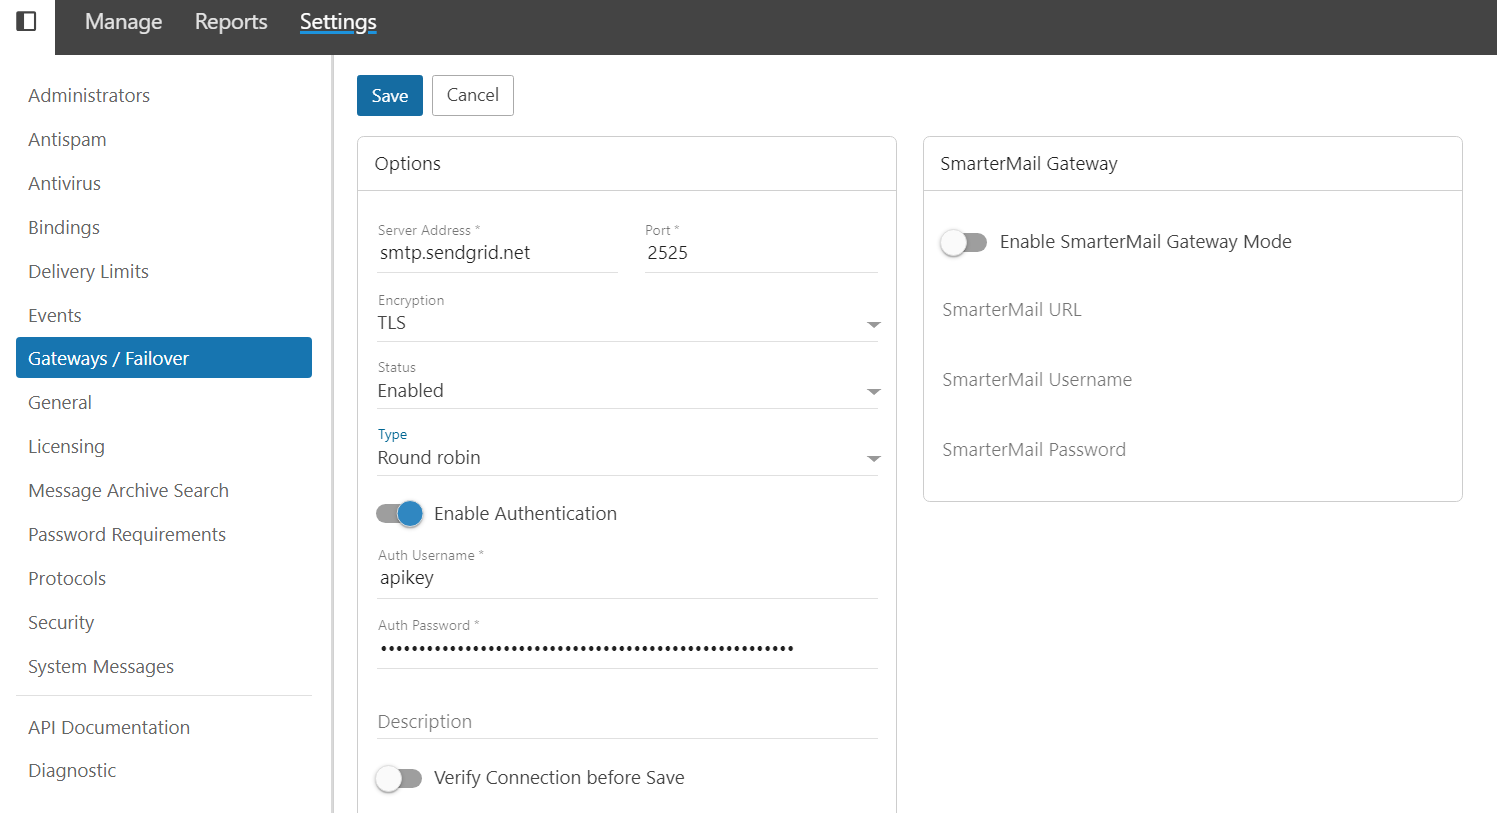
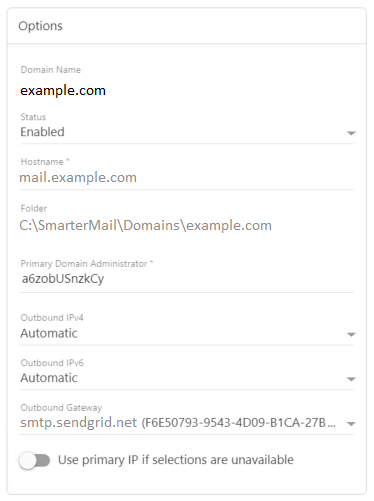
Bemerkung: Wenn Sie bereits benutzerdefinierte Smarthosts für Domains konfiguriert haben, hat der serverweite Plesk-Smarthost Vorrang vor diesen.
Deaktivieren der Smarthost-Funktion
Sie können die Smarthost-Funktion deaktivieren, indem Sie sie in der grafischen Oberfläche von Plesk ausblenden.
So deaktivieren Sie die Smarthost-Funktion:
-
Öffnen Sie die Datei panel.ini, um sie zu bearbeiten. Sie finden sie hier:
- (Plesk für Linux)
/usr/local/psa/admin/conf/panel.ini - (Plesk für Windows)
%plesk_dir%admin\conf\panel.ini
Sie können die Datei in der Plesk Oberfläche auch über die Erweiterung Panel.ini Editor bearbeiten.
- (Plesk für Linux)
-
Fügen Sie die folgenden Zeilen zur Datei
panel.inihinzu und speichern Sie sie:[mail] smarthost.server.enabled = false
Die Smarthost-Funktion wird nicht mehr in Tools & Einstellungen angezeigt.
Bemerkung: Sie können die Smarthost-Funktion auch deaktivieren, indem Sie den eingeschränkten Modus aktivieren.
Deaktivieren der SSL/TLS-Zertifikatsprüfung, die über die Schaltfläche „Verbindung überprüfen“ ausgelöst wird
Wenn die Verbindung zu einem Smarthost verschlüsselt ist und Sie auf die Schaltfläche Verbindung überprüfen klicken, wird auch geprüft, ob die Verbindung mit einem gültigen SSL/TLS-Zertifikat geschützt ist. Sollte das nicht der Fall sein, wird die Verbindung zum Smarthost nicht hergestellt.
Falls Sie die Verbindung auch dann herstellen wollen, wenn ein SSL/TLS-Zertifikat nicht vertrauenswürdig ist (z. B. abgelaufen oder selbstsigniert), können Sie die Prüfung des Zertifikats deaktivieren.
So deaktivieren Sie die Prüfung des SSL/TLS-Zertifikats, die über die Schaltfläche Verbindung überprüfen ausgelöst wird:
-
Öffnen Sie die Datei panel.ini, um sie zu bearbeiten. Sie finden sie hier:
- (Plesk für Linux)
/usr/local/psa/admin/conf/panel.ini - (Plesk für Windows)
%plesk_dir%admin\conf\panel.ini
Sie können die Datei in der Plesk Oberfläche auch über die Erweiterung Panel.ini Editor bearbeiten.
- (Plesk für Linux)
-
Fügen Sie die folgenden Zeilen zur Datei
panel.inihinzu und speichern Sie sie:[mail] smarthost.server.checkConnection.checkCertificate = false
Sie können nun die Verbindung mit einem Smarthost herstellen, der nicht über ein gültiges SSL/TLS-Zertifikat geschützt ist.