Implement Form
Every form should be an instance of pm_Form_Simple , so that it looks the same as other forms in Plesk. For most cases, you can use the same features as for Zend_Form. Namely, you can:
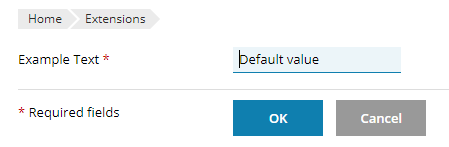
Step 1. Specify elements
Basically, you should add elements to the form using the
addElement
method. There are several standard
elements,
like “text” or “select”, and they have the same flexibility as
Zend_Form, including the ability to specify
decorators
for complex elements:
public function formAction()
{
    $form = new pm_Form_Simple();
    $form->addElement('text', 'exampleText', [
        'label' => 'Example Text',
        'value' => 'Default value',
        'required' => true,
    ]);
}
On a page, it will look like this:

Step 2. Specify buttons
You have the ability to customize what the buttons below the form will look like using the addControlButtons method:
public function formAction()
{
    $form = new pm_Form_Simple();

    // form elements are added here

    $form->addControlButtons([
        'cancelLink' => pm_Context::getModulesListUrl(),
    ]);
}
This will add buttons OK and Cancel:

Step 3. Define view
First of all, you need to pass the form from controller to view:
public function formAction()
{
    $form = new pm_Form_Simple();

    // form elements and buttons are defined here

    $this->view->form = $form;
}
And then display it in the view (in a .phtml file):
<?php echo $this->form; ?>
Now, you can visit the form action of your extension and check the result:
Moreover, you can see what the form would look like on a Plesk server using a different color scheme or branding (for example, when the Skins and Color Schemes extension is installed) or what the form would look like in adaptive design on a mobile device.
Step 4. Validate and process the form
The next step is to validate and process the form when it is submitted
by user. It is recommended to do it in controller in the same action. To
validate the form, you can specify the
validators
for the elements, or you can create a class of your form in library
directory, inherit it from
pm_Form_Simple,
and override the isValid method (to see an example of such a form,
refer to
https://github.com/plesk/ext-route53/blob/master/src/plib/library/Form/Settings.php,
and for a usage example see
https://github.com/plesk/ext-route53/blob/master/src/plib/controllers/IndexController.php
in indexAction).
public function formAction()
{
    $form = new pm_Form_Simple();

    // form elements and buttons are defined here

    if ($this->getRequest()->isPost() && $form->isValid($this->getRequest()->getPost())) {
        $value = $form->getValue('exampleText');

        // Proccess/save value here

        $this->_status->addInfo('Data was successfully saved.');
        $this->_helper->json(['redirect' => pm_Context::getBaseUrl() ]);
    }

    $this->view->form = $form;
}
Usually, after a form is processed, either a success or an error message is shown.
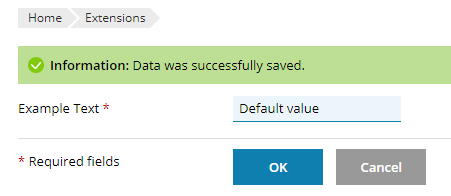
It can be implemented using pm_View_Status , as shown in the example above. You can also specify where to redirect the user after the form is processed using the “redirect” parameter of the JSON response and pm_Context helpers to compose the URL.
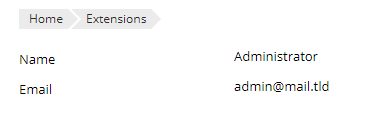
Read-only forms
Another frequently used page type in Plesk is the overview page of some
object. This can be implemented as a form with all fields marked as
read-only. For example, you can implement such action (we used
pm_Session to get the instance of the currently logged in user
pm_Client):
public function overviewAction()
{
    $client = pm_Session::getClient();
    $form = new pm_Form_Simple();
    $form->addElement('text', 'name', [
        'label' => 'Name',
        'value' => $client->getProperty('pname') ,
        'readonly' => true,
    ]);
    $form->addElement('text', 'email', [
        'label' => 'Email',
        'value' => $client->getProperty('email') ,
        'readonly' => true,
    ]);
    $this->view->form = $form;
}
Then add it to view (overview.phtml):
Current logged in user:
<?php echo $this->form; ?>
On a page, a read-only form looks like this: