Configurer un hôte intelligent ou hôte relais
Note
Les termes « hôte intelligent » et « hôte relais » sont en général interchangeables. À partir de maintenant, nous allons utiliser le terme « hôte intelligent ».
Résumé
You can configure a server-wide smarthost in Plesk Obsidian 18.0.64 or later. You can configure a smarthost at the domain level in Plesk Obsidian 18.0.76 or later.
Dans cette section, vous découvrirez :
Quand il est avantageux d’utiliser un hôte intelligent.
Comment configurer un hôte intelligent dans Plesk.
Quelles sont les répercussions possibles de la configuration d’un hôte intelligent sur une configuration manuelle existante.
Comment Plesk modifie les fichiers de configuration des services de messagerie lors de la configuration d’un hôte intelligent.
You can send emails from Plesk using its local SMTP server. However, some hosting providers block outgoing mail from local SMTP servers. Even when they allow it, email deliverability may be poor and messages can end up in spam. To avoid these issues, configure a smarthost.
A smarthost is a mail server that accepts messages from any sender and forwards them to their final destination. A smarthost acts as an intermediary to improve email deliverability and reduce the chances of messages being marked as spam.
When you send an email through a smarthost, the message appears to originate from the smarthost’s IP address. If the smarthost has a strong sending reputation, your email is more likely to reach the recipient’s inbox instead of being marked as spam. For this reason, we recommend using a reputable SMTP relay service as your smarthost (for example, SendGrid, Mailgun, Mailjet, or similar providers).
Previously, you could configure a smarthost only manually. In Plesk Obsidian 18.0.64 and later, you can configure a smarthost in the Plesk graphical interface and via the CLI.
Configuring a Server-Wide Smarthost
You can configure a smarthost for the whole server. This works in Plesk for Linux with Postfix and Plesk for Windows with either MailEnable or SmarterMail.
Prudence
Si vous avez déjà configuré un hôte intelligent manuellement, l’activation de la fonctionnalité hôte intelligent dans Plesk écrasera votre configuration existante. Avant d’activer la fonctionnalité, nous vous recommandons de consulter d’abord la section suivante.
Note
Avec certains services de relais SMTP (par exemple : SendGrid), la redirection de mails ne fonctionnera plus si un hôte intelligent est configuré.
To configure a server-wide smarthost:
Choose a reputable SMTP relay service (for example, SendGrid, Mailgun, Mailjet, or similar providers) and create an account there.
Connectez-vous à Plesk.
Allez dans Outils & Paramètres > Hôte intelligent (sous « Boîte mail »).
Cochez la case « Envoyer les mails des utilisateurs via un hôte intelligent ».
-
Dans le champ correspondant, spécifiez l’adresse IP ou le nom d’hôte d’un hôte intelligent (par exemple :
192.0.2.1ousmtp.sendgrid.net).Note
Dans Plesk pour Linux, vous pouvez désactiver les recherches MX ou SRV en mettant le nom d’hôte ou l’adresse IP entre crochets, par exemple :
[example.com]. Pour en savoir plus, consultez la documentation Postfix (la section surrelayhost). Si votre service de relais SMTP nécessite une authentification SMTP (comme la plupart des services), cochez la case « Authentification requise ».
-
Si vous avez sélectionné « Authentification requise » lors de l’étape précédente, spécifiez les informations d’identification pour vous authentifier auprès de votre service de relais SMTP.
Si le service prend en charge l’authentification de base, indiquez le nom d’utilisateur et le mot de passe dans les champs correspondants. Si le service prend en charge l’authentification via des clés API, dans le champ « Nom d’utilisateur », indiquez le nom d’utilisateur par défaut utilisé pour les clés API dans le service (par exemple : dans SendGrid, le nom d’utilisateur est
apikey) et, dans le champ « Mot de passe », indiquez la valeur de la clé API. -
(For SmarterMail only) In the « Encrypted connection » section, select whether to encrypt the credentials transmitted to the SMTP relay service. Choose if the encrypted connection is TLS, SSL, or not required.
Note
If you choose a connection type that the SMTP relay service does not support (for example, SSL instead of TLS), the smarthost will refuse the connection.
-
(Facultatif) Vous souhaiterez peut-être vérifier si la connexion à l’hôte intelligent peut être établie. Pour cela, cliquez sur Vérifier la connexion.
If you selected “Encrypted connection” in the previous step, Plesk tests the connection not only for encryption but also for a valid SSL/TLS certificate. If the connection is encrypted but the SSL/TLS certificate is not trusted (for example, expired or self‑signed), the smarthost will refuse the connection.
Note
Vous pouvez modifier le comportement par défaut décrit ci-dessus et autoriser l’établissement de la connexion même si elle n’est pas sécurisée par un certificat SSL/TLS valide.
Cliquez sur OK.
-
Mettez à jour le SPF et les autres enregistrements DNS associés dans le modèle DNS et dans les zones DNS des domaines existants. Les services de relais SMTP fournissent les informations sur les modifications DNS à effectuer.
Vous avez configuré l’hôte intelligent côté Plesk. Toutefois, la plupart des services de relais SMTP commerciaux nécessitent une authentification de domaine de leur côté (également appelée vérification de domaine). Les services de relais SMTP suivants l’exigent : SendGrid, Mailjet, Mailgun.
Accédez à votre compte de service de relais SMTP et authentifiez tous les domaines hébergés dans Plesk. Pour connaître les étapes exactes à suivre, consultez la documentation correspondant à votre service.
Envoyez un e-mail de test à un service de messagerie externe (par exemple : Gmail) et assurez-vous que l’e-mail a atteint la boîte de réception.
Vous avez configuré l’hôte intelligent dans Plesk et dans votre service de relais SMTP. Votre hôte intelligent est désormais opérationnel.
Configuring Smarthost for a Domain
You can configure a smarthost for an individual domain. This works in Plesk for Linux with Postfix and Plesk for Windows with either MailEnable or SmarterMail.
To configure a smarthost for a domain:
Choose a reputable SMTP relay service (for example, SendGrid, Mailgun, Mailjet, or similar providers) and create an account there.
Connectez-vous à Plesk.
Go to Websites & Domains > [domain_name] > Mail > Smarthost.
Cochez la case « Envoyer les mails des utilisateurs via un hôte intelligent ».
-
Dans le champ correspondant, spécifiez l’adresse IP ou le nom d’hôte d’un hôte intelligent (par exemple :
192.0.2.1ousmtp.sendgrid.net).Note
Dans Plesk pour Linux, vous pouvez désactiver les recherches MX ou SRV en mettant le nom d’hôte ou l’adresse IP entre crochets, par exemple :
[example.com]. Pour en savoir plus, consultez la documentation Postfix (la section surrelayhost). Si votre service de relais SMTP nécessite une authentification SMTP (comme la plupart des services), cochez la case « Authentification requise ».
-
Si vous avez sélectionné « Authentification requise » lors de l’étape précédente, spécifiez les informations d’identification pour vous authentifier auprès de votre service de relais SMTP.
Si le service prend en charge l’authentification de base, indiquez le nom d’utilisateur et le mot de passe dans les champs correspondants. Si le service prend en charge l’authentification via des clés API, dans le champ « Nom d’utilisateur », indiquez le nom d’utilisateur par défaut utilisé pour les clés API dans le service (par exemple : dans SendGrid, le nom d’utilisateur est
apikey) et, dans le champ « Mot de passe », indiquez la valeur de la clé API. (Facultatif) Vous souhaiterez peut-être vérifier si la connexion à l’hôte intelligent peut être établie. Pour cela, cliquez sur Vérifier la connexion.
Cliquez sur OK.
-
Update the SPF record in the DNS zone of the domain you configured. This ensures the SMTP relay service is authorized to send mail for this domain.
Vous avez configuré l’hôte intelligent côté Plesk. Toutefois, la plupart des services de relais SMTP commerciaux nécessitent une authentification de domaine de leur côté (également appelée vérification de domaine). Les services de relais SMTP suivants l’exigent : SendGrid, Mailjet, Mailgun.
Go to your SMTP relay service account and authenticate the domain you just configured smarhost for in Plesk. For exact steps on how to do so, refer to the documentation of your service.
Envoyez un e-mail de test à un service de messagerie externe (par exemple : Gmail) et assurez-vous que l’e-mail a atteint la boîte de réception.
Vous avez configuré l’hôte intelligent dans Plesk et dans votre service de relais SMTP. Votre hôte intelligent est désormais opérationnel.
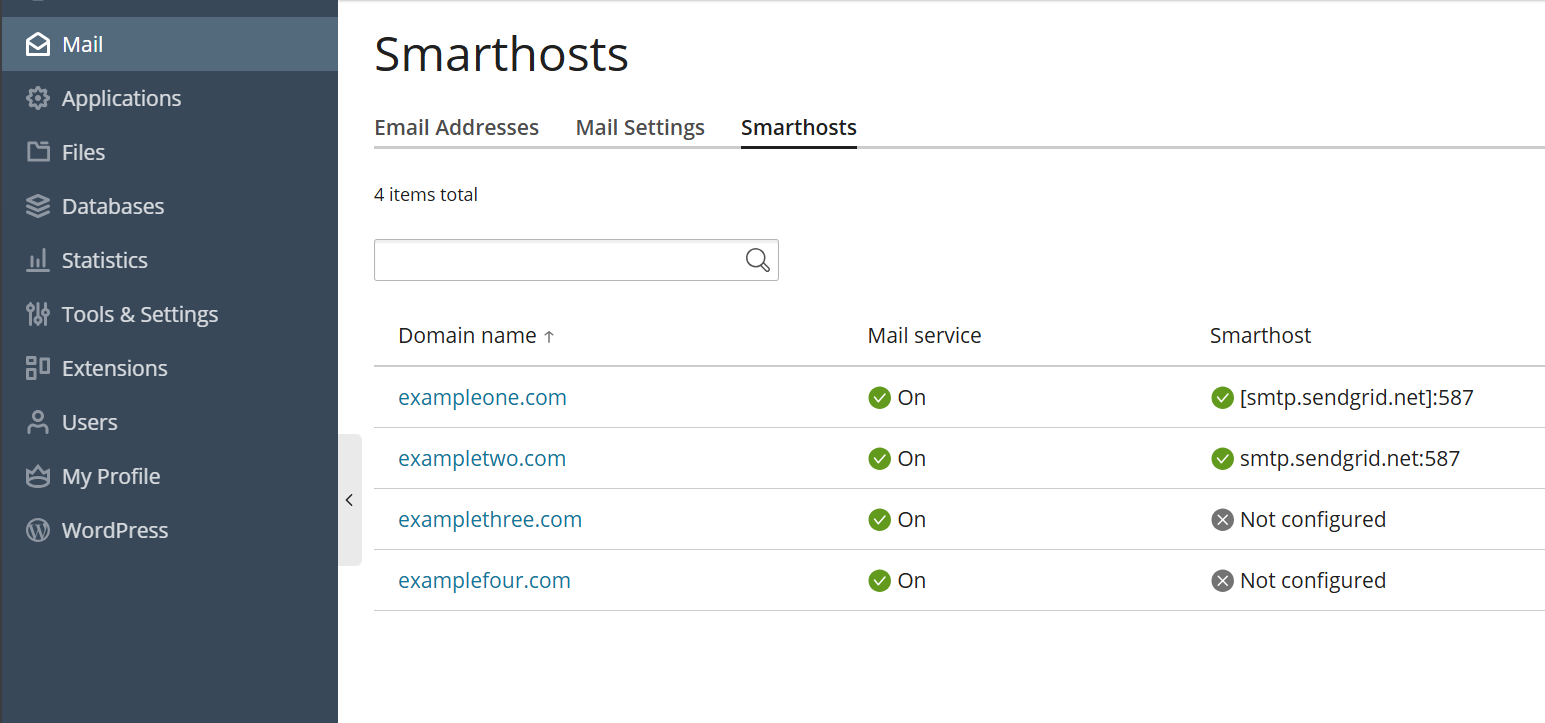
If you want to check which domains have an active smarthost, go to Mail> Smarthosts.
Configurer un hôte intelligent après une configuration manuelle précédente
Si vous avez déjà configuré un hôte intelligent manuellement, l’activation de la fonctionnalité hôte intelligent dans Plesk écrasera votre configuration existante. Bien que Plesk applique la configuration la plus fréquente adaptée à la plupart des services hôte intelligent, vous devrez peut-être modifier la configuration pour l’adapter à votre hôte intelligent.
Si vous avez déjà configuré un hôte intelligent manuellement, nous vous recommandons l’algorithme suivant :
Comparez les deux configurations de l’hôte intelligent : votre configuration manuelle et celle de Plesk.
Supprimez les paramètres qui seront contrôlés par Plesk de votre configuration manuelle.
Conservez les autres paramètres non gérés par Plesk tels quels.
Pour vous aider à comparer les deux configurations, nous décrivons ci-dessous les coulisses du fonctionnement de l’hôte intelligent : les fichiers de configuration affectés et la manière dont ils sont affectés.
(Plesk pour Linux) Configurer l’hôte intelligent avec Postfix
Note
Domain‑level smarthosts take priority over the server‑wide smarthost configured in Plesk.
When you enable the smarthost feature, Plesk performs a few actions under the hood.
For server-wide smarthost:
-
Plesk adds lines of the following pattern to the
/etc/postfix/main.cfconfiguration file:# Sets an external SMTP relayhost with a port number relayhost - [Your-SMTP-server-IP-or-hostname]:587 # Turns on authentication smtp_sasl_auth_enable = yes # Sets the username and password required for authentication smtp_sasl_password_maps = /var/spool/postfix/plesk/relay_secrets # Prohibits anonymous authentication methods. smtp_sasl_security_options = noanonymous
-
Plesk then checks that
/etc/postfix/main.cfcontains no duplicate directives, which can break the configuration:cat /etc/postfix/main.cf | grep -E "relayhost|smtp_sasl_auth_enable|smtp_sasl_password_maps|smtp_sasl_security_options"
-
Plesk configures the API authentication to the SMTP relay service of your choice via the
/etc/postfix/sasl_passwdfile. For example, with the SendGrid service, the following line will be added:[smtp.sendgrid.net]:2525 apikey:<your-SendGrid-API-key-value>
-
Finally, Plesk reloads the Postfix service to apply the changes:
systemctl reload postfix
For a domain-specific smarthost:
-
If no server-wide smarthost has been previously configured, Plesk adds the required baseline Postfix directives to the
/etc/postfix/main.cfconfiguration file and also adds per-domain routing and credentials (no globalrelayhostis needed):# Turns on authentication smtp_sasl_auth_enable = yes # Sets the username and password required for authentication smtp_sasl_password_maps = hash:/var/spool/postfix/plesk/relay_secrets.db # Prohibits anonymous authentication methods. smtp_sasl_security_options = noanonymous # Enables per‑sender authentication and routing smtp_sender_dependent_authentication = yes # Maps sender addresses to specific relay hosts sender_dependent_relayhost_maps = hash:/var/spool/postfix/plesk/sender_relay.db
-
Plesk then checks that
/etc/postfix/main.cfcontains no duplicate directives, which can break the configuration:cat /etc/postfix/main.cf | grep -E "smtp_sasl_auth_enable|smtp_sasl_password_maps|smtp_sasl_security_options|smtp_sender_dependent_authentication|sender_dependent_relayhost_maps"
-
Plesck adds or updates the sender‑dependent mapping files used for domain‑level smarthosts
/var/spool/postfix/plesk/sender_relay.db— maps domains to their relay hosts./var/spool/postfix/plesk/relay_secrets.db— stores credentials for the corresponding relay hosts.
For example, with the SendGrid service, Plesk writes entries similar to:
# sender_relay
admin@example.com    [smtp.sendgrid.net]:587

# relay_secrets
[smtp.sendgrid.net]:587    apikey:<your-SendGrid-API-key-value>
-
Finally, Plesk reloads the Postfix service to apply the changes:
systemctl reload postfix
(Plesk pour Linux) Configurer l’hôte intelligent avec MailEnable
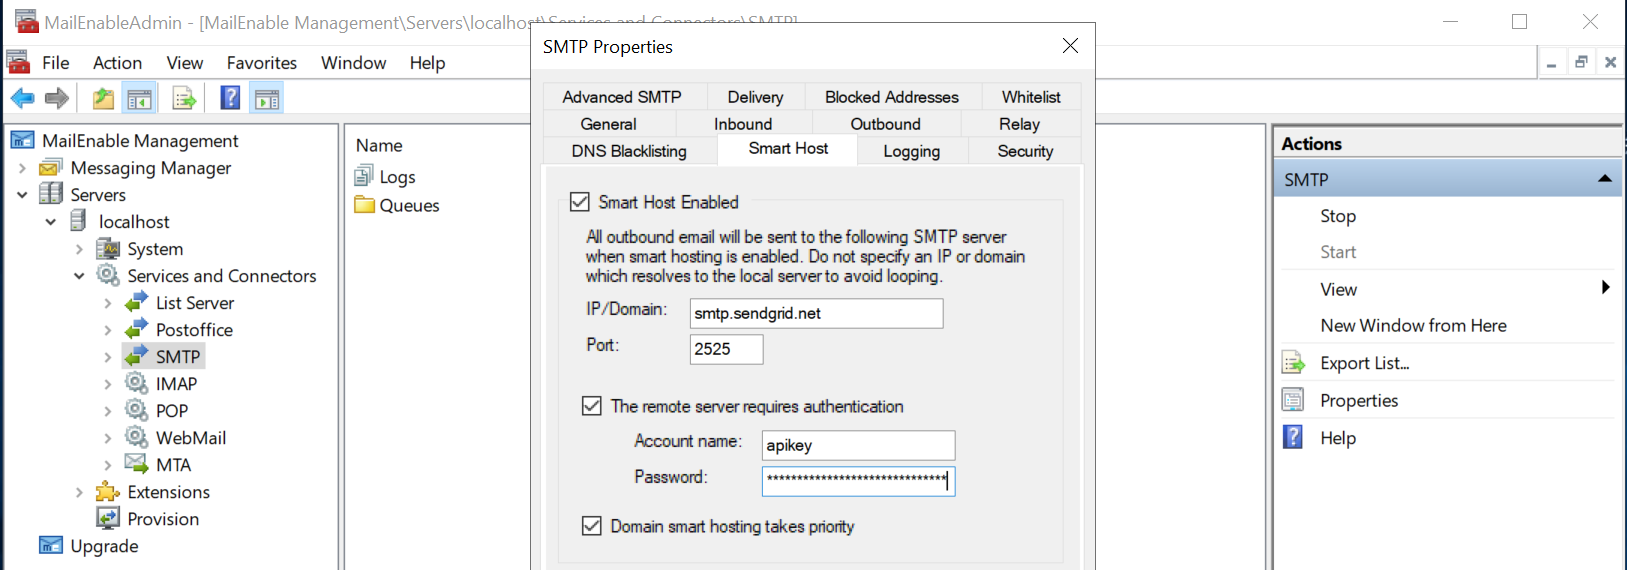
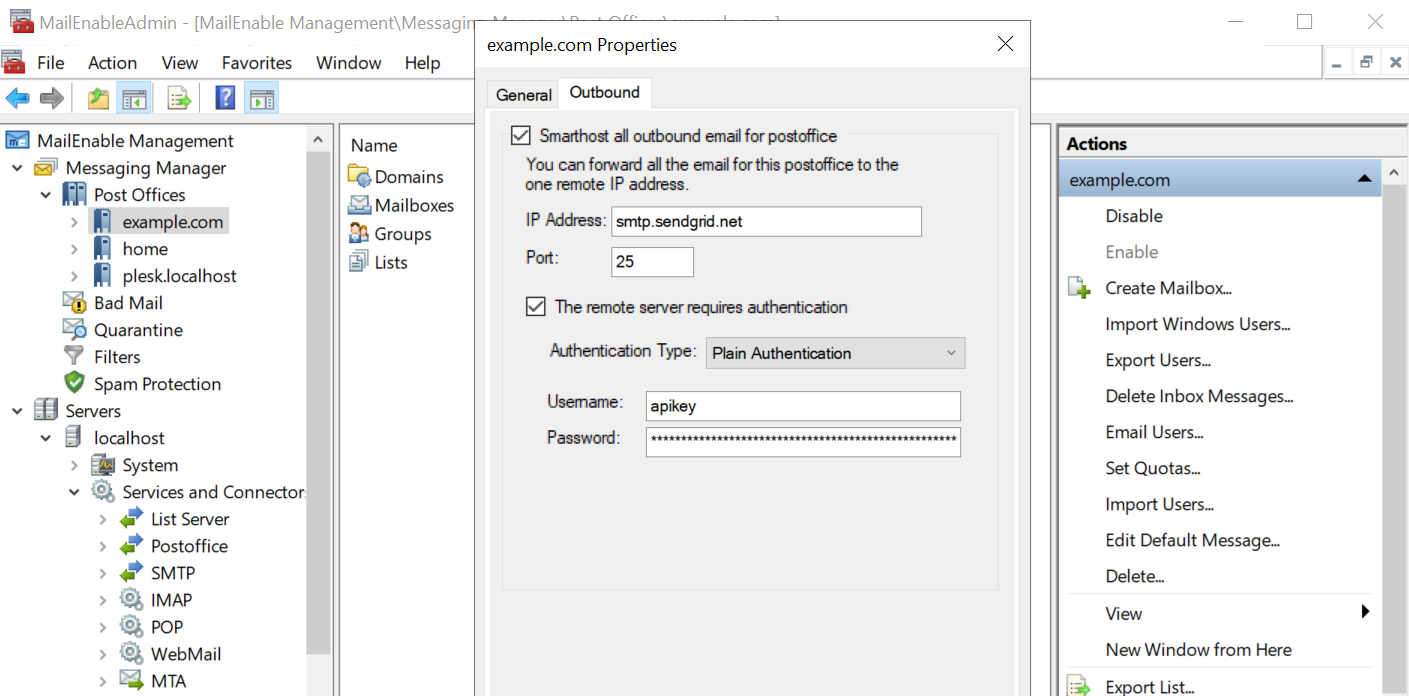
Lorsque vous activez la fonctionnalité hôte intelligent, Plesk applique la configuration MailEnable visible dans la capture d’écran ci-dessous. Nous utilisons le service de relais SMTP SendGrid comme exemple.
La première capture d’écran montre la configuration à l’échelle du serveur, tandis que la seconde montre la configuration des domaines.
Note
Domain‑level smarthosts take priority over the server‑wide smarthost configured in Plesk.
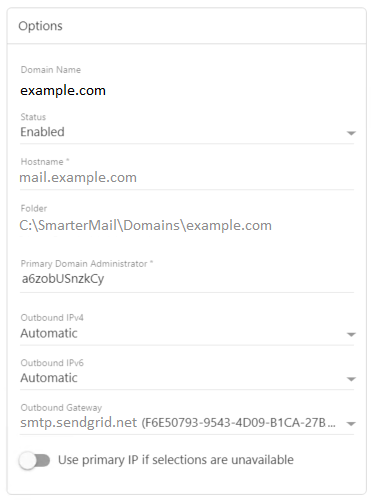
(Plesk pour Windows) Configurer l’hôte intelligent avec SmarterMail
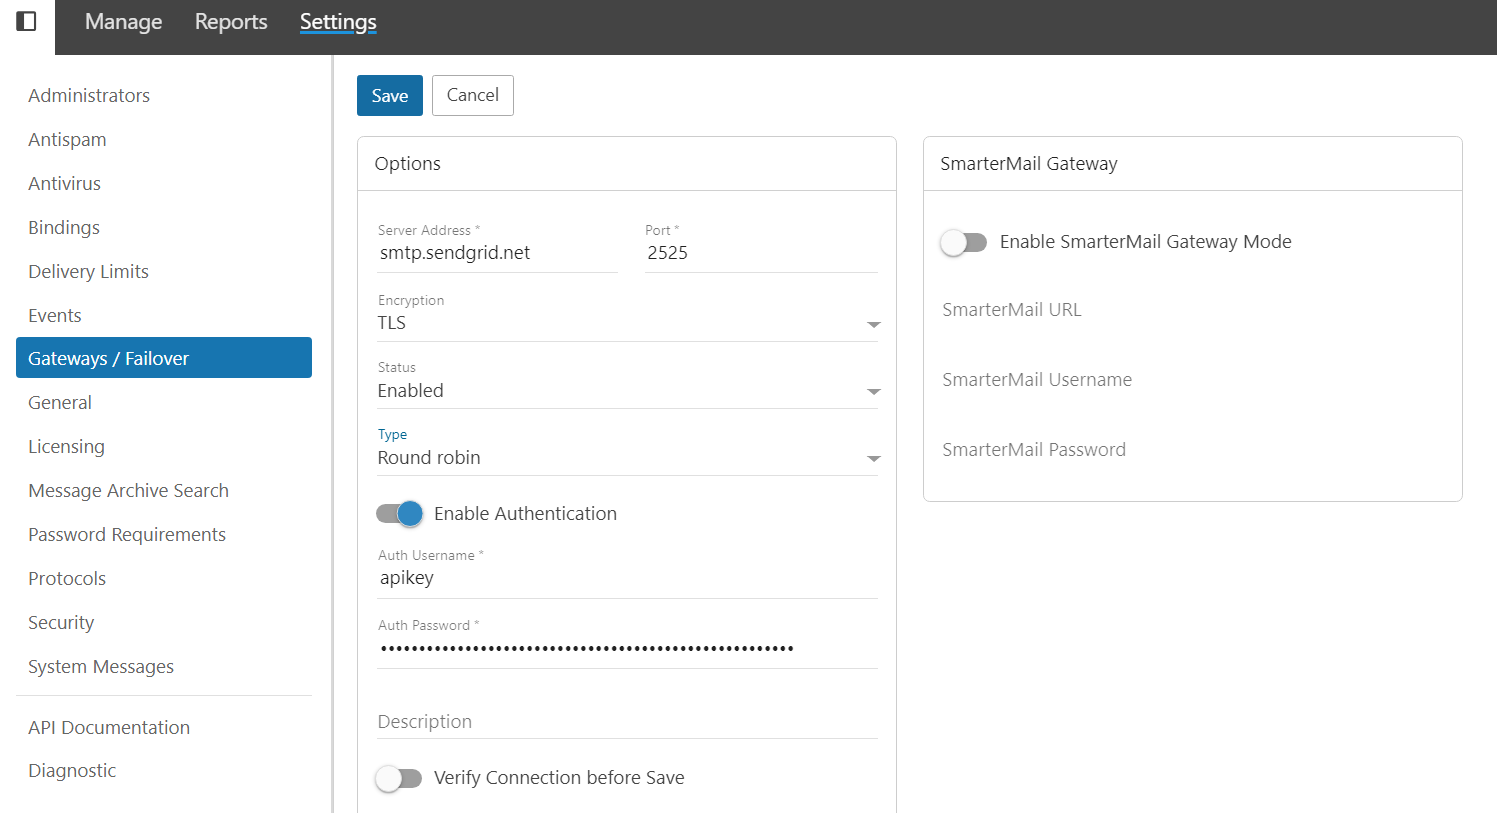
Lorsque vous activez la fonctionnalité hôte intelligent, Plesk applique la configuration SmarterMail visible dans les captures d’écran ci-dessous. Nous utilisons le service de relais SMTP SendGrid comme exemple.
La première capture d’écran montre la configuration à l’échelle du serveur, tandis que la seconde montre la configuration des domaines.
Note
Domain‑level smarthosts take priority over the server‑wide smarthost configured in Plesk.
Désactiver la fonctionnalité hôte intelligent
Vous souhaiterez peut-être désactiver la fonctionnalité hôte intelligent en la masquant dans l’interface graphique de Plesk.
Pour désactiver la fonctionnalité hôte intelligent :
-
Ouvrez le fichier panel.ini pour le modifier. Ce fichier est disponible ici :
(Plesk pour Linux)
/usr/local/psa/admin/conf/panel.ini(Plesk pour Windows)
%plesk_dir%admin\conf\panel.ini
Vous pouvez également modifier le fichier depuis l’interface de Plesk à l’aide de l’extension Panel.ini Editor.
-
To disable smarthost at the server level, add the following lines to the
panel.inifile, and then save it:[mail] smarthost.server.enabled = false
La fonctionnalité hôte intelligent n’est plus affichée dans Outils & Paramètres.
-
To disable smarthost at the domain level, add the following lines to the
panel.inifile, and then save it:[mail] smarthost.domain.enabled = false
The smarthost feature is no longer shown in Websites & Domains > [domain_name] > Mail.
Note
Vous pouvez également désactiver la fonctionnalité hôte intelligent en activant le Mode restreint.