Configurazione di uno smarthost o relayhost
Nota
I termini smarthost e relayhost sono solitamente usati in modo intercambiabile. Da qui in poi ci atterremo al termine smarthost.
Riassunto
You can configure a server-wide smarthost in Plesk Obsidian 18.0.64 or later. You can configure a smarthost at the domain level in Plesk Obsidian 18.0.76 or later.
In questa sezione, imparerai:
Quando è utile utilizzare uno smarthost.
Come configurare uno smarthost in Plesk.
Come la configurazione di uno smarthost inciderà su una configurazione manuale esistente.
Come Plesk modifica i file di configurazione dei servizi di posta durante la configurazione di uno smarthost.
You can send emails from Plesk using its local SMTP server. However, some hosting providers block outgoing mail from local SMTP servers. Even when they allow it, email deliverability may be poor and messages can end up in spam. To avoid these issues, configure a smarthost.
A smarthost is a mail server that accepts messages from any sender and forwards them to their final destination. A smarthost acts as an intermediary to improve email deliverability and reduce the chances of messages being marked as spam.
When you send an email through a smarthost, the message appears to originate from the smarthost’s IP address. If the smarthost has a strong sending reputation, your email is more likely to reach the recipient’s inbox instead of being marked as spam. For this reason, we recommend using a reputable SMTP relay service as your smarthost (for example, SendGrid, Mailgun, Mailjet, or similar providers).
Previously, you could configure a smarthost only manually. In Plesk Obsidian 18.0.64 and later, you can configure a smarthost in the Plesk graphical interface and via the CLI.
Configuring a Server-Wide Smarthost
You can configure a smarthost for the whole server. This works in Plesk for Linux with Postfix and Plesk for Windows with either MailEnable or SmarterMail.
Attenzione
Se hai già configurato manualmente uno smarthost, abilitare la funzionalità smarthost in Plesk sovrascriverà la configurazione esistente. Prima di abilitare la funzionalità, ti consigliamo di fare prima riferimento alla seguente sezione.
Nota
Con alcuni servizi di relay SMTP (ad esempio SendGrid), l”inoltro della posta non funzionerà più se è configurato uno smarthost.
To configure a server-wide smarthost:
Choose a reputable SMTP relay service (for example, SendGrid, Mailgun, Mailjet, or similar providers) and create an account there.
Accedi a Plesk.
Vai su Strumenti e impostazioni > Smarthost (in «Posta»).
Seleziona la casella di controllo «Invia la posta degli utenti tramite uno smarthost».
-
Nel campo corrispondente, specifica l’indirizzo IP o il nome host di uno smarthost (ad esempio,
192.0.2.1osmtp.sendgrid.net).Nota
In Plesk per Linux, puoi disabilitare le ricerche MX o SRV inserendo il nome host o l’indirizzo IP tra parentesi quadre, ad esempio
[example.com]. Per maggiori dettagli, vedi la documentazione di Postfix (la sezione surelayhost). Se il servizio di relay SMTP richiede l’autenticazione SMTP (come la maggior parte dei servizi), seleziona la casella di controllo «Autenticazione richiesta».
-
Se nel passaggio precedente hai selezionato «Autenticazione richiesta», specifica le credenziali per l’autenticazione al tuo servizio di relay SMTP.
Se il servizio supporta l’autenticazione di base, specifica il nome utente e la password nei campi corrispondenti. Se il servizio supporta l’autenticazione tramite chiavi API, nel campo «Nome utente», specifica il nome utente predefinito utilizzato per le chiavi API nel servizio (ad esempio, in SendGrid, il nome utente è
apikey) e, nel campo «Password», specifica il valore della chiave API. -
(For SmarterMail only) In the «Encrypted connection» section, select whether to encrypt the credentials transmitted to the SMTP relay service. Choose if the encrypted connection is TLS, SSL, or not required.
Nota
If you choose a connection type that the SMTP relay service does not support (for example, SSL instead of TLS), the smarthost will refuse the connection.
-
(Facoltativo) Potresti voler controllare se la connessione allo smarthost può essere stabilita. Per farlo, clicca su Verifica connessione.
If you selected “Encrypted connection” in the previous step, Plesk tests the connection not only for encryption but also for a valid SSL/TLS certificate. If the connection is encrypted but the SSL/TLS certificate is not trusted (for example, expired or self‑signed), the smarthost will refuse the connection.
Nota
Puoi modificare il comportamento predefinito descritto sopra e consentire di stabilire la connessione anche se non è protetta da un certificato SSL/TLS valido.
Fai clic su OK.
-
Aggiorna i record SPF e altri record DNS correlati nel modello DNS e nelle zone DNS dei domini esistenti. I servizi di relay SMTP forniscono le informazioni su quali modifiche DNS apportare.
Hai configurato lo smarthost sul lato Plesk. Tuttavia, la maggior parte dei servizi di relay SMTP commerciali richiedono l’autenticazione del dominio sul loro lato (può anche essere chiamata «verifica del dominio»). I seguenti servizi di relay SMTP la richiedono: SendGrid, Mailjet, Mailgun.
Vai al tuo account del servizio SMTP relay e autentica tutti i domini ospitati in Plesk. Per i passaggi esatti su come farlo, fai riferimento alla documentazione del tuo servizio.
Invia un’e-mail di prova a un servizio di posta elettronica esterno (ad esempio Gmail) e assicurati che l’e-mail sia arrivata nella posta in arrivo.
Hai configurato lo smarthost sia in Plesk che nel tuo servizio relay SMTP. Il tuo smarthost è ora attivo e funzionante.
Configuring Smarthost for a Domain
You can configure a smarthost for an individual domain. This works in Plesk for Linux with Postfix and Plesk for Windows with either MailEnable or SmarterMail.
To configure a smarthost for a domain:
Choose a reputable SMTP relay service (for example, SendGrid, Mailgun, Mailjet, or similar providers) and create an account there.
Accedi a Plesk.
Go to Websites & Domains > [domain_name] > Mail > Smarthost.
Seleziona la casella di controllo «Invia la posta degli utenti tramite uno smarthost».
-
Nel campo corrispondente, specifica l’indirizzo IP o il nome host di uno smarthost (ad esempio,
192.0.2.1osmtp.sendgrid.net).Nota
In Plesk per Linux, puoi disabilitare le ricerche MX o SRV inserendo il nome host o l’indirizzo IP tra parentesi quadre, ad esempio
[example.com]. Per maggiori dettagli, vedi la documentazione di Postfix (la sezione surelayhost). Se il servizio di relay SMTP richiede l’autenticazione SMTP (come la maggior parte dei servizi), seleziona la casella di controllo «Autenticazione richiesta».
-
Se nel passaggio precedente hai selezionato «Autenticazione richiesta», specifica le credenziali per l’autenticazione al tuo servizio di relay SMTP.
Se il servizio supporta l’autenticazione di base, specifica il nome utente e la password nei campi corrispondenti. Se il servizio supporta l’autenticazione tramite chiavi API, nel campo «Nome utente», specifica il nome utente predefinito utilizzato per le chiavi API nel servizio (ad esempio, in SendGrid, il nome utente è
apikey) e, nel campo «Password», specifica il valore della chiave API. (Facoltativo) Potresti voler controllare se la connessione allo smarthost può essere stabilita. Per farlo, clicca su Verifica connessione.
Fai clic su OK.
-
Update the SPF record in the DNS zone of the domain you configured. This ensures the SMTP relay service is authorized to send mail for this domain.
Hai configurato lo smarthost sul lato Plesk. Tuttavia, la maggior parte dei servizi di relay SMTP commerciali richiedono l’autenticazione del dominio sul loro lato (può anche essere chiamata «verifica del dominio»). I seguenti servizi di relay SMTP la richiedono: SendGrid, Mailjet, Mailgun.
Go to your SMTP relay service account and authenticate the domain you just configured smarhost for in Plesk. For exact steps on how to do so, refer to the documentation of your service.
Invia un’e-mail di prova a un servizio di posta elettronica esterno (ad esempio Gmail) e assicurati che l’e-mail sia arrivata nella posta in arrivo.
Hai configurato lo smarthost sia in Plesk che nel tuo servizio relay SMTP. Il tuo smarthost è ora attivo e funzionante.
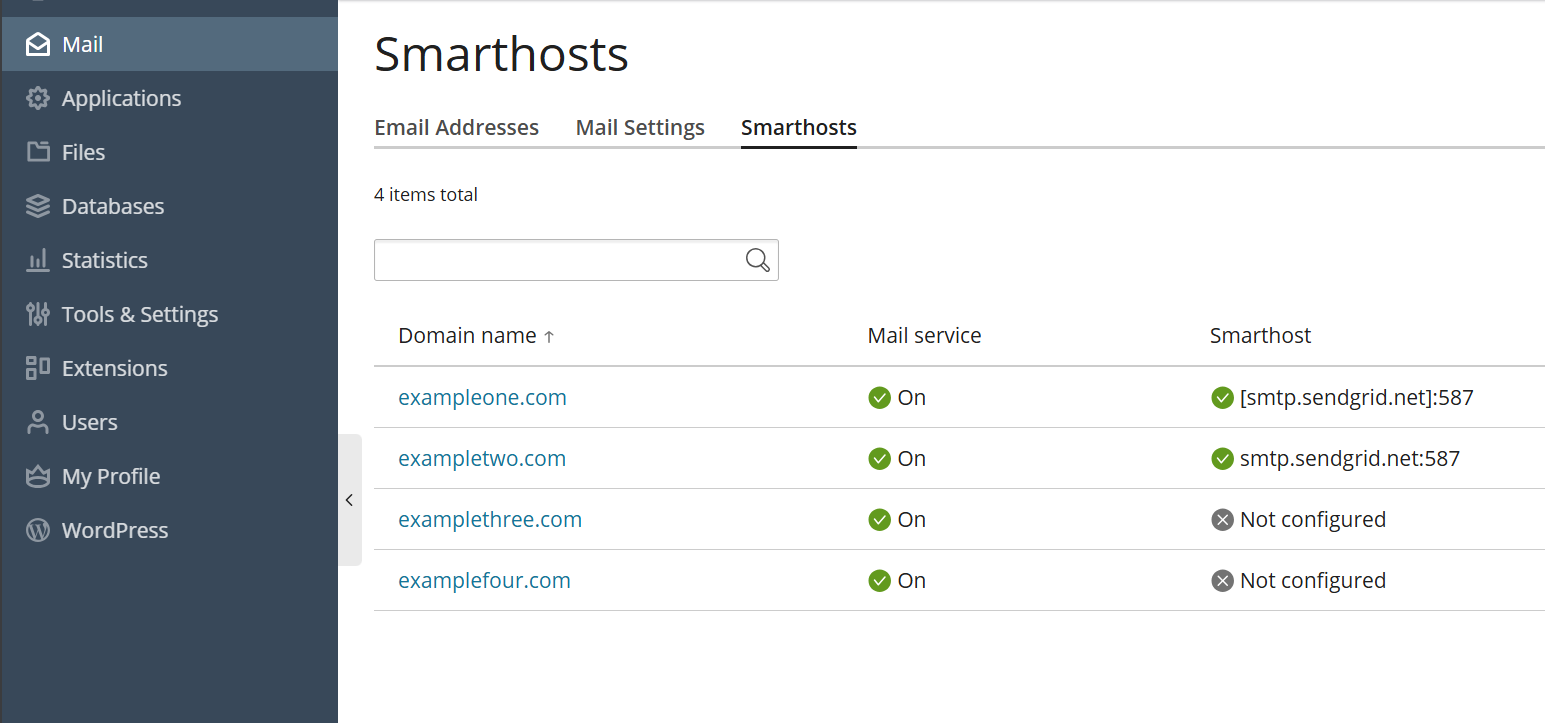
If you want to check which domains have an active smarthost, go to Mail> Smarthosts.
Configurazione di uno smarthost dopo una precedente configurazione manuale
Se hai già configurato manualmente uno smarthost, abilitare la funzionalità smarthost in Plesk sovrascriverà la configurazione esistente. Sebbene Plesk applichi la configurazione più comune adatta alla maggior parte dei servizi smarthost, potresti dover modificare la configurazione per adattarla al tuo smarthost.
Se hai già configurato manualmente uno smarthost, ti consigliamo il seguente algoritmo:
Confronta entrambe le configurazioni dello smarthost: quella manuale e quella di Plesk.
Rimuovi dalla configurazione manuale i parametri che saranno controllati da Plesk.
Mantieni i parametri aggiuntivi non coperti da Plesk così come sono.
Per aiutarti a confrontare entrambe le configurazioni, di seguito descriveremo come funziona la funzionalità smarthost, specificando quali file di configurazione influenza e in che modo.
(Plesk per Linux) Configurazione smarthost con Postfix
Nota
Domain‑level smarthosts take priority over the server‑wide smarthost configured in Plesk.
When you enable the smarthost feature, Plesk performs a few actions under the hood.
For server-wide smarthost:
-
Plesk adds lines of the following pattern to the
/etc/postfix/main.cfconfiguration file:# Sets an external SMTP relayhost with a port number relayhost - [Your-SMTP-server-IP-or-hostname]:587 # Turns on authentication smtp_sasl_auth_enable = yes # Sets the username and password required for authentication smtp_sasl_password_maps = /var/spool/postfix/plesk/relay_secrets # Prohibits anonymous authentication methods. smtp_sasl_security_options = noanonymous
-
Plesk then checks that
/etc/postfix/main.cfcontains no duplicate directives, which can break the configuration:cat /etc/postfix/main.cf | grep -E "relayhost|smtp_sasl_auth_enable|smtp_sasl_password_maps|smtp_sasl_security_options"
-
Plesk configures the API authentication to the SMTP relay service of your choice via the
/etc/postfix/sasl_passwdfile. For example, with the SendGrid service, the following line will be added:[smtp.sendgrid.net]:2525 apikey:<your-SendGrid-API-key-value>
-
Finally, Plesk reloads the Postfix service to apply the changes:
systemctl reload postfix
For a domain-specific smarthost:
-
If no server-wide smarthost has been previously configured, Plesk adds the required baseline Postfix directives to the
/etc/postfix/main.cfconfiguration file and also adds per-domain routing and credentials (no globalrelayhostis needed):# Turns on authentication smtp_sasl_auth_enable = yes # Sets the username and password required for authentication smtp_sasl_password_maps = hash:/var/spool/postfix/plesk/relay_secrets.db # Prohibits anonymous authentication methods. smtp_sasl_security_options = noanonymous # Enables per‑sender authentication and routing smtp_sender_dependent_authentication = yes # Maps sender addresses to specific relay hosts sender_dependent_relayhost_maps = hash:/var/spool/postfix/plesk/sender_relay.db
-
Plesk then checks that
/etc/postfix/main.cfcontains no duplicate directives, which can break the configuration:cat /etc/postfix/main.cf | grep -E "smtp_sasl_auth_enable|smtp_sasl_password_maps|smtp_sasl_security_options|smtp_sender_dependent_authentication|sender_dependent_relayhost_maps"
-
Plesck adds or updates the sender‑dependent mapping files used for domain‑level smarthosts
/var/spool/postfix/plesk/sender_relay.db— maps domains to their relay hosts./var/spool/postfix/plesk/relay_secrets.db— stores credentials for the corresponding relay hosts.
For example, with the SendGrid service, Plesk writes entries similar to:
# sender_relay
admin@example.com    [smtp.sendgrid.net]:587

# relay_secrets
[smtp.sendgrid.net]:587    apikey:<your-SendGrid-API-key-value>
-
Finally, Plesk reloads the Postfix service to apply the changes:
systemctl reload postfix
(Plesk per Windows) Configurazione smarthost con MailEnable
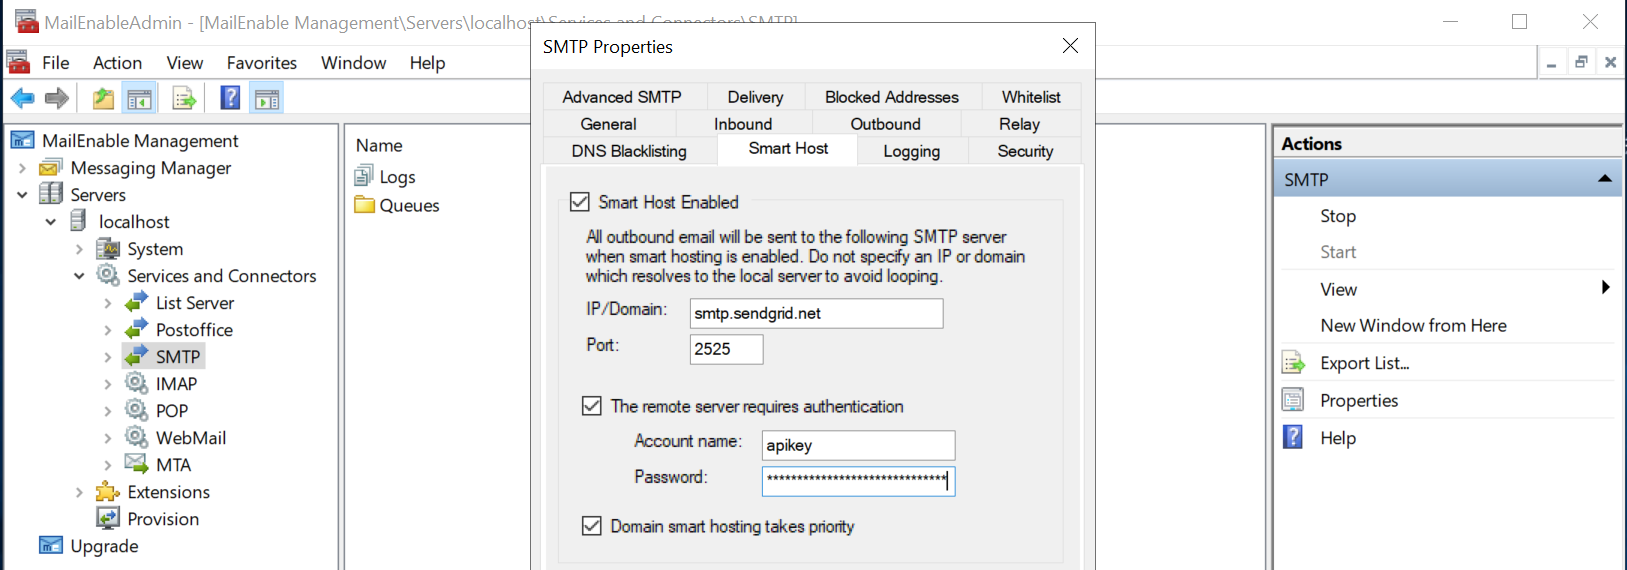
Quando abiliti la funzionalità smarthost, Plesk applica la configurazione MailEnable mostrata nello screenshot qui sotto. Usiamo il servizio relay SMTP di SendGrid come esempio.
Il primo screenshot mostra la configurazione dell’intero server, mentre il secondo mostra la configurazione per i domini.
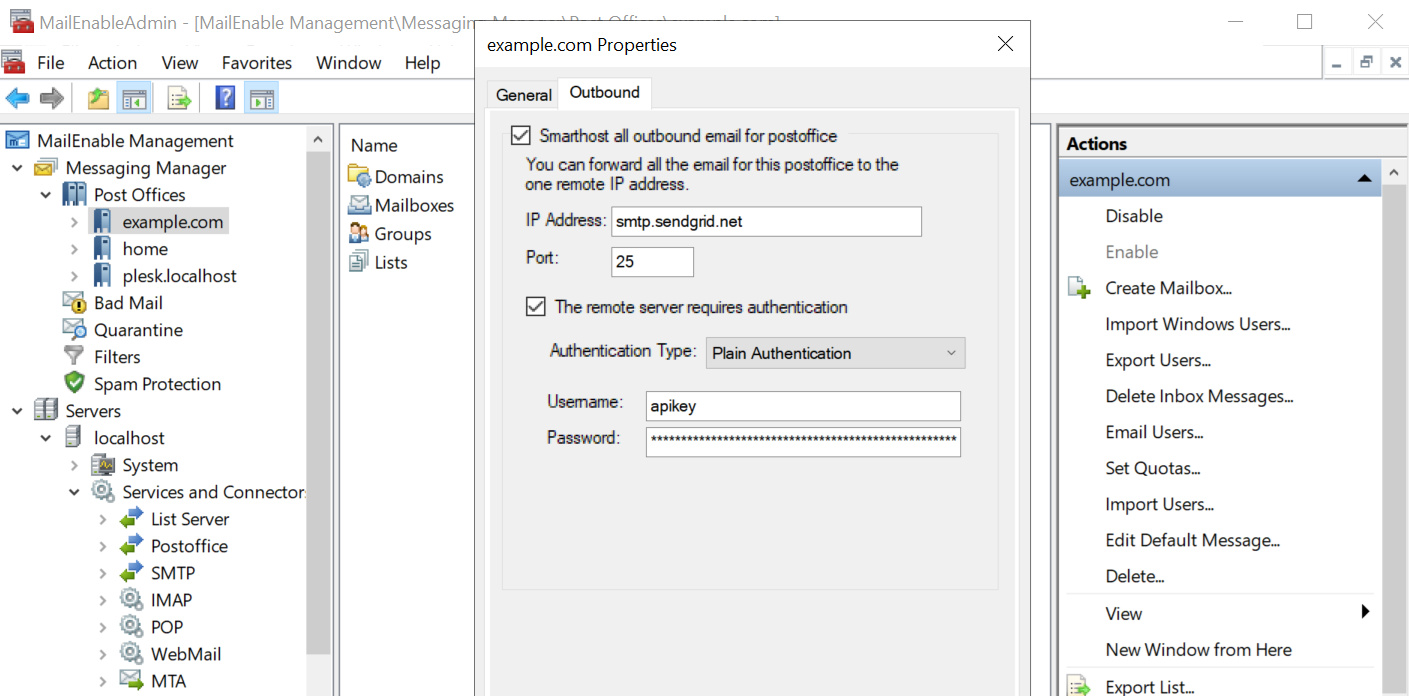
Nota
Domain‑level smarthosts take priority over the server‑wide smarthost configured in Plesk.
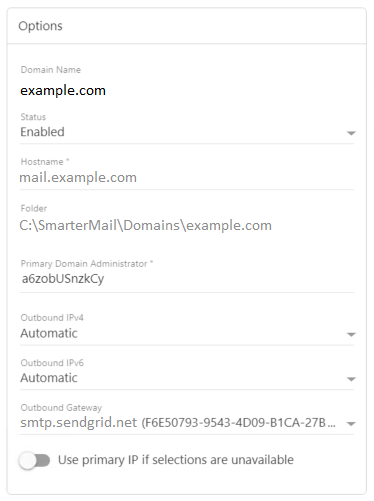
(Plesk per Windows) Configurazione smarthost con SmarterMail
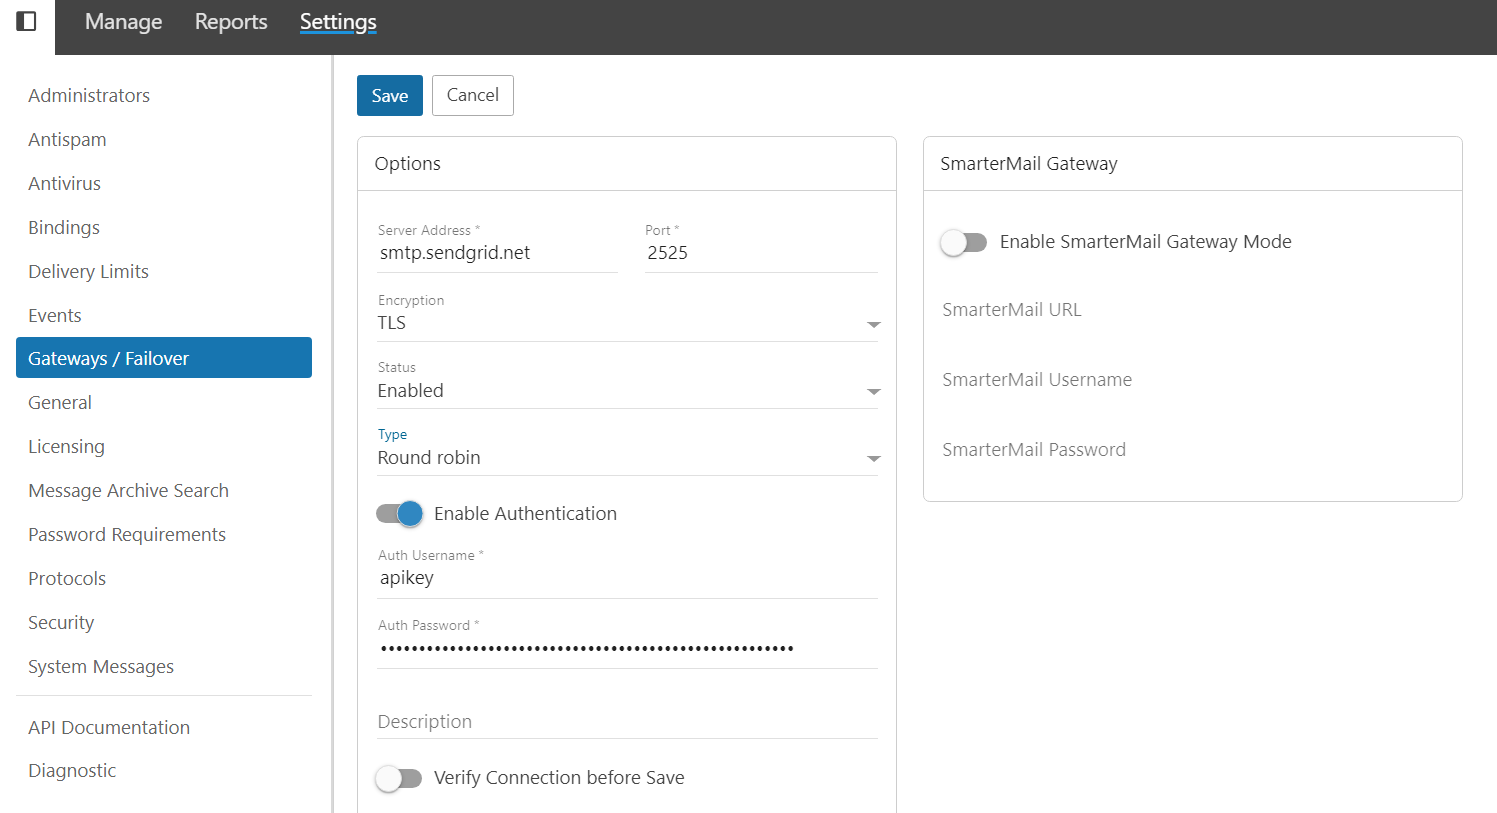
Quando abiliti la funzionalità smarthost, Plesk applica la configurazione SmarterMail mostrata negli screenshot qui sotto. Utilizziamo il servizio relay SMTP SendGrid come esempio.
Il primo screenshot mostra la configurazione dell’intero server, mentre il secondo mostra la configurazione per i domini.
Nota
Domain‑level smarthosts take priority over the server‑wide smarthost configured in Plesk.
Disabilitazione della funzione smarthost
Puoi disabilitare la funzionalità smarthost nascondendola nell’interfaccia grafica di Plesk.
Per disabilitare la funzionalità smarthost:
-
Apri il file panel.ini per la modifica, situato qui:
(Plesk per Linux)
/usr/local/psa/admin/conf/panel.ini(Plesk per Windows)
%plesk_dir%admin\conf\panel.ini
Puoi modificare il file anche dall’interfaccia di Plesk, utilizzando l’estensione Panel.ini Editor.
-
To disable smarthost at the server level, add the following lines to the
panel.inifile, and then save it:[mail] smarthost.server.enabled = false
La funzionalità smarthost non è più visualizzata in Strumenti e impostazioni.
-
To disable smarthost at the domain level, add the following lines to the
panel.inifile, and then save it:[mail] smarthost.domain.enabled = false
The smarthost feature is no longer shown in Websites & Domains > [domain_name] > Mail.
Nota
Puoi anche disabilitare la funzionalità smarthost abilitando la Modalità limitata.