スマートホストまたはリレーホストを構成する
注釈
スマートホストとリレーホストという用語は、通常同じ意味で使用されます。ここでは、スマートホストという用語を使用します。
概要
You can configure a server-wide smarthost in Plesk Obsidian 18.0.64 or later. You can configure a smarthost at the domain level in Plesk Obsidian 18.0.76 or later.
このトピックでは、以下の内容を学習します。
スマートホストの使用が有益なのはどのような場合か。
Plesk でスマートホストを構成する方法。
スマートホストを構成すると、既存の手動構成にどのように影響するか。
スマートホストをセットアップするときに Plesk がメールサービスの構成ファイルを変更する方法。
You can send emails from Plesk using its local SMTP server. However, some hosting providers block outgoing mail from local SMTP servers. Even when they allow it, email deliverability may be poor and messages can end up in spam. To avoid these issues, configure a smarthost.
A smarthost is a mail server that accepts messages from any sender and forwards them to their final destination. A smarthost acts as an intermediary to improve email deliverability and reduce the chances of messages being marked as spam.
When you send an email through a smarthost, the message appears to originate from the smarthost’s IP address. If the smarthost has a strong sending reputation, your email is more likely to reach the recipient’s inbox instead of being marked as spam. For this reason, we recommend using a reputable SMTP relay service as your smarthost (for example, SendGrid, Mailgun, Mailjet, or similar providers).
Previously, you could configure a smarthost only manually. In Plesk Obsidian 18.0.64 and later, you can configure a smarthost in the Plesk graphical interface and via the CLI.
Configuring a Server-Wide Smarthost
You can configure a smarthost for the whole server. This works in Plesk for Linux with Postfix and Plesk for Windows with either MailEnable or SmarterMail.
注意
スマートホストを手動で構成済みの場合は、Plesk でスマートホスト機能を有効にすると、既存の構成が上書きされます。機能を有効にする前に、まず 次のセクションを参照する ことをお勧めします。
注釈
一部の SMTP リレーサービス (SendGrid など) では、スマートホストを構成すると メール転送 が機能しなくなります。
To configure a server-wide smarthost:
Choose a reputable SMTP relay service (for example, SendGrid, Mailgun, Mailjet, or similar providers) and create an account there.
Plesk にログインします。
[ツールと設定] > [スマートホスト] ([メール] の下) に移動します。
[ユーザのメールをスマートホスト経由で送信] チェックボックスをオンにします。
-
対応するフィールドに、スマートホストの IP アドレスまたはホスト名を指定します (たとえば
192.0.2.1またはsmtp.sendgrid.net)。注釈
Plesk for Linux では、ホスト名または IP アドレスを角括弧で囲むことで、MX または SRV ルックアップを無効にすることができます (例:
[example.com])。詳細については、 Postfix ドキュメント (relayhostに関するセクション) を参照してください。 SMTP リレーサービスで SMTP 認証が必要な場合 (ほとんどのサービスで必要です)、[認証が必要] チェックボックスをオンにします。
-
前の手順で [認証が必要] をオンにした場合は、SMTP リレーサービスの認証用のログイン情報を指定します。
サービスが基本認証をサポートしている場合は、対応するフィールドにユーザ名とパスワードを指定します。サービスが API キーによる認証をサポートしている場合は、[ユーザ名] フィールドにサービス内の API キーに使用されるデフォルトのユーザ名 (たとえば SendGrid の場合、ユーザ名は
apikey) を指定し、[パスワード] フィールドに API キーの値を指定します。 -
(For SmarterMail only) In the "Encrypted connection" section, select whether to encrypt the credentials transmitted to the SMTP relay service. Choose if the encrypted connection is TLS, SSL, or not required.
注釈
If you choose a connection type that the SMTP relay service does not support (for example, SSL instead of TLS), the smarthost will refuse the connection.
-
(オプション) スマートホストへの接続を確立できるかどうかを確認することもできます。これを行うには、 [接続を確認] をクリックします。
If you selected “Encrypted connection” in the previous step, Plesk tests the connection not only for encryption but also for a valid SSL/TLS certificate. If the connection is encrypted but the SSL/TLS certificate is not trusted (for example, expired or self‑signed), the smarthost will refuse the connection.
注釈
上記のデフォルトの動作を変更して、有効な SSL/TLS 証明書で保護されていない場合でも接続を確立できるようにすることができます。
[OK]をクリックします。
-
DNS テンプレートおよび既存ドメインの DNS ゾーン内の SPF およびその他の関連 DNS レコードを更新します。SMTP リレーサービスから、DNS にどのような変更を加えるべきかについて情報が提供されます。
Plesk 側でスマートホストを構成しました。ただし、ほとんどの商用 SMTP リレーサービスでは、サービス側でのドメイン認証 (ドメイン検証とも呼ばれます) が必要です。次の SMTP リレーサービスでこれが必要です: SendGrid、 Mailjet、 Mailgun。
SMTP リレーサービスのアカウントに移動し、Plesk でホストされているすべてのドメインを認証します。具体的な手順については、サービスのドキュメントを参照してください。
外部メールサービス (Gmail など) にテストメールを送信し、メールが受信トレイに届いたことを確認します。
Plesk と SMTP リレーサービスの両方でスマートホストを構成しました。現在、スマートホストが稼働しています。
Configuring Smarthost for a Domain
You can configure a smarthost for an individual domain. This works in Plesk for Linux with Postfix and Plesk for Windows with either MailEnable or SmarterMail.
To configure a smarthost for a domain:
Choose a reputable SMTP relay service (for example, SendGrid, Mailgun, Mailjet, or similar providers) and create an account there.
Plesk にログインします。
Go to Websites & Domains > [domain_name] > Mail > Smarthost.
[ユーザのメールをスマートホスト経由で送信] チェックボックスをオンにします。
-
対応するフィールドに、スマートホストの IP アドレスまたはホスト名を指定します (たとえば
192.0.2.1またはsmtp.sendgrid.net)。注釈
Plesk for Linux では、ホスト名または IP アドレスを角括弧で囲むことで、MX または SRV ルックアップを無効にすることができます (例:
[example.com])。詳細については、 Postfix ドキュメント (relayhostに関するセクション) を参照してください。 SMTP リレーサービスで SMTP 認証が必要な場合 (ほとんどのサービスで必要です)、[認証が必要] チェックボックスをオンにします。
-
前の手順で [認証が必要] をオンにした場合は、SMTP リレーサービスの認証用のログイン情報を指定します。
サービスが基本認証をサポートしている場合は、対応するフィールドにユーザ名とパスワードを指定します。サービスが API キーによる認証をサポートしている場合は、[ユーザ名] フィールドにサービス内の API キーに使用されるデフォルトのユーザ名 (たとえば SendGrid の場合、ユーザ名は
apikey) を指定し、[パスワード] フィールドに API キーの値を指定します。 (オプション) スマートホストへの接続を確立できるかどうかを確認することもできます。これを行うには、 [接続を確認] をクリックします。
[OK]をクリックします。
-
Update the SPF record in the DNS zone of the domain you configured. This ensures the SMTP relay service is authorized to send mail for this domain.
Plesk 側でスマートホストを構成しました。ただし、ほとんどの商用 SMTP リレーサービスでは、サービス側でのドメイン認証 (ドメイン検証とも呼ばれます) が必要です。次の SMTP リレーサービスでこれが必要です: SendGrid、 Mailjet、 Mailgun。
Go to your SMTP relay service account and authenticate the domain you just configured smarhost for in Plesk. For exact steps on how to do so, refer to the documentation of your service.
外部メールサービス (Gmail など) にテストメールを送信し、メールが受信トレイに届いたことを確認します。
Plesk と SMTP リレーサービスの両方でスマートホストを構成しました。現在、スマートホストが稼働しています。
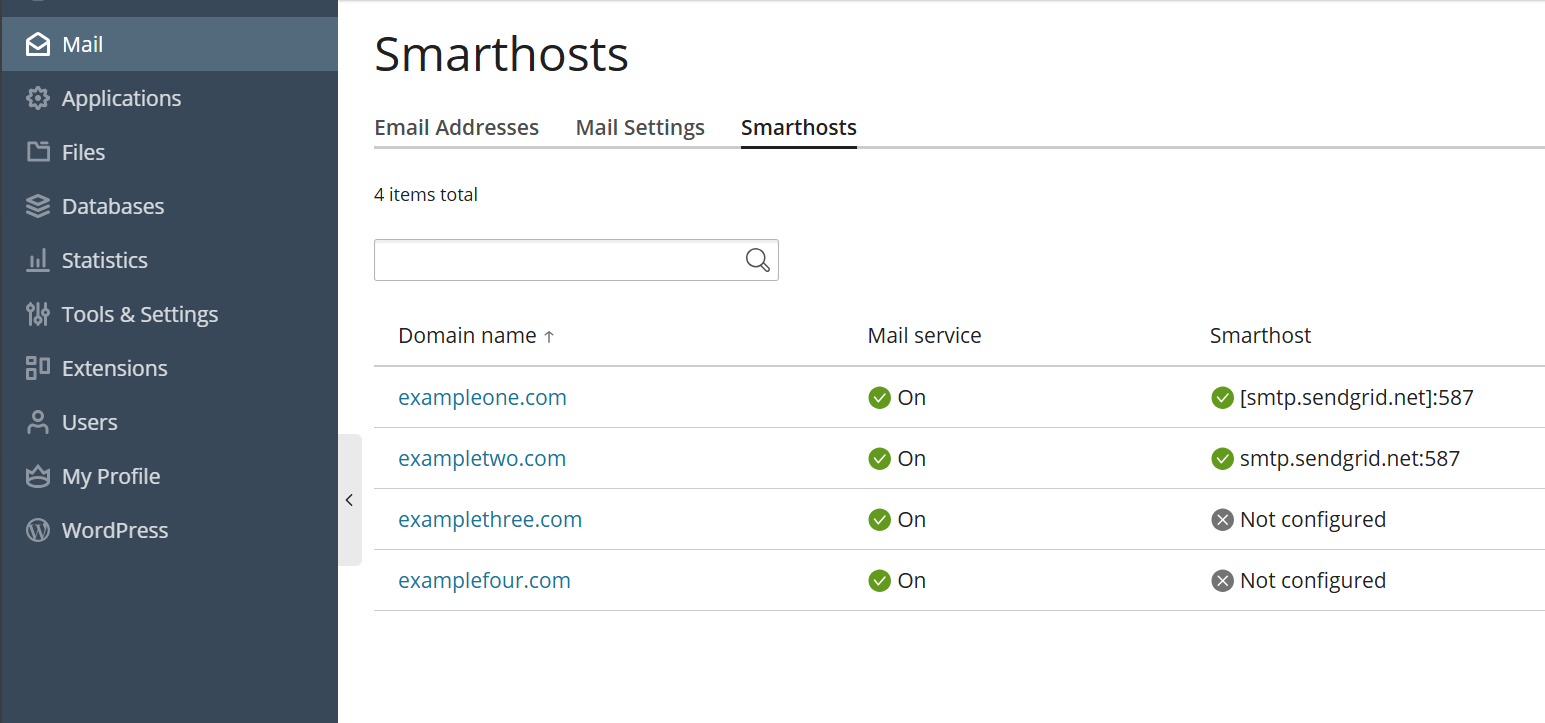
If you want to check which domains have an active smarthost, go to Mail> Smarthosts.
以前に手動構成した後でスマートホストを構成する
すでにスマートホストを手動で構成している場合は、Plesk でスマートホスト機能を有効にすると、既存の構成が上書きされます。Plesk はほとんどのスマートホストサービスに適した最も一般的な構成を適用しますが、スマートホストに合わせて構成を調整する必要がある場合があります。
すでにスマートホストを手動で構成している場合は、次のアルゴリズムをお勧めします。
両方のスマートホスト構成 (手動構成と Plesk の構成) を比較します。
Plesk によって制御されるパラメータを手動構成から削除します。
Plesk でカバーされていない追加のパラメータはそのままにしておきます。
両方の構成を比較できるように、以下ではスマートホスト機能が内部でどのように機能するか、つまりどの構成ファイルにどのような影響を与えるかについて説明します。
(Plesk for Linux) Postfix を使用したスマートホスト構成
注釈
Domain‑level smarthosts take priority over the server‑wide smarthost configured in Plesk.
When you enable the smarthost feature, Plesk performs a few actions under the hood.
For server-wide smarthost:
-
Plesk adds lines of the following pattern to the
/etc/postfix/main.cfconfiguration file:# Sets an external SMTP relayhost with a port number relayhost - [Your-SMTP-server-IP-or-hostname]:587 # Turns on authentication smtp_sasl_auth_enable = yes # Sets the username and password required for authentication smtp_sasl_password_maps = /var/spool/postfix/plesk/relay_secrets # Prohibits anonymous authentication methods. smtp_sasl_security_options = noanonymous
-
Plesk then checks that
/etc/postfix/main.cfcontains no duplicate directives, which can break the configuration:cat /etc/postfix/main.cf | grep -E "relayhost|smtp_sasl_auth_enable|smtp_sasl_password_maps|smtp_sasl_security_options"
-
Plesk configures the API authentication to the SMTP relay service of your choice via the
/etc/postfix/sasl_passwdfile. For example, with the SendGrid service, the following line will be added:[smtp.sendgrid.net]:2525 apikey:<your-SendGrid-API-key-value>
-
Finally, Plesk reloads the Postfix service to apply the changes:
systemctl reload postfix
For a domain-specific smarthost:
-
If no server-wide smarthost has been previously configured, Plesk adds the required baseline Postfix directives to the
/etc/postfix/main.cfconfiguration file and also adds per-domain routing and credentials (no globalrelayhostis needed):# Turns on authentication smtp_sasl_auth_enable = yes # Sets the username and password required for authentication smtp_sasl_password_maps = hash:/var/spool/postfix/plesk/relay_secrets.db # Prohibits anonymous authentication methods. smtp_sasl_security_options = noanonymous # Enables per‑sender authentication and routing smtp_sender_dependent_authentication = yes # Maps sender addresses to specific relay hosts sender_dependent_relayhost_maps = hash:/var/spool/postfix/plesk/sender_relay.db
-
Plesk then checks that
/etc/postfix/main.cfcontains no duplicate directives, which can break the configuration:cat /etc/postfix/main.cf | grep -E "smtp_sasl_auth_enable|smtp_sasl_password_maps|smtp_sasl_security_options|smtp_sender_dependent_authentication|sender_dependent_relayhost_maps"
-
Plesck adds or updates the sender‑dependent mapping files used for domain‑level smarthosts
/var/spool/postfix/plesk/sender_relay.db— maps domains to their relay hosts./var/spool/postfix/plesk/relay_secrets.db— stores credentials for the corresponding relay hosts.
For example, with the SendGrid service, Plesk writes entries similar to:
# sender_relay
admin@example.com    [smtp.sendgrid.net]:587

# relay_secrets
[smtp.sendgrid.net]:587    apikey:<your-SendGrid-API-key-value>
-
Finally, Plesk reloads the Postfix service to apply the changes:
systemctl reload postfix
(Plesk for Windows) MailEnable を使用したスマートホスト構成
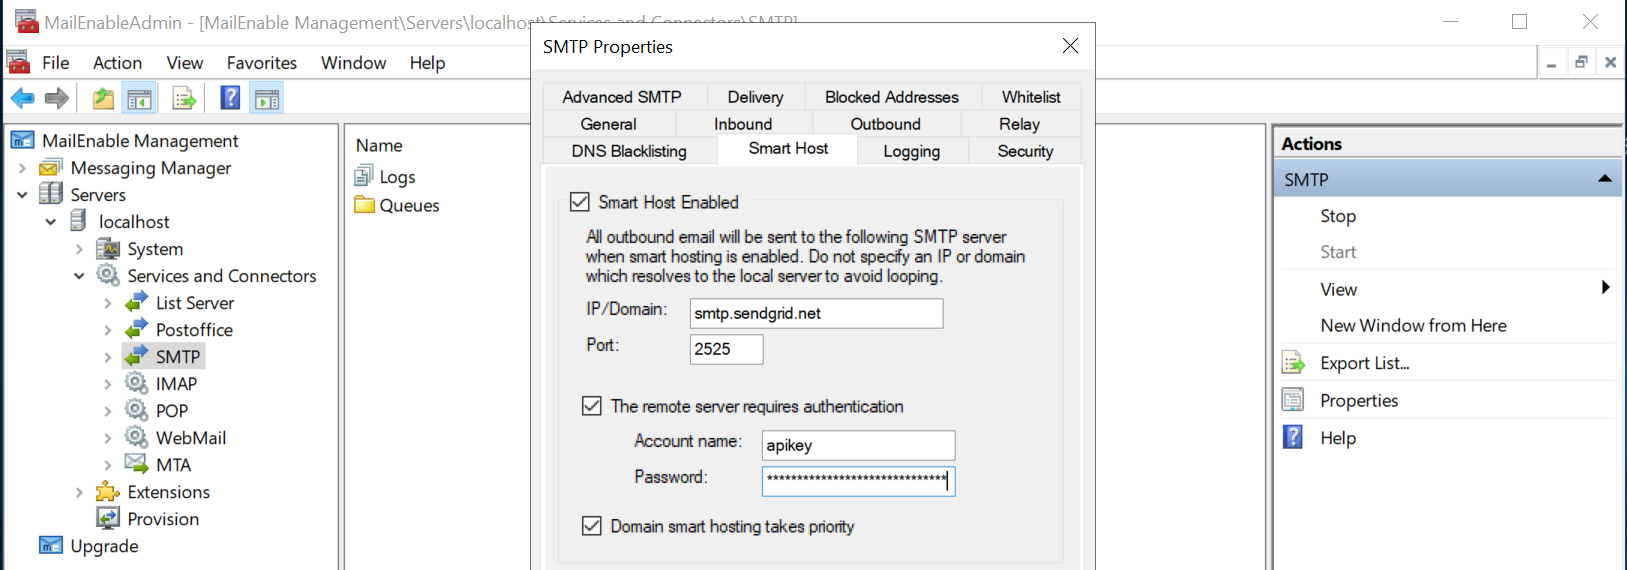
スマートホスト機能を有効にすると、Plesk は以下のスクリーンショットに示す MailEnable 構成を適用します。たとえば、SendGrid SMTP リレーサービスを使用します。
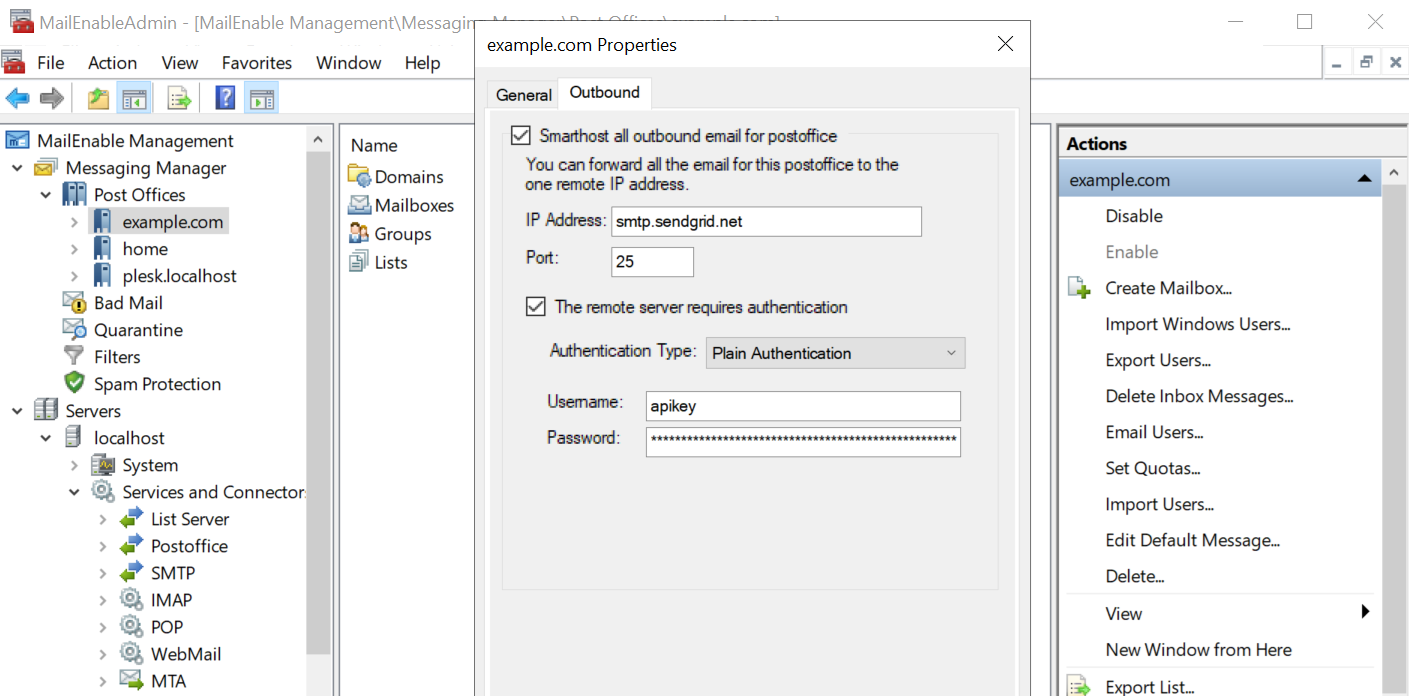
最初のスクリーンショットはサーバ全体の構成を示しており、2 番目のスクリーンショットはドメインの構成を示しています。
注釈
Domain‑level smarthosts take priority over the server‑wide smarthost configured in Plesk.
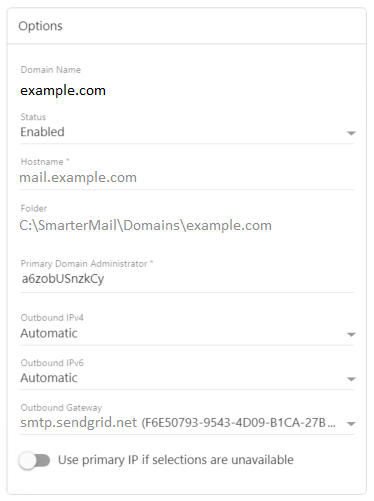
(Plesk for Windows) SmarterMail を使用したスマートホスト構成
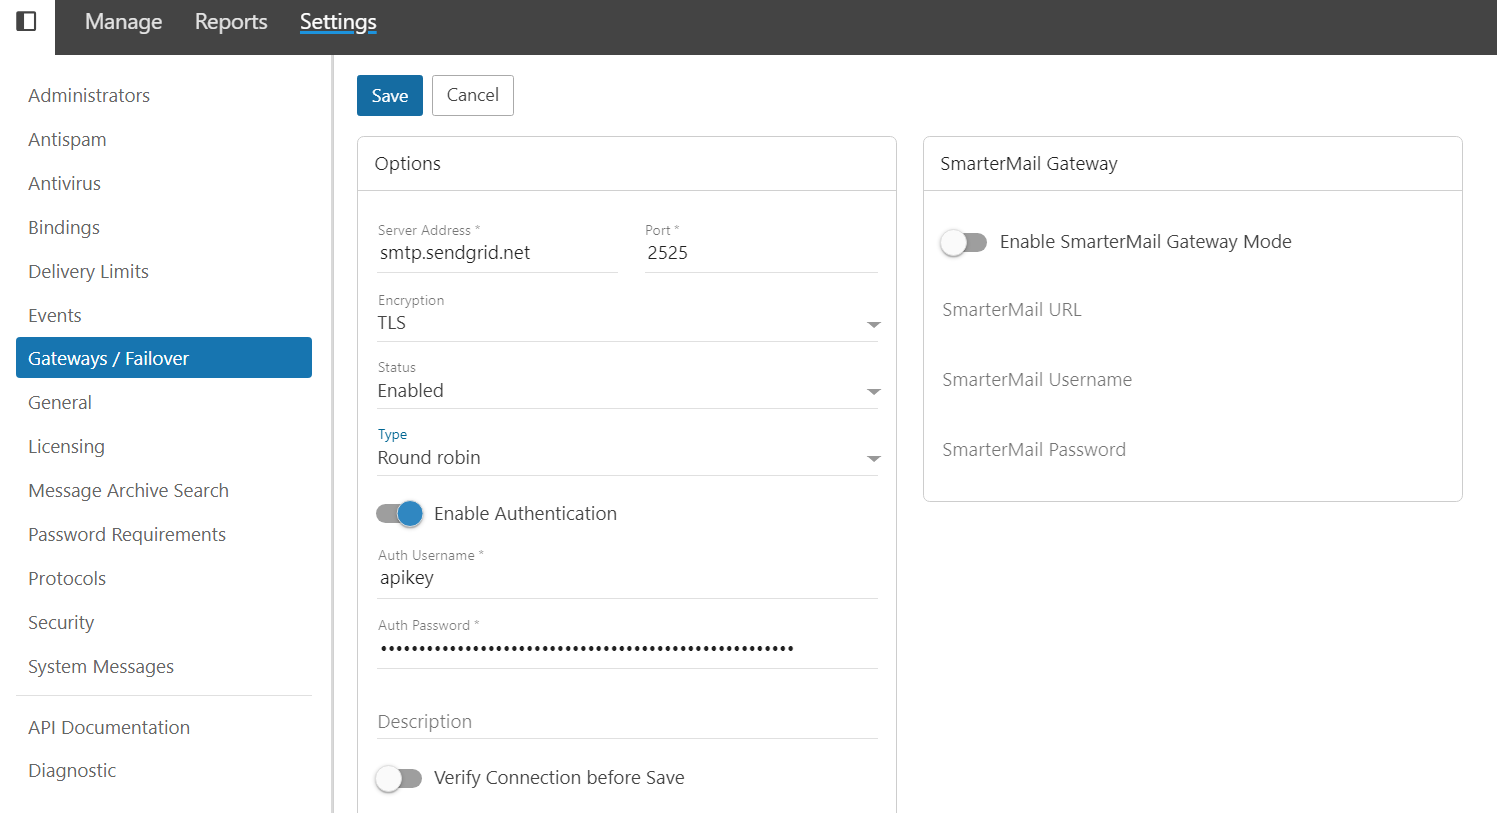
スマートホスト機能を有効にすると、Plesk は以下のスクリーンショットに示す SmarterMail 構成を適用します。たとえば、SendGrid SMTP リレーサービスを使用します。
最初のスクリーンショットはサーバ全体の構成を示しており、2 番目のスクリーンショットはドメインの構成を示しています。
注釈
Domain‑level smarthosts take priority over the server‑wide smarthost configured in Plesk.
スマートホスト機能を無効にする
Plesk グラフィカルインターフェースで非表示にすることによりスマートホスト機能を無効にすることもできます。
スマートホスト機能を無効にするには:
-
panel.ini ファイルを編集用に開きます。ファイルは以下の場所にあります。
(Plesk for Linux)
/usr/local/psa/admin/conf/panel.ini(Plesk for Windows)
%plesk_dir%admin\conf\panel.ini
Panel.ini Editor 拡張を使用すると、Plesk インターフェースでもファイルを編集できます。
-
To disable smarthost at the server level, add the following lines to the
panel.inifile, and then save it:[mail] smarthost.server.enabled = false
スマートホスト機能は [ツールと設定] に表示されなくなります。
-
To disable smarthost at the domain level, add the following lines to the
panel.inifile, and then save it:[mail] smarthost.domain.enabled = false
The smarthost feature is no longer shown in Websites & Domains > [domain_name] > Mail.
注釈
制限モード を有効にすることで、スマートホスト機能を無効にすることもできます。