Configuring a Smarthost or Relayhost
Примечание
The terms smarthost and relayhost are usually used interchangeably. We will stick to the term smarthost from here on.
Содержание
You can configure a server-wide smarthost in Plesk Obsidian 18.0.64 or later. You can configure a smarthost at the domain level in Plesk Obsidian 18.0.76 or later.
Из этого раздела вы узнаете:
When it is beneficial to use a smarthost.
How to configure a smarthost in Plesk.
How configuring a smarthost will affect an existing manual configuration.
How Plesk changes mail services“ configuration files when setting up a smarthost.
You can send emails from Plesk using its local SMTP server. However, some hosting providers block outgoing mail from local SMTP servers. Even when they allow it, email deliverability may be poor and messages can end up in spam. To avoid these issues, configure a smarthost.
A smarthost is a mail server that accepts messages from any sender and forwards them to their final destination. A smarthost acts as an intermediary to improve email deliverability and reduce the chances of messages being marked as spam.
When you send an email through a smarthost, the message appears to originate from the smarthost’s IP address. If the smarthost has a strong sending reputation, your email is more likely to reach the recipient’s inbox instead of being marked as spam. For this reason, we recommend using a reputable SMTP relay service as your smarthost (for example, SendGrid, Mailgun, Mailjet, or similar providers).
Previously, you could configure a smarthost only manually. In Plesk Obsidian 18.0.64 and later, you can configure a smarthost in the Plesk graphical interface and via the CLI.
Configuring a Server-Wide Smarthost
You can configure a smarthost for the whole server. This works in Plesk for Linux with Postfix and Plesk for Windows with either MailEnable or SmarterMail.
Осторожно
If you have already configured a smarthost manually, enabling the smarthost feature in Plesk will overwrite your existing configuration. Before enabling the feature, we recommend that you refer to the following section first.
Примечание
With some SMTP relay services (for example, SendGrid), mail forwarding will no longer work if a smarthost is configured.
To configure a server-wide smarthost:
Choose a reputable SMTP relay service (for example, SendGrid, Mailgun, Mailjet, or similar providers) and create an account there.
Войдите в Plesk.
Go to Tools & Settings > Smarthost (under «Mail»).
Select the «Send users“ mail via a smarthost» checkbox.
-
In the corresponding field, specify the IP address or hostname of a smarthost (for example,
192.0.2.1orsmtp.sendgrid.net).Примечание
In Plesk for Linux, you can disable MX or SRV lookups by putting the hostname or IP address in square brackets, for example,
[example.com]. For details, see the Postfix documentation (the section aboutrelayhost). If your SMTP relay service requires SMTP authentication (and most services do), select the «Authentication required» checkbox.
-
If you have selected «Authentication required» during the previous step, specify the credentials to authenticate to your SMTP relay service.
If the service supports basic authentication, specify the username and password in the corresponding fields. If the service supports authentication via API keys, in the «Username» field, specify the default username used for API keys in the service (for example, in SendGrid, the username is
apikey) and, in the «Password» field, specify the API key value. -
(For SmarterMail only) In the «Encrypted connection» section, select whether to encrypt the credentials transmitted to the SMTP relay service. Choose if the encrypted connection is TLS, SSL, or not required.
Примечание
If you choose a connection type that the SMTP relay service does not support (for example, SSL instead of TLS), the smarthost will refuse the connection.
-
(Optional) You may want to check if the connection to the smarthost can be established. To do so, click Check Connection.
If you selected “Encrypted connection” in the previous step, Plesk tests the connection not only for encryption but also for a valid SSL/TLS certificate. If the connection is encrypted but the SSL/TLS certificate is not trusted (for example, expired or self‑signed), the smarthost will refuse the connection.
Примечание
You can change the default behaviour described above and allow to establish the connection even if it is not secured by a valid SSL/TLS certificate.
Нажмите OK.
-
Update the SPF and other related DNS records in the DNS template and in the DNS zones of existing domains. SMTP relay services provide the information what DNS changes to make.
You have configured the smarthost on the Plesk side. However, most commercial SMTP relay services require domain authentication on their side (can also be called domain verification). The following SMTP relay services require it: SendGrid, Mailjet, Mailgun.
Go to your SMTP relay service account and authenticate all domains hosted in Plesk. For exact steps on how to do so, refer to the documentation of your service.
Send a test email to an external email service (for example, Gmail) and make sure that the email has reached the inbox.
You have configured the smarthost both in Plesk and your SMTP relay service. Your smarthost is now up and running.
Configuring Smarthost for a Domain
You can configure a smarthost for an individual domain. This works in Plesk for Linux with Postfix and Plesk for Windows with either MailEnable or SmarterMail.
To configure a smarthost for a domain:
Choose a reputable SMTP relay service (for example, SendGrid, Mailgun, Mailjet, or similar providers) and create an account there.
Войдите в Plesk.
Go to Websites & Domains > [domain_name] > Mail > Smarthost.
Select the «Send users“ mail via a smarthost» checkbox.
-
In the corresponding field, specify the IP address or hostname of a smarthost (for example,
192.0.2.1orsmtp.sendgrid.net).Примечание
In Plesk for Linux, you can disable MX or SRV lookups by putting the hostname or IP address in square brackets, for example,
[example.com]. For details, see the Postfix documentation (the section aboutrelayhost). If your SMTP relay service requires SMTP authentication (and most services do), select the «Authentication required» checkbox.
-
If you have selected «Authentication required» during the previous step, specify the credentials to authenticate to your SMTP relay service.
If the service supports basic authentication, specify the username and password in the corresponding fields. If the service supports authentication via API keys, in the «Username» field, specify the default username used for API keys in the service (for example, in SendGrid, the username is
apikey) and, in the «Password» field, specify the API key value. (Optional) You may want to check if the connection to the smarthost can be established. To do so, click Check Connection.
Нажмите OK.
-
Update the SPF record in the DNS zone of the domain you configured. This ensures the SMTP relay service is authorized to send mail for this domain.
You have configured the smarthost on the Plesk side. However, most commercial SMTP relay services require domain authentication on their side (can also be called domain verification). The following SMTP relay services require it: SendGrid, Mailjet, Mailgun.
Go to your SMTP relay service account and authenticate the domain you just configured smarhost for in Plesk. For exact steps on how to do so, refer to the documentation of your service.
Send a test email to an external email service (for example, Gmail) and make sure that the email has reached the inbox.
You have configured the smarthost both in Plesk and your SMTP relay service. Your smarthost is now up and running.
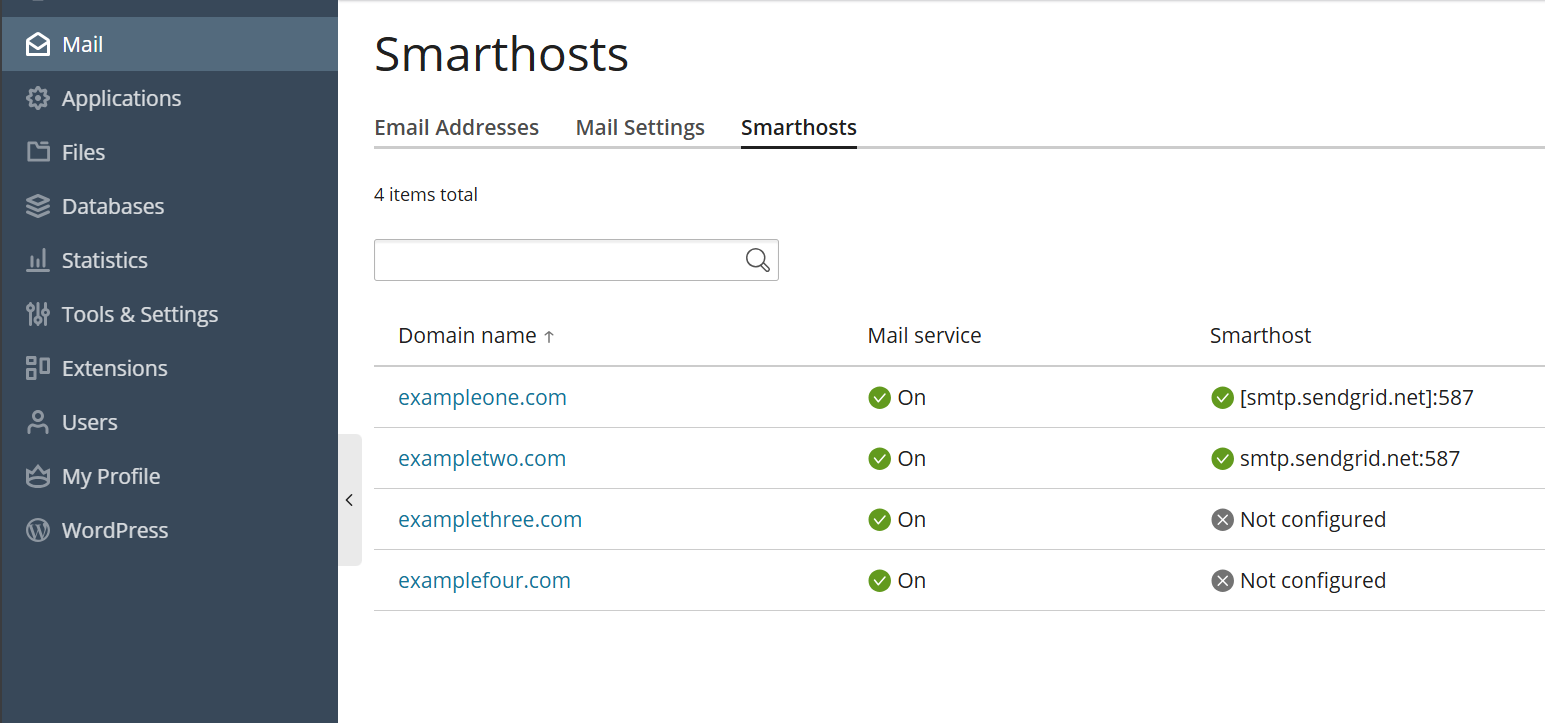
If you want to check which domains have an active smarthost, go to Mail> Smarthosts.
Configuring a Smarthost After a Previous Manual Configuration
If you have already configured a smarthost manually, enabling the smarthost feature in Plesk will overwrite your existing configuration. Although Plesk applies the most common configuration suited for most smarthost services, you may need to tinker with the configuration to tailor it to your smarthost.
If you have already configured a smarthost manually, we recommend you the following algorythm:
Compare both smarthost configurations: your manual one and the one from Plesk.
Remove the parameters that will be controlled by Plesk from your manual configuration.
Keep additional parameters not covered by Plesk as it is.
To help you compare both configurations, below we describe how the smarthost feature works under the hood: which configuration files it affects and in what way.
(Plesk for Linux) Smarthost Configuration with Postfix
Примечание
Domain‑level smarthosts take priority over the server‑wide smarthost configured in Plesk.
When you enable the smarthost feature, Plesk performs a few actions under the hood.
For server-wide smarthost:
-
Plesk adds lines of the following pattern to the
/etc/postfix/main.cfconfiguration file:# Sets an external SMTP relayhost with a port number relayhost - [Your-SMTP-server-IP-or-hostname]:587 # Turns on authentication smtp_sasl_auth_enable = yes # Sets the username and password required for authentication smtp_sasl_password_maps = /var/spool/postfix/plesk/relay_secrets # Prohibits anonymous authentication methods. smtp_sasl_security_options = noanonymous
-
Plesk then checks that
/etc/postfix/main.cfcontains no duplicate directives, which can break the configuration:cat /etc/postfix/main.cf | grep -E "relayhost|smtp_sasl_auth_enable|smtp_sasl_password_maps|smtp_sasl_security_options"
-
Plesk configures the API authentication to the SMTP relay service of your choice via the
/etc/postfix/sasl_passwdfile. For example, with the SendGrid service, the following line will be added:[smtp.sendgrid.net]:2525 apikey:<your-SendGrid-API-key-value>
-
Finally, Plesk reloads the Postfix service to apply the changes:
systemctl reload postfix
For a domain-specific smarthost:
-
If no server-wide smarthost has been previously configured, Plesk adds the required baseline Postfix directives to the
/etc/postfix/main.cfconfiguration file and also adds per-domain routing and credentials (no globalrelayhostis needed):# Turns on authentication smtp_sasl_auth_enable = yes # Sets the username and password required for authentication smtp_sasl_password_maps = hash:/var/spool/postfix/plesk/relay_secrets.db # Prohibits anonymous authentication methods. smtp_sasl_security_options = noanonymous # Enables per‑sender authentication and routing smtp_sender_dependent_authentication = yes # Maps sender addresses to specific relay hosts sender_dependent_relayhost_maps = hash:/var/spool/postfix/plesk/sender_relay.db
-
Plesk then checks that
/etc/postfix/main.cfcontains no duplicate directives, which can break the configuration:cat /etc/postfix/main.cf | grep -E "smtp_sasl_auth_enable|smtp_sasl_password_maps|smtp_sasl_security_options|smtp_sender_dependent_authentication|sender_dependent_relayhost_maps"
-
Plesck adds or updates the sender‑dependent mapping files used for domain‑level smarthosts
/var/spool/postfix/plesk/sender_relay.db— maps domains to their relay hosts./var/spool/postfix/plesk/relay_secrets.db— stores credentials for the corresponding relay hosts.
For example, with the SendGrid service, Plesk writes entries similar to:
# sender_relay
admin@example.com    [smtp.sendgrid.net]:587

# relay_secrets
[smtp.sendgrid.net]:587    apikey:<your-SendGrid-API-key-value>
-
Finally, Plesk reloads the Postfix service to apply the changes:
systemctl reload postfix
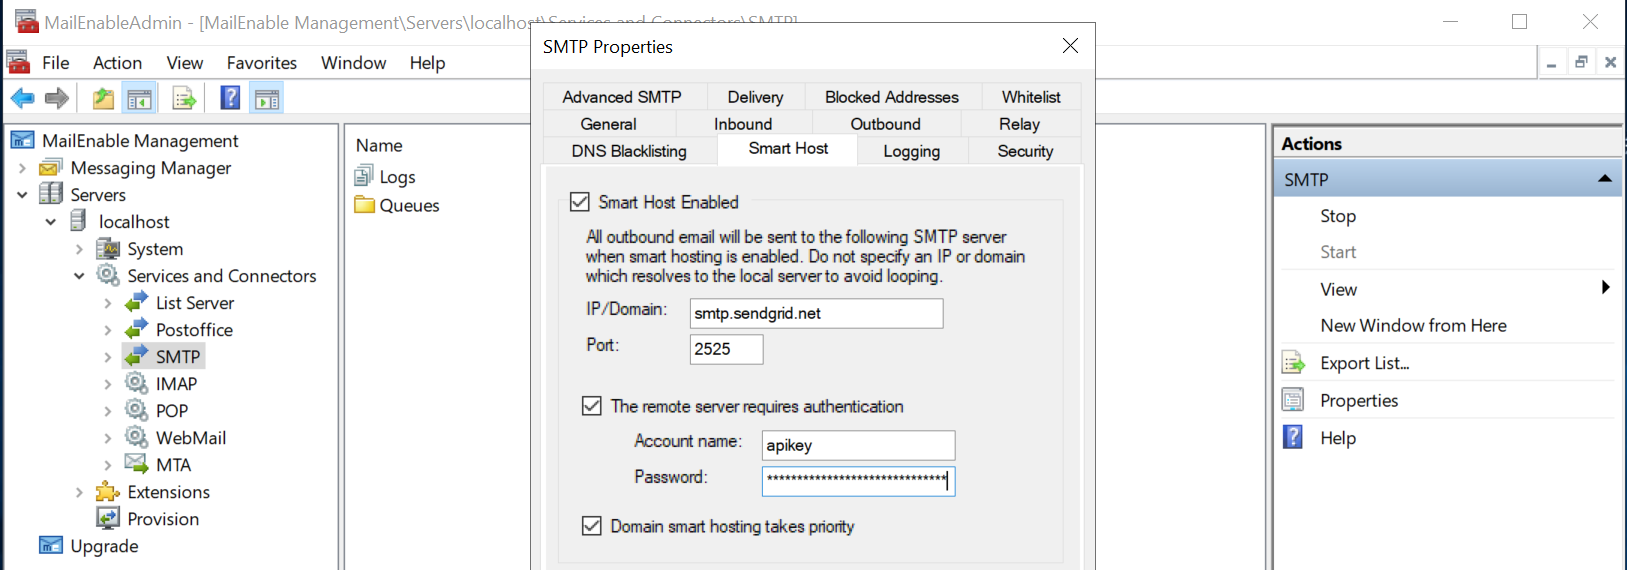
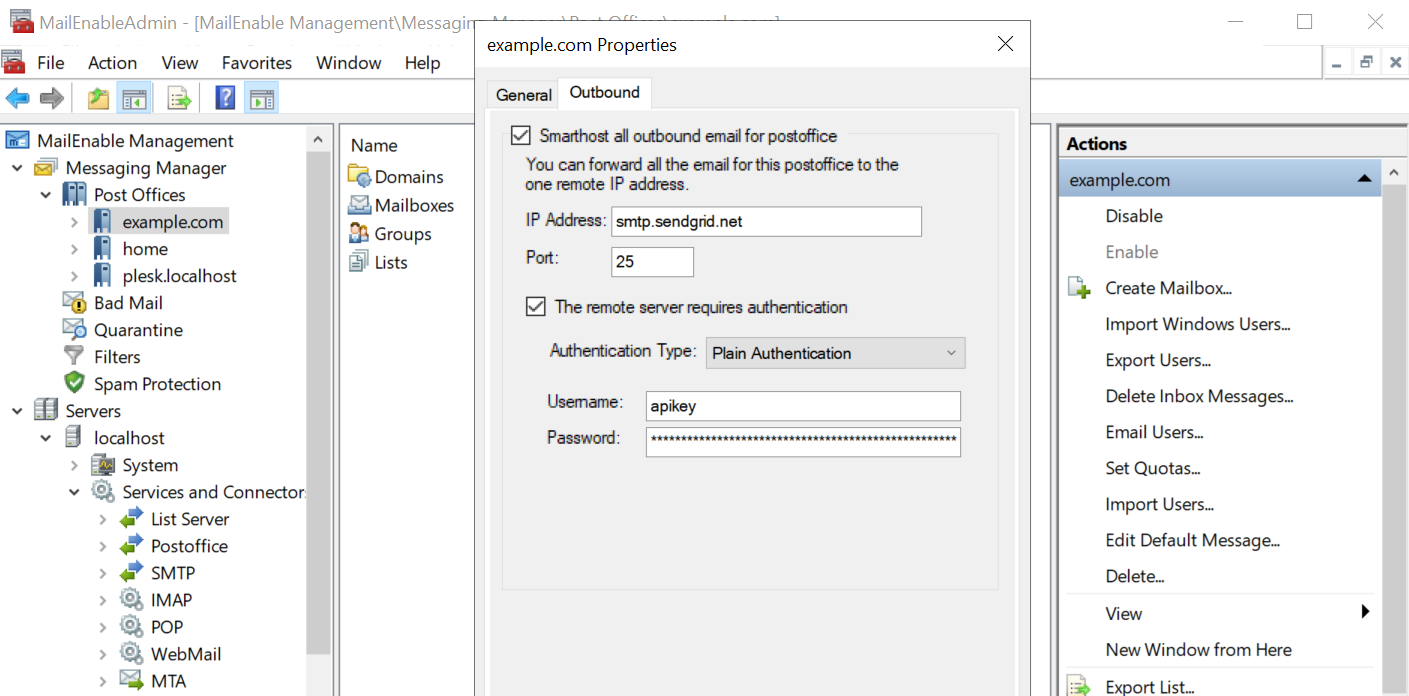
(Plesk for Windows) Smarthost Configuration with MailEnable
When you enable the smarthost feature, Plesk applies the MailEnable configuration shown on the screenshot below. We use the SendGrid SMTP relay service as an example.
The first screenshot shows the server-wide configuration, while the second one—the configuration for domains.
Примечание
Domain‑level smarthosts take priority over the server‑wide smarthost configured in Plesk.
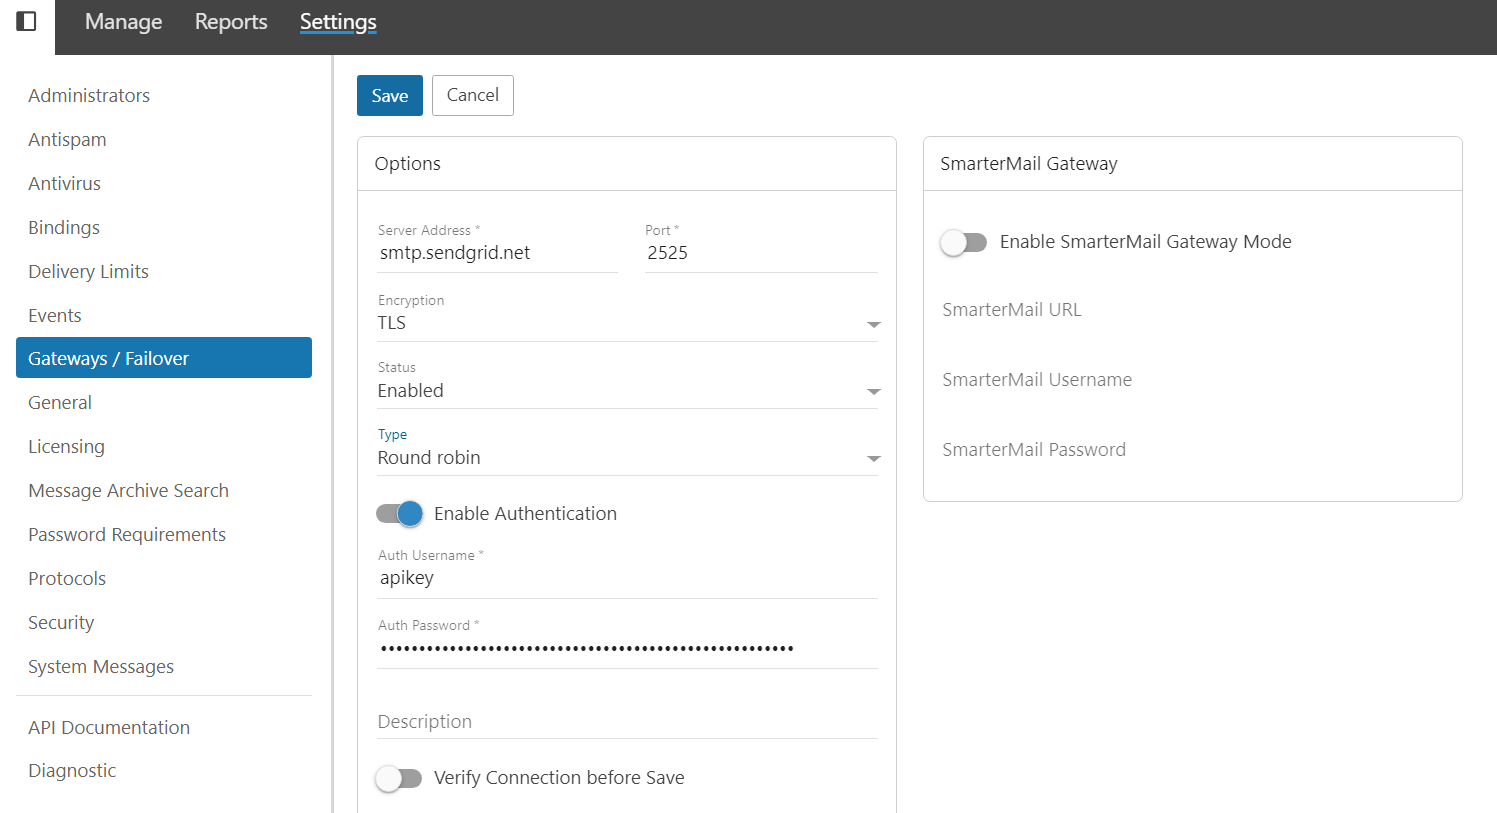
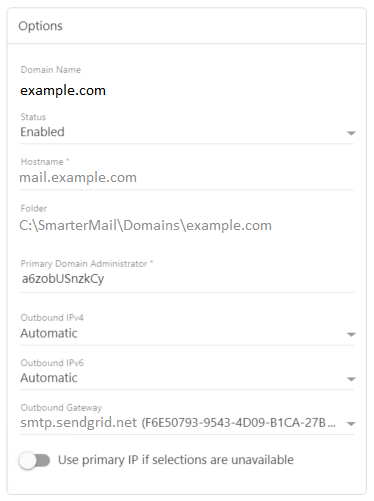
(Plesk for Windows) Smarthost Configuration with SmarterMail
When you enable the smarthost feature, Plesk applies the SmarterMail configuration shown on the screenshots below. We use the SendGrid SMTP relay service as an example.
The first screenshot shows the server-wide configuration, while the second one—the configuration for domains.
Примечание
Domain‑level smarthosts take priority over the server‑wide smarthost configured in Plesk.
Disabling the Smarthost Feature
You may want to disable the smarthost feature by hiding it in the Plesk graphical interface.
To disable the smarthost feature:
-
Откройте для редактирования файл panel.ini, который находится здесь:
(Plesk для Linux)
/usr/local/psa/admin/conf/panel.ini(Plesk для Windows)
%plesk_dir%admin\conf\panel.ini
Вы также можете редактировать файл в интерфейсе Plesk, используя расширение Panel.ini Editor.
-
To disable smarthost at the server level, add the following lines to the
panel.inifile, and then save it:[mail] smarthost.server.enabled = false
The smarthost feature is no longer shown in Tools & Settings.
-
To disable smarthost at the domain level, add the following lines to the
panel.inifile, and then save it:[mail] smarthost.domain.enabled = false
The smarthost feature is no longer shown in Websites & Domains > [domain_name] > Mail.
Примечание
You can also disable the smarthost feature by enabling Restricted Mode.