Plesk 更新
概要: To make sure you’re not missing out on new Plesk features, quality of life improvements, and important security fixes, you need to keep your server up to date.
In this topic, you will learn how to update Plesk and its services, and also how to configure automatic updates.
为了确保您的 Plesk 能够保持更新,会默认启用自动安装 Plesk 更新。欲保障安全并及时享用最新功能,我们强力建议保留启用自动更新。并且,您可以设置安装 Plesk 更新时的预期工作日和时间范围。
You can see the information about the current Plesk version and available updates on the Home page under “System Overview”.

Plesk also shows notifications when updates are available or have been installed in the Plesk UI notifications pane.
Plesk 版本
每个 Plesk 版本都包含一个名称和版本标识符。例如,在 Plesk Obsidian 18.0.58 中,Obsidian 是名称,而 18.0.58 是版本标识符,而 数字 58 是第 58 次更新。
Plesk 版本的简短引用只包括版本名称,例如 Plesk Obsidian。
更新
Plesk 更新会添加新的功能、增强功能和安全性修复。无论是哪种许可证密钥,更新都是是免费的,并可用于所有 Plesk 安装实例,。
更新 Plesk 不会更改其版本。有关已应用的更新的信息将添加到产品版本名称中,例如,Plesk Obsidian 18.0 Update 58。
注解: Plesk 更新会按顺序应用。因此,您无法只安装某个更新或跳过某个更新。
您可以通过多种方式更新 Plesk:
- 自动(推荐且默认启用)。
- 手动,使用 Plesk 用户界面。
- 手动,使用命令行界面。
概要
在 Plesk 中,您可以管理以下组件的更新:
-
Plesk 程序包和服务包由 Plesk 打造。后者包括所有的 Plesk 扩展、Plesk Premium Antivirus、Sophos Anti-Virus for Servers 等等。
请查看下面的 通过用户界面手动更新 Plesk ,也可以查看 通过命令行手动更新 Plesk 。
-
(Plesk for Linux) 操作系统包。如果打开了 系统更新 工具则可以在 Plesk 中管理其更新和有关更新的通知。
请参阅下面的 手动更新系统和第三方组件 。
-
Plesk (Plesk for Linux) 自带的第三方组件,例如 MySQL/MariaDB、PHP、web 服务器、各个邮件服务,等等。如果您打开了自动更新第三方组件功能,这些组件更新可作为系统更新或 Plesk 更新的一部分执行。
注解: 请谨慎使用第三方组件的自动更新。托管于您的服务器上的网站可能会与某个组件的新版本不兼容。 系统更新 工具能够让您锁定所选包,而将不再应用任何更新。这就是为什么会默认关闭自动更新第三方组件的原因。
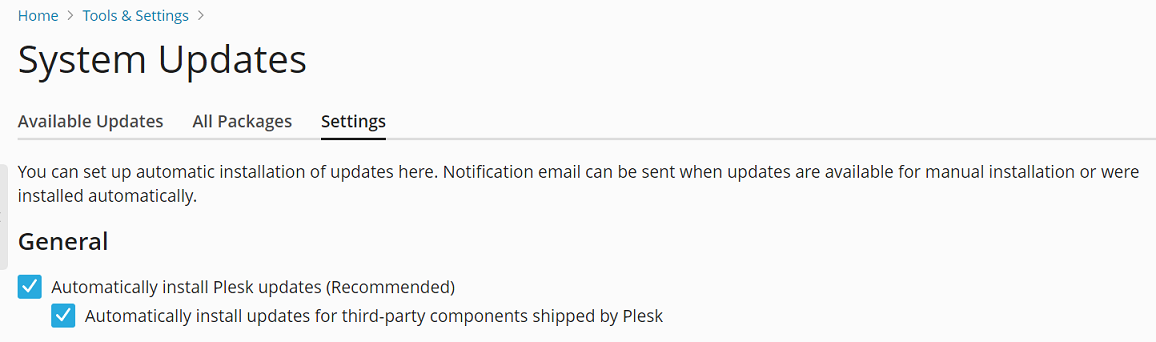
To enable automatic updates for third-party components, go to Tools & Settings > Update Settings (under “Plesk”) and select the “Automatically install updates for third-party components shipped by Plesk” checkbox.
该表显示了用于更新各个软件组件的 Plesk 工具。
| 要更新的工具或程序包 | Plesk 包和由 Plesk 建立的服务包 | Plesk 附带的服务包(第三方组件) | 操作系统包(Linux) |
|---|---|---|---|
|
系统更新工具。 位于Plesk for Linux中的 工具与设置 > 系统更新 。 |
➖ |
➕
|
➕ |
|
Plesk 安装程序 进入 工具与设置 > 更新 或通过 命令行界面实现。 |
➕ |
➕
注解:
如果禁用了或不支持系统更新工具,这些组件则由 Plesk 安装程序更新。 |
➖ |
*例外:由 Plesk 安装程序交付的更新将会包含第三方服务包更新(如果 Plesk 包更新依赖需要这些更新,尤其是当 Plesk 更新解决了重要的安全或稳定性问题时)。
自动更新Plesk 和系统组件
默认,Plesk 将会一天一次检查更新。若有可用更新,Plesk 会自动下载并安装。
会在 工具与设置 > 更新设置(在 “Plesk” 下)中默认启用以下更新选项:
- “自动安装 Plesk 更新(推荐)”。该选项会使用 Plesk 安装程序,允许自动更新 Plesk 和其内置的服务。在某些情况下,Plesk 第三方组件可以与 Plesk 同时更新。
- (Plesk for Linux) “自动为 Plesk 附带的第三方组件安装更新”。第三方服务可与 Plesk 组件或系统组件同时更新(如果打开了 系统更新 工具)。
默认情况下不会启用 “自动安装系统包更新” 选项,且该选项仅适用于 Plesk for Linux。该选项会使用 系统更新 工具,允许自动更新系统包和 Plesk 第三方组件。
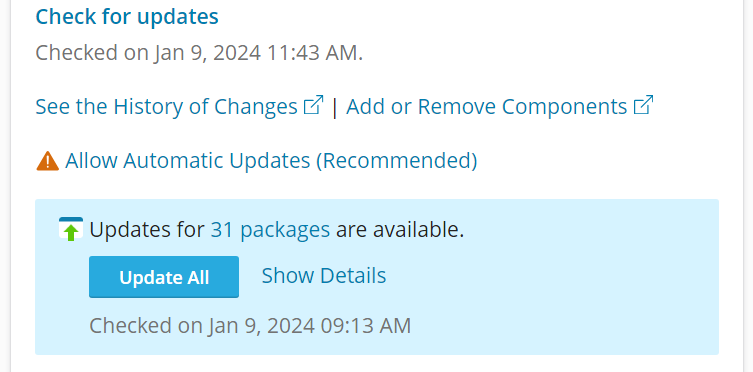
You can see the status of updates and also install updates manually on the home page under “System Overview”. Alternatively, go to Tools & Settings > System Updates (under “Server Management”). For details, refer to System Updates.
注解: 如要阻止某些包自动更新,请在包列表中选定它们(在 所有包 中) 并通过点击 锁定 来锁定它们。注意只有在使用 系统更新 工具的情况下才能实现此操作。
If you disable automatic Plesk updates, the home page will prompt you to allow automatic updates.
设置自动安装 Plesk 更新的时间
您可以设置自动安装 Plesk 更新的预期工作日和/或时间范围(开始和结束时间)。
这在以下几种情况中很有用:
- 您想要遵循主机提供商采用的更改管理流程(例如,所有更新必须在办公时间外/内安装)。
- 应法律要求您要提前通知服务器所有者 Plesk 的宕机时间。
- 贵国的立法规定电信公司必须在更新期间执行某些流程。
您可以管理何时自动安装 Plesk 更新:
- 针对单台服务器。此种情况请查看下面的说明。
- 针对许可证的集群。通过 KAPC 执行此操作。在此文中了解更多。
若要指定自动安装 Plesk 更新的预期工作日和时间范围,请如下操作:
按照下面的模式添加一项到 panel.ini 文件:
[updates]
updateDays = weekday1,weekday2
timeFrameStart = hour
timeFrameEnd = hour
注解: 您必须在 UTC( 世界标准时间)中至少指定两个工作日和/或小时(将您所在的本地时间转换为 UTC)。
注解: 您可以分别指定 updateDays 参数和 timeFrameStart 与 timeFrameEnd 参数对(仅指定工作日或仅指定时间范围)。但是,您无法单个使用 timeFrameStart 和 timeFrameEnd 参数。您必须同时指定两个参数以设置时间范围。
例如,如果您将以下条目添加到 panel.ini 文件
[updates]
updateDays = saturday,sunday
timeFrameStart = 11
timeFrameEnd = 18
将只在周六和周日 11 和 18 小时 (UTC) 之间安装 Plesk 更新。
注解: 指定的时间范围设置了开始安装更新所需的时间间隔,但并不保证更新的安装将在该间隔内完成。
通过用户界面手动更新 Plesk
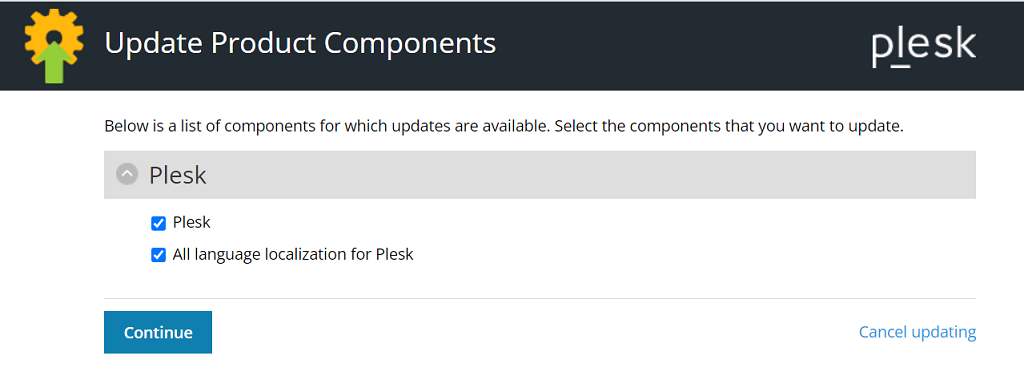
You can update Plesk and third-party components by clicking Tools & Settings > Updates (under “Plesk”), and then going to the “Update Components” tab. Here you can select particular components that have available updates and click Continue to update them.
通过命令行手动更新 Plesk
若要安装当前 Plesk 版本内的所有可用更新(包括 MySQL/MariaDB 或 PHP 等组件的更新),请使用以下命令:
plesk installer --select-release-latest --upgrade-installed-components
如果您只安装 Plesk 更新,请使用以下命令:
plesk installer install-panel-updates
在此情况下,MySQL/MariaDB 和 PHP 等的组件不会被更新,除非某些 Plesk 功能需要更新这些组件。
更改更新安装目录并使用代理连接
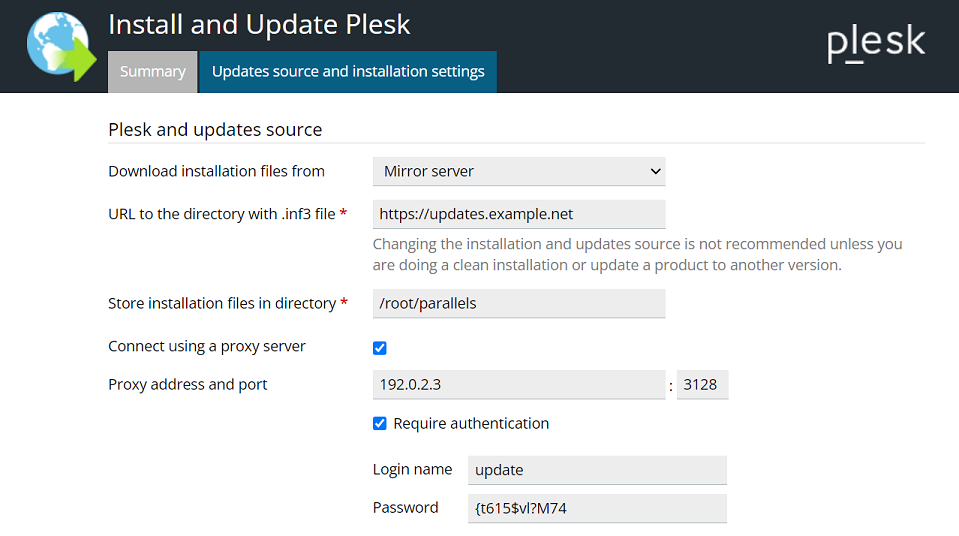
您可以更改 Plesk 安装程序下载其文件的目录(默认的安装目录是 /root/parallels)并/或使用代理服务器连接。
-
转到 工具与设置 > 更新(在 “Plesk” 下)。Plesk 安装程序将在新的浏览器窗口或标签中打开。
-
如果 Plesk 安装程序开始下载更新,并且目前只想更改设置,请单击取消。
-
转到 “更新源和安装设置” 标签执行以下操作:
- 将默认的安装目录
/root/parallels更改为自定义的目录。 - 如果使用代理服务器,则选择“使用代理连接”复选框,在相应字段中指定代理主机名和端口号,如果代理服务器需要身份验证,则选择“需要验证”复选框并指定用户名和密码。
- 将默认的安装目录
-
单击 保存 保存设置。

Using the Plesk Port for Installing and Updating Components
In Plesk Obsidian 18.0.57 and earlier, for installing and updating Plesk components to be possible, the TCP port 8447 had to be opened in the firewall. However, when running Plesk in the cloud, opening a custom port in the firewall may be complicated or even impossible.
Starting from Plesk Obsidian 18.0.58, it is possible to install and update Plesk components without opening the TCP port 8447 in the firewall. This is done by configuring Plesk to proxy requets to Plesk Installer via its own port. Effectively, Plesk Installer uses the same port used by Plesk.
Configuring Plesk Installer to use the Plesk port:
- 登录到 Plesk。
- 进入 工具与设置 > 更新设置(在 “Plesk” 下)。
- Select the “Access Plesk Installer via the Plesk hostname and port” checkbox, and then click OK.
Plesk Installer will now use the Plesk port instead of the TCP port 8447.
You can also configure Plesk Installer to use the Plesk port via the CLI by running the following command:
plesk bin settings --set installerProxyMode=true
To have Plesk Installer use the TCP port 8447, either clear the “Access Plesk Installer via the Plesk hostname and port” checkbox, or run the following command:
plesk bin settings --set installerProxyMode=false