Integrating Plesk DNS With Cloudflare
概要
The Cloudflare DNS service is a reliable DNS hosting service offering additional benefits such as caching and protection from DDoS attacks. Both free and paid plans are available, with different features.
If you already use Cloudflare DNS, you can connect websites hosted in Plesk to Cloudflare. If you do not, you can switch websites hosted in Plesk from the Plesk DNS servers to those from Cloudflare. In both cases, you will be able to manage your websites』 DNS zones directly from Plesk without having to log in to Cloudflare.
In this topic, you will learn how to connect and switch websites hosted in Plesk to Cloudflare, and also how to enable or disable the proxying of DNS records via Cloudflare.
前提條件
To integrate DNS in Plesk with Cloudflare, the following prerequisites must be met:
The DNS Integration for Cloudflare® extension must be installed from the Extensions Catalog.
You must have a Cloudflare account.
Challenges and Limitations
Integrating DNS in Plesk with Cloudflare comes with the following challenges and limitations:
Domains with nonexistent top-level domains (TLDs), such as example.tld, cannot be exported to Cloudflare. This is due to Cloudflare API limitations.
Domain aliases cannot be exported to Cloudflare. This is due to Cloudflare API limitations.
Subdomains with standalone DNS zones cannot be exported to Cloudflare. To export a subdomain’s DNS records to Cloudflare, disable its DNS zone, and then export its parent domain’s DNS zone to Cloudflare.
No more than 50 websites can be exported at once.
Cloudflare generally supports IDN domain names. However, the support for importing and exporting websites with IDN domain names has not been tested.
DNS records of types not supported in Plesk (CERT, HTTPS, LOC, NAPTR, SMIME, URI, SVCB, and SSHFP) cannot be imported from Cloudflare to Plesk.
TLSA DNS records cannot be exported from Plesk to Cloudflare.
Connecting Your Cloudflare Account
Before you can connect or switch websites hosted in Plesk to Cloudflare, you need first to connect your Cloudflare account.
To connect your Cloudflare account:
登錄到 Plesk。
In the navigation pane, click Cloudflare DNS.
Click Connect to Cloudflare.
Log in to your Cloudflare dashboard.
-
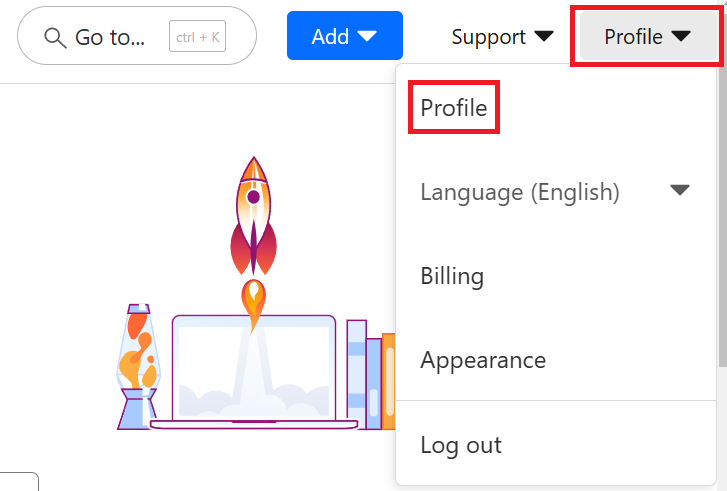
In the top right corner of the screen, open the 「Profile」 menu, and then click Profile.

Go to 「API Tokens」, click Create Token, and then click Get started next to 「Create Custom Token」.
-
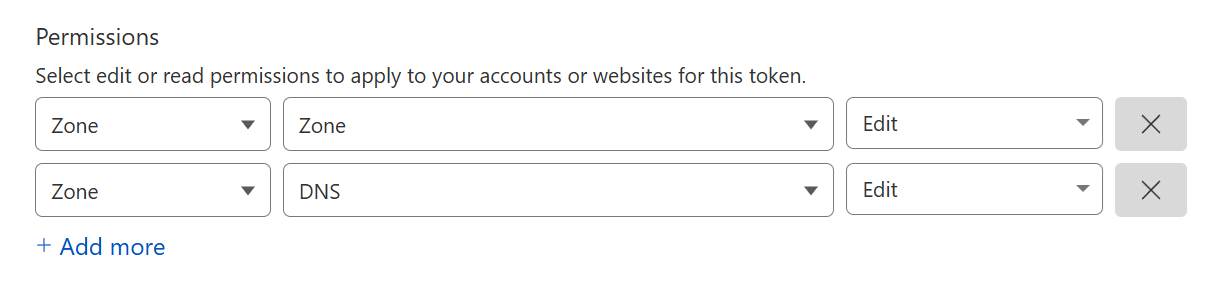
Give your token a name, and give it the 「Zone:Zone:Edit」 and 「Zone:DNS:Edit」 permissions, like so:
-
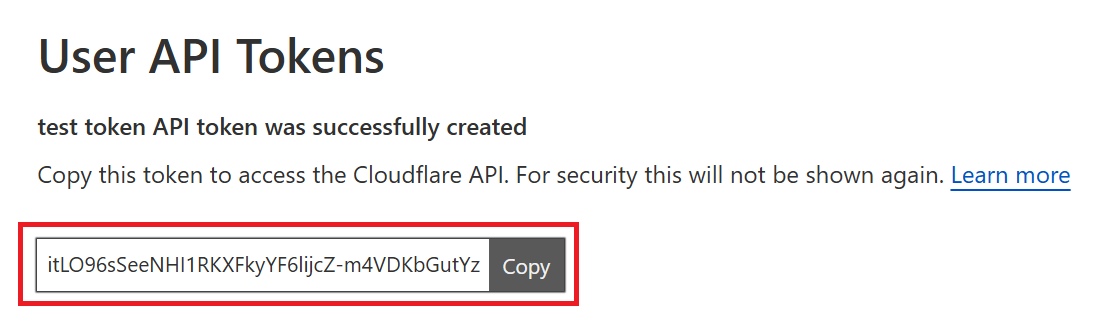
Once you are done, click Continue to summary, and then click Create Token. You will be shown your token.
Save this token in a secure location. You will use it to connect your Cloudflare account to Plesk.
In Plesk, enter the token into the 「Your API Token」 field, and then click Save.
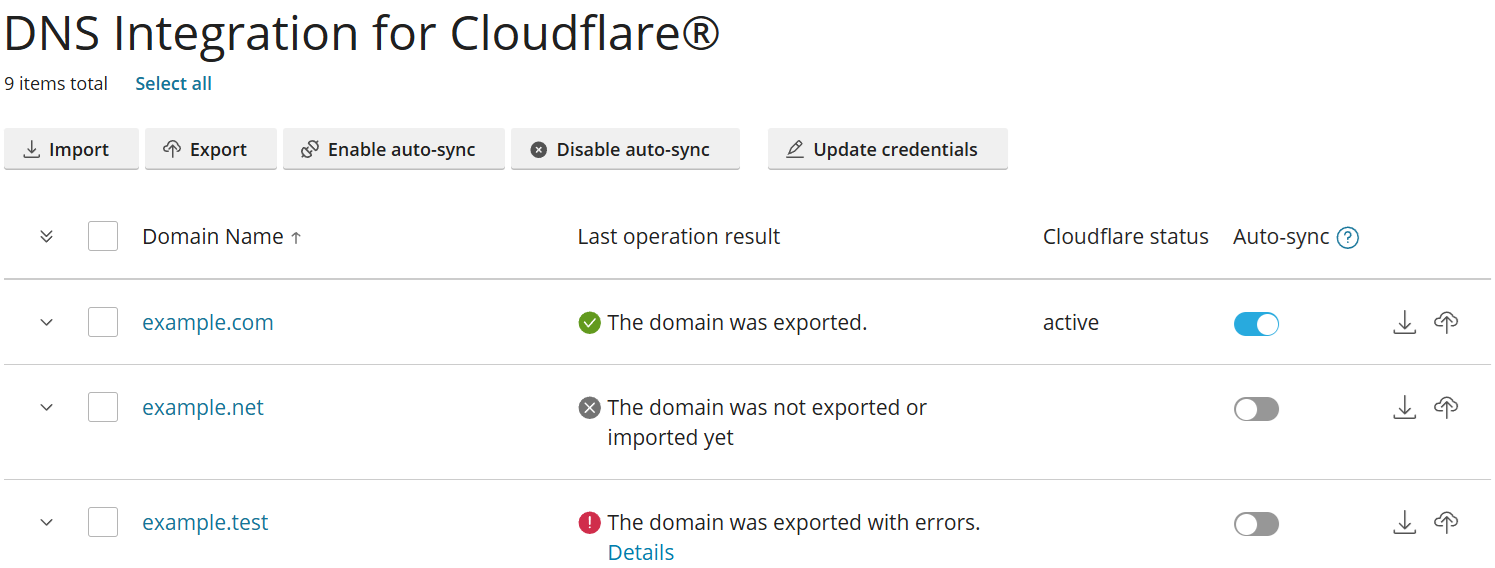
Once your Cloudflare account is connected, you will see the websites hosted in Plesk on the extension’s page.
By default, every website hosted in Plesk is shown on the 「DNS Integration for Cloudflare®」 page. To only see the websites owned by administrator accounts (and not any resellers and customers), add the following lines to the panel.ini file:
[ext-cloudflaredns]
adminDomainFilters = 0
Connecting a Website to Cloudflare
If you have a website in Plesk whose DNS zone is hosted in Cloudflare, you can connect the website to Cloudflare. When you do, you will be able to manage its DNS zone directly from Plesk.
To connect a website to Cloudflare:
登錄到 Plesk。
In the navigation pane, click Cloudflare DNS.
Locate the website you want to connect, and then click
. To connect multiple websites at once, select them, and then click Import.
Once the import procedure has finished, your website is connected to Cloudflare, and its status on the extension’s page will change to 「active」. The following important changes will happen:
DNS records of all supported types from the website’s DNS zone hosted in Cloudflare will be duplicated in Plesk (subject to the import limitations). Records of all types other than NS that existed in Plesk before it was connected (including any custom records) are removed.
Website’s NS DNS records in Plesk will now point to the Cloudflare NS servers instead of the Plesk NS server(s).
From now on, you need to make changes to the website’s DNS zone in Plesk, and not in Cloudflare. Any changes made directly in Cloudflare will be overwritten during the next synchronization.
Automatic synchronization from Plesk to Cloudflare will be enabled. We strongly recommend that you do not disable it until you are ready to disconnect the website from Cloudflare.
Switching a Website to Cloudflare
If you have a website in Plesk whose DNS zone is hosted in Plesk or in a third-party DNS provider other than Cloudflare, you can switch the website to Cloudflare. When you do, the website’s DNS zone will be hosted in Cloudflare, but you will be able to manage it directly from Plesk.
To switch a website to Cloudflare:
登錄到 Plesk。
In the navigation pane, click Cloudflare DNS.
-
Locate the website you want to switch, and then click
. To connect multiple websites at once, select them, and then click Export.備註
If you encounter the 「Code: 400 Message: Bad Request: Record already exists」 error at this point, retry exporting the website to resolve the issue.
Once the export procedure has finished, your website will be marked as 「Pending」 on the extension’s page.
To finish switching it to Cloudflare, you need to update the website’s authoritative name servers to those provided by Cloudflare.
Under 「Cloudflare status」, click 「Details」 to see the names of the Cloudflare name servers you need to use (for example, 「rajeev.ns.cloudflare.com, rosalyn.ns.cloudflare.com」).
-
Log in to your domain registrar and update the website’s authoritative name servers.
If you are not sure who your registrar is, you can use the ICANN’s registration data lookup tool.
If you are not sure how to update the website’s authoritative name servers, refer to your registrar’s documentation. For your convenience, Cloudflare has a list of links to the relevant documentation of many popular domain registrars.

Once you have updated the website’s authoritative name servers, your website is switched to Cloudflare, and its status on the extension’s page will change to 「active」. The following important changes will happen:
A DNS zone will be created in Cloudflare and assigned to the 「Free」 plan. The DNS records from the website’s DNS zone hosted in Plesk will be duplicated in Cloudflare (subject to the export limitations).
Website’s NS DNS records in Plesk will now point to the Cloudflare NS servers instead of the Plesk NS server(s).
You need to keep making changes to the website’s DNS zone in Plesk, and not in Cloudflare. Any changes made directly in Cloudflare will be overwritten during the next synchronization.
Automatic synchronization from Plesk to Cloudflare will be enabled. We strongly recommend that you do not disable it until you are ready to disconnect the website from Cloudflare.
Proxying DNS Records
Once you have connected or switched a website in Plesk to Cloudflare, its A, AAAA, and CNAME DNS records are automatically proxied via Cloudflare.

This is a free feature, and it means that any requests to your website go through the Cloudflare infrastructure, protecting the Plesk server from DDoS attacks, and also caching and optimizing all requests to your website. This also means that instead of your website’s IP address, a Cloudflare IP address will be shown to anyone looking it up via DNS queries. Learn more about proxied DNS records in Cloudflare
If you want, you can disable proxying for any A, AAAA, and/or CNAME DNS records of any website connected or switched to Cloudflare.
To disable proxying for a DNS record:
登錄到 Plesk。
In the navigation pane, click Cloudflare DNS.
Locate the website whose DNS record(s) you do not want to be proxied, and then click it to see the list of records.
Locate the DNS record(s) you do not want to be proxied, and then click its 「Proxied」 toggle so that it shows 「Off」.
Once you have disabled proxying for a DNS record, that record is no longer protected or cached by Cloudflare. Additionally, the website’s IP address will be shown in response to DNS queries.
By default, A, AAAA, and CNAME DNS records are proxied automatically. To make it so that only records of specific types are proxied automatically, add the following lines to the panel.ini file and specify the types of records (among A, AAAA, and/or CNAME) that must be proxied. Records of other types will not be proxied automatically:
[ext-cloudflaredns]
defaultProxiedEnabledTypes = A, CNAME
Automatic Synchronization Between Plesk and Cloudflare
Once a website is connected or switched to Cloudflare, automatic synchronization from Plesk to Cloudflare is enabled automatically.

Once five minutes have passed from automatic synchronization being enabled for a website, any changes made to its DNS zone in Plesk will be automatically duplicated in Cloudflare. At the same time, any changes made directly in Cloudflare are discarded.
Certain parameters of automatic synchronization can be changed by editing the panel.ini file.
To change how much time must pass before automatic synchronization starts working, add the following lines to the panel.ini file and specify the desired value in seconds:
[ext-cloudflaredns]
autoSyncDisableTtl = 300
To change what DNS record types are automatically synchronized, add the following lines to the panel.ini file and specify the types of records that must be synchronized. Records of other types will not be imported from or exported to Cloudflare, and will not be synchronized:
[ext-cloudflaredns]
defaultSyncableDnsRecordTypes = A, AAAA, CNAME, MX, PTR, TXT, SRV, AXFR, DS, CAA
To disable automatic synchronization, add the following lines to the panel.ini file:
[ext-cloudflaredns]
autoSyncEnable = 0
To make it so that, whenever a website connected or switched to Cloudflare is removed in Plesk, its DNS zone is also removed from Cloudflare, add the following lines to the panel.ini file:
[ext-cloudflaredns]
cloudflareDomainRemovalEnabled = 1