DKIM, SPF, and DMARC Protection and ARC Support
summary: Plesk supports modern anti-spam mechanisms used to validate the identity of mail senders. Namely, DKIM, SPF, DMARC, and ARC.
In this topic, you will learn how to configure DKIM, SPF, and DMARC protection in Plesk. You will also learn how ARC support is implemented in Plesk for Linux.
Here is a short summary of the three mechanisms described in this topic and what they do:
- DKIM (DomainKeys Identified Mail) is a method used to associate a domain name identity with an outgoing message and to validate a domain name identity associated with an incoming message through cryptographic authentication.
- SPF (Sender Policy Framework) is a method used to prevent sender address forgery, i.e. using fake sender addresses. It allows mail server to check that incoming mail from a domain comes from a host authorized by that domain’s administrator. In addition, Plesk uses SRS (Sender Rewriting Scheme), so that forwarded messages can pass SPF checking.
- DMARC (Domain-based Message Authentication, Reporting and Conformance) is a technology to extend the capabilities of the SPF and DKIM methods. The DMARC policy defines how the receiver should treat email messages depending on the results of DKIM and SPF checking.
- ARC (Authenticated Received Chain) is a technology that enables intermediate mail servers (for example, mailing lists and mail forwarding services) to store an email’s authentication results using special headers. This helps the destination mail server validate the email if its SPF and DKIM records are made invalid by the intermediate mail server’s processing.
The mail server requirements for these solutions are as follows:
| Mail Server | DKIM | SPF* | SRS | DMARC | ARC |
|---|---|---|---|---|---|
| Postfix (Linux) | ➕ | ➕ | ➕ | ➕ | ➕ |
| Qmail (Linux) | ➕ | ➕ | ➖ | ➕ | ➕ |
| MailEnable Professional (Windows) | ➕ | ➖ | ➖ | ➖ | ➖ |
| MailEnable Standard (Windows) | Version 9.16 or later | ➖ | ➖ | ➖ | ➖ |
| SmarterMail (Windows) | ➕ | ➖ | ➕ | ➕ | ➖ |
| IceWarp (Windows) | ➕ | ➖ | ➕ | ➖ | ➖ |
In this table, ‘+’ means that the solution is supported by all versions that are supported by Plesk Obsidian. ‘-‘ means that the solution is not supported.
Note: *In the table above, SPF support means SPF for incoming mail. Linux mail servers are marked with ‘+’ because Plesk for Linux supports SPF for incoming and outgoing mail. Windows mail servers are marked with ‘-’ because Plesk for Windows supports SPF for outgoing mail only.
DKIM
Enabling DKIM for a domain attaches a special header to every email sent from the domain. This header contains a cryptographic private key. The recipient mail servers use a public key to verify that an email was indeed sent from the domain and no one tampered with the email content in transit. Emails that do not have the header will be detected as not authentic.
To provide the DKIM support, Plesk uses the functionality of an external library (Linux) or of the mail server supplied with Plesk (Windows).
Enabling or Disabling DKIM on the Server
DKIM is enabled in Plesk by default. To disable DKIM or to keep it only for outgoing or incoming mail, go to Tools & Settings > Mail Server Settings (under “Mail”), scroll down to the “DKIM spam protection” section, and clear one of the following checkboxes or both of them:
- “Allow signing outgoing mail”. This option enables customers to manage the DKIM signing of outgoing mail on a per-domain basis.
- (Plesk for Linux) “Verify incoming mail”. This option turns on DKIM checking for all incoming mail. All messages are checked, and if the check fails, are marked with a special header.
Note: You cannot disable DKIM checking for incoming mail if DMARC is enabled.
Enabling DKIM for a Domain
If DKIM signing is enabled on the server, new domains that have their DNS and mail hosting in Plesk sign outgoing mail with DKIM by default.
Domains that use an external DNS server cannot have DKIM enabled by default.
Signing outgoing mail with DKIM means that Plesk adds the following two records to the DNS zone of the domain (example.com stands for your domain name):
-
default._domainkey.example.comcontains the public part of the generated key. -
_ domainkey.example.comcontains the DKIM policy. You can edit this policy.
Unlike domains hosted in Plesk, Plesk cannot add these records to domains that use an external DNS server. For those domains, you need to enable DKIM manually.
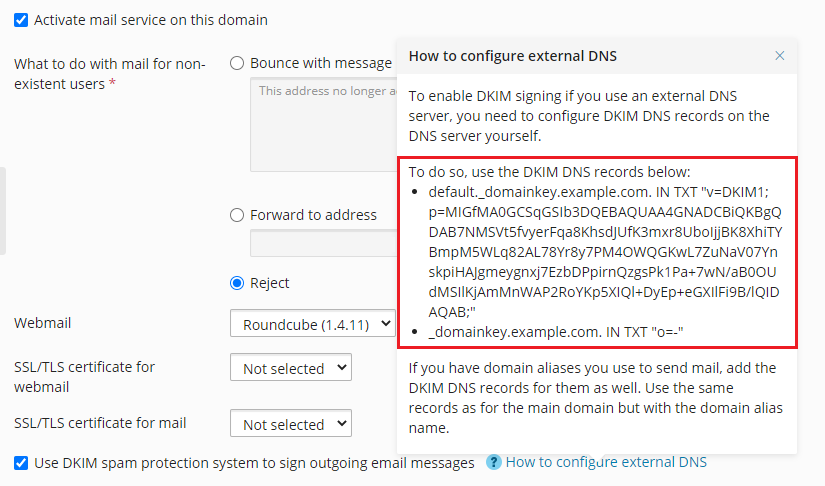
To enable DKIM signing of outgoing mail for a domain that uses an external DNS server:
-
Go to Websites & Domains > your domain > the “Mail” tab > Mail Settings.
-
Keep the “Use DKIM spam protection system to sign outgoing email messages” checkbox selected.
-
Click the “How to configure external DNS” hint. Copy two DNS records you see there and add them to the DNS server.
Note: If you have domain aliases you use to send mail, add the DKIM DNS records for them as well. Use the same records as for the main domain but with the domain alias name.

SPF and SRS
SPF (Sender Policy Framework) is a method used to prevent sender address forgery, i.e. using fake sender addresses. SPF allows a domain’s administrator to set a policy that authorizes particular hosts to send mail from the domain. A receiving mail server checks that the incoming mail from a domain comes from a host authorized by that domain’s administrator. SPF is based on the rules specified by the administrator in the sender’s DNS zone.
In Plesk, you can set up an SPF policy for outgoing mail by specifying rules in a DNS record. In Plesk for Linux, SPF also checks incoming mail by default.
When SPF is set up, the mail server checks incoming mail using the following algorithm steps:
-
Read local rules.
Local rules are the rules used by the spam filter. An example local rule can be the following:
a:test.plesk.com. -
Search for the sender’s DNS SPF record (if any).
An example SPF record can be the following:
example.com. TXT v=spf1 +a +mx -all -
Concatenate the local rules and the SPF record into the resulting policy.
In our example, the resulting policy will be
example.com. TXT v=spf1 +a +mx +a:test.plesk.com -all.Note: If the mail server detects no SPF record, local rules will be ignored as well.
-
Check mail against the policy resulting from the previous step.
-
Read guess rules.
Guess rules are the global rules that override the SPF record. An example guess rule can be the following:
v=spf1 +a/24 +mx/24 +ptr ?all. -
Check mail against the guess rules only.
-
Compare the results of the two checks: the one made against the resulting policy (step 4) and the one made against the guess rules only (the previous step). Apply the check whose result is more permissive.
See more information on SPF check statuses.
To set up an SPF policy for outgoing mail:
Go to Tools & Settings > DNS Settings (under “General Settings”) and edit the TXT DNS record related to SPF. This DNS record is always present in the server-wide DNS template. Here is an example of SPF record created by Plesk:
example.com. TXT v=spf1 +a +mx +a:test.plesk.com -all
The parts of this record mean the following:
| Part | Description |
|---|---|
v=spf1 |
The domain uses SPF of the version 1. |
+a |
All the hosts from the “A” records are authorized to send mail. |
+mx |
All the hosts from the “MX” records are authorized to send mail. |
+a:test.plesk.com |
The domain test.plesk.com is authorized to send mail. |
-all |
All other domains are not authorized to send mail. |
Read more about the syntax of SPF DNS records. The policy notation is available at RFC7208.
(Plesk for Linux) To configure SPF to check incoming mail:
-
Go to Tools & Settings > Mail Server Settings (under “Mail”) and scroll down to the “SPF spam protection” section.
-
Select an option from the SPF checking mode drop-down box to specify how to deal with email when SPF applies local and guess rules:
- Only create Received SPF-headers, never block - to accept all incoming messages regardless of SPF check results.
- Use temporary error notices when you have DNS lookup problems - to accept all incoming messages regardless of SPF check results, even if SPF check failed due to DNS lookup problems.
- Reject mail if SPF resolves to “fail” (deny) - to reject messages from senders who are not authorized to use the domain in question.
- Reject mail if SPF resolves to “softfail” - to reject the messages from senders who cannot be identified by SPF system as authorized or are not authorized because the domain has no SPF records published.
- Reject mail if SPF resolves to “neutral” - to reject the messages from senders who cannot be identified by SPF system as authorized or are not authorized because the domain has no SPF records published.
- Reject mail if SPF does not resolve to “pass” - to reject the messages that do not pass SPF check for any reason (for example, when sender’s domain does not implement SPF and SPF checking returns the “unknown” status).
-
To specify local rules, type the rules you need in the SPF local rules box.For example: include:spf.trusted-forwarder.org.
-
You can also specify the guess rules in the SPF guess rules box.
For example: v=spf1 +a/24 +mx/24 +ptr ?all
-
To specify an arbitrary error notice that is returned to the SMTP sender when a message is rejected, type it into the SPF explanation text box.
If no value is specified, the default text will be used as a notification.
-
To complete the setup, click OK.
(Plesk for Linux) To disable SPF checking for incoming mail:
- Go to Tools & Settings > Mail Server Settings (under “Mail”).
- In the “DMARC” section, clear the “Enable DMARC to check incoming mail” checkbox if it is selected.
- In the “SPF spam protection” section, clear the “Enable SPF spam protection to check incoming mail” checkbox and then click OK.
Using SRS
Additionally to SPF, some mail servers in Plesk support SRS (Sender Rewriting Scheme), a mechanism for rewriting sender addresses when an email is forwarded in such a way that the forwarded email continues to be SPF compliant. SRS helps to make sure that messages are delivered in case of using SPF.
SRS is used automatically when messages are forwarded from Plesk-hosted mailboxes.
To provide the SRS functionality, Plesk uses the capabilities of an external library (Linux) or of the mail server software (Windows).
DMARC
DMARC (Domain-based Message Authentication, Reporting and Conformance) is a technology to extend the capabilities of the SPF and DKIM sender policies. The DMARC policy defines how the receiver should treat email messages depending on the results of DKIM and SPF checking. This technology is based on the rules specified in the sender’s DNS zone.
In Plesk, you can set up a DMARC policy for outgoing mail by specifying rules in a DNS record.
Note: In Plesk for Linux and Plesk for Windows that uses SmarterMail, DMARC also checks incoming mail by default.
To set up a custom DMARC policy for outgoing mail:
- Go to Tools & Settings > DNS Settings (under “General Settings”).
- Edit the DNS records related to the DMARC policy. These DNS records are always present in the server-wide DNS template. By contrast, DNS records related to DKIM are added to DNS zones of individual domains when DKIM is activated on the domain.
For example, the Plesk default DMARC policy is defined in the following record:
_dmarc.<domain>. TXT v=DMARC1; adkim=s; aspf=s; p=quarantine
According to this policy, the receiving mail server should put emails that do not pass DKIM and SPF checks in quarantine. The quarantine means moving the emails to the spam folder and flagging them as suspicious. You can specify a stricter policy. However, the receiving server is free to apply its own policy to incoming mail.
See more information on DMARC, including policy notations.
Domains also have their own individual DMARC policies, which customers can edit. New domains that have their DNS and mail hosting in Plesk have the DMARC quarantine policy enabled by default.
To disable DMARC to check incoming mail:
- Go to Tools & Settings > Mail Server Settings (under “Mail”).
- In the DMARC section, clear the “Enable DMARC to check incoming mail” checkbox and then click OK.
(Plesk for Linux) ARC
ARC (Authenticated Received Chain) is a technology that enables intermediate mail servers to add an additional layer of authentication to emails that are forwarded or sent from a mailing list by adding extra headers to emails. This is so that the final receiving mail server may be able to (but does not have to) treat an email as legitimate even if it fails its SPF, DKIM, and/or DMARC checks.
Note: ARC is supported on all Plesk Obsidian 18.0.58 and later servers running the Postfix or qmail mail servers. At the moment, ARC is only supported in Plesk for Linux, because none of the mail servers supported in Plesk for Windows have ARC support.
Note: The ARC support implementation in Plesk satisfies the Google requirement to add ARC headers to forwarded mail for senders who send 5000 or more messages a day to Gmail accounts.
Limitations
- ARC headers are not added to mail sent to a mailing list.
- Plesk does not validate the ARC headers for incoming mail.
Enabling ARC Support
(Plesk for Linux) To enable ARC support on your server:
- Log in to Plesk.
- Go to Tools & Settings > Mail Server Settings (under “Mail”).
- Under “DKIM spam protection”, select the “Allow signing outgoing mail” checkbox.
- (Recommended) Under “SPF spam protection”, select the “Enable SPF spam protection to check incoming mail” checkbox.
- (Recommended) Under “DMARC”, select the “Enable DMARC to check incoming mail” checkbox.
- Click OK.
ARC headers can now be added to outgoing mail forwarded via the Plesk forwarding feature or sent by the autoresponder.
Once ARC support is enabled on your server, ARC can be enabled for individual mail domains.
Note: For the ARC signatures to be valid, the DNS records required for DKIM to work must be configured properly for the domain hosting the forwarding mail account.
(Plesk for Linux) To enable ARC for a domain:
- Log in to Plesk.
- Go to Websites & Domains, find the domain hosting the mail account, go to the “Mail” tab, and then click Mail Settings.
- Select the “Use DKIM spam protection system to sign outgoing email messages” checkbox, and then click OK.
ARC headers will now be added to outgoing mail forwarded via the Plesk forwarding feature or sent by the autoresponder by any of the mail accounts hosted on the domain.