Installing Plesk on DigitalOcean
Provided Product Configurations
The following Plesk configurations are available on DigitalOcean.
| Plesk | Components set |
|---|---|
| Plesk Web Admin Edition SE (Ubuntu 18.04) | Recommended set* (Fail2Ban, ModSecurity, Plesk Firewall, and **WordPress Toolkit are installed by default). Additionally, the DigitalOcean DNS extension is installed by default. |
| Plesk Web Admin Edition SE (CentOS 7) | Recommended set* (Fail2Ban, ModSecurity, Plesk Firewall, and **WordPress Toolkit are installed by default). Additionally, the DigitalOcean DNS extension is installed by default. |
Note: *The Recommended components set includes all components necessary for web hosting (including the web server, a mail server, a database server, and so on), plus the most popular and widely used features. For more information about Plesk Web Admin Edition SE, see the topic Plesk Web Admin SE.
Note: ** WordPress Toolkit in Plesk Web Admin Edition SE provides only basic functionality. To use premium WordPress features, upgrade your Plesk license to Web Pro or Web Host Edition.
Installing Plesk on DigitalOcean
-
Log in to an existing DigitalOcean account or create a new one.
-
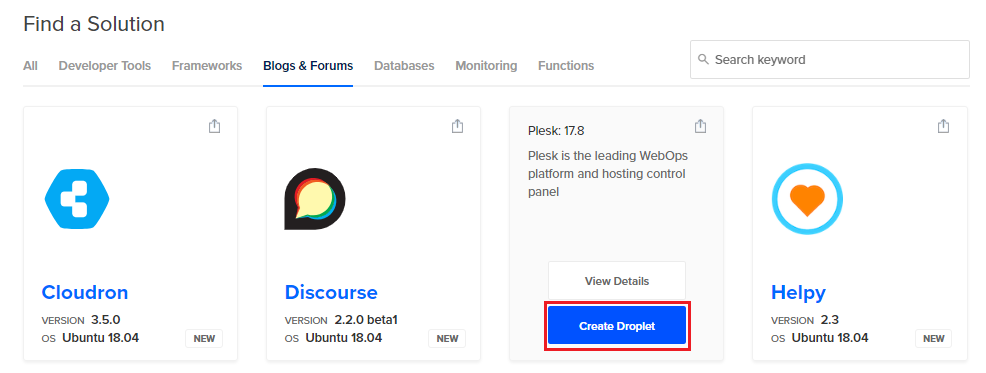
Click Marketplace > (under “DISCOVER” in the left navigation bar) and go to the “Blogs & Forums” tab.

-
Hover on Plesk and click Create Droplet.
-
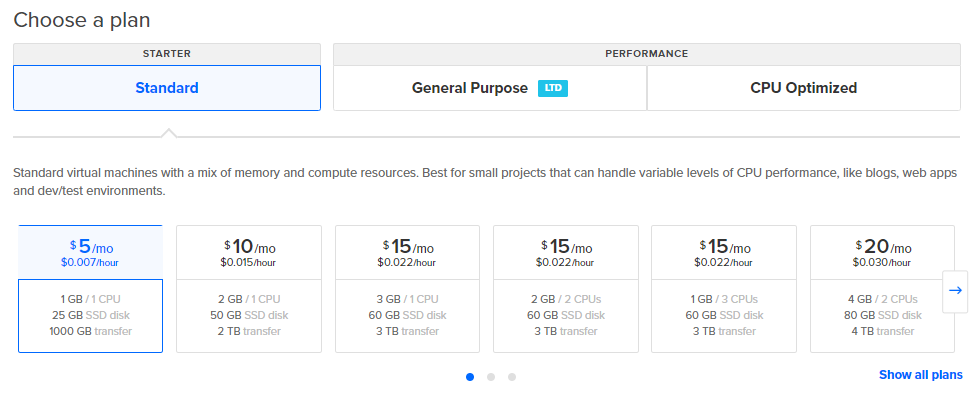
Choose one of the three plans and then choose a droplet paying attention to the amount of memory it comes with.
You can choose one of the standard droplets paying attention to the amount of memory it comes with.
The more websites you intend to host and the more traffic the hosted websites generate, the more memory you will need. Estimate the amount of memory your setup will require.
If you want to try out Plesk on DigitalOcean, you can choose the smallest possible droplet (1 GB/1 vCPU under the Standard plan), which is sufficient for testing. If later you find yourself running out of resources, you can upgrade your droplet.
-
Adding backups and block storage is not necessary for Plesk to operate. You can skip these options and go to the next step.
-
Choose a datacenter region. If you plan to host small business websites, we recommend choosing the zone closest to their geographic location to reduce page load times for local visitors.
-
Additional options such as Private networking, IPv6, User data, and Monitoring are not necessary for most Plesk users. You can skip them and go to the next step.
-
Choose how to log in to your droplet.
The easiest way is by using the
rootusername and a password, which you will receive by email after the droplet is created. To log in this way, skip the “Add your SSH keys” step and go to the next one.Alternatively, you can use an SSH key for logging in. To do so, add a new SSH key by clicking New SSH key or select a previously added key (if you have any).
-
Choose how many Plesk instances you want to deploy and give each one a recognizable name.
-
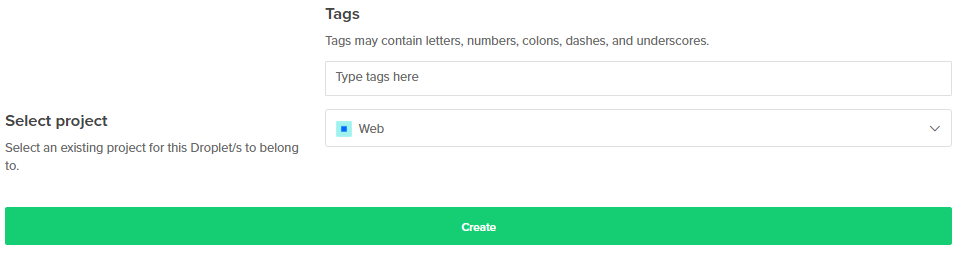
(Optional) At this point, your Plesk instance is ready to be deployed. If you plan to deploy several instances, you may want to group them by:
- Tagging them. You can manage every droplet with the same tag at once.
- Selecting an existing project to which the droplet will belong.
You can tag the droplet or select a project for it any time later after the droplet is created.
-
Click Create.


Your Plesk instance is being deployed. You can start working in Plesk once the deployment is finished.
Accessing Plesk for the first time
If you use the root username and password, you can log in to Plesk
the fastest way possible: without accessing the droplet command line.
To access Plesk for the first time without using the command line:
- Go to the
https://<your-droplet-IP>:8443link. - On the Plesk login page, specify the
rootusername and the password you received by email from DigitalOcean. - You will be redirected to the Plesk welcome screen. Provide your contact name and email, accept the End-User License Agreement, and set an administrator password (you will then log in to Plesk using that password).
- Once you have finished, click Enter Plesk to log in to Plesk.
- (Optional) To enhance security, you can later log in to the command line and change the root password you received by email. The command line will automatically prompt you to do so.
Alternatively, you can log in to Plesk for the first time by accessing the droplet command line.
To access Plesk for the first time by using the command line:
-
Access the droplet command line using:
- SSH
- Any SSH client, for example, PuTTY or iTerm2.
- (For the root password only) The DigitalOcean console.
-
Change the root password (if you use one). The command line will prompt you to do so.
-
Run the following command to generate a one-time login link:
sudo plesk login -
Plesk will generate two login links. Go to the second login link
https://<public-ip-address>:8443/, for example,https://192.0.2.1:8443/login?secret=hlHH450sx%2FAlSJHj1VWJC2qKxK6gqVxtsMkYG6bf6wc%3D -
You will be redirected to the Plesk welcome screen. Provide your contact name and email, accept the End-User License Agreement, and set an administrator password (you will then log in to Plesk using that password).
-
Once you have finished, click Enter Plesk to log in to Plesk.
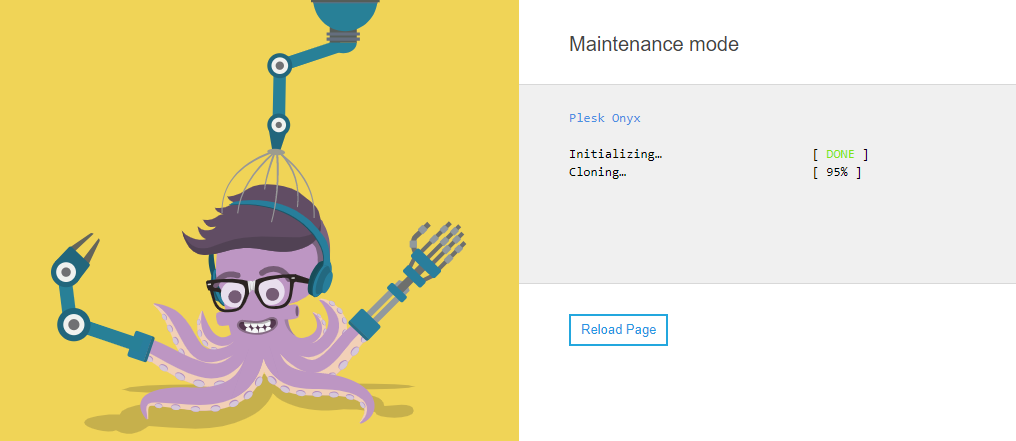
Note: If you log in to a Plesk instance that is still being deployed, you will see the maintenance screen. Once the deployment is finished, the maintenance screen will be gone and you will be able to start using Plesk.
Setting up DNS Hosting
To put your websites online, choose how to set up your DNS hosting: internally in Plesk or externally by using a third-party DNS service, for example DigitalOcean DNS. We strongly recommend that you use DigitalOcean DNS because of the following advantages:
- No need to set up and maintain a slave DNS server. DigitalOcean DNS offers free DNS hosting with three different name servers. This will reduce your Plesk server load and improve DNS hosting reliability.
- No need to configure DNS settings manually. DNS zones will be automatically synchronized between Plesk and DigitalOcean DNS by the DigitalOcean DNS extension (installed by default with Plesk on DigitalOcean).
You can set up DNS hosting before or after adding domains to Plesk. Either way, both new and existing domains will be automatically synced with DigitalOcean DNS.
To set up DNS hosting in DigitalOcean’s DNS:
-
Log in to Plesk.
-
Go to Extensions > the “My Extensions” tab > DigitalOcean DNS > Open.
-
Click “Authorize”, select your DigitalOcean account, click Authorize application, and then click the link to confirm sending the DigitalOcean authorization data to your Plesk.
Now all domains in Plesk, new and existing, will be automatically synced with DigitalOcean DNS.
-
Contact your registrar (the one you bought your domain name from) and change the nameservers to DigitalOcean’s nameservers: ns1.digitalocean.com, ns2.digitalocean.com, and ns3.digitalocean.com. See instructions how to do so for many popular registrars (GoDaddy, 1&1, HostGator, and others).
Note: It takes some time for changes to come into effect. They are rolled out gradually: more and more visitors will have access to your website with time. For most users, your website will be again accessible within 24 hours.
Note: You cannot create a domain in Plesk if its name matches the name of a website that is already hosted in DigitalOcean DNS.
If you want to use Plesk as a DNS server, refer to this topic.
If you want to use an external DNS service other than DigitalOcean DNS, you need to configure this external DNS service and also point the domain name to your Plesk server. To configure an external DNS service, refer to its documentation. If you have already configured the external DNS service and it supports DomainConnect, use the Domain Connect extension, which is shipped with Plesk by default, to automatically point the domain name to your Plesk server.
Assigning Floating IP Addresses
Once a droplet is created, DigitalOcean automatically assigns a static public IP address to it. This IP address is enough for staging websites or for trying Plesk. You can reboot your droplet, switch it on and off, or rebuild it - the static IP address is lost only if you destroy the droplet.
However, for hosting production websites, we recommend that you assign a floating IP address to your droplet and back up your droplet. Unlike static IP addresses, floating IP addresses can be moved between droplets.
If your droplet breaks down or if you accidentally destroy it, your website will be unavailable until you fix the droplet or create a new one. The easiest way to avoid downtime is to move the floating IP to the backup droplet. This will immediately bring your website back up with no need to change DNS settings.
Issues with Sending Email
If you cannot send email from Plesk, check if outbound connections on TCP port 25 are blocked. If they are, contact DigitalOcean support.