(Plesk pour Linux) Protection contre les attaques par force brute (Fail2Ban)
Résumé: Fail2Ban est un outil de bannissement d’adresses IP qui protège votre serveur et les sites web hébergés contre les attaques par force brute. Cet outil avancé est désactivé par défaut. Plesk dispose également d’une protection de base contre les attaques par force brute pour les connexions. Cette protection de base est activée par défaut.
Dans cette section, vous découvrirez comment :
- Activer et configurer Fail2Ban pour assurer une protection optimale avec un minimum d’effort.
- Bloquer manuellement les connexions provenant de certaines adresses IP et comment débloquer manuellement les connexions provenant d’adresses IP interdites.
- S’assurer que les connexions provenant de certaines adresses IP ne sont jamais bloquées par Fail2Ban.
- Créer, configurer, supprimer, activer et désactiver les jails Fail2Ban, et comment ajouter des filtres utilisés par les jails Fail2Ban.
- Configurez la protection contre les attaques par force brute pour les connexions.
Vue d’ensemble
Fail2Ban protège votre serveur en analysant les fichiers journaux de divers services Plesk. Il recherche les entrées indiquant des échecs d’authentification, des attaques connues et d’autres entrées suspectes provenant d’adresses IP spécifiques. Lorsque le nombre d’entrées de journal associées à une adresse IP spécifique atteint une valeur prédéfinie, Fail2Ban envoie un e-mail de notification ou « bannit » cette adresse IP (bloque tout accès ultérieur à partir de cette adresse IP en ajoutant une règle correspondante à la configuration du pare-feu du serveur) pendant une durée prédéfinie (« période de bannissement »).
Par exemple, avec la configuration Fail2Ban par défaut en vigueur, à la cinquième tentative infructueuse de connexion à Plesk à partir de l’adresse IP 198.51.100.1 dans un délai de dix minutes, la règle suivante est ajoutée à la configuration du pare-feu :
Chain f2b-plesk-login (1 references)
target     prot opt source               destination
REJECT     all  --  198.51.100.1         anywhere             reject-with icmp-port-unreachable
Une fois la période de bannissement de dix minutes terminée, l’adresse IP est automatiquement débloquée et la règle de pare-feu correspondante est supprimée.
La logique de Fail2Ban est régie par l’utilisation de « jails ». Une jail est combine un « filtre », un ensemble d’une ou plusieurs expressions régulières utilisées pour détecter les violations, et une « action », une directive indiquant les mesures à prendre au-delà d’un certain nombre de violations provenant d’une adresse IP spécifique.
Une seule jail correspond généralement à un seul service exécuté sur le serveur, tel que le serveur Web ou le serveur SSH. Plesk inclut un certain nombre de jails préconfigurées prêtes à l’emploi, couvrant la plupart des services Plesk. Vous pouvez également ajouter manuellement des jails personnalisées.
En complément de Fail2Ban, Plesk intègre une protection contre les attaques par force brute activée par défaut. Cela signifie qu’après cinq tentatives de connexion infructueuses, une adresse IP est restreinte pendant 300 secondes avant de pouvoir se reconnecter. Ces paramètres sont modifiables. Pour en savoir plus sur la modification de ces paramètres, consultez notre document Configurer la protection contre les attaques par force brute.
Mises en garde et limites
Lorsque vous utilisez Fail2Ban dans Plesk, gardez à l’esprit les limitations suivantes :
- Fail2Ban s’appuie uniquement sur les adresses IP et n’effectue pas de recherche de nom d’hôte, sauf s’il est configuré pour le faire.
- Fail2Ban doit utiliser ses paramètres les plus stricts pour assurer une protection contre les attaques par force brute distribuées, car il identifie les intrus à l’aide de leur adresse IP. De tels paramètres peuvent causer des problèmes aux utilisateurs légitimes en cas de faux positifs.
Activer Fail2Ban
Sur les serveurs Plesk installés avec le préréglage « Recommandé », Fail2Ban est activé par défaut et toutes les jails par défaut sont activées. Si Fail2Ban n’est pas activé sur votre serveur (par exemple, parce qu’il n’est pas installé), vous devez l’installer et l’activer, ainsi que les jails par défaut avant de pouvoir profiter de la protection qu’il offre.
Pour installer et activer Fail2Ban :
- Connectez-vous à Plesk.
- Allez dans Outils & Paramètres > Bannissement d’adresses IP (Fail2Ban) (sous « Sécurité »). Si l’option Bannissement d’adresses IP (Fail2Ban) n’est pas disponible, vous devez d’abord installer le composant « Fail2Ban ».
- Cochez la case « Activer la détection d’intrusion », puis cliquez sur Appliquer.
- Allez dans l’onglet « Jails ». Sélectionnez toutes les jails marquées comme « Inactive(s) », puis cliquez sur Activer.
Fail2Ban fonctionne désormais avec les paramètres par défaut. Pour désactiver Fail2Ban, décochez la case « Activer la détection d’intrusion » située dans l’onglet « Paramètres », puis cliquez sur OK.
Configurer Fail2Ban
Les paramètres par défaut de Fail2Ban sont optimaux dans la plupart des scénarios. Toutefois, vous souhaiterez peut-être les modifier pour rendre Fail2Ban plus strict ou plus indulgent, selon vos besoins.
Pour modifier les paramètres Fail2Ban :
-
Allez sous Outils & Paramètres > Bannissement d’adresses IP (Fail2Ban) (sous « Sécurité »).
-
Allez dans l’onglet « Paramètres ».
-
(Facultatif) Modifiez la valeur de la « Période de bannissement de l’adresse IP » pour allonger ou raccourcir la période de bannissement d’une adresse IP. Si vous la définissez sur « -1 », tous les bannissements seront permanents.
Une période de bannissement plus longue exclura un attaquant plus longtemps, mais elle exclura également un utilisateur légitime plus longtemps en cas de faux positif. Un bannissement permanent arrêtera toutes les attaques ultérieures à partir d’une adresse IP, mais bloquera également définitivement un utilisateur légitime en cas de faux positif. Vous pouvez débloquer manuellement n’importe quelle adresse IP à tout moment.
-
(Facultatif) Modifiez la valeur de l’option « Intervalle de détection des attaques ultérieures » pour allonger ou raccourcir la période pendant laquelle toute entrée de journal individuelle indiquant un échec d’authentification ou une attaque potentielle reste « active ».
Plus la période est longue, plus les chances de détecter et de bloquer les attaques survenant à intervalles réguliers sont grandes, ainsi que le risque de faux positifs, car les échecs d’authentification des utilisateurs légitimes sont également suivis plus longtemps.
-
(Facultatif) Modifiez la valeur « Nombre d’échecs avant le bannissement de l’adresse IP » pour définir le nombre d’échecs d’authentification ou d’attaques potentielles provenant d’une seule adresse IP nécessaires pour que celle-ci soit interdite.
Plus la valeur est faible, moins il faut détecter d’échecs d’authentification ou d’attaques potentielles pour qu’un bannissement se produise. Cela augmente la sécurité au détriment d’une augmentation de la probabilité de faux positifs. La définition de la valeur de ce paramètre sur « 1 » entraînera un bannissement chaque fois qu’un échec d’authentification ou une attaque potentielle est détecté, offrant une protection maximale, mais maximisant également le risque de faux positifs.
-
Cliquez sur OK.
Les paramètres configurés entreront alors en vigueur. Notez que ces paramètres peuvent également être modifiés pour des jails individuelles. Par ailleurs, les paramètres d’une jail individuelle sont prioritaires à ceux configurés dans l’onglet « Paramètres ».
Bannir et ne plus bannir manuellement des adresses IP
Vous pouvez voir quelles adresses IP sont actuellement bannies par Fail2Ban. Vous pouvez également bannir manuellement une adresse IP ou annuler le bannissement d’une adresse IP qui a été bannie.
Pour voir la liste des adresses IP actuellement bannies :
- Connectez-vous à Plesk.
- Allez sous Outils & Paramètres > Bannissement d’adresses IP (Fail2Ban) (sous « Sécurité »).
- Allez sous l’onglet « Adresses IP bannies ».
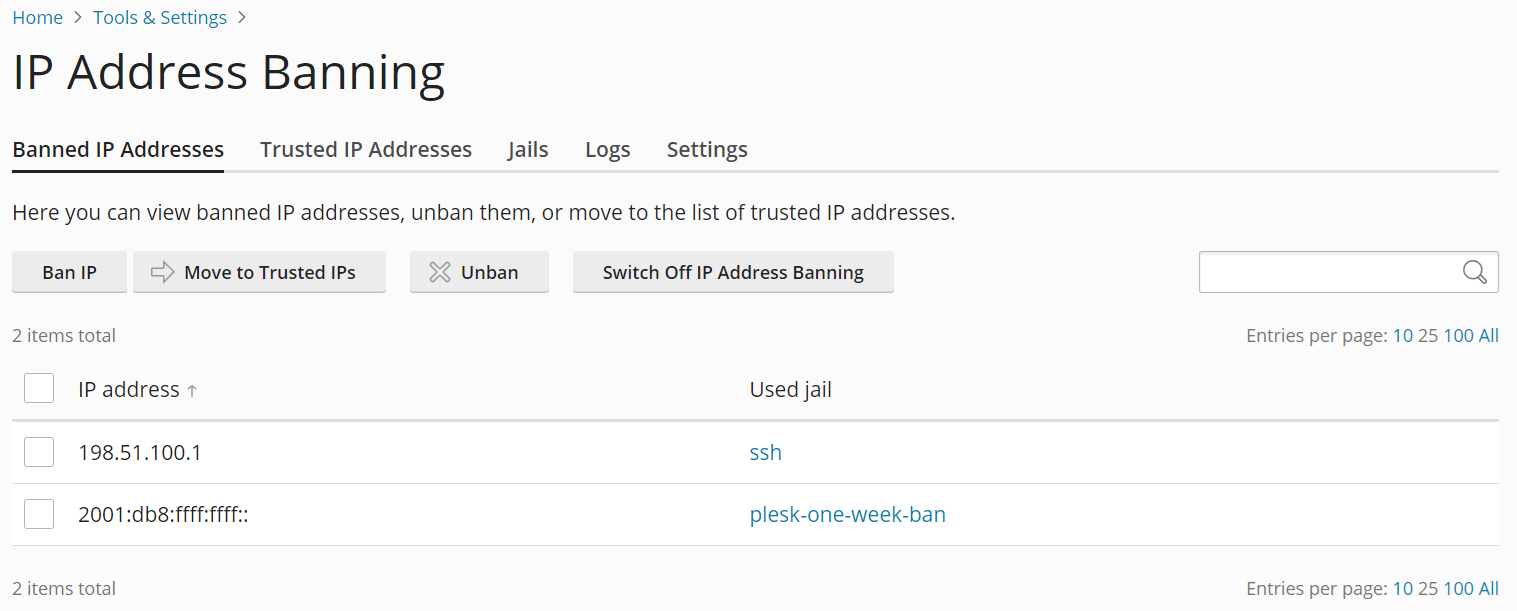
Dans cet onglet, vous pouvez voir toutes les adresses IP actuellement bannies par Fail2Ban, ainsi que les noms des jails responsables de l’interdiction.
Pour bannir manuellement une ou plusieurs adresses IP :
- Connectez-vous à Plesk.
- Allez sous Outils & Paramètres > Bannissement d’adresses IP (Fail2Ban) (sous « Sécurité »).
- Allez sous l’onglet « Adresses IP bannies », puis cliquez sur Bannir l’adresse IP.
- Spécifiez l’adresse IP ou le masque de sous-réseau CIDR que vous souhaitez interdire sous « Adresse IP ».
- Sélectionnez la durée d’interdiction souhaitée sous « Bannir l’adresse IP », puis cliquez sur OK.
L’adresse ou les adresses IP spécifiées sont désormais bannies. Vous pouvez les voir dans l’onglet « Adresses IP bannies ».
Vous pouvez retirer manuellement une adresse IP de la liste des adresses bannies à tout moment, qu’elle ait été bannie automatiquement ou manuellement.
Pour retirer manuellement une ou plusieurs adresses IP de la liste des adresses bannies :
- Connectez-vous à Plesk.
- Allez sous Outils & Paramètres > Bannissement d’adresses IP (Fail2Ban) (sous « Sécurité »).
- Allez sous l’onglet « Adresses IP bannies ».
- Sélectionnez l’adresse ou les adresses IP que vous souhaitez retirer des adresses bannies dans la liste des adresses IP actuellement bannies, puis cliquez sur Ne plus bannir.
L’adresse ou les adresses IP sélectionnées ne sont plus bannies.
Empêcher des adresses IP ou des noms d’hôtes spécifiques d’être bannies
Vous pouvez empêcher que des adresses IP, des sous-réseaux ou des noms d’hôtes spécifiques soient bannis par Fail2Ban. Par exemple, pour garantir que vous ne serez jamais exclu du serveur par Fail2Ban.
Empêcher une adresse IP, un sous-réseau ou un nom d’hôte d’être banni :
- Connectez-vous à Plesk.
- Allez sous Outils & Paramètres > Bannissement d’adresses IP (Fail2Ban) (sous « Sécurité »).
- Allez dans l’onglet « Adresses IP de confiance », puis cliquez sur Ajouter une IP de confiance.
- Spécifiez l’adresse IP ou le masque de sous-réseau CIDR ne devant jamais être banni sous « Adresse IP ».
- (Facultatif) Ajoutez un message indiquant la raison de l’ajout de l’adresse IP, du masque de sous-réseau CIDR ou du nom d’hôte à la liste sous « Description ». Ce message s’affichera dans l’onglet « Adresses IP de confiance ».
- Cliquez sur OK.
L’adresse IP, le masque de sous-réseau CIDR ou le nom d’hôte spécifiés ne seront pas bannis par Fail2Ban même s’ils déclenchent une ou plusieurs jails actives. Vous pouvez voir la liste des adresses IP, des masques de sous-réseau CIDR et des noms d’hôte qui ne peuvent pas être bannis par Fail2Ban dans l’onglet « Adresses IP de confiance ».
Afficher et télécharger le fichier journal Fail2Ban
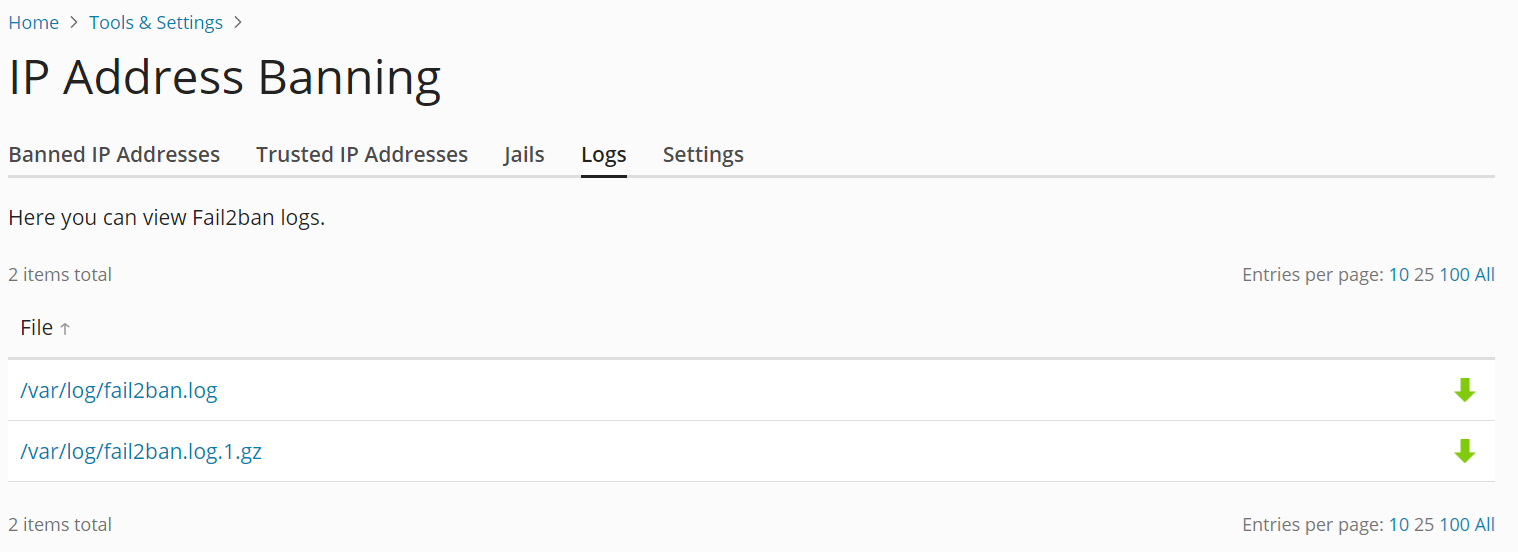
Fail2Ban consigne les informations sur les adresses IP bannies et retirées de la liste des adresses bannies, ainsi que d’autres informations (telles que les jails créées ou activées) dans un fichier journal. Vous pouvez afficher les journaux Fail2Ban à partir de l’interface graphique de Plesk et également les télécharger sur votre ordinateur.
Pour afficher ou télécharger le fichier journal Fail2Ban :
- Connectez-vous à Plesk.
- Allez sous Outils & Paramètres > Bannissement d’adresses IP (Fail2Ban) (sous « Sécurité »).
- Accédez à l’onglet « Journaux », puis cliquez sur un fichier journal pour l’afficher.
- (Facultatif) Cliquez sur l’icône
 à côté d’un fichier journal pour le télécharger sur votre ordinateur.
Activer et désactiver les jails
Pour que Fail2Ban protège un service Plesk spécifique, la jail correspondante doit exister et être activée. Plesk inclut un certain nombre de jails prêtes à l’emploi et couvrant la plupart des services Plesk. De plus, des jails personnalisées supplémentaires peuvent être ajoutées manuellement.
Pour activer une jail :
- Connectez-vous à Plesk.
- Allez sous Outils & Paramètres > Bannissement d’adresses IP (Fail2Ban) (sous « Sécurité »), puis accédez à l’onglet « Jails ».
- Sélectionnez une ou plusieurs jails et cliquez sur Activer. Cette option est disponible uniquement lorsque le service Fail2Ban est en cours d’exécution (case Activer la détection d’intrusion cochée dans l’onglet Paramètres).
La ou les jails sélectionnées sont désormais actives. Fail2Ban bannit désormais les adresses IP qui déclenchent les jails activées.
Note: Lors de l’activation de plusieurs jails à la fois, si l’une d’entre elles ne s’active pas, aucune des jails sélectionnées ne sera activée. Dans ce cas, activez les jails une par une.
Pour désactiver une jail :
- Connectez-vous à Plesk.
- Allez sous Outils & Paramètres > Bannissement d’adresses IP (Fail2Ban) (sous « Sécurité »), puis accédez à l’onglet « Jails ».
- Sélectionnez une ou plusieurs jails et cliquez sur Désactiver.
La ou les jails sélectionnées sont désormais inactives. Fail2Ban ne bannira plus les adresses IP qui déclencheraient les jails désactivées. De plus, toutes les adresses IP qui ont été bannies par les jails désactivées sont désormais débloquées.
Note: Les jails plesk-one-week-ban et plesk-permanent-ban ne peuvent pas être désactivées.
Ajouter et supprimer des jails personnalisés
Si aucune des jails Plesk par défaut ne couvre un service spécifique ou ne protège contre une attaque spécifique, vous pouvez corriger ce problème en ajoutant une jail personnalisée.
Note: Lorsque vous ajoutez une jail personnalisée, vous devrez probablement ajouter d’abord un nouveau filtre.
Pour ajouter une jail personnalisée :
-
Allez sous Outils & Paramètres > Bannissement d’adresses IP (Fail2Ban) (sous « Sécurité »), puis accédez à l’onglet « Jails ».
-
Cliquez sur Ajouter une jail.
-
Donnez un nom à la jail en le saisissant sous « Nom ».
-
Sélectionnez le filtre que la jail utilisera dans le menu « Filtre ». Vous pouvez utiliser l’un des filtres par défaut ou un filtre que vous avez ajouté manuellement.
-
Ajoutez une ou plusieurs actions de prison à exécuter chaque fois que la jail est déclenchée, soit en les saisissant sous forme libre, soit en sélectionnant l’une des quatre actions préconfigurées dans le menu « Action », puis en cliquant sur Ajouter. Les actions préconfigurées suivantes sont disponibles :
-
iptables bannit l’adresse IP qui a déclenché la jail sur un seul port. Spécifiez les paramètres de la règle de pare-feu à ajouter, par exemple :
iptables[chain="INPUT", name="ssh", port="22", protocol="tcp"] -
iptables-multiport bannit l’adresse IP qui a déclenché la jail sur plusieurs ports. Spécifiez les paramètres de la règle de pare-feu à ajouter, par exemple :
iptables-multiport[chain="INPUT", name="apache", port="80,443", protocol="tcp"] -
iptables-allports bannit un attaquant sur tous les ports. Il n’est pas nécessaire de spécifier d’autres paramètres que le nom, par exemple :
iptables-allports[name=recidive] -
sendmail envoie une notification par e-mail à l’adresse e-mail spécifiée. Spécifiez l’adresse e-mail de destination, par exemple :
sendmail[mailcmd='/usr/sbin/sendmail -f "fail2ban@example.com" "mail@example.com"', dest="root", sender="fail2ban", sendername="Fail2Ban", name="default"]Dans cet exemple, un e-mail de « fail2ban@example.com » sera envoyé à « mail@example.com ».
-
-
Spécifiez un ou plusieurs fichiers journaux que Fail2ban analysera à l’aide du filtre sélectionné sous « Chemin d’accès du fichier journal ».
-
Spécifiez la durée de bannissement en secondes sous « Période de bannissement de l’adresse IP ».
-
Spécifiez le nombre de tentatives de connexion infructueuses nécessaires pour qu’un bannissement soit émis : « Nombre maximum de tentatives de connexion échouées ».
-
Cliquez sur OK.
La jail existe désormais et est active. Vous pouvez la trouver dans l’onglet « Jails ».
Pour supprimer une ou plusieurs jails personnalisées :
- Connectez-vous à Plesk.
- Allez sous Outils & Paramètres > Bannissement d’adresses IP (Fail2Ban) (sous « Sécurité »), puis accédez à l’onglet « Jails ».
- Sélectionnez une ou plusieurs jails personnalisées. Cliquez sur Supprimer, puis sur Oui, supprimer.
Les jails sélectionnées sont désormais supprimées et ne seront plus affichées dans l’onglet « Jails ». De plus, toutes les adresses IP qui ont été bannies par les jails supprimées sont désormais débloquées.
Note: Les jails Plesk par défaut ne peuvent pas être supprimées.
Éditer des jails
Vous pouvez modifier les propriétés des jails par défaut et des jails personnalisées.
Note: La modification des valeurs « Période de bannissement de l’adresse IP » ou « Nombre maximum de tentatives de connexion échouées » d’une jail entraînera le remplacement de ces valeurs par défaut spécifiées dans l’onglet « Paramètres ».
Pour modifier les paramètres d’une jail existante :
- Connectez-vous à Plesk.
- Allez sous Outils & Paramètres > Bannissement d’adresses IP (Fail2Ban) (sous « Sécurité »), puis accédez à l’onglet « Jails ».
- Cliquez sur le nom de la jail, puis sur Changer les paramètres.
- Modifiez les paramètres de la jail, puis cliquez sur OK.
Les nouveaux paramètres de la jail sont désormais en vigueur.
Ajouter et supprimer des filtres
Un filtre est une combinaison d’expressions régulières utilisée pour analyser les fichiers journaux à la recherche d’entrées correspondant à des modèles spécifiques associés à des attaques ou à des échecs d’authentification. En général, vous avez besoin d’au moins un filtre pour chaque service que vous souhaitez protéger avec Fail2Ban, car un filtre destiné à détecter des irrégularités dans les fichiers journaux d’Apache ne convient pas à une utilisation avec Postfix, et vice versa.
Note: Un filtre doit avoir une syntaxe appropriée pour fonctionner correctement. Découvrez comment développer des filtres Fail2Ban.
Pour ajouter un filtre :
- Connectez-vous à Plesk.
- Allez sous Outils & Paramètres > Bannissement d’adresses IP (Fail2Ban) (sous « Sécurité »), puis accédez à l’onglet « Jails ».
- Cliquez sur Gérer les filtres, puis sur Ajouter un filtre.
- Spécifiez le nom du filtre et l’expression régulière utilisée pour faire correspondre les lignes des fichiers journaux.
Configurer la protection contre les attaques par force brute
La limitation du nombre de tentatives de connexion améliore la protection contre les attaques par force brute sur votre serveur Plesk. La protection contre les attaques par force brute est activée par défaut pour les connexions via l’interface utilisateur et l’API, mais également pour les demandes de réinitialisation de mot de passe.
Par défaut, après cinq tentatives de connexion, l’adresse IP est restreinte pendant 300 secondes avant d’être autorisée à se reconnecter. Pour configurer la protection contre les attaques par force brute, ajoutez les lignes suivantes au fichier panel.ini» (En savoir plus sur la configuration du fichier panel.ini) :
[security]
bruteforceProtection.enabled = true
bruteforceProtection.rateLimit = 5
bruteforceProtection.rateLimitPeriod = 300
Modifiez ces paramètres pour désactiver la protection contre la force brute ou modifiez la limite des tentatives et la période de limite des tentatives.
| Option | Description |
|---|---|
bruteforceProtection.enabled |
Active ou désactive la protection contre les attaques par force brute. La valeur peut être true` ou false. |
bruteforceProtection.rateLimit |
Nombre de tentatives d’accès infructueuses autorisées par une adresse IP. Ce nombre peut être un entier positif. |
bruteforceProtection.rateLimitPeriod |
Période limite de tentatives en secondes. Ce nombre peut être un entier positif. |
Jails Fail2Ban par défaut de Plesk
Plesk inclut un certain nombre de jails préconfigurées prêtes à l’emploi. Elles couvrent tous les services d’hébergement (serveur web, serveur de messagerie, serveur FTP, etc.). Les jails préconfigurées suivantes sont disponibles :
| Nom | Fonction |
|---|---|
| plesk-apache | Analyse les échecs d’authentification Apache. |
| plesk-apache-badbot | Analyse les journaux d’accès Apache à la recherche de récupérateurs d’e-mails et de scanners de vulnérabilité. |
| plesk-dovecot | Analyse les échecs d’authentification Dovecot IMAP, POP3 et Sieve. |
| plesk-modsecurity | Bannit les adresses IP identifiées comme dangereuses par le pare-feu applicatif ModSecurity. Cette jail peut être activée uniquement si ModSecurity est en cours d’exécution. Les attaquants sont bannis même si ModSecurity fonctionne en mode « Détection uniquement ». |
| plesk-one-week-ban | Utilisée pour bloquer les adresses IP qui ont été bannies manuellement pendant une semaine. Cette jail ne peut être ni désactivée ni modifiée. |
| plesk-panel | Analyse les échecs d’authentification Plesk. |
| plesk-permanent-ban | Utilisée pour bloquer les adresses IP qui ont été bannies manuellement de façon permanente. Cette jail ne peut être ni désactivée ni modifiée. |
| plesk-postfix | Analyse les échecs d’authentification SMTP et SASL de Postfix. |
| plesk-proftpd | Analyse les échecs d’authentification ProFTPD. |
| plesk-roundcube | Analyse les échecs d’authentification de messagerie web Roundcube. |
| plesk-wordpress | Analyse les échecs d’authentification WordPress. |
| recidive | Analyse le journal Fail2Ban pour rechercher les bannissements émis par d’autres jails. Bloque les adresses IP qui sont bannies à plusieurs reprises par d’autres jails dans un court laps de temps et qui ne peuvent pas accéder à Plesk ou à l’un des services Plesk pendant une semaine. |
| ssh | Analyse les échecs d’authentification SSH. |
Filtres Fail2Ban par défaut de Plesk
Plesk inclut un certain nombre de filtres préconfigurés prêts à l’emploi. Ils couvrent tous les services d’hébergement (serveur web, serveur de messagerie, serveur FTP, etc.). Ces filtres sont utilisés dans les jails Plesk par défaut et peuvent également être utilisés avec des jails personnalisées. Les filtres préconfigurés suivants sont disponibles :
| Nom | Fonction |
|---|---|
| apache-auth | Analyse les échecs d’authentification Apache. |
| apache-badbots | Analyse les robots de spam et les robots d’exploration web malveillants. |
| plesk-courierlogin | Analyse les échecs d’authentification Courier IMAP et POP3. |
| plesk-dovecot | Analyse les échecs d’authentification Dovecot IMAP, POP3 et Sieve. |
| plesk-modsecurity | Analyses des attaques contre les applications web détectées par le pare-feu applicatif ModSecurity. |
| plesk-panel | Analyse les échecs d’authentification Plesk. |
| plesk-qmail | Analyse les échecs d’authentification SMTP de qmail. |
| plesk-roundcube | Analyse les échecs d’authentification de messagerie web Roundcube. |
| plesk-wordpress | Analyse les échecs d’authentification WordPress. |
| postfix | Analyse les échecs d’authentification SMTP et SASL de Postfix. |
| proftpd | Analyse les échecs d’authentification ProFTPD. |
| recidive | Analyse les adresses IP bannies à plusieurs reprises par Fail2Ban. |
| sshd | Analyse les échecs d’authentification SSH. |