(Plesk for Linux) Watchdog によるディスクスペース使用状況のモニタリング
概要
Plesk とそのサービスが正しく動作するかどうかは、サーバ上に十分なディスクスペース空き容量と一意のファイル識別子 (inode) があるかどうかに依存します。サーバに十分な空き容量がない場合、Plesk やホストされているウェブサイトが影響を受けます。
Plesk for Linux では、これら両方が不足するのを防ぐために、 Monit ユーティリティ を使用する無料の Watchdog 拡張を使用できます。この拡張は、Plesk サーバのファイルシステムパーティションをモニタリングし、ディスクスペース空き容量または inode が不足する恐れのあるパーティションを管理者にメールで通知します。また、パーティションの空き容量または inode が不足するようになったら事前に設定したコマンドを実行することもできます。
このトピックでは、すべてのパーティションのディスクスペース使用状況のモニタリングを有効化する方法、特定のパーティションのモニタリング設定を構成する方法、および特定のパーティションのモニタリングを無効化する方法について説明します。
前提条件
ディスクスペース使用状況をモニタリングするには、 Watchdog 拡張 を 拡張カタログからインストールする 必要があります。
概要
Plesk サーバ上の一部またはすべてのパーティションに対してモニタリングを有効化することができます。
モニタリング対象パーティションごとに、2 つのしきい値を個別に設定できます。
ディスクスペース使用量のしきい値は、パーティションのディスクスペース総容量に対するパーセンテージ、またはキロバイト、メガバイト、ギガバイト単位の絶対値で設定できます。デフォルトで、しきい値は 80% に設定されています。
ファイル数のしきい値は、パーティションの inode 総数に対するパーセンテージ、または絶対値 (負でない整数) で設定できます。デフォルトで、しきい値は 80% に設定されています。
注釈
いずれかのしきい値に絶対値を設定する場合、入力された値は検証されません。パーティションのディスクスペース総容量または許容される inode 数を超える値を入力した場合、しきい値に到達することも超過することもなく、通知も送信されません。
ディスクスペース使用状況のモニタリングが有効になっている場合、Watchdog はモニタリング対象として設定されているすべてのパーティションの状態を定期的に確認 (ポーリング) します (デフォルトのポーリング間隔は 5 分ごと)。モニタリング対象パーティションのいずれかで、設定されたしきい値に達したか、しきい値を超えたことが検出された場合、以下のアクションのいずれかまたは両方が自動的に実行されます。
デフォルトでは、指定されたメールアドレスにメール通知が送信されます。
さらに、サーバ上で実行されるコマンドを設定することもできます。
これにより、1 つまたは複数のパーティションでディスクスペース空き容量や利用可能な inode 数が不足しつつあることを事前に把握し、ディスクスペースや inode が完全に枯渇した場合に発生する事態を防ぐための対策を講じることができます。また、Watchdog を設定して、ディスクスペースや inode を解放するコマンドやスクリプトを自動的に実行することもできます (このようなコマンドやスクリプトは Plesk に付属していないため、ご自身で用意する必要があります)。
ディスクスペース使用状況のモニタリングを有効にする
ディスクスペース使用状況のモニタリングを開始するには、まずサービスとディスクのモニタリングを有効化する必要があります。
サービスとディスクのモニタリングを有効化するには:
Plesk にログインします。
ナビゲーションペインで [拡張] をクリックし、[自分の拡張] タブに移動します。
Watchdog 拡張を探し、 [開く] をクリックします。
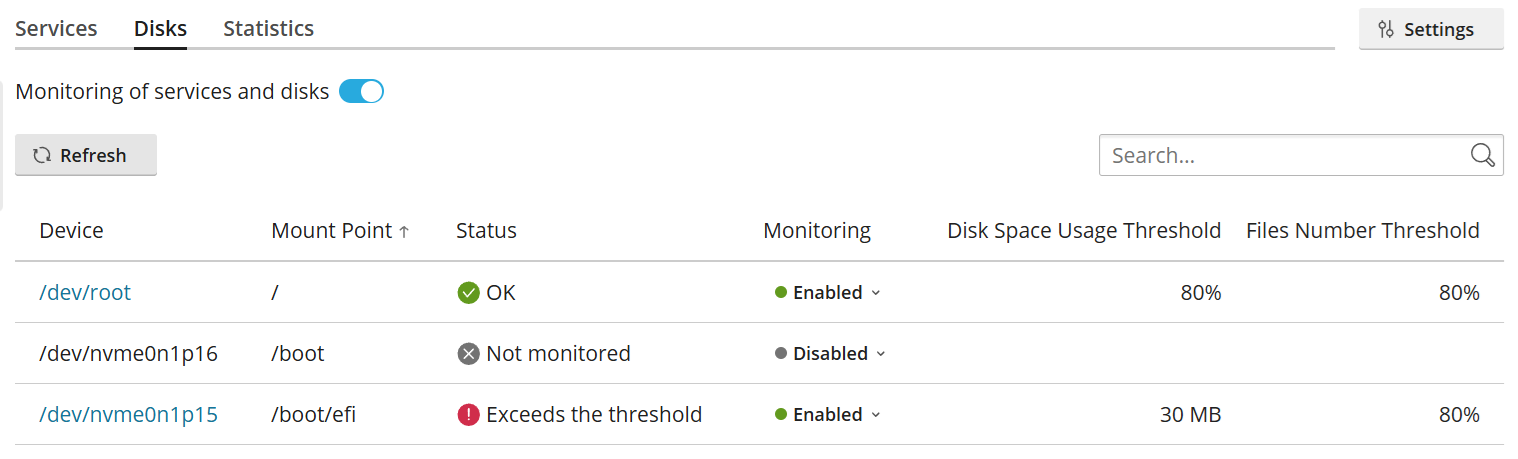
[ディスク] タブに移動し、[サービスとディスクのモニタリング] トグルボタンをクリックして [有効] と表示されるようにします。
すべてのパーティションのディスクスペース使用状況がモニタリングされるようになりました。各パーティションのディスクスペースと inode の使用状況のしきい値は 80% に設定されており、いずれかのしきい値に達した場合にコマンドが実行されない設定になっています。
注釈
ディスクスペース使用状況のモニタリングを有効化すると、 Plesk サービスのモニタリング も有効になります。どちらか一方だけを有効化または無効化することはできません。
個々のパーティションのディスクスペース使用状況モニタリング設定を構成する
モニタリング対象パーティションごとに、ディスクスペース使用量とファイル数のデフォルトのしきい値を変更できます。また、いずれかのしきい値に達した場合や超えた場合に実行されるコマンドまたはスクリプトを設定することもできます。
特定のパーティションのディスクスペース使用状況のモニタリング設定を構成するには:
Plesk にログインします。
ナビゲーションペインで [拡張] をクリックし、[自分の拡張] タブに移動します。
Watchdog 拡張を探し、 [開く] をクリックします。
[ディスク] タブに移動し、[デバイス] の下で、モニタリング設定を構成するパーティションをクリックします。現在モニタリング中のパーティションのみ設定できます。
(オプション) ディスクスペース使用量またはファイル数のしきい値を変更します。パーセンテージと絶対値を切り替えるには、値を含むフィールドの右側にあるドロップダウンメニューから希望のオプションを選択します。
-
(オプション) いずれかのしきい値に達するか超過した場合に実行するコマンドを [実行するコマンド] フィールドに入力します。
注釈
このコマンドは、Watchdog がパーティションをポーリングするたびに実行されるのではなく、しきい値に達したか超えた場合にのみ 1 回だけ実行されます。コマンドの実行後、パーティションのディスクスペースまたは inode の使用量は正常に戻り、その後再びしきい値に達するか超えた場合にのみ、コマンドが再度実行されます。
設定の構成が終了したら、 [保存] をクリックします。
変更は、Watchdog が次にパーティションをポーリングしたときに有効になります。
個々のパーティションのディスクスペース使用状況モニタリング設定を無効にする
Watchdog で特定のパーティションをモニタリングしたくない場合は、そのパーティションのモニタリングを無効化することができます。
特定のパーティションのディスクスペース使用状況のモニタリングを無効化するには:
Plesk にログインします。
ナビゲーションペインで [拡張] をクリックし、[自分の拡張] タブに移動します。
Watchdog 拡張を探し、 [開く] をクリックします。
[ディスク] タブに移動し、リストから目的のパーティションを見つけます。
そのパーティションの [モニタリング] の下で [有効] をクリックし、[無効化] をクリックします。
パーティションのモニタリングは停止されます。[無効] をクリックして [有効化] をクリックすることで、そのパーティションのモニタリングを再度有効化できます。
注釈
パーティションのディスクスペース使用状況のモニタリングを無効化すると、モニタリング設定の変更 (変更があった場合) がすべてリセットされます。後で同じパーティションのモニタリングを再度有効化する場合は、モニタリング設定を再度構成する必要があります。