Einhaltung des Security.txt-Standards
security.txt ist ein weit verbreiteter Standard für die Meldung von Sicherheitslücken an die Betreiber von Diensten. Das Hauptziel von security.txt ist es, sowohl Ihren Kunden als auch Sicherheitsforschern die Kontaktaufnahme mit Ihnen zu erleichtern, wenn sie eine Schwachstelle in einer Plesk-Domain finden.
Ab der Version 18.0.62 ist Plesk Obsidian vollständig mit dem Standard kompatibel:
- Die Datei
security.txtwird für alle auf einem Plesk-Server gehosteten Domains erstellt. - Die Datei
security.txtwird in Plesk nach der Erstellung und der Aktivierung der Funktion kontinuierlich aufrechterhalten. - In Plesk wird die benutzerdefinierte Datei
security.txteiner Domain berücksichtigt und die Sicherheitsrichtlinien aus der Serverdatei werden nie auf die Domain angewendet. - Plesk aktualisiert automatisch das Ablaufdatum der Datei.
So können Sie die Anforderungen von security.txt auf Ihrem Plesk-Server einhalten:
-
Installieren Sie die Erweiterung „Native security.txt compliance“.
-
Sobald die Erweiterung installiert ist, klicken Sie auf Öffnen.
-
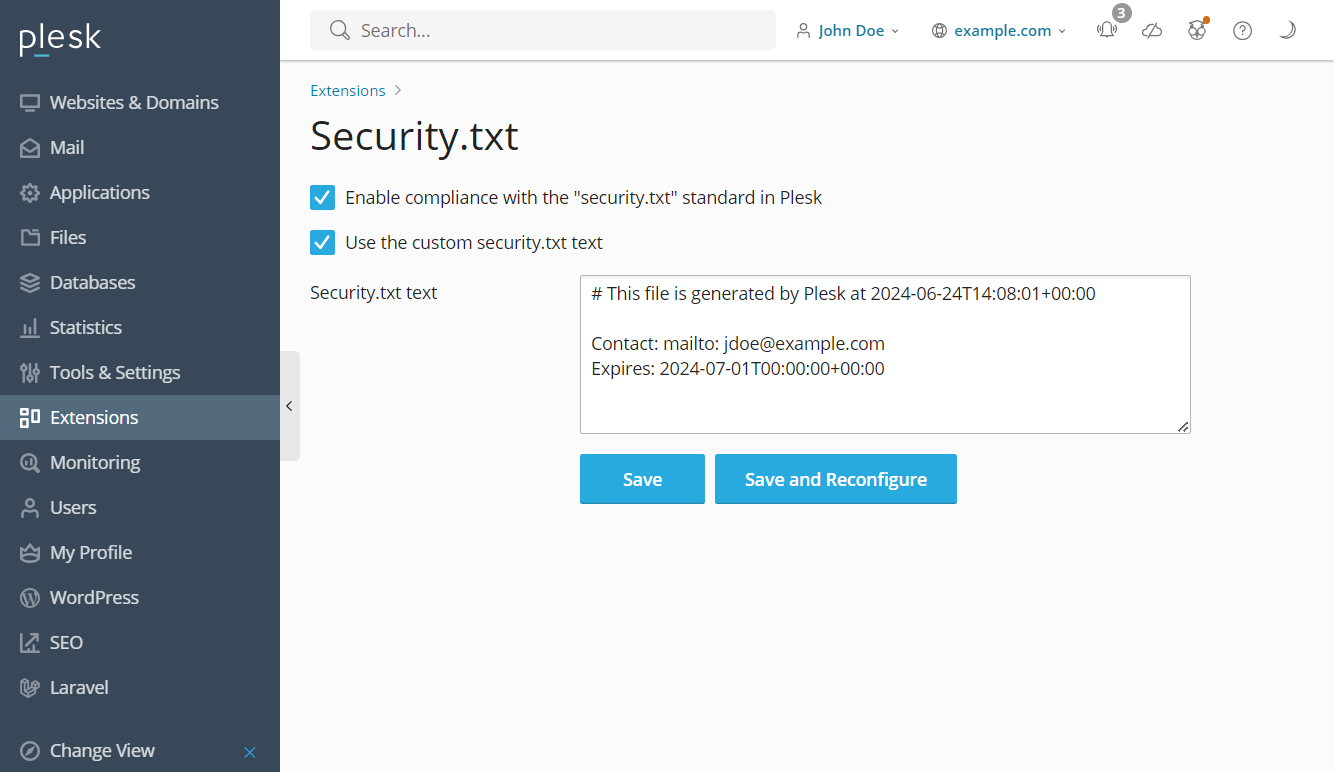
Aktivieren Sie das Kontrollkästchen „Enable compliance with the „security.txt“ standard in Plesk“ (Einhaltung mit dem Standard „security.txt“ in Plesk aktivieren).

-
(Optional) Um die von Plesk generierte Standarddatei
security.txtzu ändern, aktivieren Sie das Kontrollkästchen „Use the custom security.txt text“ (Benutzerdefinierten security.txt-Text verwenden). Geben Sie dann im Feld „security.txt text“ (security.txt-Text) an, was geändert werden soll. Sie können die Datei auch über die Befehlszeile ändern. -
Speichern Sie Ihre Änderungen, indem Sie auf eine der folgenden Optionen klicken:
-
Save (Speichern), um die Konfiguration zu speichern und die Änderungen später manuell anzuwenden. Dies ist zum Beispiel sinnvoll, wenn Sie Ihren Kunden mehr Zeit geben möchten, damit sie ihre Domains an die Änderungen anpassen können, und so mögliche Probleme vermeiden wollen. Sie können den Server manuell rekonfigurieren, indem Sie den folgenden Befehl in der Befehlszeilenschnittstelle ausführen:
plesk repair web. - Save and Reconfigure (Speichern und neu konfigurieren), wenn Sie die Änderungen übernehmen und den Plesk-Server sofort neu konfigurieren möchten.
Jetzt wird der security.txt-Standard auf Ihrem Plesk-Server eingehalten.
Verwenden des Befehlszeilenprogramms
Sie können das Befehlszeilenprogramm plesk ext security-txt-plesk verwenden, um Ihre security.txt-Konfiguration zu aktualisieren. Das Dienstprogramm akzeptiert die folgenden Befehle:
-
--help: Alle verfügbarensecurity-txt-plesk-Befehle werden angezeigt. -
--status: Zeigt an, ob der Plesk-Server die Richtliniensecurity.txtverwendet. Wenn Sie die Standardrichtliniesecurity.txtaktiviert haben, wirdvalue: onzurückgegeben. Wenn Sie eine benutzerdefinierte Richtliniesecurity.txtaktiviert oder einen benutzerdefinierten Dateipfad verwendet haben, wirdvalue: customzurückgegeben. -
--enable: Dadurch werden alle Domains auf Ihrem Plesk-Server so konfiguriert, dass sie die Standardrichtliniensecurity.txtverwenden. So werden alle benutzerdefinierten Dateipfade und die Option „Use the custom security.txt text“ (Benutzerdefinierten security.txt-Text verwenden) im Erweiterungsmenü deaktiviert. -
--disable: Damit werden alle Domains auf Ihrem Plesk-Server so eingestellt, dass sie allesecurity.txt-Richtlinien ignorieren. -
-
-path: Legt einen neuen Dateipfad für die Dateisecurity.txtfest. Um einen neuen Pfad für einesecurity.txt-Datei festzulegen, benötigen Sie zunächst einesecurity.txt-Datei am neuen Speicherort. -
Bemerkung:
Damit dieser Befehl funktioniert, müssen Sie zunächst die Option „Use the custom security.txt text“ (Benutzerdefinierten security.txt-Text verwenden) im Erweiterungsmenü „Native security.txt compliance“ (Native security.txt-Compliance) aktivieren. Dann müssen Sie den Befehl
--reconfigure-alleinfügen. Wenn Sie beispielsweise ein benutzerdefiniertessecurity-Verzeichnis für Ihresecurity.txt-Datei verwenden möchten, erstellen Sie die neue Datei und das neue Verzeichnis und verwenden Sie dann den folgenden Befehl:plesk ext security-txt-plesk -path /security/security.txt --reconfigure-all.
-
-
--reconfigure-all: Aktualisiert alle Domains auf dem Plesk-Server, um die neuesecurity.txt-Konfiguration zu verwenden.