Plesk Updates
summary
To make sure you’re not missing out on new Plesk features, quality of life improvements, and important security fixes, you need to keep your server up to date.
In this topic, you will learn how to update Plesk and its services, and also how to configure automatic updates.
To ensure that your Plesk is up to date, automatic installation of Plesk updates is enabled by default. To stay safe and enjoy the latest features, we strongly recommend that you keep automatic updates enabled. Moreover, you can set the desired weekdays and time range when Plesk updates are installed.
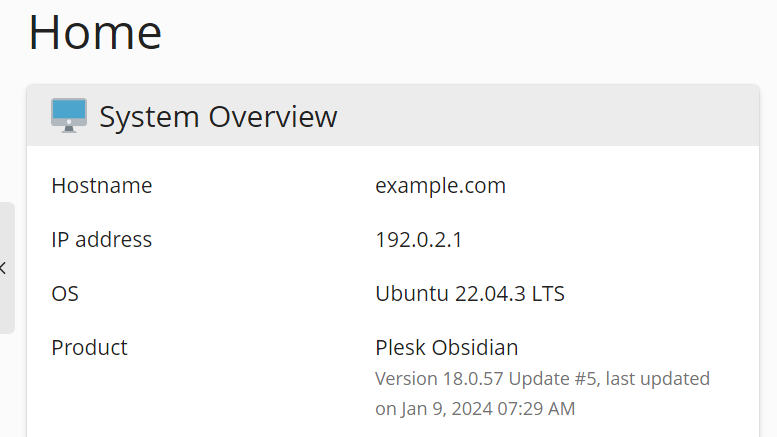
You can see the information about the current Plesk version and available updates on the Home page under “System Overview”.

Plesk also shows notifications when updates are available or have been installed in the Plesk UI notifications pane.
Plesk Versioning
Each Plesk version consists of a name and version identifier. For example, in Plesk Obsidian 18.0.58, Obsidian is the name, 18.0.58 is the version identifier, and the number 58 is Update 58.
The shortened reference to Plesk version includes only the version name, for example, Plesk Obsidian.
Updates
Plesk updates add new features, enhancements, and security fixes. They are free of charge and are available for all Plesk installations, regardless of their license key.
Updating Plesk does not change its version. The information about the applied update is added to the product version name, for example, Plesk Obsidian 18.0 Update 58.
Note
Plesk updates are applied sequentially. You cannot install only a specific update or skip one of the updates.
You can update Plesk in a number of ways:
Automatically (recommended and enabled by default).
Manually, using the Plesk user interface.
Manually, using the command line interface.
Overview
In Plesk, you can manage updates of the following components:
-
Plesk packages and service packages built by Plesk. The latter include all Plesk extensions, Plesk Premium Antivirus, Sophos Anti-Virus for Servers, and so on.
See Updating Plesk Manually via the User Interface below and also Updating Plesk Manually via the Command Line.
-
(Plesk for Linux) Operating system packages. You can manage their updates and notifications about the updates in Plesk if the System Updates tool is turned on.
See Updating System and Third-Party Components Manually below.
-
(Plesk for Linux) Third-party components shipped with Plesk, such as MySQL/MariaDB, PHP, web servers, various mail services, and so on. These components can be updated as part of either system updates or Plesk updates if you have enabled automatic updating of third-party components.
Note
Use automatic updates of third-party components with care. Websites hosted on your server might be incompatible with newer versions of certain components. The System Updates tool allows you to lock selected packages so that no updates will be applied to them. This is why automatic updates of third-party components are turned off by default.
To enable automatic updates for third-party components, go to Tools & Settings > Update Settings (under “Plesk”) and select the “Automatically install updates for third-party components shipped by Plesk” checkbox.
This table shows which Plesk tool can be used for updating various software components.
Tools or Packages to Update |
Plesk packages and service packages built by Plesk |
Service packages shipped by Plesk (third-party components) |
Operating system packages (Linux) |
|---|---|---|---|
|
The System Updates tool. Available in Tools & Settings > System Updates in Plesk for Linux. |
➖ |
➕
|
➕ |
|
Plesk Installer. Available in Tools & Settings > Updates or via the command line interface. |
➕ |
➕ Note If the System Updates tool is disabled or not supported, these components are updated via Plesk Installer. |
➖ |
*Exceptions: an update delivered by Plesk Installer will contain third-party service package updates if these updates are required by dependency for a Plesk package update. Especially if a Plesk update resolves critical security or stability issues.
Updating Plesk and System Components Automatically
By default, Plesk checks for updates once a day. If updates are available, Plesk automatically downloads and installs them.
The following update options are enabled by default in Tools & Settings > Update Settings (under “Plesk”):
“Automatically install Plesk updates (Recommended)”. This option uses Plesk Installer and allows automatic updating of Plesk and its built-in services. In some cases, Plesk third-party components can be updated at the same time with Plesk.
(Plesk for Linux) “Automatically install updates for third-party components shipped by Plesk”. Third-party services can be updated simultaneously either with Plesk components or with system components (if the System Updates tool is turned on).
The “Automatically install system package updates” option is not enabled by default and is available in Plesk for Linux only. This option uses the System Updates tool and allows automatic updating of system packages and Plesk third-party components.
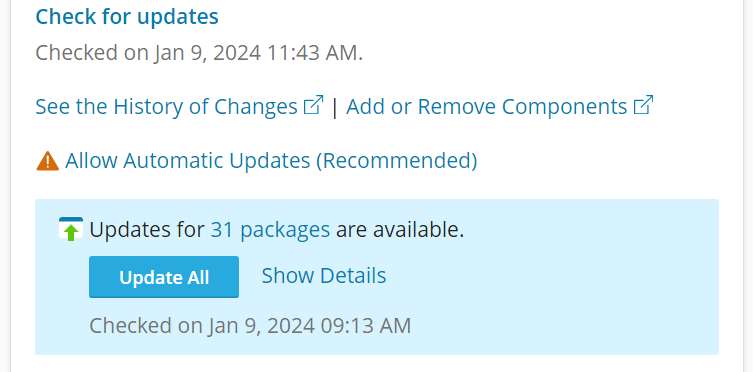
You can see the status of updates and also install updates manually on the home page under “System Overview”. Alternatively, go to Tools & Settings > System Updates (under “Server Management”). For details, refer to System Updates.
Note
To prevent certain packages from being updated automatically, select them in the list of packages (in All Packages) and lock them by clicking Lock. Note that you can do this only if you use the System Updates tool.

If you disable automatic Plesk updates, the home page will prompt you to allow automatic updates.

Setting Time for Installing Automatic Plesk Updates
You can set the desired weekdays and/or time range (the start and end hour) when automatic Plesk updates are installed.
It is useful in the following cases:
You want to comply with change management procedures adopted by your hosting provider (for example, all updates must be installed outside/during business hours).
You are required by law to inform servers’ owners about Plesk downtime in advance.
The legislation of your country obliges telecommunications companies to carry out certain procedures during update.
You can manage when automatic Plesk updates are installed for:
An individual server. In this case, see the instruction below.
Clusters of licenses. Do this via KAPC. Read more in this article.
To specify the desired weekdays and time range when Plesk auto-updates are installed:
Add an entry to the panel.ini file according to the following pattern:
[updates]
updateDays = weekday1,weekday2
timeFrameStart = hour
timeFrameEnd = hour
Note
You must specify not less than two weekdays and/or hours in UTC (convert your local time to UTC).
Note
You can specify the updateDays parameter and the pair of the timeFrameStart and timeFrameEnd
parameters separately (to specify only weekdays or only the time range).
However, you cannot use the timeFrameStart and the timeFrameEnd parameters individually.
You must specify them both to set the desired time range.
For example, if you add the following entry to the panel.ini file
[updates]
updateDays = saturday,sunday
timeFrameStart = 11
timeFrameEnd = 18
Plesk updates will be installed only on Saturday and Sunday between 11 and 18 hours (UTC).
Note
The specified time range sets the desired time interval during which the installation of updates starts but does not guarantee that the installation of updates will be finished within that interval.
Updating Plesk Manually via the User Interface
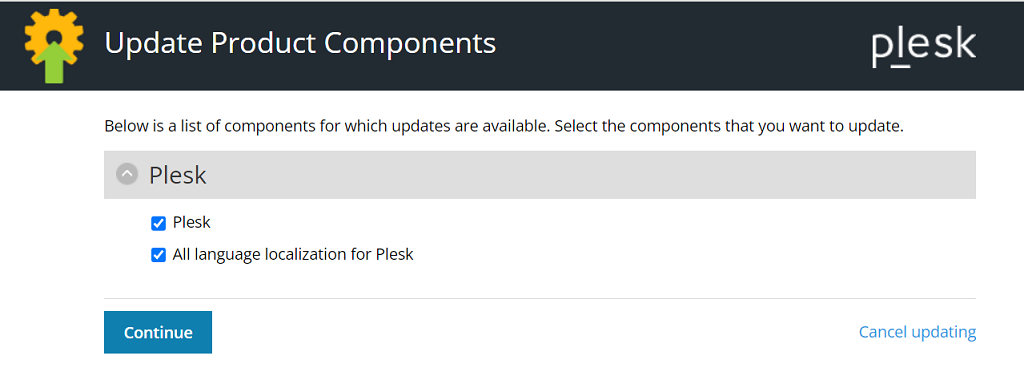
You can update Plesk and third-party components by clicking Tools & Settings > Updates (under “Plesk”), and then going to the “Update Components” tab. Here you can select particular components that have available updates and click Continue to update them.

Updating Plesk Manually via the Command Line
To install all available updates within the current Plesk version, including updates for components such as MySQL/MariaDB or PHP, use the following command:
plesk installer --select-release-latest --upgrade-installed-components
If you want to install only Plesk updates, use the following command:
plesk installer install-panel-updates
In this case, components such as MySQL/MariaDB and PHP will not be updated unless it is required for proper Plesk functioning.
Changing the Updates Installation Directory and Connect Using Proxy
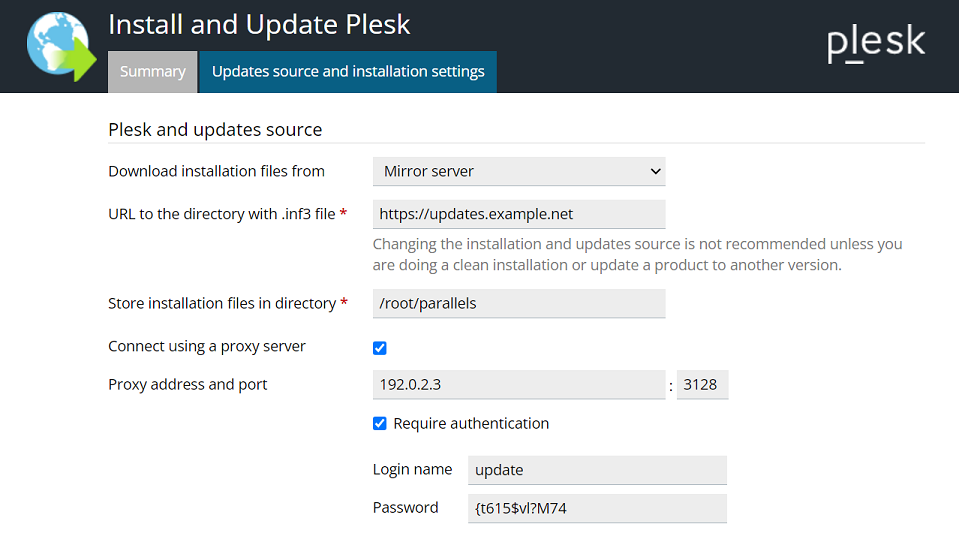
You can change the directory where Plesk Installer downloads its files
(by default the installation directory is /root/parallels)
and/or choose to connect using a proxy server.
Go to Tools & Settings > Updates (under “Plesk”). Plesk Installer will be opened in a new browser window or tab.
If Plesk Installer starts downloading updates and you would only like to change settings at the moment, click Cancel.
-
Go to the “Updates source and installation settings” tab and do the following:
Change the default installation directory
/root/parallelsto a custom one.If you use a proxy server, select the “Connect using a proxy” checkbox, specify the proxy host name and port number in the corresponding fields and, if the proxy server requires authentication, select the “Require authentication” checkbox and specify the username and password.
-
Click Save to save the settings.
Using the Plesk Port for Installing and Updating Components
In Plesk Obsidian 18.0.57 and earlier, for installing and updating Plesk components to be possible, the TCP port 8447 had to be opened in the firewall. However, when running Plesk in the cloud, opening a custom port in the firewall may be complicated or even impossible.
Starting from Plesk Obsidian 18.0.58, it is possible to install and update Plesk components without opening the TCP port 8447 in the firewall. This is done by configuring Plesk to proxy requets to Plesk Installer via its own port. Effectively, Plesk Installer uses the same port used by Plesk.
Configuring Plesk Installer to use the Plesk port:
Log in to Plesk.
Go to Tools & Settings > Update Settings (under “Plesk”).
Select the “Access Plesk Installer via the Plesk hostname and port” checkbox, and then click OK.
Plesk Installer will now use the Plesk port instead of the TCP port 8447.
You can also configure Plesk Installer to use the Plesk port via the CLI by running the following command:
plesk bin settings --set installerProxyMode=true
To have Plesk Installer use the TCP port 8447, either clear the “Access Plesk Installer via the Plesk hostname and port” checkbox, or run the following command:
plesk bin settings --set installerProxyMode=false
