Hosting Node.js Applications
summary: Node.js is an open-source, cross-platform runtime environment that makes it possible to run JavaScript code outside a web browser. Plesk offers a suite of tools to help you host Node.js applications with little hassle.
In this topic, you will learn how to upload, configure, and run Node.js applications in Plesk. Note that this topic presumes that you already have your application ready, or are planning on creating one. This is not a guide on how to create Node.js applications.
Prerequisites
Before you can host Node.js applications, the free Node.js Toolkit extension must be installed on the Plesk server:
- If you are the Plesk administrator, install the extension from the Extensions Catalog.
- Otherwise, contact your hosting provider and ask them to install the extension for you.
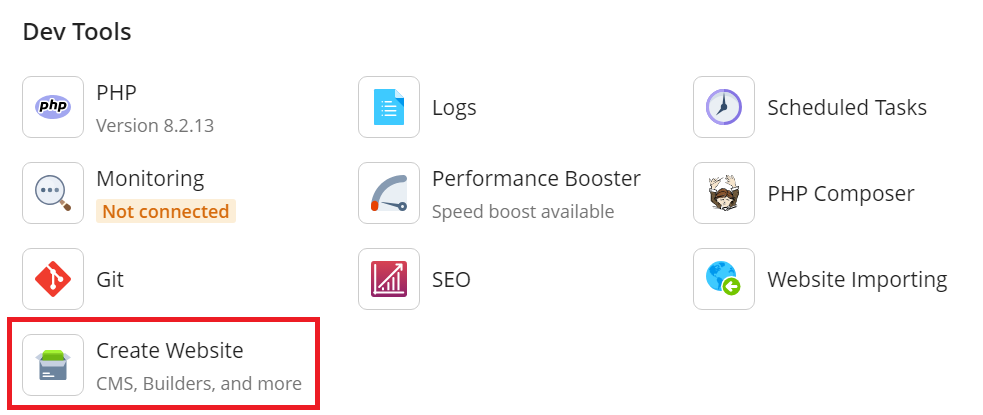
Once the extension is installed, you are ready to begin. The Node.js icon will appear in the “Create Website” drawer found on the domains’ cards.
Uploading Your Application
Before you can configure and run your application, you need to upload it to the Plesk server.
The easiest ways to upload your application are using the built-in File Manager or an FTP client:
If you are familiar with Git, we recommend pulling the application files directly from the repository using the Plesk Git extension.
When you receive an application from a third party (for example, a freelance developer), it is usually in the form of a compressed file or a link to a Git repository. In any case, you may note that some of the application’s files are placed in different subdirectories. For the application to run properly, it is important to preserve this structure when uploading the application.
At the most basic level, the directory in which all of application’s files and subdirectories are placed is called the “application root”. Inside it, there is usually a subdirectory called “document root” in which the application’s static content files can be found. You will need to specify the paths to these directories later when configuring the application. If you are unsure which files should go in which directory, consult the person or organization that provided you with the application.
Once the application files have been uploaded, you can proceed to the next step.
Configuring Your Application
Once you have uploaded your application, it’s time to configure it so that it runs properly.
Configuring your Node.js application:
- Log in to Plesk.
- Go to Websites & Domains, find the domain that will host your application, and then click Create Website > Node.js.
- Next to “Node.js Version”, select the version of the runtime environment that will be used to run your application. Node.js application are usually created with a specific runtime environment version in mind, and selecting an inappropriate version may prevent your application from running properly. If you are unsure which runtime environment version to choose, consult the person or organization that provided you with the application.
- Next to “Package Manager”, select the desired package manager that will be used to install packages necessary for your application to run. You can choose between “npm” or “Yarn”. Plesk attempts to detect the optimal package manager for your application, but you can override it by selecting the package manager manually. If you are unsure which package manager to choose, use the one Plesk selects automatically.
- Next to “Document Root”, select the directory with the application’s static content files.
- Next to “Application Mode”, you can set the value of the
NODE_ENVenvironment variable. Choose between “Development” and “Production”, or type in a custom value. Note that this setting does nothing by itself, it merely changes the way your application works if it is programmed to respond differently to different application modes. If you are unsure which application mode to choose, we recommend that you select “Development” until you are ready for your application to go live, at which time switch to “Production”. - Next to “Application Root”, select the directory you uploaded all of the application’s files and subdirectories to.
- Next to “Application Startup File”, specify the name of the file that starts the application. The startup file must be located in the “Application root” directory. If you are unsure which file that is and there is no file named ‘app.js’ among those you uploaded, consult the person or organization that provided you with the application.
- (Plesk for Linux only) Next to “Custom Environment Variables”, you can specify any number of environment variables. To specify a variable, you need to know its name and desired value. Your application may need one or more custom environment variables to run properly, or it may change its behavior depending on the environment variables that have been set. If you are unsure whether your application needs any environment variables to run properly, consult the person or organization that provided you with the application.
Your application is now configured and ready to run. Once the application is configured, the Node.js button appears on the card of the domain hosting your application.
Starting Your Application
Once you have configured your application, it’s time to start it and see if it runs properly.
Starting your Node.js application:
- Log in to Plesk.
- Go to Websites & Domains, find the domain hosting your application, and then click Node.js.
- Click Enable Node.js.
- Click NPM Install or Yarn install (depending on the configured package manager). This will install the additional packages necessary for your application to run on your server. The list of these packages can be found in the package.json file. You only need to do this once.
- (Optional) You can also run any scripts specified in the package.json file. To run a script, click Run script, specify the name of the script to run plus any parameters, and then click Ok. If you are unsure whether you need to run any scripts at this point, consult the person or organization that provided you with the application.
Your application is now running. On the domain card, you can see that the Node.js runtime environment version has appeared under the Node.js button.

Stopping Your Application
To stop your application, go to Websites & Domains, click Node.js, and then click Disable Node.js. Doing so does not affect your settings, and you can start your application again at any time.
Note: In Plesk for Linux, if you have non-chrooted shell access to the server, you can use both Node.js CLI and npm CLI to manage your application.
Viewing Logs of Node.js Applications
You can view the logs of Node.js applications in domain log browser.
Viewing your Node.js application logs:
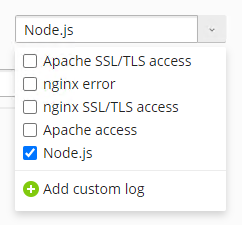
- Go to Websites and Domains, find the domain hosting your application, and then click Logs.
- Entries from the Node.js logs will be shown here together with entries from other logs monitored by Plesk. To see only Node.js log entries, expand the “All logs” drop-down menu on the right and clear the checkboxes next to log files other than “Node.js”.