Installing Plesk on Microsoft Azure
Creating a Virtual Machine
Plesk provides a variety of virtual machine images with the most popular configurations. Thus, no actual installation is required. You just need to create a virtual machine from the appropriate image. All available images for virtual machines can be found at the Microsoft Azure Virtual Machines Marketplace.
Note: To create a virtual machine, you must have access to a subscription or resource group in Azure with a permission of managing resources (Owner or Contributor role).
Log in to Azure Portal and in your dashboard select New> Compute. Here you can search for Plesk virtual machine images and select an appropriate Plesk configuration.
For detailed instructions on how to create a virtual machine from a Plesk-published image, see:
- https://docs.microsoft.com/en-us/azure/virtual-machines/windows/quick-create-portal (for Windows)
- https://docs.microsoft.com/en-us/azure/virtual-machines/linux/quick-create-portal (for Linux)
When configuring a virtual machine, you will be asked to specify the following settings:
-
Basic settings: virtual machine name, disk type (SSD or HD), user name and password, your Azure subscription and resource group.
Note: The
rootuser name cannot be used during the VM creation. You may grant therootuser access to the VM later from the console.For Linux VM, you can choose the authentication type:
- SSH public key. In this case, you should specify your SSH public key. The information about creation of public and private SSH keys can be found here.
- Password. In this case, you should specify and confirm the password that will be used for connection to the virtual machine.
-
VM size. You can choose one of available standard sizes provided by Azure.
-
Storage and network settings, including virtual network, subnet, public IP address, network security group (firewall). It is OK to leave the default values for most options.
Note: By default, you machine will have a dynamic IP address, so that the IP address will be changed each time when the virtual machine is restarted. If you want to avoid this, click Public IP address and then select the Static option. The virtual machine will be created with a static IP address.
When all the settings are specified, you can see them as a summary. Confirm the settings for your new VM and click OK.
Finally, you can see your offer details and purchase the virtual machine by clicking the Purchase button.The deployment process will start, and you will see its progress on your Dashboard.
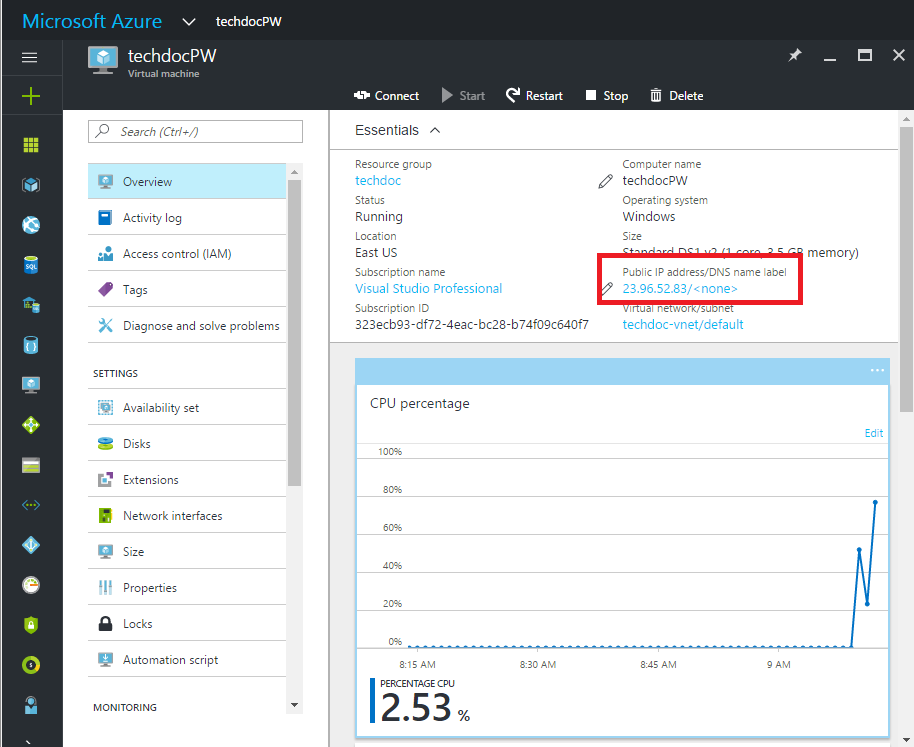
When your virtual machine is deployed, it is automatically started and the page with its settings is opened. You also can view and manage your virtual machine settings by going to Virtual Machines and selecting your virtual machine name. In particular, you can see the Public IP address of the machine.
The deployed virtual machine contains installed Plesk with all the latest updates.
Accessing Plesk on your virtual machine
To access Plesk on your virtual machine:
- Connect to the virtual machine.
- If you have a Windows VM, connect to it via Remote Desktop. Go to Azure Portal Dashboard > Virtual Machines, choose your VM, and click Connect. This creates and downloads a Remote Desktop Protocol file (.rdp file) that is like a shortcut to connect to your machine. Open this file and connect to your virtual machine using your login and password.
- If you have a Linux VM, you can SSH into its public IP address
that is displayed in the virtual machine’s settings. Depending on
selected authentication type, you may use either login and
password, or your SSH public key. From a Mac or Linux workstation,
you can SSH directly from the Terminal. For example:
ssh -i ~/.ssh/azure_id_rsa ubuntu@13.91.99.206. If you are on a Windows workstation, you need to use PuTTY, MobaXTerm or Cygwin to SSH to Linux. For details, see How to Use SSH keys with Windows on Azure.
- On the virtual machine, run
plesk loginto get a one-time login for logging in to Plesk. You will receive two links: based on the virtual machine name and based on the IP address. - Use the link based on the IP address to log in to Plesk. For example: https://13.91.99.206:8443/login?secret=57qYv9e9vfPYtlCG74OaVXeTbVLBhZwYvc%2Fgd1I5Dug%3D.
Note: You cannot use the link based on the virtual machine name for the first logging in because Plesk has not passed the initial configuration and the full hostname has not been created yet. You should use the link with IP address.
When you log in to Plesk, you can set the virtual machine’s host name and the administrator’s login name and password. You can use them for further logging in to Plesk by one of the links:
- https://<public-ip>:8443/
- https://<hostname>:8443/
where <public-ip> is the Public IP and <hostname> is the full hostname of the virtual machine.
Configuring Email Sending
To stop spam, Azure blocks outbound connections on TCP port 25. By default, you cannot send emails directly to external domains (for example, outlook.com or gmail.com). This affects all subscriptions created after November 15th, 2017 except for subscriptions of Enterprise Agreement Azure customers. Such customers can send emails with no limitations.
If you are not an Enterprise Agreement Azure customer, you created your Azure subscription after November 15th, 2017, and you want to send mail from your Plesk server, you have two options:
- Configure an authenticated SMTP relay service (for example Exchange Online Protection or SendGrid) on TCP port 587, 443, or any other. Do not use the TCP port 25.
Microsoft recommends that you use SMTP relay services to configure sending emails. You can use SMTP relay services with any Azure subscription.
- Open a support request to allow outbound connections on TCP port 25. Select the issue type Technical > Virtual Network > Connectivity > Cannot send e-mail (SMTP/Port 25). Explain why you need to send emails directly instead of using SMTP relay services. Microsoft will review your request and approve it after an anti-fraud check.
You can only request to have outbound connections on TCP port 25 allowed if you are Pay-As-You-Go customer. For customers with MSDN, Azure Pass, Azure in Open, Education, BizSpark, Cloud Service Provider (CSP), or Free Trial subscriptions that were created after November 15, 2017, such requests are denied. To configure email sending, use SMTP relay services instead.