
WP Toolkit
概要
WP Toolkit は、Plesk で WordPress® ウェブサイトを作成、構成、管理するために使用できる単一の管理インターフェースです。
このトピックでは、Plesk のウェブサイトに WordPress をインストールする方法と、WP Toolkit で既存の WordPress ウェブサイトを登録する方法について説明します。また、新規作成するウェブサイトに WordPress をあらかじめ自動インストールする方法、WordPress のプラグインとテーマのセットを作成・管理する方法、WordPress ウェブサイトでプラグインとテーマをインストールまたは削除する方法、WordPress ウェブサイトをバックアップおよび復元する方法、デフォルトのデータベーステーブルプレフィックスなどのさまざまな WordPress 設定を構成する方法についても説明します。
注釈
WP Toolkit では、WordPress バージョン 4.9 以降をインストール、構成、管理できます。
WordPress ウェブサイトのコンテンツを管理するには、当社ドキュメントの ウェブサイトのコンテンツ をお読みください。
前提条件
WP Toolkit の使用を開始する前に、 WP Toolkit 拡張 を Plesk サーバにインストールする必要があります。
Plesk 管理者の場合は、拡張カタログから拡張をインストールします。
それ以外の場合は、ホスティング事業者に連絡して拡張をインストールしてもらえるか確認してください。
Once the extension is installed, you are ready to begin. You will see the WordPress option in the Navigation Pane
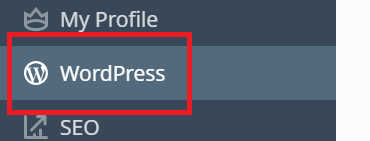
and also on the cards of domains with WordPress installed

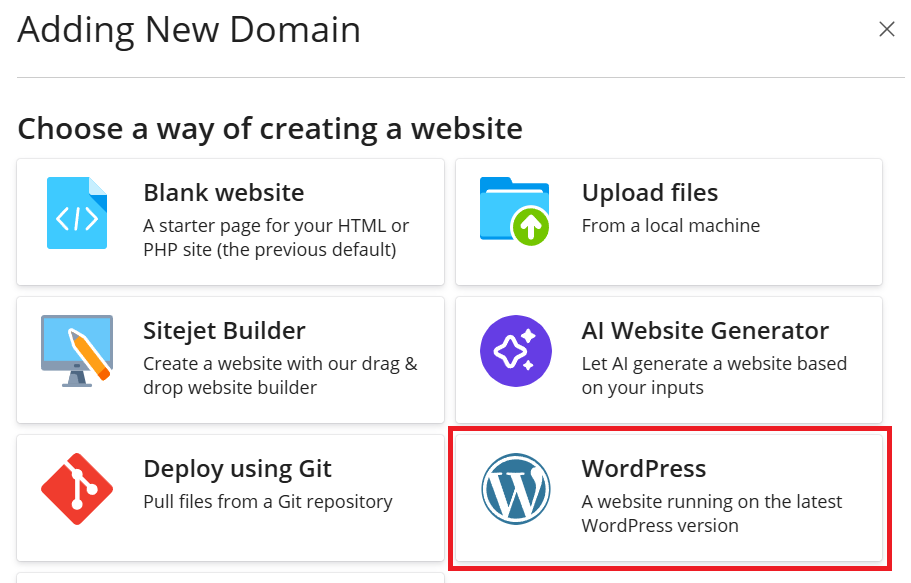
「WordPress」オプションは、ドメインの [ウェブサイトを作成] ドロワーにも表示されます。
注釈
WP Toolkit 拡張は、Plesk の Web Pro エディションと Web Host エディションでは無料で、Web Admin エディションでは有料でご利用いただけます。
WordPress をインストールする
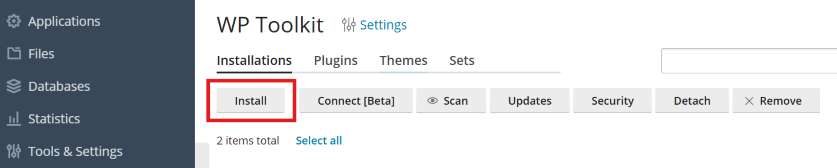
新たに WordPress をインストールするには、[WordPress]で[インストール]をクリックします。
以下が可能です。
[インストール]をクリックし、最新バージョンの WordPress をデフォルト設定でインストールする。
-
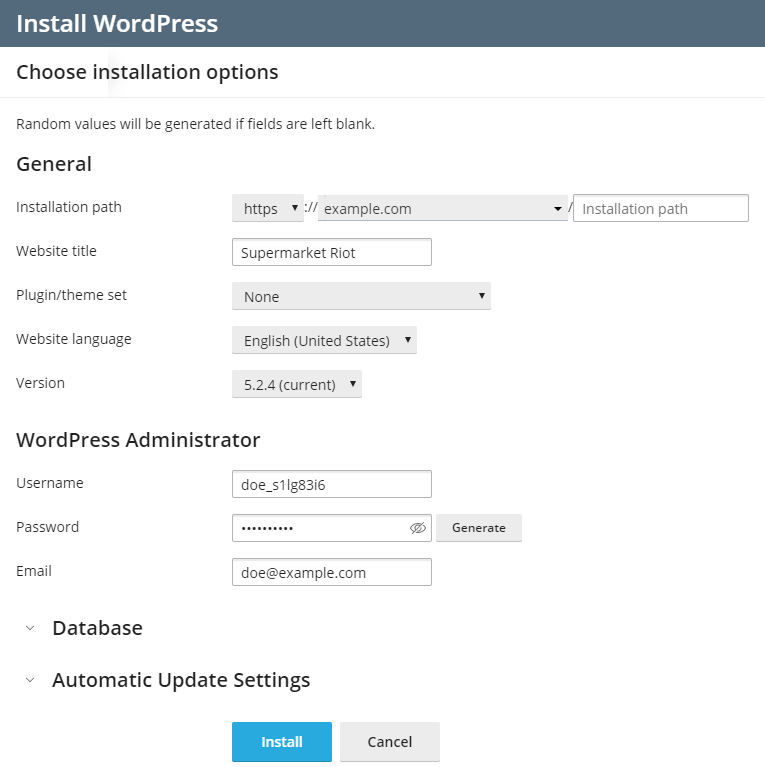
デフォルト設定を変更し(必要な WordPress バージョン、データベース名、自動更新設定など)、[インストール]をクリックする。

注釈
To install WordPress, WP Toolkit retrieves data from
wordpress.org. By default, if WP
Toolkit cannot establish connection in 15 seconds, wordpress.org
is considered to be unavailable. If you experience connectivity
issues (for example, due to the poor quality of the Internet
connection), consider increasing the timeout value. To do so, go to
WordPress, click "Settings", specify the desired value in
the "HTTP timeout for retrieving data from wordpress.org (sec)" field,
and then click OK.
WordPress がインストールされました。新しいインストールは、 [WordPress] の既存の WordPress インストールのリストに表示されます。
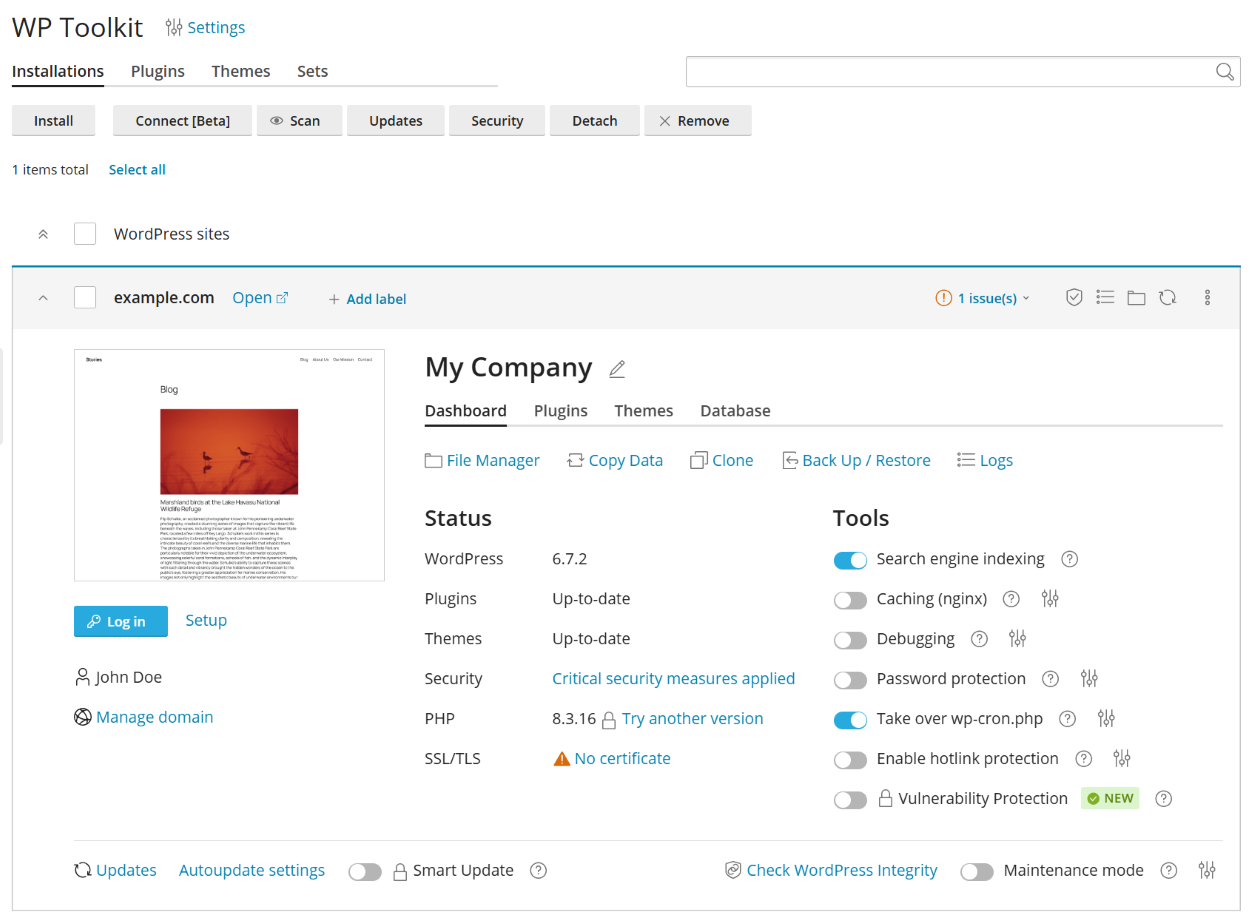
既存の WordPress インストールを WP Toolkit に追加する
WP Toolkit を使用して追加されたすべての WordPress インストールは WP Toolkit に自動的に表示されますが、手動でインストールした場合は、WP Toolkit にアタッチする必要があります。また、旧バージョンの Plesk で WordPress を使用しており、Plesk をアップグレードした場合は、既存のすべての WordPress インストールを WP Toolkit にアタッチすることをお勧めします。
WP Toolkit に WordPress インストールをアタッチするには:
[WordPress]に移動します。
[スキャン]をクリックします。
WordPress インストールがアタッチされ、 [WordPress] で既存の WordPress インストールのリストに表示されます。
WordPress インスタンスをインポートする
「ウェブサイトの移行」機能を使用すると、御社が所有し、Plesk 以外でホストしている WordPress ウェブサイトを移行できます。WordPress ウェブサイトを移行すると、Plesk がそのサイトのファイルとデータベースをすべて御社のサーバにコピーします。ウェブサイトの移行が完了すると、WP Toolkit を使用して WordPress の構成を管理し、 Plesk を使用してコンテンツを管理できるようになります。
サーバ上のすべての WordPress インストール用に言語を 1 つ選択する
WP Toolkit を使用して WordPress をインストールする際は、WP Toolkit により、WordPress のインストール先ユーザーの Plesk インターフェース言語と同じ言語が WordPress のデフォルト言語として選択されます。たとえば、Plesk インターフェース言語をイタリア語にしているユーザのために WordPress をインストールする場合、イタリア語が WordPress のデフォルト言語として選択されます。
ただし、ユーザが選択した Plesk のインターフェース言語にかかわらず、サーバ上のすべての WordPress インストールに 1 つの言語を設定することもできます。それには、[WordPress] > [設定] で WordPress のデフォルトインストール言語を選択して[保存]をクリックします。ここで選択した言語が、そのサーバ上にあるすべての新規 WordPress インストールのデフォルトとなります。ユーザは WordPress をインストールする際に必要に応じて別の言語を自由に選べます。
WordPress の言語選択をデフォルトの方法に戻すには、[WordPress] > [設定] で[デフォルトの WordPress インストール言語]の横の[ユーザの言語と同じ]を選択して[保存]をクリックします。
サーバ上のすべての WordPress インストール用にデータベーステーブルのプレフィックスを 1 つ指定する
WP Toolkit は、Plesk サーバ上の新規 WordPress インストールそれぞれに対し、データベーステーブルのプレフィックスをランダムに生成します。この挙動を変更して、すべての新規 WordPress インストールで使用されるデフォルトのプレフィックスを指定することもできます。
データベーステーブルのデフォルトプレフィックスを指定するには:
[WordPress] > [設定]に移動します。
-
Next to "Default database table name prefix", specify the desired prefix and then click Save.
注釈
If you want to specify the
wp_prefix, change it a bit (for example,wporwp__). Thewp_prefix is considered insecure and conflicts with WP Toolkit security measures. If you specify this prefix, new WordPress installations will receive the "Danger" security status. Any form different from the exactwp_does not trigger the security warning.
To return to random prefixes, clear the "Default database table name prefix" field and then click Save.
ユーザのドメインに WordPress をプリインストールする
ビデオチュートリアルを再生
Plesk WP Toolkit を使用すれば、新規作成したドメインに WordPress をプリインストールすることができます。事前定義したプラグインとテーマのリストをこれらのドメインにインストールすることもできます。さらに、顧客とリセラーに対して Smart Updates の有効化を許可することができます。
各ホスティングプランに対し、以下のオプションから選択できます。
WordPress をプリインストールしない
WordPress のみプリインストールする
事前定義したプラグインとテーマのセットありで WordPress をプリインストールする
事前定義したプラグインとテーマのセットあり(またはなし)で WordPress をプリインストールし、Smart Updates の有効化を許可する
後半 3 つのオプションのいずれかを選択すると、このホスティングプランをベースにする各契約の最初のドメイン(メインドメイン)に WordPress が自動的にインストールされます。
新規作成されたドメインに WordPress をプリインストールするには:
[サービスプラン]に移動します。
On the "Hosting Plans" tab, either click Add a Plan to create a new plan, or click the name of an existing plan to edit it.
If you have installed the Smart Updates license, customers and resellers can also enable Smart Update. You can specify the exact number of customers' and resellers' installations that can use Smart Update. To do so, clear the "Unlimited" checkbox next to "WordPress websites with Smart Update" and specify the desired limit. Regardless of the specified number, customers and resellers cannot use Smart Update on more WordPress installations than your Smart Updates license allows.
Go to the "Additional Services" tab.
-
WordPress のみプリインストールするか、事前設定されたプラグインとテーマのセットで WordPress をインストールするかを選択できます。
To install WordPress only, select "Install WordPress" under "WP Toolkit".
To install WordPress with a predefined set of plugins and themes, select "Install WordPress with the ... set" under "WP Toolkit".
[OK](既存のプランを編集する場合は[更新して同期])をクリックします。
これで、このホスティングプランをベースに新しい契約を作成するたびに、この契約のメインドメインに WordPress が自動的にインストールされます。このホスティングプランをベースにした既存の契約には影響を与えません。
セットを管理する
セットとは、事前定義された WordPress プラグインとテーマのリストです。WP Toolkit にはさまざまなセットがあらかじめ構成されており、いつでも追加のセットを作成できます。デフォルトで、顧客とリセラーは作成されたすべてのセットを使用できます。セットは次のように使用できます。
顧客とリセラーのウェブサイトにセットをプリインストールできます。これには、WordPress をプリインストールするためのホスティングプランを構成し、単一のセットを追加します。このセットに含まれるすべてのプラグインとテーマが WordPress とともにインストールされます。
-
貴社および顧客とリセラーは、カスタムインストールを実行する際にセットを選択して WordPress とともにインストールできます。顧客とリセラーはセットに含まれるプラグインとテーマを確認できます。
注釈
If you do not want customers and resellers to install sets on their WordPress installations, go to WordPress, click "Settings", and clear the "Allow customers to use sets when they install WordPress" checkbox.
貴社または顧客とリセラーに属する既存のウェブサイトにセットをインストールできます。
セットを作成するには:
Go to WordPress, go to the "Sets" tab, and then click Create Set.
セットに名前を付けて[作成]をクリックします。
-
[プラグイン追加] > [プラグイン追加]の順にクリックします。必要なプラグインを検索し、リストから選択して、[追加]をクリックします。
注釈
WordPress ウェブサイトにセットをインストールした後で、アクティブ化するプラグインとしないプラグインを選択できます。これを行うには、[状態]列の下で、アクティブ化しないプラグインをオフにします。
必要なプラグインをすべて追加したら、ペインを閉じます。
-
テーマに関して同じステップを繰り返します。
注釈
WordPress ウェブサイトにセットをインストールした後で、アクティブ化するテーマを選択できます。それには、[状態]列の下で、アクティブ化するテーマをオンにします。
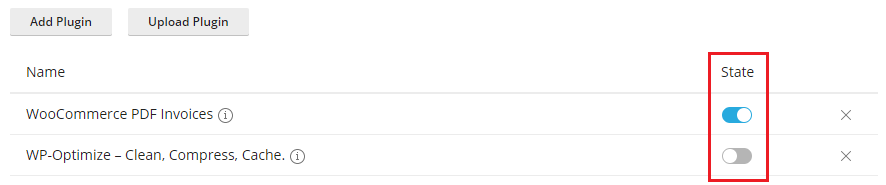
これで、セットをホスティングプランのプリインストールオプションとして選択するか、WordPress のカスタムインストール中に選択することができます。
セットにプラグインとテーマを追加するには:
Go to WordPress, and then go to the "Sets" tab.
-
変更するセットで[プラグイン追加]をクリックし、[プラグイン追加]をクリックします。必要なプラグインを検索し、リストから選択して、[追加]をクリックします。
注釈
WordPress ウェブサイトにセットをインストールした後で、アクティブ化するプラグインとアクティブ化しないプラグインを選択できます。それには、[アクティブ]列の下で、アクティブ化したくないプラグインをオフに切り替えます。
必要なプラグインをすべて追加したら、ペインを閉じます。
-
テーマに関して同じステップを繰り返します。
注釈
WordPress ウェブサイトにセットをインストールした後で、アクティブ化するテーマを選択できます。それには、[アクティブ]列の下で、アクティブ化するテーマをオンにします。
セットにプラグインとテーマを追加しても、このセットが適用された既存の契約に影響は与えません。
既存の WordPress インストールにセットをインストールするには:
Go to WordPress, go to the "Sets" tab, and then click the
icon
corresponding to the set that you want to install.[セットをインストール]をクリックし、セットをインストールするウェブサイトを選択して、[インストール]をクリックします。
 icon
corresponding to the set that you want to install.
icon
corresponding to the set that you want to install.選択した WordPressインストールにセットがインストールされます。セットの作成時に、アクティブにすることを選択していれば、セット内のプラグインとテーマがアクティブ化されます。
選択したプラグインとテーマをセットから削除するには:
Go to WordPress, and then go to the "Sets" tab.
Click the number displayed under the "Plugins" or "Themes" columns (for example,
2 total) to show the list of plugins or themes currently included in the set.削除するプラグインまたはテーマの名前の横で
アイコンをクリックします。
 アイコンをクリックします。
すべてのプラグインとテーマをセットから削除するには:
Go to WordPress, and then go to the "Sets" tab.
変更するセットの
アイコンをクリックし、[すべてのプラグインを削除]または[すべてのテーマを削除]をクリックして、[はい]をクリックします。
セットからプラグインとテーマを削除しても、このセットが適用された既存の契約に影響は与えません。
セットの名前を変更する:
Go to WordPress, and then go to the "Sets" tab.
名前を変更するセットの名前をクリックし、新しい名前を入力して
アイコンをクリックします。
 アイコンをクリックします。
セットを削除するには:
Go to WordPress, and then go to the "Sets" tab.
-
削除するセットの
アイコンをクリックし、[セットを削除]をクリックして[はい]をクリックします。
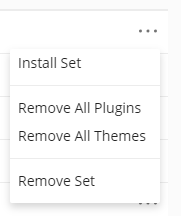
Removing a set does not affect existing subscriptions to which this set has been applied. For all hosting plans that used the removed set, WordPress preinstall settings are reset (on the "Additional Services" tab, "WP Toolkit" is set to "None").
ユーザの WordPress インストール数を制限する
Plesk 管理者は顧客とリセラーがインストールして管理できる WordPress インストールの数に制限を設定できます。この制限は、以下の状況で WordPress インストール数が増える際に適用されます。
Adding existing WordPress installations using the "Scan" feature.
注釈
WP Toolkit が自ら作成するテクニカルインストール(たとえば Smart Updates によって作成される複製)には、この制限は適用されません。
WordPress インストールの数に制限を設定するには:
-
特定の契約またはサービスプランに制限を設定できます。
[契約] で、[契約を追加]をクリックして新規契約を作成するか、既存の契約の名前をクリックして右側のサイドバーで[カスタマイズ]をクリックします。
Go to Service Plans. On the "Hosting Plans" tab, either click Add a Plan to create a new plan or click the name of an existing plan to edit it.
By default, no limits are set. Next to "WordPress Websites", clear the "Unlimited" checkbox. You can also limit the number of WordPress websites that can use the "Smart Updates" feature. If so, clear the checkbox next to "WordPress websites with Smart Update" as well.
-
Specify the number of WordPress websites customers can manage and/or the number of WordPress websites that can use the "Smart Updates" feature.
[OK](既存のプランを編集する場合は[更新して同期])をクリックします。
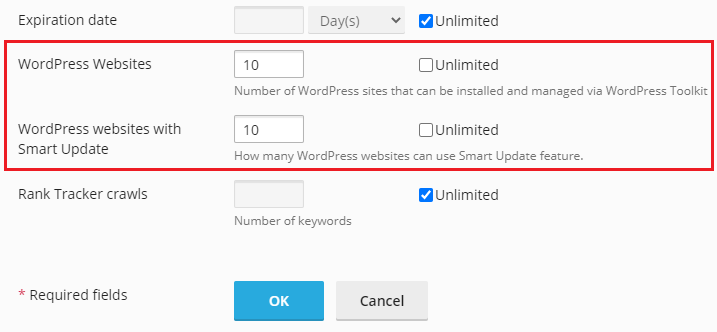
ユーザの WordPress インストールの数に制限を設定しました。
注釈
設定した制限が顧客の所有するウェブサイト数より少ない場合、余分なインストールが自動で削除されることはありません。ユーザが削除やデタッチを行わない限り、既存のインストール数は変わりません。削除やデタッチをしたインストールを元に戻すことや、他の方法で制限より多くインストール数を増やすことはできません。
ユーザーの WP Toolkit バックアップ数を制限する
Plesk 管理者は、顧客とリセラーが作成できる WP Toolkit バックアップの数に制限を設定できます。
この制限を設定すると、顧客とリセラーは許可されるディスクスペースクォータを完全には使用できなくなります。この制限は、契約に属するすべてのウェブサイトに適用されます。WP Toolkit バックアップ数をユーザーに適用しない場合、制限をゼロに設定してください。
WP Toolkit バックアップの数に制限を設定するには:
-
特定の契約またはサービスプランに制限を設定できます。
[契約] で、[契約を追加]をクリックして新規契約を作成するか、既存の契約の名前をクリックして右側のサイドバーで[カスタマイズ]をクリックします。
Go to Service Plans. On the "Hosting Plans" tab, either click Add a Plan to create a new plan or click the name of an existing plan to edit it.
-
By default, no limits are set. Next to "WordPress Backups", clear the "Unlimited" checkbox and then specify the number of backups customers and resellers can create.
[OK](既存のプランを編集する場合は[更新して同期])をクリックします。

ユーザーの WP Toolkit バックアップの数に制限を設定しました。
注釈
設定した制限がユーザの所有するバックアップ数より少ない場合、余分なバックアップが自動で削除されることはありません。ユーザが削除しない限り、既存のバックアップ数は変わりません。その後、制限を超えてバックアップを増やすことはできません。
WordPress インストールを管理する
[WordPress]に移動し、サーバ上のすべての WordPress インストールを表示します。
WP Toolkit では、「カード」と呼ばれるブロックに各インストールに関する情報がグループ分けされています。
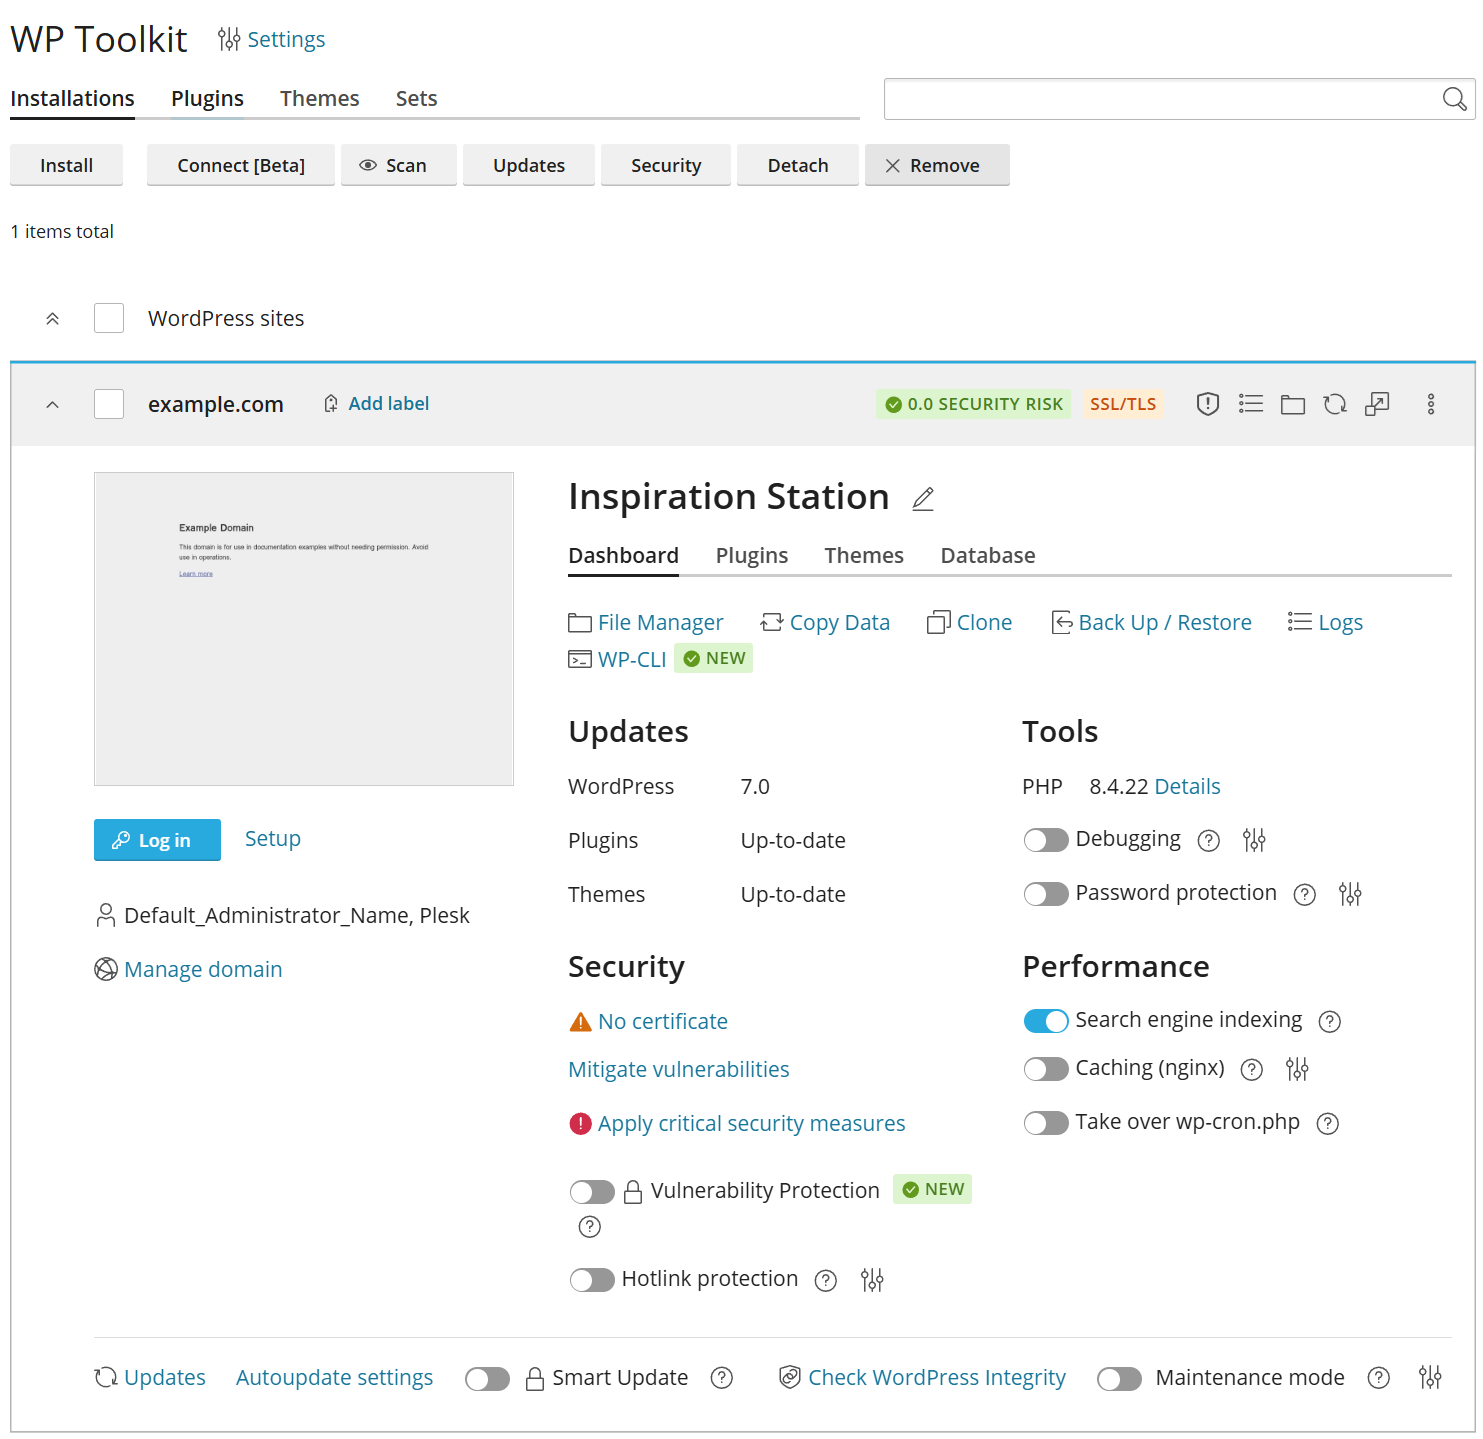
1 つのカードに、ウェブサイトのスクリーンショットとともにさまざまなコントロールが表示され、よく使用するツールに簡単にアクセスできます。このスクリーンショットは、ウェブサイトに加えた変更を反映してリアルタイムに変化します。たとえば、メンテナンスモードをオンに切り替えたり、WordPress テーマを変更したりすると、ウェブサイトのスクリーンショットが瞬時に変化します。
注釈
WordPress で直接加えた変更は、24 時間ごとに WP Toolkit と同期されます。手動で同期するには、 アイコンをクリックしてください。
ウェブサイトのスクリーンショット上にカーソルを動かすと、以下が表示されます:
[ウェブサイトを開く]ボタン。新規ブラウザタブでウェブサイトを開くには、このボタンをクリックしてください。
スクリーンショットが前回更新された日時。スクリーンショットをただちに更新するには、スクリーンショットの右上隅にある
アイコンをクリックします。
 アイコンをクリックします。
ここで以下のような操作も実行できます。
-
ウェブサイト名を変更する。それには、
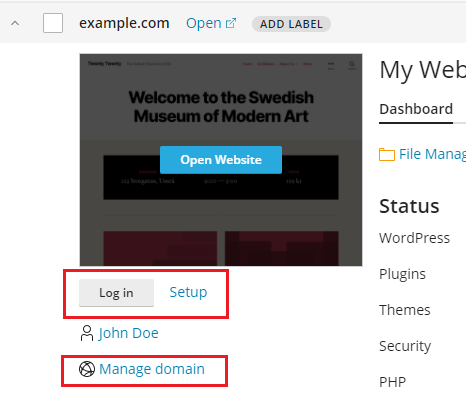
アイコンをクリックして、ウェブサイトに名前を付け、 をクリックします。 WordPress に管理者としてログインします。それには、ウェブサイトのスクリーンショットの下で[ログイン]をクリックします。
Change general WordPress settings. To do so, click "Setup" next to Log in.
-
[ウェブサイトとドメイン]でドメインの画面を開く。それには、ウェブサイトのスクリーンショットの下で[ドメイン管理]をクリックします。
 アイコンをクリックして、ウェブサイトに名前を付け、
 をクリックします。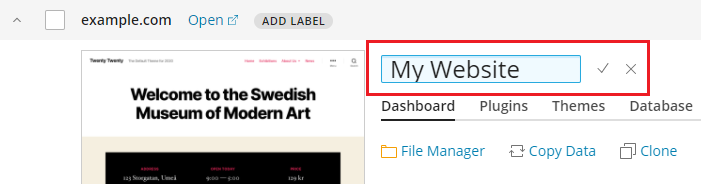
ステータス
WordPress ウェブサイトはハッカーの標的になることが多く、古い WordPress コア、プラグイン、テーマにはセキュリティリスクもあります。
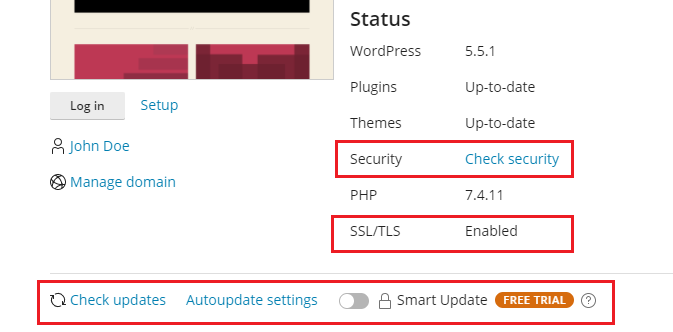
In the "Updates" section, you can do the following:
WordPress コアおよびインストール済みのプラグインとテーマが最新状態であるか確認し、 必要に応じてアップデートする。
In the "Security" section, you can do the following:
SSL/TLS サポートが有効であるか確認し、有効でない場合は 有効にする。
ウェブサイトがどの程度安全かを確認し、 セキュリティを強化する。
Enable hotlink protection to prevent other websites from displaying, linking or embedding your images. This is called hotlinking and it can quickly drain your bandwidth and make your website unavailable.
In the "Tools" section, you can do the following:
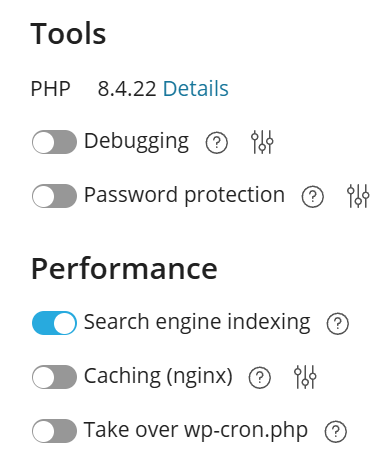
See the currently used PHP version, change the PHP version, and also access the smart PHP updates feature.
"Debugging" helps you debug a website that is not ready for viewing and being tested or developed.
[パスワード保護]:Plesk から WordPress へのログインに使用するパスワードを指定します。
In the "Performance" section, you can do the following:
"Search engine indexing" shows your website in search results of search engines.
[キャッシング(nginx)]:ウェブサイトのロードが高速化し、サーバ負荷が軽減されます。
[wp-cron.php を継承]:
wp-cron.phpの通常の実行をセットアップできます。
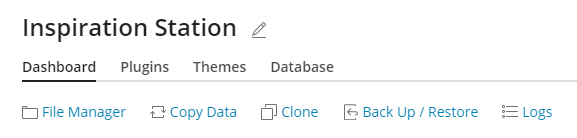
At the top of the card, you can find the following WP Toolkit features:
"File Manager" to manage the website’s files in File Manager.
"Copy Data" to copy the content of your website to another.
"Clone" to make a full copy of your website.
"Back Up / Restore" to create a backup of your website and restore it if necessary.
"Logs" to view WP Toolkit logs of the installation you need to troubleshoot.
"WP-CLI" to access WP-CLI from the Plesk interface.
ウェブサイトカードの一番下で、以下の操作を実行できます。
Smart Update を有効にする:本番ウェブサイトを破損するリスクなく最新状態に保つ有料機能です。
Turn on "Maintenance mode", which hides your website’s content from visitors.

残り 3 つのタブでは、インストールのプラグインやテーマの管理、データベースのユーザ名とパスワードの変更ができます。
ウェブサイトラベル
Website labels are preconfigured identifiers that you can give to your websites (for example, "staging", "production", "testing", and so on).
プロジェクトによっては、さまざまな目的でウェブサイトのコピーを複数ホストする必要があります。ラベルは、こうしたウェブサイトを見分けるのに役立ちます。
By default, a website has no label. To label it, click Add label (on the website card next to the website name) and select the desired label. Labels are optional and you can change or remove a label at any time.

カードビューを管理する
WP Toolkit でのカードの表示方法を選択できます。デフォルトビューは、少数のインストールの管理に最適です。大量のインストールを管理する場合は、カードを折りたたむ( )ことができます。
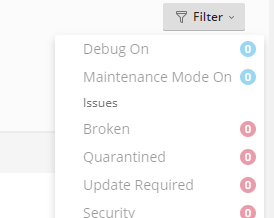
また、インストールをフィルタリングすれば、管理が容易になります。
インストールを削除またはデタッチする
WP Toolkit に表示して管理する必要のない WordPress インストールはデタッチできます。インストールはデタッチしても削除されず、WP Toolkit で表示されなくなるだけです。デタッチされたインストールは、WordPress インストールをスキャンすると再び WP Toolkit にアタッチされます。WordPress インストールのデタッチは、個別に行うことも複数のインストールに対して一括で行うこともできます。
WordPress インストールをデタッチするには:
-
[WordPress]に移動して、以下の操作を行います。
(To detach an individual installation) On the card of the installation you want to detach, click the
icon.(複数のインストールをデタッチするには)デタッチするインストールを複数選択し、[デタッチ]をクリックします。
[デタッチ]をクリックします。
 icon.
icon.デタッチと違い、削除を実行すると WordPress インストールが完全に削除されます。インストール方法が WP Toolkit を使用したインストールでも、[アプリケーション]ページからのインストールでも、あるいは手動インストールでも、あらゆるインストールを削除できます。WordPress インストールの削除は、個別に行うことも複数のインストールに対して一括で行うこともできます。
WordPress インストールを削除するには:
-
[WordPress]に移動して、以下の操作を行います。
(To remove an individual installation) On the card of the installation you want to remove, click the
icon.(複数のインストールを削除するには)削除するインストールを複数選択し、[デタッチ]をクリックします。
[削除]をクリックします。
検索エンジンインデックス化とデバッグ
デフォルトで、新規作成された WP Toolkit ウェブサイトは検索エンジンの検索結果に表示されます。ウェブサイトを公開する準備ができていない場合、[検索エンジンインデックス化]をオフに切り替えます。
If you are installing WordPress for testing or development, you can
enable "Debugging" to automatically find and fix errors in the website
code. To do so, click the  icon next to "Debugging", select the WordPress
debugging tools you want to activate, and then click OK.
icon next to "Debugging", select the WordPress
debugging tools you want to activate, and then click OK.
WordPress インストールを更新する
ウェブサイトのセキュリティを維持するには、WordPress コアおよびインストール済みのプラグインとテーマを定期的に更新する必要があります。これは、自動または手動で実行できます。
手動更新では、アップデートをインストールするタイミングを管理できます。たとえば、インストールを待機して、特定のアップデートをインストールすると他の WordPress ユーザに問題が生じないかどうかを確認できます。ただし、遅れをとらないようにするには定期的な更新が必要であることを覚えておく必要があります。
自動更新では、WordPress インストールが常に最新状態に保たれているという安心感を得られます。ただし、更新でインストールに障害が発生した場合に、自動更新では障害をすぐに検知できない可能性があります。
セキュリティ上の理由から、自動更新を構成しておくことをお勧めします。
WordPress インストールを手動で更新するには:
-
[WordPress]に移動します。WordPress インストールを更新する必要がある場合は、[ステータス]セクションに次のメッセージが表示されます(例:[プラグインのアップデートをインストール])。
-
利用可能なアップデートに関する任意のメッセージをクリックして、WP Toolkit にアップデートのリストが読み込まれるまで待ち、インストールするアップデートを選択します。
注釈
If an update of a WordPress core is available, you will see the "Restore Point" checkbox. Keep this checkbox selected to create a restore point you can use to roll back the update if something goes wrong.
[アップデート]をクリックします。
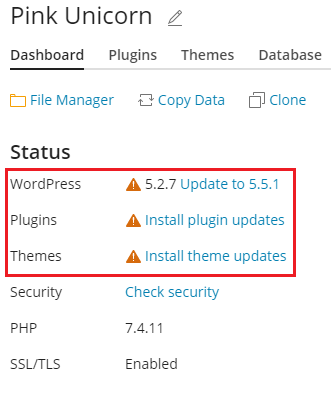
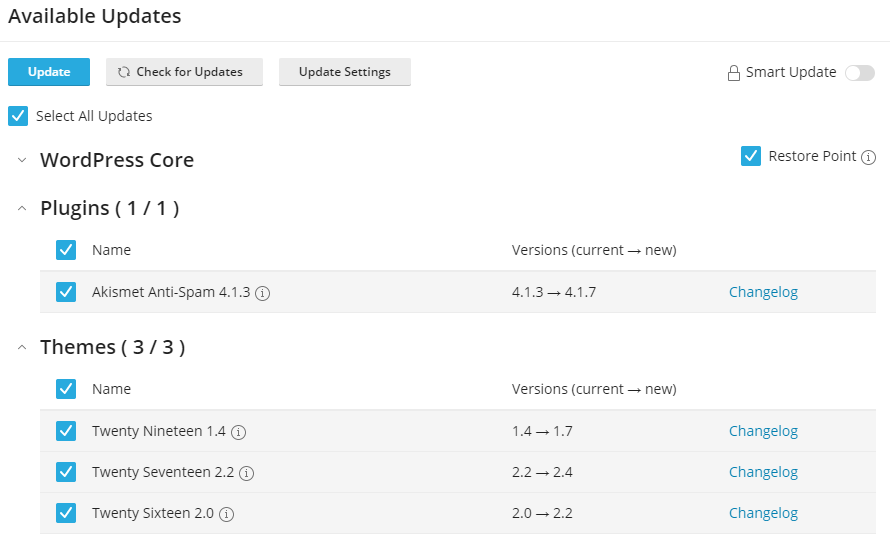
選択したアップデートが適用されます。
Although WP Toolkit regularly checks for updates itself, you can also check for updates at any time. To do so, click "Check for Updates".
WordPress インストールの自動更新を構成するには:
-
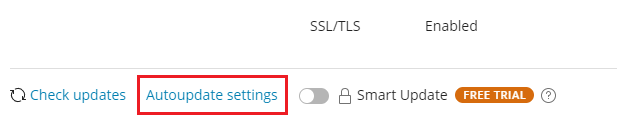
Go to WordPress and choose the WordPress installation that you want to update automatically and then, on the installation card, click "Autoupdate settings".
-
必要な自動更新設定を選択します。
WordPress コア、プラグイン、テーマに対して別々に自動更新を構成できます(たとえば、プラグインとテーマについては自動更新を有効にし、WordPress コアについては有効にしないことを選択できます)。
また、自動更新をすべてのプラグインとテーマに対して構成することも、それぞれのプラグインとテーマに対して個別に構成することもできます。
自動更新を微調整するには、次の推奨事項に従ってください。
Selecting "No" next to "Update WordPress automatically" turns off autoupdates of WordPress core. This is insecure.
If your website is publicly available (production) and you are concerned that applying updates automatically may break it, keep "Yes, but only minor (security) updates" selected.
If your website is a non-public (staging) version of a WordPress website, select "Yes, all (minor and major) updates". This will keep your staging website up-to-date and ensure that, should an update break something, it happens to the staging website and not to the production one.
-
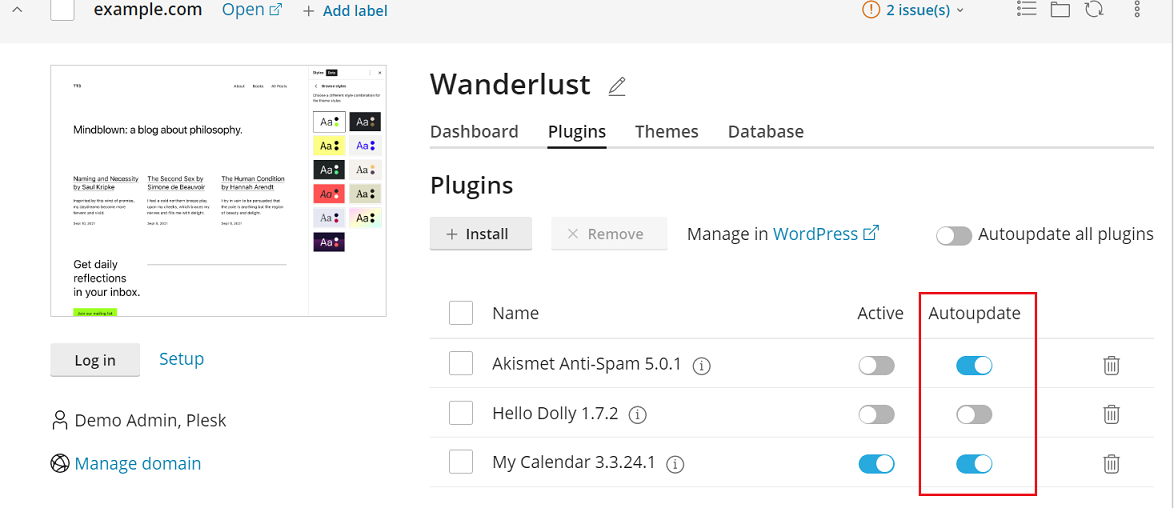
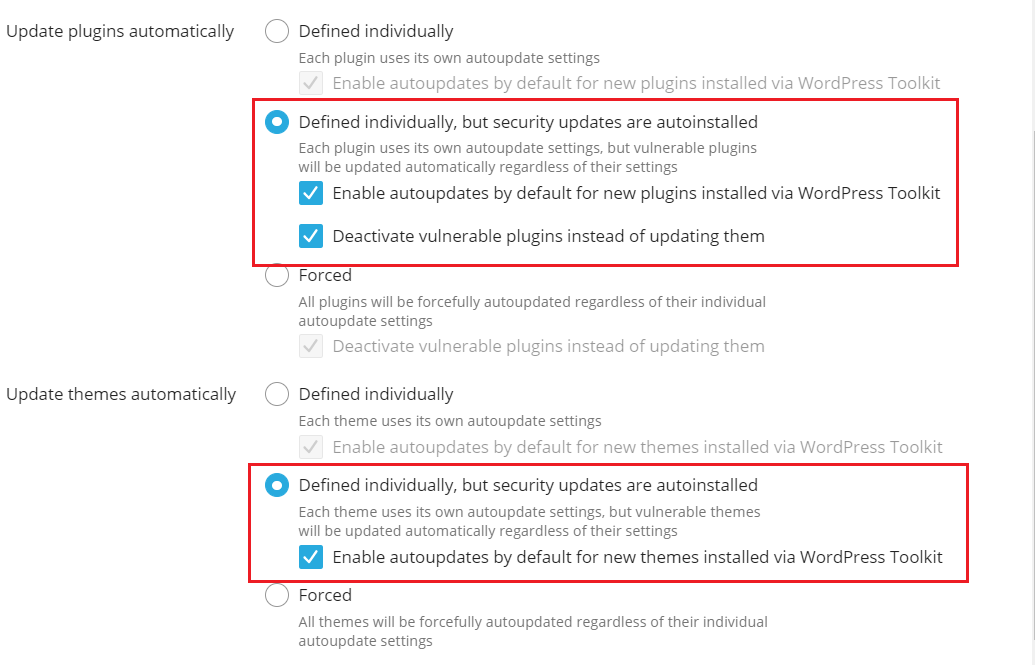
ほとんどの場合は、[個別に定義されますが、セキュリティアップデートは自動更新されます]をプラグインとテーマの両方に選択することをお勧めします。その後、ウェブサイトカードの[プラグイン]タブと[テーマ]タブで各プラグインとテーマに対して自動更新を構成する必要があります。
ただし、WP Toolkit は、脆弱性のあるプラグインやテーマに対し、たとえ自動更新がオフにされていたとしても、セキュリティアップデートを自動的にインストールします。
プラグインのセキュリティアップデートによってウェブサイトに障害が発生することを懸念している場合は、[脆弱性プラグインを更新ではなく非アクティブ化する]チェックボックスをオンにしてください。その場合、脆弱性のあるプラグインを手動で更新して、(ウェブサイトで安全に使用できることを確認した後で)再びアクティブ化することができます。
[プラグイン]タブと[テーマ]タブで新しいプラグインとテーマの自動更新を個別にオンにする手間を省くには、 [WP Toolkit 経由でインストールされた新しいプラグインに対し、デフォルトで自動更新を有効にする]と[WP Toolkit 経由でインストールされた新しいテーマに対し、デフォルトで自動更新を有効にする]をオンにしてください。
自動更新をさらに詳細にコントロールしたい場合は、プラグインとテーマに対して[個別に定義]をオンにします。このシナリオは、前のものとよく似ていますが、自動更新がオフになっている場合は、脆弱性のあるプラグインやテーマが WP Toolkit によって更新されません。脆弱性のあるプラグインとテーマに関する WP Toolkit からのメール通知をモニタリングして手動で更新を行うか、非アクティブ化することをお勧めします。
すべてのプラグインとテーマが常に最新状態であるようにするには、プラグインとテーマ両方に対して[強制]を選択します。この場合、WP Toolkit は個別の自動更新設定を問わず、すべてのプラグインとテーマを自動的に更新します。[強制]オプションを選択すると、[プラグイン]タブと[テーマ]タブに表示される個々のプラグインとテーマの個別の自動更新設定より優先されます。
[OK]をクリックします。
注釈
WordPress 自動更新によってウェブサイトに障害が発生することが懸念される場合は、Smart Updates を使用してください。Smart Updates を使用すると、WordPress インストールは常に安全に更新されるようになり、ウェブサイトに支障を来すことはありません。Smart Updates を有効にした場合、この機能によってすべての自動更新がチェックされ、ウェブサイトに問題を引き起こさないものだけが許可されます。
WordPress インストールのバックアップと復元
データの損失を防ぐため、ウェブサイトのバックアップと復元を行うことができます。これには、WP Toolkit 機能を使用するか、Plesk の一般的なバックアップメカニズム(バックアップマネージャ)を使用します。
バックアップの作成に WP Toolkit を使用するのは、次のような理由からバックアップマネージャを使用する場合より便利です。
WP Toolkit では個別のウェブサイトをバックアップしますが、バックアップマネージャでは契約全体をバックアップし、その契約のすべてのウェブサイトとそのデータがバックアップに含まれます。
個別のウェブサイトをバックアップする必要がある場合、WP Toolkit の方が時間がかからず、ディスク容量も少なくて済みます。
WP Toolkit を使用してバックアップを作成する際は、セットアップを行う必要はありません。
WordPress ウェブサイトをバックアップするには:
-
[WordPress]に移動し、バックアップしたい WordPress インストールのカードで[バックアップ/復元]をクリックします。
[バックアップ]をクリックします。

バックアップが終了したら、WP Toolkit バックアップのリストにこれが表示されます。

WordPress ウェブサイトを復元するには:
[WordPress]に移動し、バックアップを復元したい WordPress インストールのカードで[バックアップ/復元]をクリックします。
-
復元したいバックアップの
アイコンをクリックします。注釈
バックアップを復元すると、 バックアップ実行日以降に行ったすべての変更が削除されます。このため、現在の状態のウェブサイトをバックアップしておき、復元にこのバックアップを使用することが WP Toolkit から推奨されます。
[復元]をクリックします。
 アイコンをクリックします。
バックアップが復元されました。
念のため、WP Toolkit バックアップファイルをダウンロードしていずれかの場所に保存しておくことができます。
WP Toolkit バックアップファイルをダウンロードするには:
[WordPress]に移動し、バックアップファイルをダウンロードしたい WordPress インストールのカードで[バックアップ/復元]をクリックします。
-
バックアップファイルをダウンロードしたいバックアップの
アイコンをクリックします。ファイルマネージャのディレクトリ(ウェブサイトのホームディレクトリの
/wordpress-backups)にリダイレクトされ、ここが WP Toolkit バックアップファイルの保存先となります。 ダウンロードしたいバックアップファイルの
アイコンをクリックして、[ダウンロード]をクリックします。
 アイコンをクリックします。
 アイコンをクリックして、[ダウンロード]をクリックします。
バックアップファイルがダウンロードされました。
不要になった WP Toolkit バックアップは削除できます。
WP Toolkit バックアップを削除するには:
[WordPress]に移動し、バックアップファイルを削除したい WordPress インストールのカードで[バックアップ/復元]をクリックします。
Click the
icon corresponding to the backup you want to delete and then click Delete.
 icon corresponding to the backup you want to delete and then click Delete.
バックアップが削除されました。
Smart Updates
Smart Updates とは、WP Toolkit Deluxe に含まれる有料機能で、スタンドアロンの拡張として購入することも可能です。ウェブサイトに障害が発生するリスクを冒すことなく、本番モードのウェブサイトを最新状態に保つことができます。Smart Updates では、アップデートのインストール後に発生する可能性がある結果を分析し、インストールが安全かどうかをアドバイスします。
ウェブサイトのセキュリティを維持するには、WordPress のテーマ、プラグイン、コアを定期的に更新する必要があります。ただし、これらのアップデートにより、ウェブサイトに障害が発生する可能性があります。手動更新では管理者の注意が必要であり、ウェブサイトが正常に機能を続けることを保証することはできません。
Smart Updates は、ウェブサイトを壊すことなく、WordPress インストールが常に安全にアップデートされるようにします。次のような機能を備えています。
インストールを複製し、問題がないか分析する。
複製をアップデートし、再度分析する。
問題を検出します(PHP の問題、HTTP 応答コードのエラー、ページタイトルの変更など)。アップデートに起因する問題だけでなく、アップデートの適用前から存在していない問題も検出できます。
手動更新の場合、Smart Updates はアップデートを安全に適用できるかどうかを報告します。検出された問題に関する詳細なレポートを確認してダウンロードし、本番ウェブサイトを更新するかどうかを決定できます。
自動更新の場合、アップデートに起因する問題が 1 つ以上ある場合を除き、Smart Updates が本番ウェブサイトを自動更新します。問題があればアップデートは行われず、分析結果をまとめたメールが送信されます。
Smart Updates を使用する
Smart Updates は有料機能であり、インストールごとに購入できます。Smart Updates は手動更新と自動更新の両方で使用できます。
Smart Update を有効化するには:
Smart Updates を購入し、受信した追加ライセンスキーをインストール します。各インストールに対し、個別に Smart Update を有効化します。
[WordPress]のインストールカードで[Smart Update]をオンにします。
Smart Update が有効になります。これで、手動更新または自動更新で Smart Update を使用できるようになります。
注釈
Smart Update はバックアップの代わりにはなりません。自動更新を使用する場合は特に、WordPress インストールを定期的にバックアップすることをお勧めします。
Smart Update を手動で使用するには:
アップデート対象をフルコピーできる十分なディスク容量を確保してください。
インストールカードで、 [アップデート] をクリックします。
[使用可能なアップデート] カードで、 [アップデートの確認] をクリックします。
インストールするアップデートを選択して、 [Smart Update テストを実行] をクリックします。
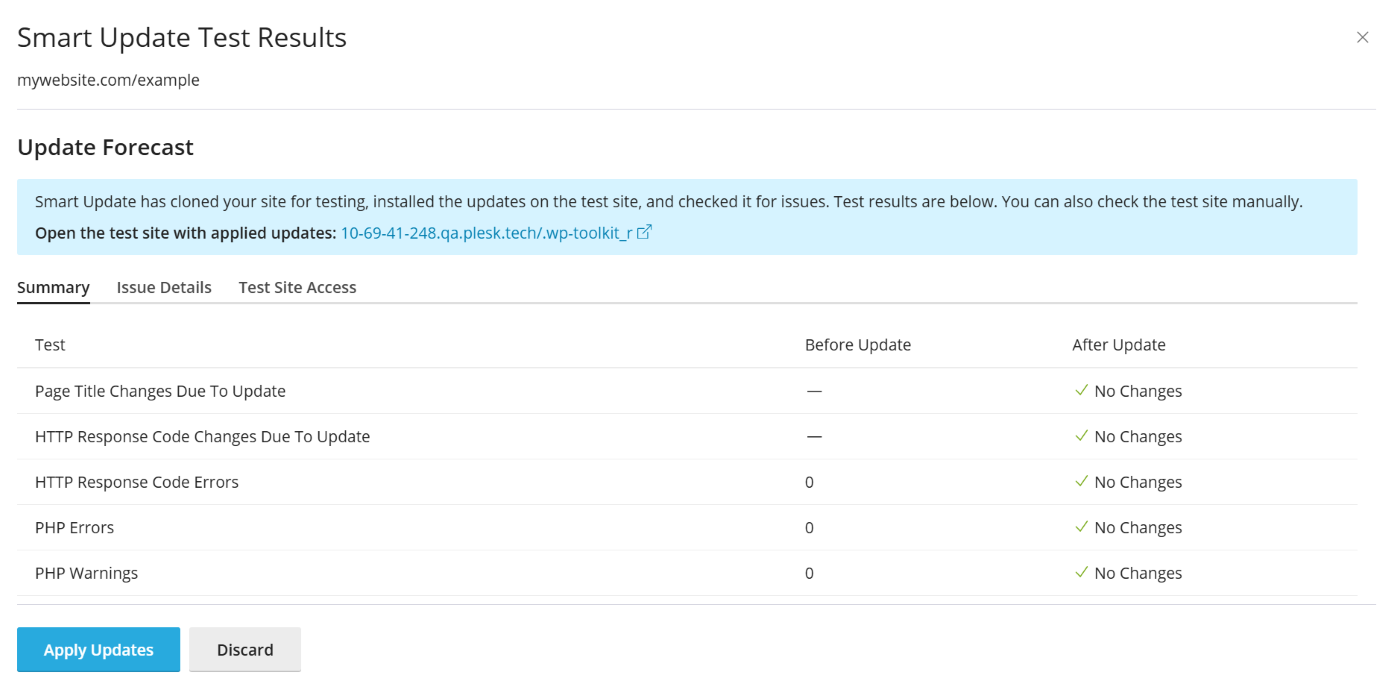
Smart Update がウェブサイトを複製して分析します(ウェブサイトのサイズに応じてしばらく時間がかかる可能性があります)。分析はバックグラウンドで実行されるため、ウィンドウを閉じても更新は中断されません。
-
ウェブサイトの分析レポートを表示します。ウェブサイト全体で見つかった問題を確認できます。それらの問題に関するレポートをダウンロードするには、 [サマリーをダウンロード] をクリックします。
-
Smart Update によってアップデートの問題が検出されず、スクリーンショットでもそのことを確認できる場合、 [アップデートを適用] をクリックして選択を確定します。Smart Update により本番インストールがアップデートされ、複製が削除されます。
本番インストールを更新したくない場合、[破棄]をクリックします。
Smart Update を自動で使用するには:
アップデート対象をフルコピーできる十分なディスク容量を確保してください。
アップデートが使用可能になると、Smart Update がインストールを複製してアップデートを適用し、更新された複製を分析します。
アップデートで問題が発生しない場合、Smart Update は本番インストールを自動更新します。アップデートに起因する可能性がある問題が 1 件以上検出された場合、アップデートは適用されず、リンク付きのメールが送信されます。リンクから、問題に関するレポートを開くことができます。
Smart PHP Updates
For both security and performance reasons, it is recommended that websites that use PHP, including WordPress websites, always use the latest available PHP version. However, switching a website's PHP version, especially when moving between major PHP versions (for example, switching from PHP 7.x to PHP 8.x), may cause issues with the website.
For your peace of mind, we offer the Smart PHP Updates feature. WP Toolkit can verify whether switching a WordPress website to a different PHP version is likely to cause issues, and warn you in advance, minimizing the chances of a production WordPress website failing due to PHP compatibility issues.
How It Works
With Smart PHP Updates you can, on demand, verify whether switching a WordPress website to a different PHP version is likely to cause issues. When you do, WP Toolkit creates a copy of that website, switches the copy to the selected PHP version, and then compares the original to the copy.
Afterwards, WP Toolkit reports any issues that were discovered, such as changes in HTTP response codes for the copy, or any HTTP response or PHP errors present for the copy, but not the original.
Once the report has been generated, you can either switch the original website to the selected PHP version, or to decline to do so. In either case, the copy of the website is automatically removed afterwards.
前提条件
Before you can use Smart PHP Updates, the following prerequisites must be met:
A paid WP Guardian (Plesk addon) license must be purchased and installed in Plesk.
The configured limits and permissions for the subscription owning the domain in question must allow for the creation of at least one additional domain or subdomain.
注釈
Installing any WP Guardian (Plesk addon) license, no matter the number of sites on the license, allows you to use Smart PHP Updates for every WordPress website managed via WP Toolkit with no restrictions or limitations.
Using Smart PHP Updates
To use Smart PHP Updates:
Go to WordPress, and then find the desired WordPress website.
-
Under "Tools", next to "PHP", click Details, and then click Try another version.
Select the desired PHP version, and then click Check.
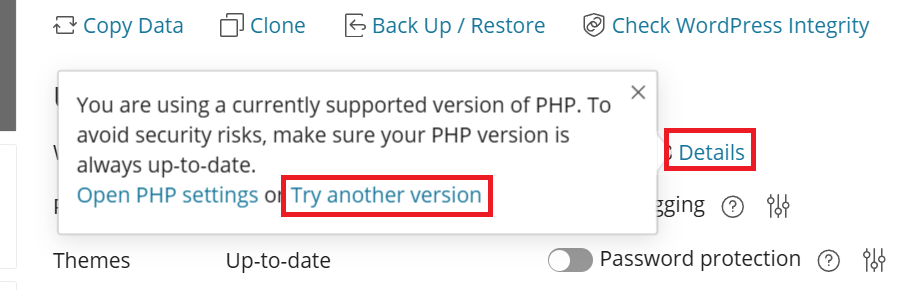
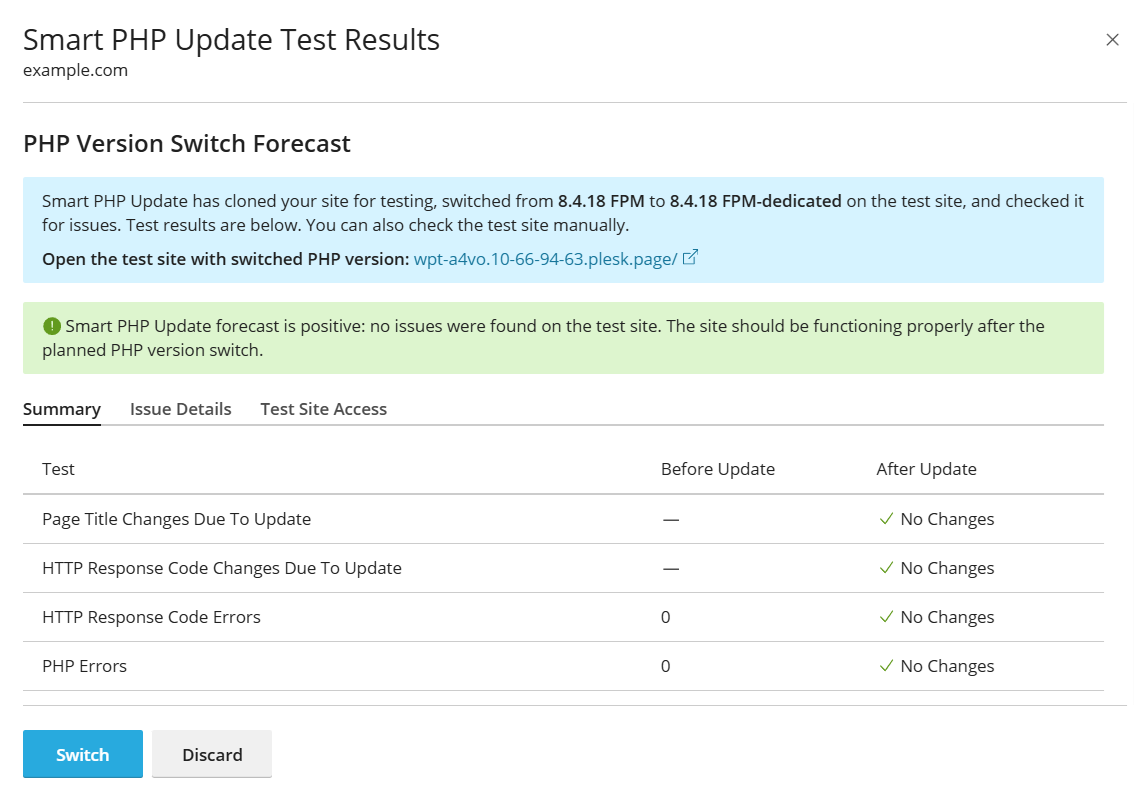
WP Toolkit will create a copy of the website and test it using the selected PHP version. This may take a few minutes. Once the process is complete, you will see a report page with the test results.
注釈
You can close the report window with no issue. Once a report has been generated, you can return to it later by clicking Details > Review Smart PHP Update results.
If any issues are detected, they will most likely be related not to WordPress core, but to one or more plugins. Here's what you can try to move forward:
Try using different plugins with similar functions.
Contact the plugin(s) author(s) and ask them to update those plugins, so that they are compatible with modern PHP versions.
Try a different minor PHP version (for example, if there are issues detected with PHP 8.4, try using PHP 8.2 instead).
Once you've made the decision whether to switch the production website to the selected PHP version, on the report page, click Switch > Switch PHP Version to perform the switch, or click Discard > Discard PHP Version Switch. In either case, the test site will be removed afterwards.
プラグインを管理する
WordPress プラグインは、WordPress に新機能を追加するサードパーティソフトウェアです。WP Toolkit を使用して、1 つまたは複数の WordPress インストールにプラグインをインストールし、管理できます。
プラグインをインストールする
WP Toolkit では、1 つ以上の WordPress インストールにプラグインをインストールできます。
wordpress.org のプラグインリポジトリ でプラグインを検索してインストールできます。また、カスタムプラグインをアップロードすることもでき、以下のような場合に便利です。
wordpress.org リポジトリで適当なプラグインが見つからない。
-
独自のプラグインをインストールする必要がある。
注釈
アップロードしたすべてのプラグインは、顧客によってインストールできるようになります。
特定の WordPress インストールにプラグインをインストールするには:
-
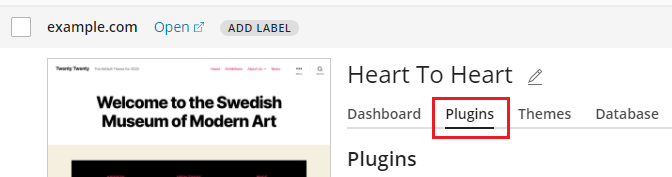
Go to WordPress, go to the "Plugins" tab of an installation card, and then click Install.
プラグインを検索し、インストールするプラグインの横で[インストール]をクリックします。インストールしたプラグインは即時にアクティブになります。
複数の WordPress インストールにプラグインをインストールするには:
-
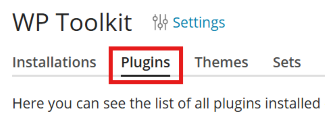
Go to WordPress > the "Plugins" tab, and then click Install.
-
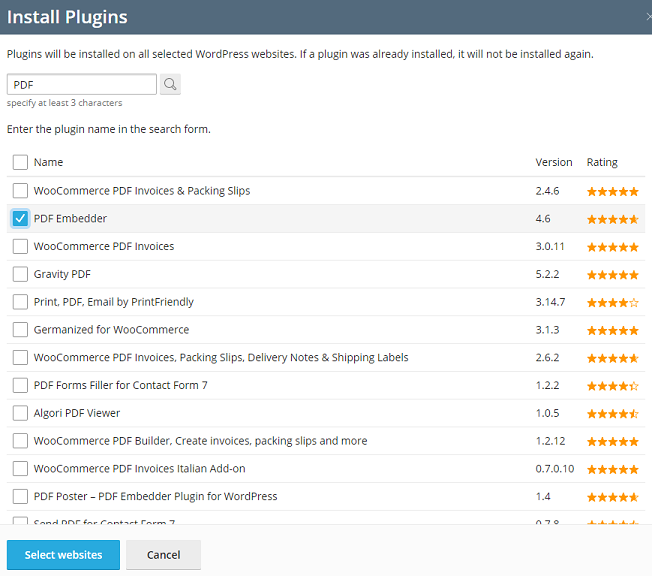
プラグインを検索し、インストールするプラグインを選択して、[ウェブサイトを選択]をクリックします。
注釈
1 つ以上のプラグインを選択し、それらをインストールせずに新たに検索を実行すると、選択はリセットされます。
By default, newly installed plugins are activated immediately. You can prevent this by clearing the "Activate after installation" checkbox.
プラグインをインストールするウェブサイトを選択して、[インストール]をクリックします。
プラグインをアップロードするには:
Go to WordPress > the "Plugins" tab, and then click Upload plugin.
-
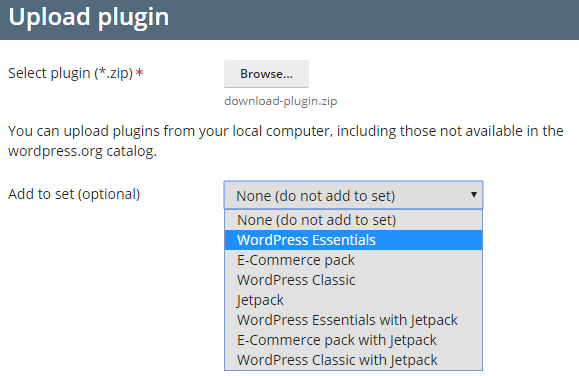
[参照...]をクリックし、アップロードしたいプラグインが含まれる ZIP ファイルの場所まで移動します。
アップロードしたプラグインをセットに追加できます。これには、ドロップダウンリストからセットを選択します。アップロードしたプラグインをセットに追加したくない場合、[None(なし)]オプションのままにします。セットについては、セットを管理する で詳細を確認できます。
[OK]をクリックします。
これで、アップロードしたプラグインを顧客がインストールできるようになります。また、アップロードしたプラグインを自社の WordPress インスタンスにインストールすることもできます。
アップロードしたプラグインをインストールするには:
Go to WordPress > the "Plugins" tab.
-
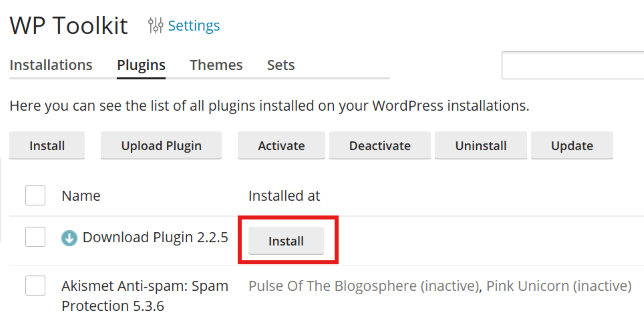
アップロードしたプラグインの横の[インストール]をクリックします。
アップロードしたプラグインをインストールする WordPress インストールを選択します。
By default, a newly uploaded plugin is not activated. You can activate it by selecting the "Activate after installation" checkbox.
[インストール]をクリックします。
プラグインをアクティブ/非アクティブにする
特定のインストール(またはサーバ上でホストされているすべてのインストール)にインストールされたプラグインをアクティブ/非アクティブにできます。
特定のインストールに対してプラグインをアクティブ/非アクティブにするには:
Go to WordPress, and then go to the "Plugins" tab of an installation card.
-
[アクティブ]の下で、プラグインをオンにしてアクティブ化するか、オフにして非アクティブ化します。
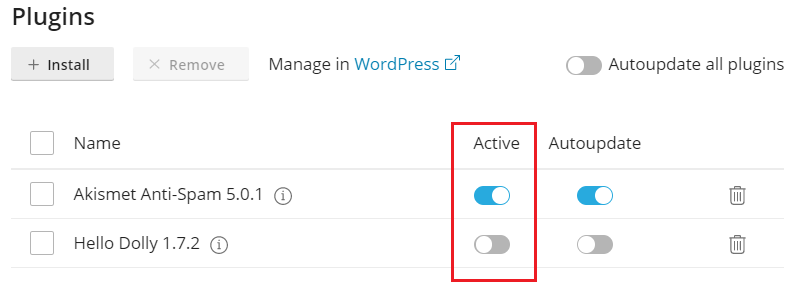
サーバ上でホストされているすべてのインストールに対してプラグインをアクティブ/非アクティブにするには:
Go to WordPress > the "Plugins" tab.
アクティブ/非アクティブにするプラグインを選択します。
[アクティブ化]または[非アクティブ化]をクリックします。
プラグインを更新する
If a plugin needs updating, you will see "Updates" next to the plugin on the "Plugins" tab of an installation card. You can update not only free plugins but also paid ones if they can be updated in the usual way in the WordPress admin dashboard.
注釈
ライセンスを必要とする有料のプラグインも、ライセンスがあれば WP Toolkit で更新できます。標準とは異なる方法で更新するプラグインを WP Toolkit で更新することはできません。
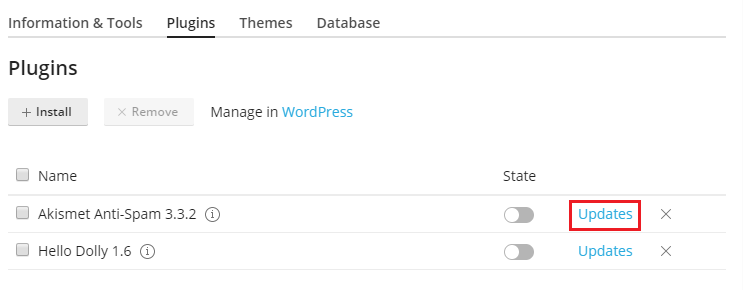
以下が可能です。
Update plugins for one particular installation. Read how to do so in the "To update a WordPress installation manually" procedure.
複数のインスタンスにインストールされたプラグインを更新する。
Configure autoupdates for plugins. Read how to do so in the "To configure autoupdates for a WordPress installation" procedure.
複数のインストールに対してプラグインを更新するには:
Go to WordPress > the "Plugins" tab.
-
更新するプラグインの横の[バージョン ... に更新]アイコンをクリックします。更新について詳しくは、[変更履歴]をクリックしてください。wordpress.org のプラグインページが開きます。
[はい]をクリックします。
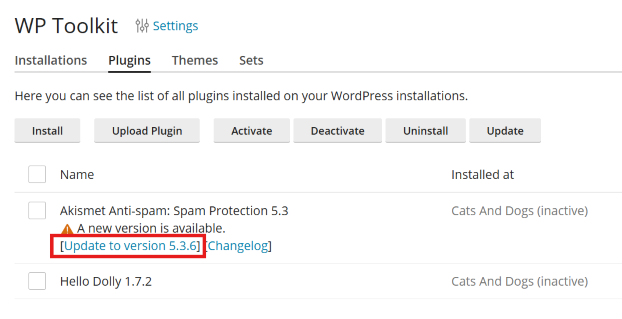
プラグインを削除する
特定のインストール(またはサーバ上でホストされているすべてのインストール)からプラグインを削除できます。
特定のインストールからプラグインを削除するには:
Go to WordPress, and then go to the "Plugins" tab of an installation card.
To remove one plugin, click the
icon corresponding to the plugin you want to remove.
To remove several plugins, select them and click Remove.[はい]をクリックします。
サーバ上でホストされているすべてのインストールからプラグインを削除するには:
Go to WordPress > the "Plugins" tab.
削除したいプラグインを選択し、[アンインストール]をクリックしてから[はい]をクリックします。
Must-Use Plugins
You may notice one or more plugins installed on a WordPress website being marked as "Must-Use". Such plugins are sometimes used to add support for important features. For example, WP Toolkit uses the must-use plugin "WP Toolkit plugin" to enable the "Vulnerability Protection" feature. Learn more about must-use plugins in WordPress.

注釈
The "Must-Use" designation only means that one or more plugins are treated as must-use for all websites that belong to a specific WordPress installation. It does not mean that those plugins are in any way endorsed or promoted by either WordPress Foundation or WebPros.
There are a number of differences between the way regular and must-use plugins work:
Must-use plugins are loaded before the regular plugins.
Must-use plugins are always on for all websites that belong to the WordPress installation the plugins are installed on.
Must-use plugins cannot be updated, deactivated, or removed via either WP Toolkit or the WordPress admin dashboard.
WordPress プラグインのブロックリスト
注釈
WordPress プラグインブロックリストは、WP Toolkit バージョン 5.6 以降で使用できます。
Some WordPress plugins can affect the server's performance, interfere with other plugins, or cause security issues. The reason is that plugins are developed by various developers with various knowledge and skill. In the plugin blocklist, you can forbid particular plugins from being installed on the server and automatically disable them if they are already installed.
例:サーバのパフォーマンスに影響を与えるプラグイン
ある WordPress プラグインが動作するために、あまりに多くのサーバリソースが必要であるとします。Plesk サーバの安定したスムーズな動作を確保するためには、クライアントがこのプラグインをインストールできないようにする必要があります。その方法をご紹介します。
[WordPress]に移動します。
[設定]をクリックします。
-
[WP Toolkit 設定]ポップアップウィンドウの[プラグインブロックリスト]フィールドで、プラグイン名を入力します。単語と単語の間はダッシュでつないでください。
注釈
リストに別のプラグインを追加するには、最初のプラグイン名の後にコンマを付けてから、スペースを入れずに新しいプラグインの名前を指定してください。
[Save]をクリックします。
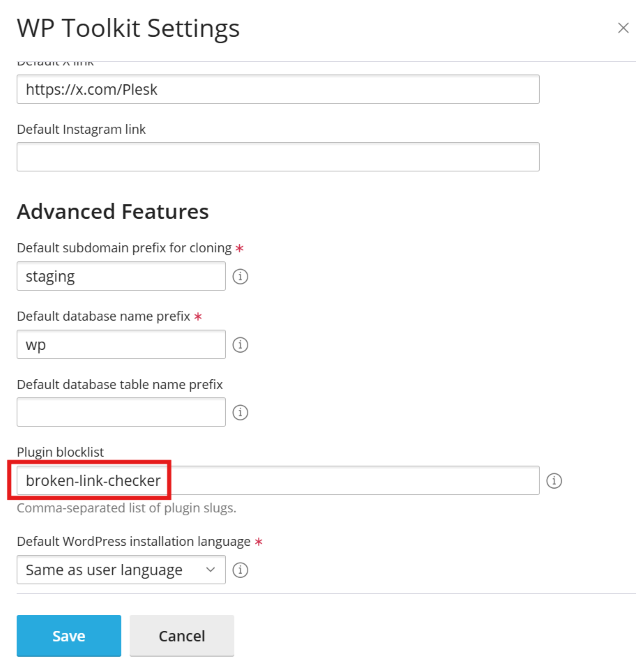
その結果、クライアントは指定されたプラグインを WP Toolkit でインストール、アップロード、またはアクティブ化することはできなくなります。既にこのプラグインがインストールされている場合、WP Toolkit によって自動で無効化されます。
テーマを管理する
WordPress テーマは、色、フォント、レイアウトなど、ウェブサイト全体のデザインを決定します。別のテーマを選択すると、ウェブサイトのルック&フィールが変わりますが、コンテンツは変更されません。WP Toolkit により、テーマをインストールしたり管理したりできます。
テーマをインストールする
WP Toolkit では、1 つ以上の WordPress インストールにテーマをインストールできます。
wordpress.org のテーマリポジトリ でテーマを検索してインストールできます。また、カスタムテーマをアップロードすることもでき、以下のような場合に便利です。
wordpress.org リポジトリで適当なテーマが見つからない。
-
独自のテーマをインストールする必要がある。
注釈
アップロードしたすべてのテーマは、顧客によってインストールできるようになります。
特定の WordPress インストールにテーマをインストールするには:
-
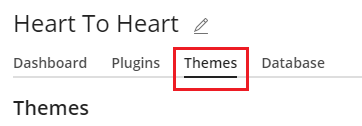
Go to WordPress, go to the "Themes" tab of an installation card, and then click Install.
テーマを検索し、インストールしたいテーマの横の[インストール]をクリックします。デフォルトで、新規インストールしたテーマはアクティブになっていません。
複数の WordPress インストールにテーマをインストールするには:
-
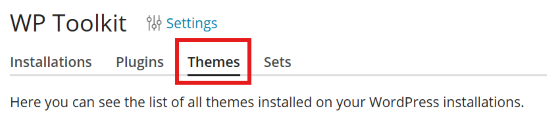
Go to WordPress > the "Themes" tab, and then click Install.
-
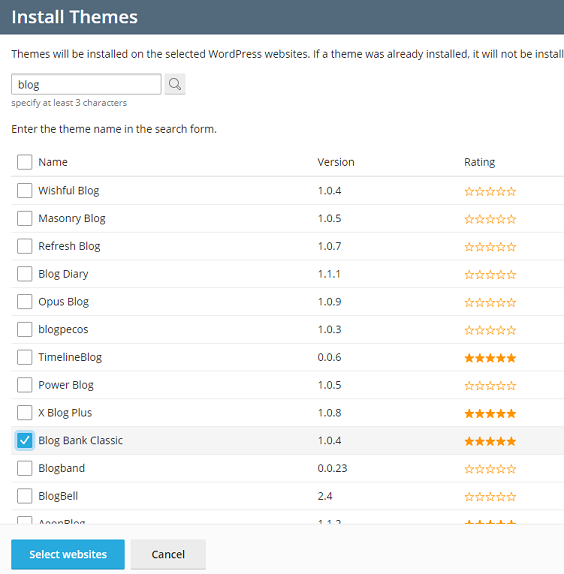
テーマを検索し、インストールするテーマを選択して、[ウェブサイトを選択]をクリックします。
注釈
1 つ以上のテーマを選択し、それらをインストールせずに新たに検索を実行すると、選択はリセットされます。
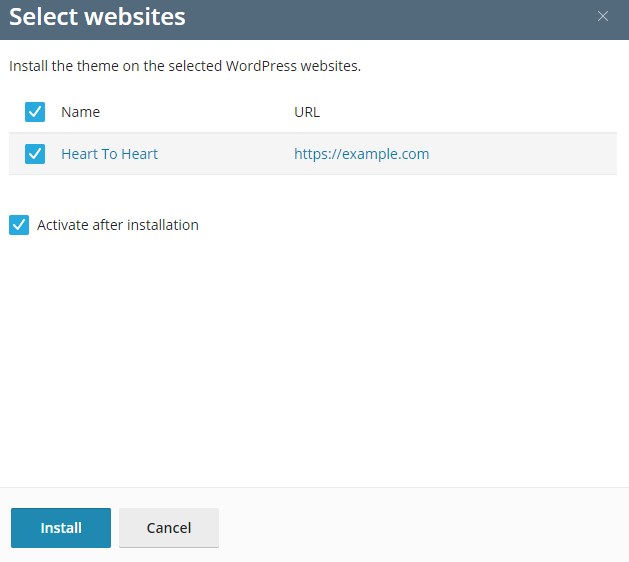
テーマをインストールするウェブサイトを選択して、[インストール]をクリックします。
テーマをアップロードするには:
Go to WordPress > the "Themes" tab, and then click Upload theme.
[参照...]をクリックし、アップロードしたいテーマが含まれる ZIP ファイルの場所まで移動します。
アップロードしたテーマをセットに追加できます。これには、ドロップダウンリストからセットを選択します。アップロードしたテーマをセットに追加したくない場合、[なし]オプションのままにします。セットについては、「セットを管理する」で詳細を確認できます。
[OK]をクリックします。
これで、アップロードしたテーマを顧客がインストールできるようになります。また、アップロードしたテーマを自社の WordPress インスタンスにインストールすることもできます。
アップロードしたテーマをインストールするには:
Go to WordPress > the "Themes" tab.
-
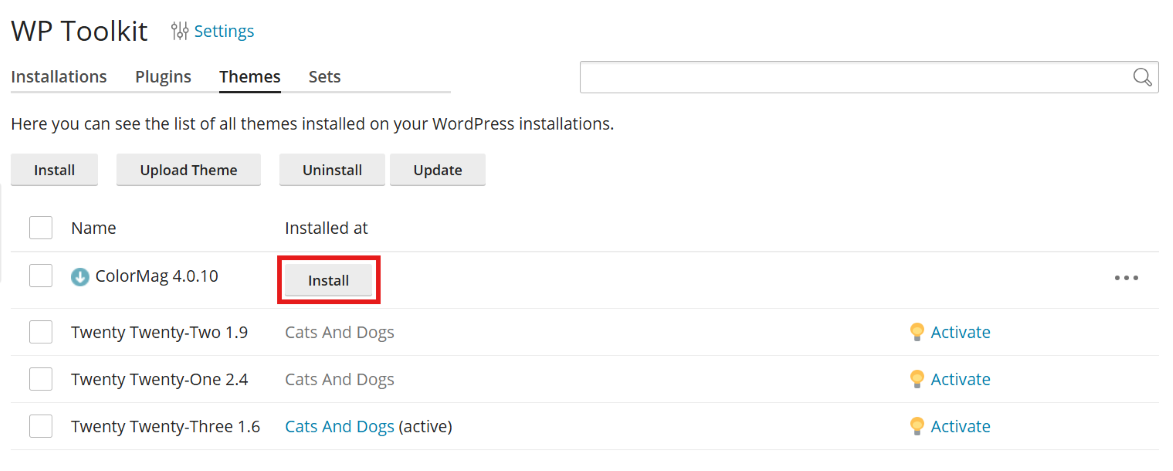
アップロードしたテーマの横の[インストール]をクリックします。
-
アップロードしたテーマをインストールする WordPress インストールを選択します。
By default, a newly uploaded theme is activated. You can deactivate it by clearing the "Activate after installation" checkbox.
[インストール]をクリックします。
テーマをアクティブにする
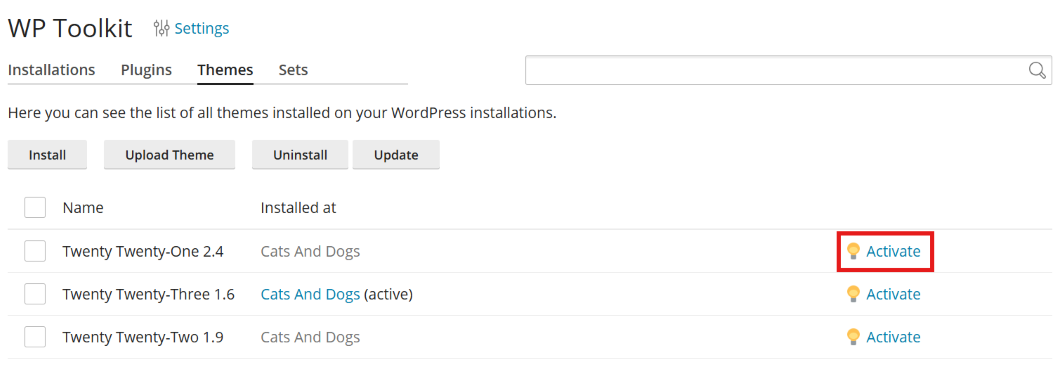
特定のインストール(またはサーバ上でホストされているすべてのインストール)にインストールされたテーマをアクティブにできます。1 つの WordPress インストールに対し、一度に 1 つのテーマだけアクティブにできます。
特定のインストールに対してテーマをアクティブにするには:
Go to WordPress, and then go to the "Themes" tab of an installation card.
[アクティブ]の下で、テーマをオンにしてアクティブ化します。以前にアクティブだったテーマが自動的に非アクティブになります。
サーバ上でホストされているすべてのインストールに対してテーマをアクティブにするには:
Go to WordPress > the "Themes" tab.
-
アクティブにするテーマの横で[アクティブ化]をクリックします。
テーマを更新する
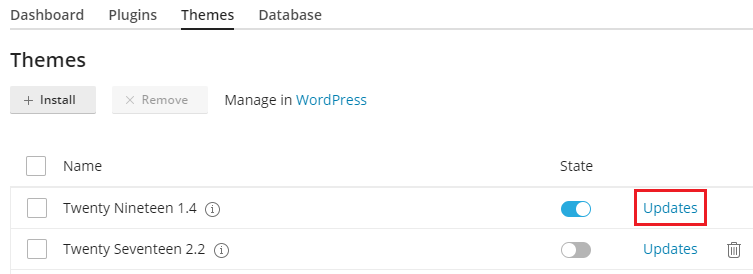
If a theme needs updating, you will see "Updates" next to the theme on the "Themes" tab of an installation card. You can update not only free themes but also paid ones if they can be updated in the usual way in the WordPress admin dashboard.
注釈
ライセンスを必要とする有料のテーマも、ライセンスがあれば WP Toolkit で更新できます。標準とは異なる方法で更新するテーマを WP Toolkit で更新することはできません。
以下が可能です。
Update themes for one particular installation. Read how to do so in the "To update a WordPress installation manually" procedure.
複数のインストールにインストールされたテーマを更新する。
Configure autoupdates for themes. Read how to do so in the "To configure autoupdates for a WordPress installation" procedure.
複数のインストールに対してプラグインを更新するには:
Go to WordPress > the "Themes" tab.
更新するテーマの横の[バージョン ... に更新]アイコンをクリックします。更新について詳しくは、[変更履歴]をクリックしてください。wordpress.org のテーマページが開きます。
[はい]をクリックします。
テーマを削除する
特定のインストール(またはサーバ上でホストされているすべてのインストール)からテーマを削除できます。
注釈
アクティブなテーマは削除できません。現在アクティブなテーマを削除するには、先に別のテーマをアクティブにしてください。
特定のインストールからテーマを削除するには:
Go to WordPress, and then go to the "Themes" tab of an installation card.
Click the
icon next to theme you want to remove. To remove
several themes, select them and click Remove.[はい]をクリックします。
サーバ上でホストされているすべてのインストールからテーマを削除するには:
Go to WordPress > the "Themes" tab.
削除したいテーマを選択し、[アンインストール]をクリックしてから[はい]をクリックします。
Managing the Database
On the Database tab of a WordPress installation card, you can view the database details for the installation, change the database username and password, and open the database in phpMyAdmin.
To view the database details of a WordPress installation:
Go to WordPress, go to the "Database" tab of the installation card, and then view the information in the "Database details" section.
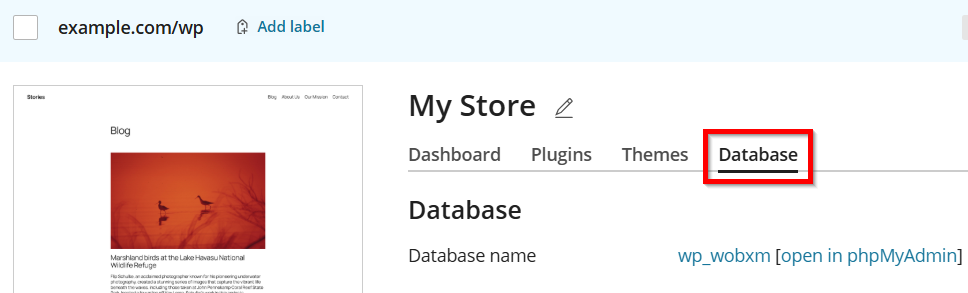
表示される情報は以下のとおりです。
Database name — the name of the database used by this WordPress installation.
Database table prefix — the prefix applied to all WordPress database tables.
Database user name — the username WP Toolkit uses to connect to the database.
Database server — the address and port of the database server.
Changing the Database Username and Password
You can change the credentials WP Toolkit uses to connect to the database of a WordPress
installation at any time. WP Toolkit updates the wp-config.php file automatically.
To change the database username or password of a WordPress installation:
-
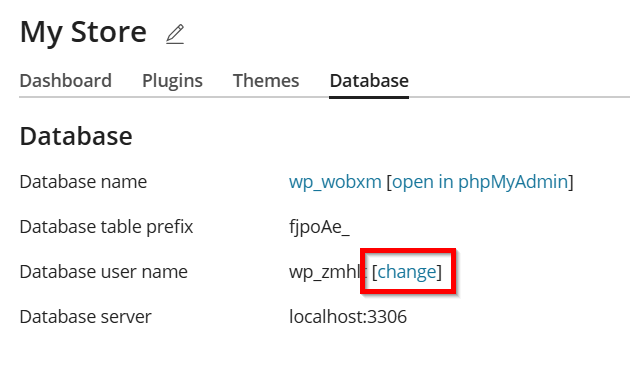
Go to WordPress, go to the "Database" tab of the installation card, and then click change next to "Database user name".
Enter a new username, password, or both.
[OK]をクリックします。
Opening the Database in phpMyAdmin
To open the database of a WordPress installation in phpMyAdmin:
Go to WordPress, go to the "Database" tab of the installation card, and then click open in phpMyAdmin next to "Database name".
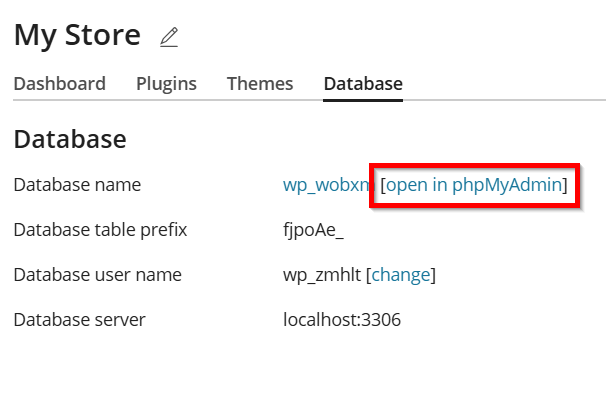
The database opens in phpMyAdmin in a new browser tab.
WordPress のセキュリティを強化する
WP Toolkit により、WordPress インストールのセキュリティを強化できます(たとえば、XML-RPC ピンバックをオフにする、 wp-content フォルダのセキュリティをチェックするなど)。
We call individual improvements you can make to the installation's security "measures". We consider certain measures to be critical. For that reason, WP Toolkit applies them automatically to all newly created installations.
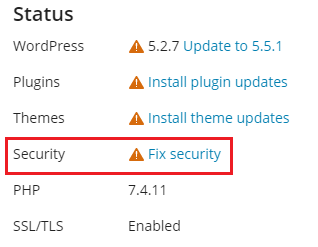
On an installation's card, under "Security", you can see the following security messages:
"Apply critical security measures" means that not all critical security measures were applied. We strongly recommend that you apply them all.
"Critical security measures applied" means that all critical security measures were applied, while some recommended measures were not.
"All security measures applied" means that all security measures (critical and recommended) were applied.
注釈
Some security measures, once applied, can be reverted (they are marked with the "can be reverted" tag). Some cannot. We recommend that you back up a WordPress installation before securing it.
WordPress インストールのセキュリティ強化は、個別に行うことも複数のインストールに対して一括で行うこともできます。
個別の WordPress インストールをセキュリティ強化するには:
Go to WordPress, choose the installation you want to secure, and then, on the installation card, click the message under "Security" (for example, "Apply critical security measures").
WP Toolkit により、適用可能なセキュリティ措置が表示されるまで待ちます。
Select the security measures you want to apply, and then click Secure. Alternatively, click Apply All to apply all available security measures.
選択したすべての措置が適用されます。
複数の WordPress インストールをセキュリティ強化するには:
Go to WordPress, click Security, and then go to the "Security Measures" tab.
WordPress インストールのリストが表示されます。インストールごとに、適用できる重要なセキュリティ措置(
アイコン)と推奨されるセキュリティ措置( アイコン)の数が表示されます。適用できる措置のリストを表示するには、対応するアイコンをクリックします。すべてのセキュリティ措置を適用すると、 アイコンが表示されます。(Optional) To see more information about all security measures and to manage them for an individual WordPress installation, click
next to the desired installation. To return to managing security of
multiple installations, close the drawer.セキュリティ措置を適用するインストールを選択し、[セキュリティ保護]をクリックします。
-
デフォルトで、重要なセキュリティ措置のみが適用対象として選択されます。以下も選択できます。
選択したセキュリティ措置。[カスタム選択]ラジオボタンをクリックします。
All security measures at once. To do so, click the "All (critical and recommended)" radio button.
[セキュリティ保護]をクリックします。
 アイコン)と推奨されるセキュリティ措置(
 アイコン)の数が表示されます。適用できる措置のリストを表示するには、対応するアイコンをクリックします。すべてのセキュリティ措置を適用すると、
 アイコンが表示されます。
 next to the desired installation. To return to managing security of
multiple installations, close the drawer.
next to the desired installation. To return to managing security of
multiple installations, close the drawer.選択した措置が適用されます。
セキュリティ措置を元に戻す
In rare cases, applying security measures can break your website. In this case, you can revert security measures you have applied. Not all security measures can be reverted. Those that can be are marked with the "can be reverted" tag. You can revert security measures for an individual WordPress installation or for multiple WordPress installations at a time.
個別のインストールに適用したセキュリティ措置を元に戻すには:
-
Go to WordPress, choose the installation for which you want to revert an applied measure, and then, on the installation card, click the message under "Security" (for example, "All security measures applied").
WP Toolkit にセキュリティ措置のリストが表示されるまで待ちます。
元に戻すセキュリティ措置を選択して[Revert(戻す)]をクリックします。

適用されたセキュリティ措置が元に戻ります。
複数のインストールに適用したセキュリティ措置を元に戻すには:
Go to WordPress, click Security, and then go to the "Security Measures" tab.
サーバでホストされている WordPress インストールのリストに、重要なセキュリティ措置と推奨されるセキュリティ措置が適用されているかどうかが表示されます。
(Optional) To see more information about all security measures and to manage them for an individual WordPress installation, click
next to the desired installation.
To return to managing security of multiple installations,
close the drawer.セキュリティ措置を元に戻すインストールを選択し、[元に戻す]をクリックします。
元に戻すセキュリティ措置を選択して[元に戻す]をクリックします。
適用されたセキュリティ措置が元に戻ります。
Mitigating WordPress Vulnerabilities
Like any other popular software, WordPress can suffer from vulnerabilities that find their way into its code. They range from harmless to critical in impact, and can be found in WordPress core, plugins, and themes. No matter the source, an unmitigated vulnerability can result in the hosted WordPress websites being compromised.
Detecting Vulnerabilities
To help you protect against this threat and keep the hosted WordPress websites secure, WP Toolkit detects known vulnerabilities and offers ways of mitigating them. WP Toolkit uses the information from the PatchStack and Wordfence vulnerability databases.
When one or more vulnerabilities are detected, notifications appear in the WP Toolkit interface:
-
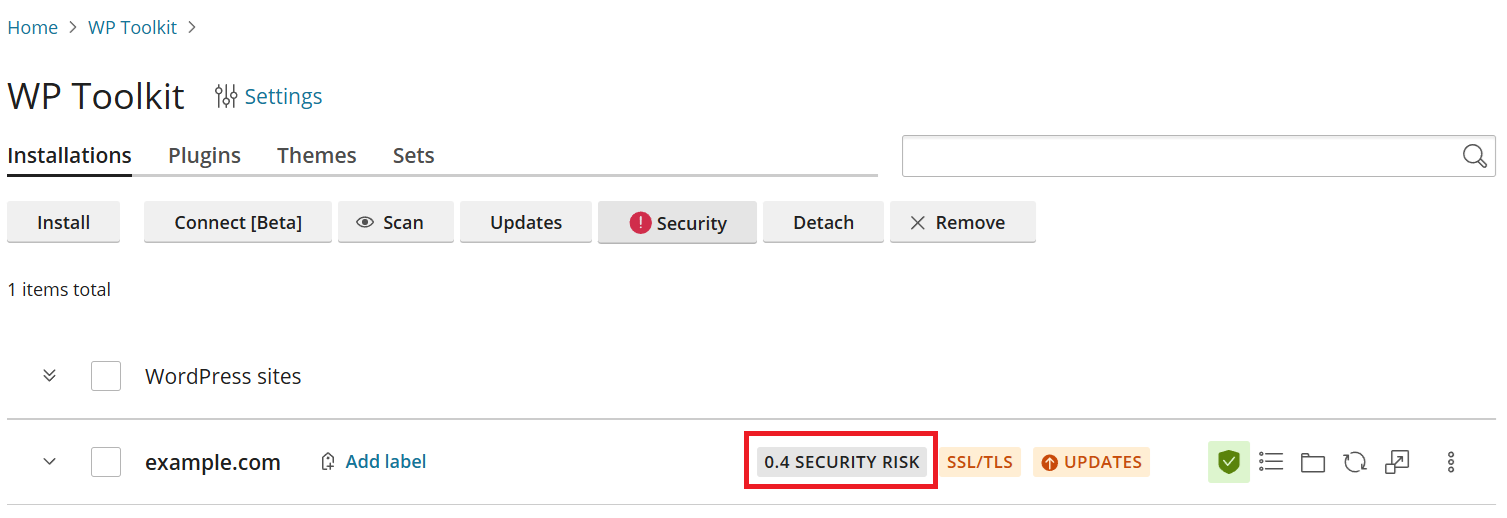
On the "WP Toolkit" page, the WordPress websites with one or more known vulnerabilities are tagged with the "Security risk" tag, together with a number. The number is an estimation of the severity of the threat posed by the vulnerabilities, where 0.1 is the mimimum threat, and 10 is the maximum.
-
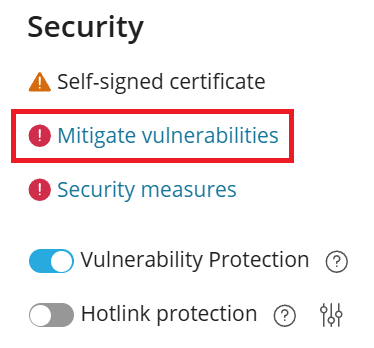
On the individual websites' cards, on the "WordPress" tab, under "Security", the Mitigate vulnerabilities call to action is shown.
-
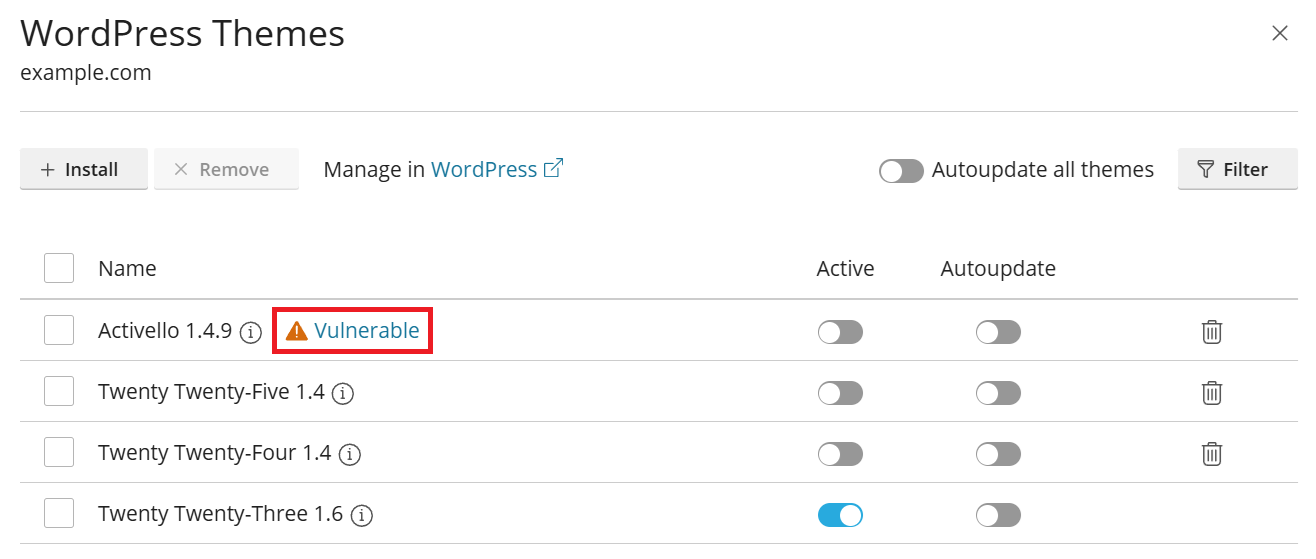
In the individual websites' "WordPress Plugins" and "WordPress Themes" drawers, any installed plugins or themes that are vulnerable are marked with the
icon and the word "Vulnerable". Any currently active plugins that are vulnerable, or the currently active theme if it is vulnerable, are marked with the icon and the word "Vulnerable". Also, when activating a vulnerable plugin or theme, a separate confirmation is required.
 icon and the word "Vulnerable". Any currently active plugins that are vulnerable, or the currently active theme if it is vulnerable, are marked with the
  icon and the word "Vulnerable". Also, when activating a vulnerable plugin or theme, a separate confirmation is required.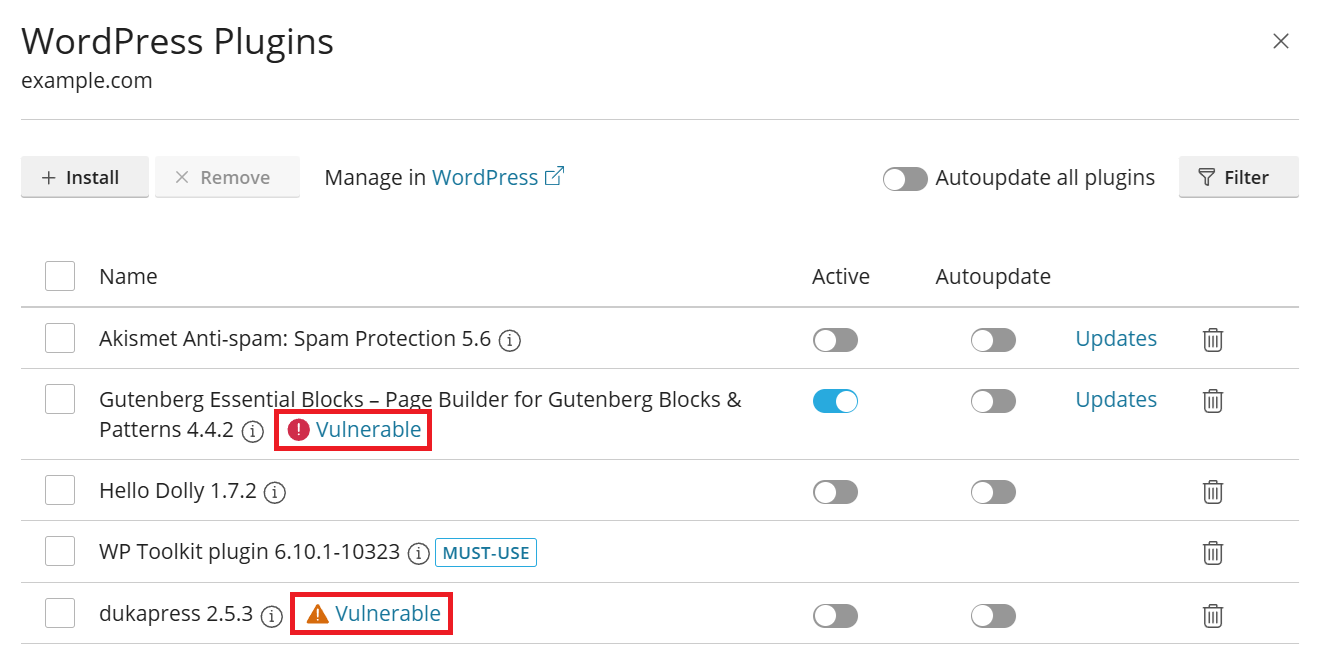
Mitigating Vulnerabilities
Clicking the element notifying you of the presence of vulnerabilities (the "Security risk" tag, the Mitigate vulnerabilities call to action, or the word "Vulnerable") opens the "Security Status" drawer. Here you can find more information about the vulnerabilities and their potential impact, and also mitigate them.
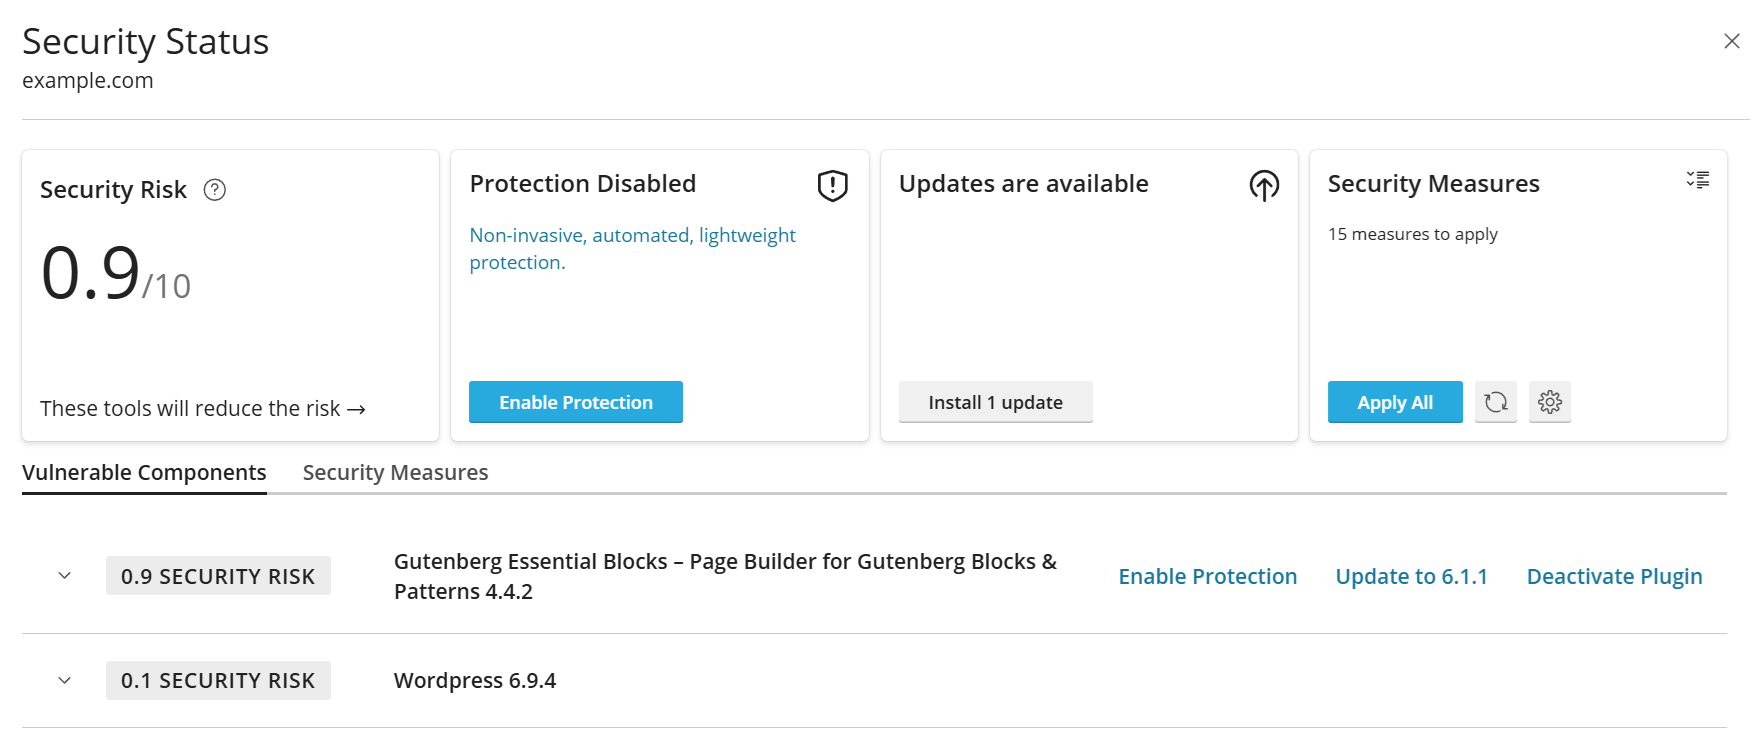
In the drawer, you can see the individual sources of vulnerabilities (WordPress core and/or any vulnerable plugins). You can click any item to expand it. If you do, you will see the list of specific vulnerabilities associated with that source, including its estimated impact and CVE identifier.
The possible methods of mitigating the vulnerabilities introduced by a specific source (if any) are shown to the right of the name of each source. You can choose what method to use, if any, on a per source basis. WP Toolkit offers four such methods:
Vulnerabilities are mainly mitigated by installing updates from the WordPress core team (if the vulnerability is in the WordPress core), or the plugin's or theme's maintainer or vendor (if the vulnerability is in a plugin or a theme). However, this approach requires an update to be available. In case of plugins and themes, an update may come with a delay, or not at all, depending on how actively they are maintained. Additionally, installing updates can interfere with the stable operation of the WordPress website.
Some vulnerabilities can be mitigated by applying certain security measures. However, this method is not applicable to all vulnerabilities.
Vulnerabilities found in plugins and themes can be mitigated by deactivating or removing the affected plugins, or by switching to a different theme. However, this method may not always be practical, as deactivating a vulnerable plugin a WordPress website relies on to function or changing the theme will change the website's appearance and/or interfere with the stable operation of the website.
-
Vulnerabilities can also be mitigated using the "Vulnerability Protection" WP Toolkit feature. It offers a number of advantages compared to the other methods:
Vulnerabilities are mitigated automatically as soon as a fix from the PatchStack team is available.
There is no need to deactivate vulnerable plugins.
There is no need to install any updates on the server itself.
WordPress ウェブサイトを複製する
WordPress ウェブサイトを複製すると、ウェブサイトファイル、データベース、設定がすべて含まれるウェブサイトの完全なコピーが作成されます。
WordPress ウェブサイトの複製が必要になるのは、次のような状況です。
別のドメインまたはサブドメインで WordPress ウェブサイトの非公開(ステージング)バージョンを管理している。このバージョンを本番ドメインに発行して一般に公開する。
一般公開している(本番)WordPress ウェブサイトがある。この非公開(ステージング)コピーを作成し、本番ウェブサイトに影響を与えずに変更を加えたい。
You want to create a "master" copy of a WordPress website with preconfigured settings, plugins, and theme, and then clone it to start a new development project for a client.
WordPress ウェブサイトのコピーを複数作成し、それぞれに異なる変更を加えたい(たとえば、クライアントに見せて、気に入ったものを選んでもらうため)。
注釈
By default, on cloned WordPress installations, the "Search engine indexing" option is turned off. To turn this option on for cloned WordPress installations, go to WordPress, click "Settings", and then clear the "Turn off Search Engine Indexing for cloned websites" checkbox.
WordPress ウェブサイトを複製する:
-
[WordPress]に移動し、複製する WordPress インストールのカードで[複製]をクリックします。
-
ウェブサイトをどこに複製するかを選択します。
[サブドメインを作成]を選択したまま維持すると、WP Toolkit がデフォルトの「staging」プレフィックスで新しいサブドメインを作成します。これを使用するか、希望するサブドメインプレフィックスを入力することができます。
注釈
デフォルトのサブドメインプレフィックスは変更できます。これには、[WordPress]に移動して[設定]をクリックし、[デフォルトの複製用サブドメインプレフィックス]フィールドに必要なプレフィックスを指定して、[OK]をクリックします。
[既存のドメインまたはサブドメインを使用]を選択し、リストから必要なドメインまたはサブドメインを選択する。
注意
複製先として選択するドメインまたはサブドメインが既存のウェブサイトで使用されていないことを確認してください。複製中に、複製先にあるウェブサイトのデータが上書きされ、復元できなくなる可能性があります。
(オプション)複製時に自動で作成されたデータベースの名前を変更します。
選択した複製先とデータベース名で問題なければ、[開始]をクリックします。

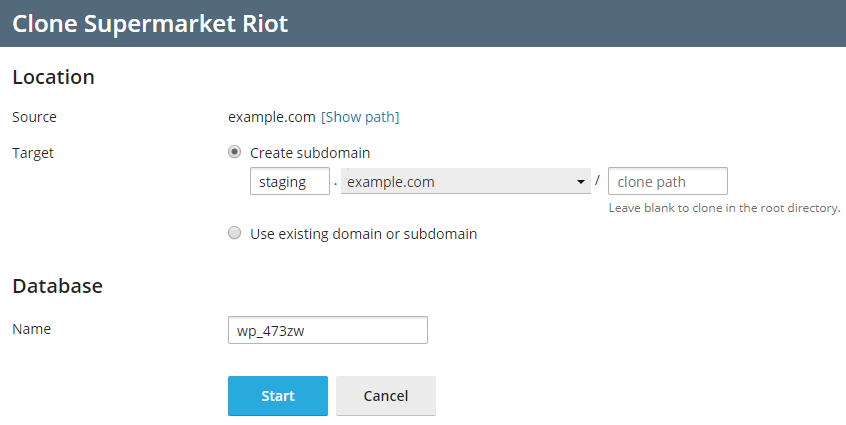
複製が終了すると、WordPress インスタンスのリストに新しく複製されたインスタンスが表示されるようになります。
WordPress ウェブサイト間でデータをコピーする
WordPress ウェブサイトのコンテンツ(ファイルとデータベースを含む)を別の WordPress ウェブサイトにコピーできます。
たとえば、ステージングバージョンの WordPress ウェブサイトを別ドメインまたは別サブドメインで管理しており、本番バージョンを本番ドメインで管理しているとします。ウェブサイト間でデータをコピーする必要があるのは次のような状況です。
ステージングバージョンで加えた変更を本番バージョンにコピーしたい。
本番ウェブサイトからステージングウェブサイトへデータをコピーして、本番データで変更(新しいプラグインなど)がどのように機能するかを確認したい。すべて正常に機能することを確認してから、変更を本番ウェブサイトにコピーできます。
ステージングウェブサイトにいくつかの変更(新しいプラグインのインストールなど)を加え、これらの変更によりデータベースに新しいテーブルが追加されている。これらのテーブルだけを本番ウェブサイトにコピーできるため、他のデータに影響はありません。
ステージングウェブサイトを新規リリースされた WordPress バージョンにアップグレードし、アップグレード後に発生した問題(もしあれば)を修正した。これらの変更を本番ウェブサイトにも適用したい。
WordPress ファイル、WordPress データベース、またはファイルとデータベースの両方をコピーすることを選択できます。データベースをコピーする場合、すべてのテーブルをコピーするか、コピー元サーバにはあるがコピー先サーバにはないテーブルをコピーするかを選択できます。または、コピーするデータベーステーブルを個別に指定することができます。
コピーを実行するときは、以下に注意してください。
選択したデータはコピー元のウェブサイトからコピー先のウェブサイトへコピーされます。ファイル/データベーステーブルがコピー元とコピー先の両方にあり、内容が同一でない場合には、該当するファイル/データベーステーブルがコピー元からコピー先にコピーされます。コピー先にしかないファイルやデータベーステーブルは、コピー時に[不足ファイルを削除]を選択しない限りは影響を受けません。
コピーの実行中、コピー先ウェブサイトはメンテナンスモード になり、一時的に使用できなくなります。
コピー先ウェブサイトの WordPress のバージョンがコピー元サイトより古い場合、WP Toolkit はまず、コピー先ウェブサイトの WordPress をアップグレードし、コピー元ウェブサイトにインストールされたバージョンと同じバージョンにします。その後、コピーが実行されます。
コピー元ウェブサイトの WordPress バージョンがコピー先ウェブサイトのバージョンより古い場合、コピーは中止されます。データをコピーするには、コピー元の WordPress のバージョンを、コピー先にインストールされている WordPress のバージョン以上にアップグレードする必要があります。
コピー元とコピー先でデータベースプレフィックスが異なる場合、WP Toolkit はコピー中に、コピー先ウェブサイトのデータベースプレフィックスをコピー元に合わせて変更します。
通常の WordPress インストールとマルチサイトインストールの間でのデータコピーはサポートされません。代わりに、複製を使用することをお勧めします。
注釈
コピーの実行中、コピー元からコピーされたファイルとデータベーステーブルによって、コピー先にあるファイルとデータベーステーブルが上書きされます。コピーの開始前にコピー先のファイルとデータベーステーブルに加えた変更はすべて警告なく破棄され、失われます。
注釈
コピーする WordPress ウェブサイトにキャッシングプラグインをインストールしていた場合、コピーを実行する前にコピー元ウェブサイトのキャッシュをクリアしてください。クリアしなければ、コピー先ウェブサイトが正しく機能しない可能性があります。
WordPress ウェブサイト間でデータをコピーするには:
-
[WordPress]に移動し、コピーする WordPress インストールのカードで[データをコピー]をクリックします。
-
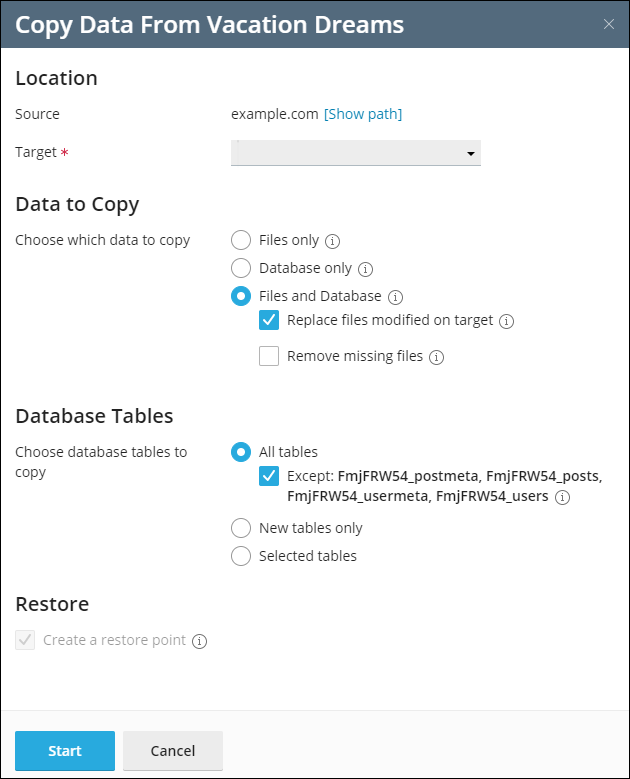
[ターゲット]の横で、データのコピー先の WordPress インストール(同じ契約または別の契約の下)を選択します。
-
[コピーするデータ]の下で、コピー先の WordPress ウェブサイトにコピーするデータを選択します。
-
[ファイルのみ]- ウェブサイトファイルのみコピーされます(WordPress のコアファイル、テーマとプラグインに関連するファイルを含む)。
注釈
デフォルトで、
htaccess、web.config、wp-config.phpファイルはコピーされません。これらのファイルに変更を加えると WordPress が正常に機能しなくなる可能性があるためです。[wp-config.php をコピーします]チェックボックスをオンにすると、WP Toolkit にwp-config.phpファイルをコピーできます。このチェックボックスを表示するには、[WordPress]に移動して[設定]をクリックし、[データコピー機能の使用時に wp-config.php のコピーを許可する]チェックボックスをオンにして、[OK]をクリックします。注釈
wp-config.phpファイルをコピーすることを選択した場合も、データベースに関連する情報はコピーされず、ターゲットの WordPress インストールの破損を防止できます。コピー先のwp-config.phpファイルに指定されているカスタム設定はコピー元の設定で上書きされます。 [データベースのみ]- データベースのみコピーされます。インポート対象として、すべてのデータベーステーブル、新規データベーステーブル、または選択したデータベーステーブルを選択できます(詳しくは、以下のステップ 5 を参照してください)。
[ファイルとデータベース]- ウェブサイトファイルとデータベースの両方がコピーされます。インポート対象は、すべてのデータベーステーブル、新規のデータベーステーブル、または選択したデータベーステーブルから選択できます(詳しくは、以下のステップ 5 を参照してください)。
-
-
ステップ 3 で[ファイルのみ]または[ファイルとデータベース]を選択した場合、さらに 2 つのオプションが表示されます。
[ターゲットで変更済みのファイルを置換]- デフォルトで、コピー元とコピー先の両方に同じ名前のファイルがある場合、コピー元にあるファイルがコピー先にコピーされ、コピー元のファイルが古い場合でもコピー先のファイルが上書きされます。コピー先のファイルがコピー元のファイルで上書きされないようにするには、このチェックボックスをオフにしてください。
-
[不足ファイルを削除]- デフォルトで、コピー先にファイルがあってコピー元にはない場合、このファイルはそのまま維持されます。このチェックボックスをオンにすると、コピー先にだけ存在し、コピー元にはないファイルが削除されるようになります。
注釈
これらのオプションを隠して、管理者自身も顧客も使用できないようにすることができます。これには、[WordPress]に移動して[設定]をクリックし、[rsync をファイルコピー操作に使用]チェックボックスをオフにして、[OK]をクリックします。
-
ステップ 3 で[データベースのみ]または[ファイルとデータベース]を選択した場合、コピーするデータベーステーブルを選択してください。
[すべてのテーブル](デフォルトオプション)。ページ、投稿、ユーザ以外の変更をすべてコピーしたい場合は、[除外: _postmeta, _posts, _usermeta, _users]チェックボックスをオンにしておいてください。
[新しいテーブルのみ]
[選択されたテーブル]。[コピーするテーブルを選択]をクリックし、コピーしたいテーブルを選択して、[選択]をクリックします。
-
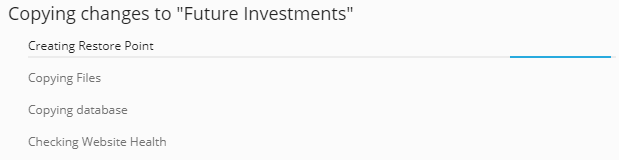
データをコピーする前に、WP Toolkit から復元ポイントの作成を提案されます。これを使用して、コピー中に行われた変更をロールバックすることができます。復元ポイントを作成しない場合は、[復元ポイントを作成]チェックボックスをオフにしてください。復元ポイントを使用して WordPress インストールを復元する方法は、以下の「WordPress インストールを復元する」を参照してください。
注釈
WordPress インストールごとに復元ポイントを 1 つだけ作成できます。復元ポイントを作成すると、既存の復元ポイントが上書きされます(もしあれば)。
選択したオプションで問題なければ、[開始]をクリックしてデータのコピーを開始します。

復元ポイントから WordPress インストールを復元する
WordPress コアを更新するか、WordPress インストール間でデータをコピーする際は、処理を開始する前に復元ポイントを作成することが提案されます。処理の結果に満足できない場合、復元ポイントを使用して変更をロールバックし、処理を開始する前の状態に戻すことができます。
注釈
WP Toolkit は、単一の WordPress インストールを更新する場合にのみ復元ポイントの作成を提案します。
完全な復元ポイントを作成する
デフォルトで、復元ポイントにはデータのコピーや更新によって影響を受けるデータのみが含まれます。コピー先インストールの全データ(ファイルとデータベースの両方を含む)を復元ポイントに含めるように WordPress に指定できます。これには、[WordPress]に移動して[設定]をクリックし、[常にウェブサイトのフルスナップショットを作成]チェックボックスをオンにして、[OK]をクリックします。完全な復元ポイントにより、復元が成功する可能性が高まりますが、作成には時間がかかり、使用するディスク容量が通常の復元ポイントより増えます。
復元ポイントから WordPress インストールを復元するには:
[WordPress]で、復元するインストールのカードを見つけます。
-
[復元ポイント]の横の
アイコンをクリックし、[続行]をクリックします。
 アイコンをクリックし、[続行]をクリックします。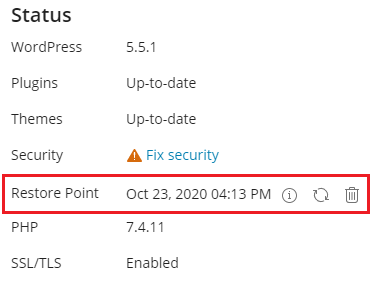
復元が開始されます。インストールが、処理開始前の状態に戻ります。
復元ポイントが使用するディスク容量は、使用が許可されているディスク容量にカウントされます。WordPress インストールを復元した後や、すべてが正常に完了して復元の必要がないことを確認した後で、復元ポイントを削除できます。
復元ポイントを削除するには:
[WordPress]で、削除する復元ポイントを見つけます。
Click the
icon next to "Restore Point", and then click Remove.
注釈
WordPress インストールごとに復元ポイントを 1 つだけ作成できます。復元ポイントを作成すると、既存の復元ポイントが上書きされます(もしあれば)。
復元ポイントがバックアップと同じものではないということを理解しておくことが重要です。データをコピーした後や更新後に、コピー先インストールに変更を加えると、復元ポイントから復元することはできなくなります。本番環境の WordPress インストールからデータをコピーしたり更新したりする場合は、復元ポイントの作成に加え、事前にバックアップしておくことをお勧めします。
ウェブサイト URL を更新する
別のサーバからウェブサイトを移動した場合、ウェブサイトの URL が変わる場合があります。この場合、移行した WordPress インストールは、WordPress でウェブサイト URL を更新するまで機能しません。これまではこれを手動で行う必要がありましたが、新たに WP Toolkit が自動的にウェブサイト URL を更新できるようになりました。
ウェブサイト URL を更新するには:
Go to WordPress, choose the card of the website that you have migrated, click the
icon,
and then click Update Site URL.-
WP Toolkit により、実際のウェブサイト URL が WordPress データベースおよび
wp-config.phpに指定された URL と比較されます。これらの URL が一致していれば、ウェブサイトの URL は最新状態です。[戻る]をクリックしてウェブサイトカードに戻ってください。
これらの URL が一致していない場合、WordPress で指定された URL を実際の URL に変更して[更新]をクリックしてください。
ウェブサイトがオンラインになることを確認しました。
「開発者を採用」リンクを更新する
[開発者を採用] メニューを使用すると、WordPress 開発者を採用するためのカスタム URL を WP Toolkit に表示できます。この URL は、紹介ボーナスの効率化などに利用できます。デフォルトで、このリンクは Codeable にリダイレクトされます。
panel.ini ファイルを使用してこのメニューを非表示にするには:
-
お好みのテキストエディタで "panel.ini" ファイル開きます。ファイルは以下の場所にあります。
(Plesk for Linux)
/usr/local/psa/admin/conf/panel.ini(Plesk for Windows)
%plesk_dir%admin\conf\panel.ini
-
以下の行を追加してファイルを保存します。
[ext-wp-toolkit]
hireDeveloperFeature = false
panel.ini ファイルを使用してこのメニューを表示するには:
-
お好みのテキストエディタで "panel.ini" ファイル開きます。ファイルは以下の場所にあります。
(Plesk for Linux)
/usr/local/psa/admin/conf/panel.ini(Plesk for Windows)
%plesk_dir%admin\conf\panel.ini
-
以下の行を追加してファイルを保存します。
[ext-wp-toolkit]
hireDeveloperFeature = true
サーバに対してこのリンクを変更または非表示にするには:
WP Toolkit に移動して、
アイコンをクリックします。 [WP Toolkit 設定] メニューが表示されます。-
[一般設定] メニューの [「開発者を採用」リンクのカスタマイズ] で、次のいずれかのオプションを選択します。
リンクが非表示 - 「開発者を採用」リンクはどのユーザにも表示されません。
デフォルトリンク (Codeable) - 「開発者を採用」リンクをクリックすると、ユーザが Codeable に誘導されます。
カスタム URL のリンク - 「開発者を採用」リンクをクリックすると、ユーザはカスタムアドレスに誘導されます。
ウェブサイトをパスワードで保護する
パスワードを設定することで、WordPress ウェブサイトへのアクセスを保護できます。パスワード保護されたウェブサイトへのすべての訪問者は、有効なユーザ名とパスワードを入力しなければウェブサイトコンテンツを閲覧できません。
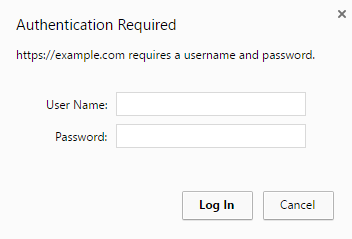
パスワード保護が有益なのは以下のような状況です。
ウェブサイトを開発中なので、自分以外に表示したくない。
ウェブサイトのデモバージョンを特定の訪問者にのみ表示したい。
WordPress ウェブサイトをパスワードで保護するには:
[WordPress]で、パスワードで保護したいインストールを選択し、[パスワード保護]をオンにします。
パスワードを作成または生成します。必要に応じて、ユーザ名も変更できます(デフォルトではインストールの管理者のユーザ名が使用されます)。
[保護]をクリックします。
[パスワード保護]を無効にするには、オフに切り替えてください。
wp-cron.php の通常の実行をセットアップする
wp-cron.php ファイルは仮想 cron ジョブ(またはスケジュールタスク)で、WordPress はこれを使用して特定の処理を自動化します。たとえば、プラグイン/テーマのアップデートのチェックなどを行います。デフォルトで、WordPress はウェブサイトへの訪問者があるたびに wp-cron.php タスクを実行します。WordPress による処理をスケジュールに沿って定期的に行いたい場合は、デフォルトの wp-cron.php 実行を無効にする必要があります。
ウェブサイトへのトラフィックが多い場合、定期的に wp-cron.php を実行することでウェブサイトの読み込み時間が改善される可能性もあります。
特定の WordPress インストールで wp-cron.php を無効にするには:
[WordPress]に移動して、デフォルトの
wp-cron.php実行を無効にする WordPress インストールを選択します。-
インストールカードで[wp-cron.php を継承する]をオンにします。
デフォルトの
wp-cron.phpの実行は無効になりました。 -
デフォルトで、WP Toolkit は置換用スケジュール済みタスクを自動的に作成します。今後は、30 分ごとに
wp-cron.phpが実行されます。次の場合、置換タスクは不要である可能性があります。
置換タスクを独自に作成したか、作成する予定である。
wp-cron.phpを実行するとウェブサイトに悪影響があるため、置換タスクを必要としていない。
置換タスクを作成しない、または WP Toolkit で作成したものを削除することを選択した場合は、
をクリックして[継承が開始されたときに置換タスクを作成]をオフにしてください。 (Optional) If you want to run
wp-cron.phpon a different schedulem or do not wantwp-cron.phpto run at all, you can edit or remove the replacement task. To do so, click the icon next to "Take over wp-cron.php". This will open a new Plesk tab with the scheduled task. There, you can make the desired changes, including deactivating the task.
新規作成されるすべての WordPress インストールで wp-cron.php を無効にすることもできます。それには、[WordPress]に移動して[設定]をクリックし、[新しい WordPress インストールすべてで wp-cron.php を無効にする]チェックボックスをオンにします。
注釈
誤って置換タスクを削除してしまった場合は、いつでも作り直すことができます。それには、 アイコンをクリックしてオフにしてから、[継承が開始されたときに置換タスクを作成]をオンに戻します。
以前の wp-cron.php 構成
以下のいずれかの方法で、WP Toolkit を使用せずに wp-cron.php を既に無効にしている可能性もあります。
wp-config.phpファイルを編集する。この場合、WP Toolkit によってこの変更が検出され、[wp-cron.php を継承する]のトグルボタンが調整されます。-
独自の置換用スケジュール済みタスクを作成する。この場合、[継承が開始されたときに置換タスクを作成]をオンにすると WP Toolkit によって別のタスクを作成できます。以下のオプションから選択可能です。
2 つのタスクを維持する(パフォーマンスにあまり影響を与えません)。
独自のタスクを削除して、WP Toolkit によって作成されたタスクを維持する。
独自のタスクを維持して、WP Toolkit によって作成されたタスクを削除する。これには、[継承が開始されたときに置換タスクを作成]をオフにします。
WordPress インストールのイベントをロギングする
WordPress インストールが期待どおりに機能していない場合、ログを表示して問題のトラブルシューティングを行えます。WP Toolkit では、管理対象のウェブサイトで実行した以下のような重要なイベントのログをとります。
ウェブサイトのテーマを更新する。
セキュリティ措置を適用する。
ウェブサイトを複製する。
注釈
WP Toolkit バージョン 5.5 8(以降)では、管理対象のウェブサイトで実行したすべてのイベントのログをとります。WP Toolkit バージョン 5.4 を使用している場合、重要なイベントのみがリストに表示されます。
WP Toolkit は、個々の WordPress インストールごとにテキスト形式でログを記述します。
WordPress インストールのログを表示するには:
[WordPress]に移動します。
-
ログを表示したい WordPress インストールの横にある[ログ]をクリックします。
-
[<site's name> のログ]ポップアップウィンドウで、ロギングされたイベントの詳細情報を確認できます。

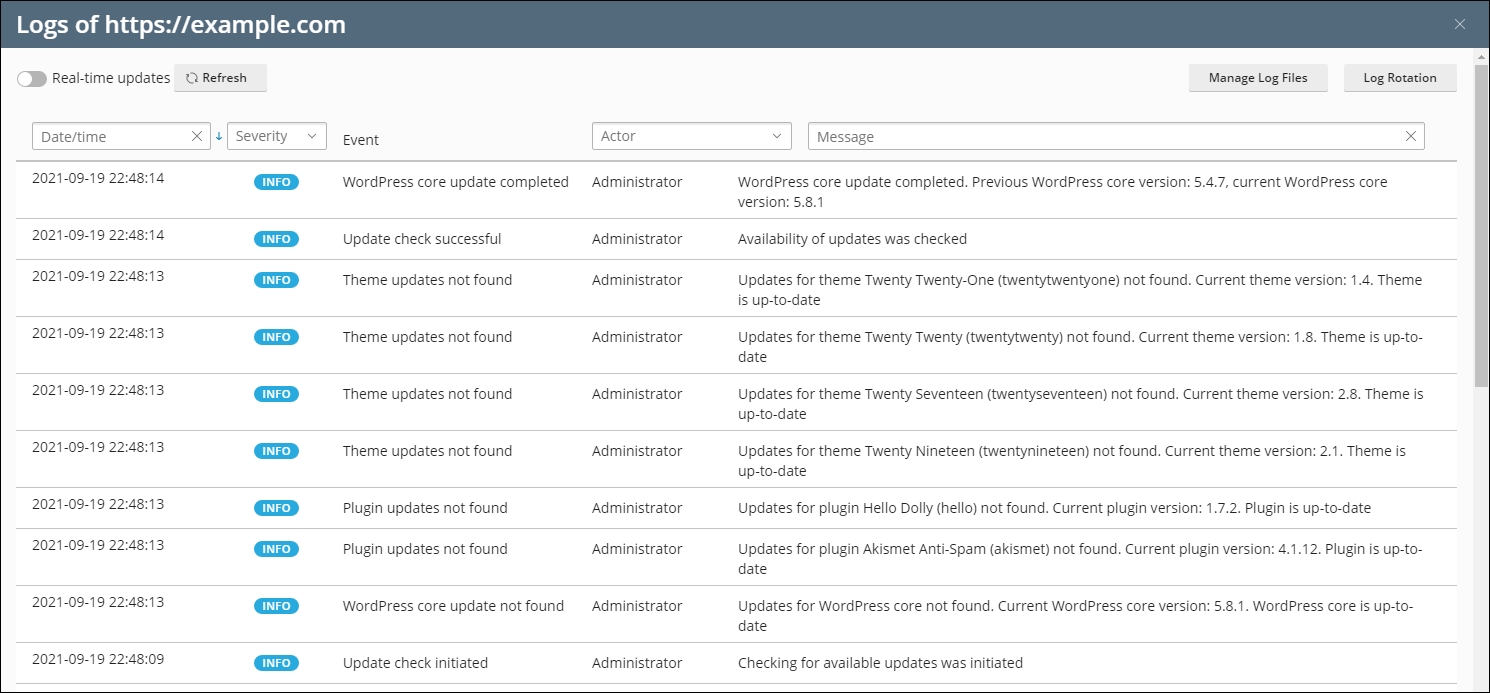
サイトのログ情報を示すポップアップウィンドウが表示されます。デフォルトで、リストはポップアップを開くときにのみ更新されます。以下の操作を行うことでリストを更新することもできます。
最新のログを表示するには、[更新]をクリックします。
-
リストの表示中に定期的にリストを更新したい場合は、[リアルタイム更新]のトグルボタンをオンにします。
注釈
このトグルボタンをオンにすると、ログは 5 秒ごとに更新されます。別の更新間隔を指定するには、
panel.ini構成ファイルのactionLogRealTimeUpdatesPeriod変数を使用します。
ロギングされたイベントをフィルタリングする
リストで特定のイベントを探したい場合、以下のフィルタを適用できます。

イベントの日時。
イベントの重大度。可能な値: Error、Warning、Info。
イベントのアクター。特定のユーザまたはシステム自体である可能性があります。
イベントの説明として使用されるメッセージ。
フィルタの適用が終了すると、フィルタ条件を満たすイベントのみが表示されるようになります。
ログローテーション
WP Toolkit バージョン 5.5 以降では、特定の WordPress インストールのログローテーションを構成できます。ただし、これを無効にすることも、それぞれのインストールに対して個別設定を構成することもできます。その方法は次のとおりです。
[WordPress]に移動します。
必要な WordPress インストールの横の[ログ]をクリックします。
ポップアップウィンドウの右上隅で[ログローテーション]をクリックします。
-
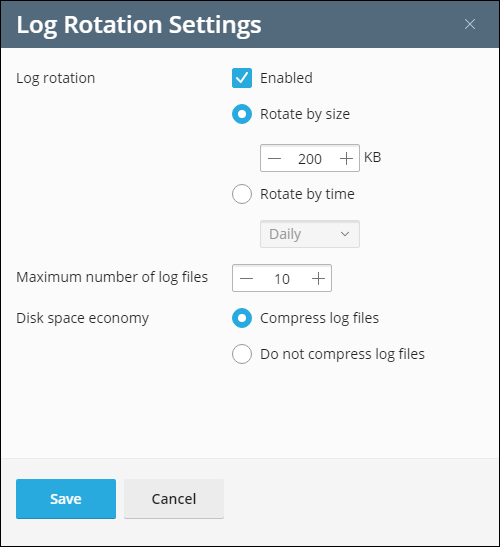
[ログローテーション設定]ポップアップウィンドウで、以下のパラメータを構成します。
[有効]チェックボックス。デフォルトでこのチェックボックスはオンになっています。これをオフにすることで、ログローテーションを手動で無効にできます。
[サイズ基準のローテーション]または[時間基準のローテーション]のラジオボタン。必要なオプションを選択し、最大ログサイズまたはローテーション時間を指定します。
ログファイルの最大数:ログファイルの数が指定した数に達した場合、WP Toolkit は圧縮されていない一番古いログファイルを圧縮してから新しいログファイルを作成します。
Log files compression. To save disk space, select the Enabled radio button. If you want the log files to be available at any moment, select the Disabled radio button.
ログファイルマネージャ
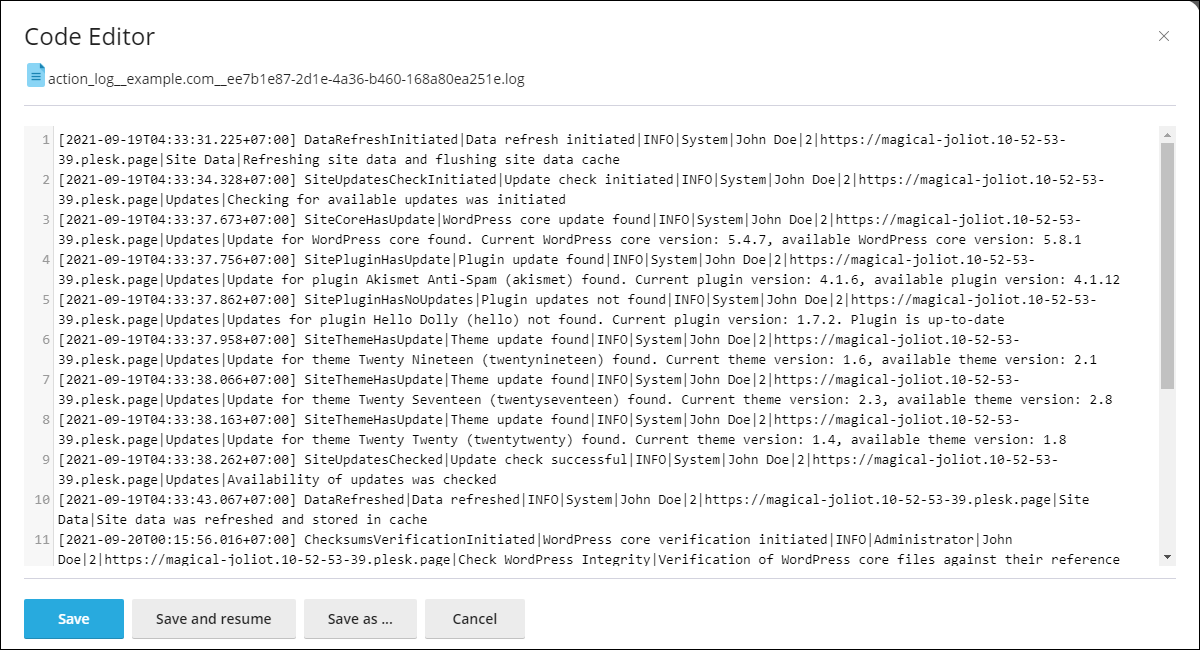
ログファイルマネージャでは、記録されたイベントの特定の行を表示、コピー、または削除できます。WP Toolkit は、すべての WP Toolkit インストールのログファイルを別々のディレクトリに保存します。
/var/log/plesk/modules/wp-toolkit/action-logs/{installation GUID}/{installation GUID}.log
ここで、{installation GUID} はインストールの一意の識別子です (例: 03bc4edc-7a80-483e-8ae0-ab560e661c98)。
ログエディタは次のような外観です。
メンテナンスモード
WordPress ウェブサイトがメンテナンスモードになると、このウェブサイトのコンテンツは訪問者に表示されなくなり、変更や何らかの影響を与えることはできなくなります。ウェブサイトがメンテナンスモードのときに訪問者がアクセスすると、ウェブサイトのコンテンツではなくメンテナンス画面ウェブページが表示されます。
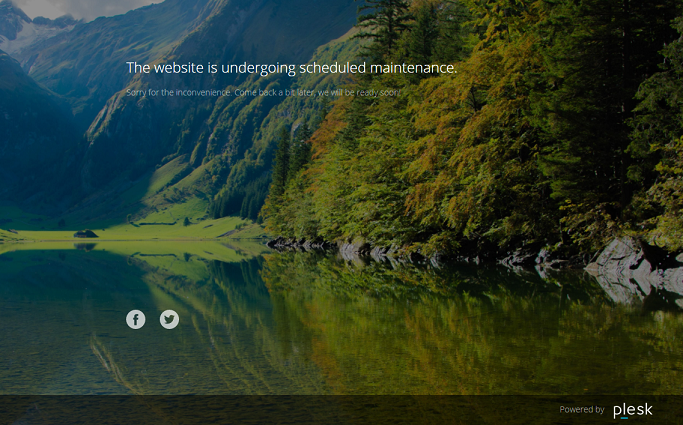
メンテナンスモードをオンにする
WordPress ウェブサイトは、次の場合にメンテナンスモードになります。
WordPress インストールをアップグレードする。
WordPress インストール間でデータをコピーする。
ウェブサイトに変更を加え、訪問者から一時的に隠したい場合、手動でメンテナンスモードにできます。
WordPress ウェブサイトをメンテナンスモードにするには:
[WordPress]で、メンテナンスモードにする WordPress インストールを選択します。
-
インストールカードで[メンテナンスモード]をオンにします。
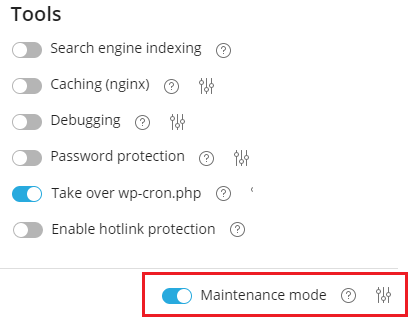
ウェブサイトをメンテナンスモードから復帰させるには、[メンテナンスモード]をオフに切り替えてください。
メンテナンスページをカスタマイズする
Plesk WP Toolkit により、メンテナンスページの特定の属性を変更し、より詳細な情報を提供することができます。たとえば、以下が可能です。
メンテナンスページに表示されるテキストを変更する
カウントダウンタイマーを追加する
ソーシャルネットワークページへのリンクを提供または削除する
メンテナンスページをカスタマイズするには:
[WordPress]で、メンテナンスページをカスタマイズする WordPress インストールを選択して、インストールカードで[メンテナンスモード]の横の
アイコンをクリックします。[画面テキスト]セクションでは、表示されるテキストを変更できます。HTML タグを使用してテキストの表示をフォーマットします。
-
In the "Countdown timer" section, you can set up and turn on the countdown timer, which will be displayed on the maintenance page.
注釈
このタイマーは、ダウンタイムの推定残り時間を訪問者に示すだけのものです。カウントダウンが終了しても、ウェブサイトはメンテナンスモードから復帰しません。手動で操作する必要があります。
In the "Social Network Links" section, provide or remove links to social network pages (Facebook, X, and Instagram).
(オプション)構成したメンテナンスページがどのように表示されるか確認するには、[プレビュー]をクリックします。
メンテナンスページに加えた変更で問題がなければ、[OK]をクリックします。
コーディングスキルがある場合、上記のオプション以外にもメンテナンスページをカスタマイズできます。特定の WordPress ウェブサイトに対してカスタマイズすることも、サーバ上でホストされているすべての WordPress ウェブサイトに対してカスタマイズすることも可能です。
特定のウェブサイトに対してメンテナンスページをカスタマイズするには:
[WordPress]で、メンテナンスページをカスタマイズする WordPress インストールを選択して、インストールカードで[メンテナンスモード]の横の
アイコンをクリックします。[カスタマイズ]をクリックし、コードエディタでメンテナンスページのテンプレートを編集します。
[OK]をクリックします。
サーバ上でホストされているすべての WordPress ウェブサイトに対してメンテナンスページをカスタマイズするには:
-
サーバ全体のメンテナンスページテンプレートを編集します。
(Plesk for Linux)
/usr/local/psa/var/modules/wp-toolkit/maintenance/template.phtml(Plesk for Windows)
%plesk_dir%var\modules\wp-toolkit\maintenance\template.phtml
初めて WordPress ウェブサイトをメンテナンスモードにすると、カスタマイズされたメンテナンスページテンプレートが自動的に適用されます。
カスタマイズされたサーバ全体のメンテナンスページテンプレートは、以前にメンテナンスモードにされたことがない WordPress ウェブサイトにのみ適用されます。以前にメンテナンスモードにされたことがある WordPress ウェブサイトに適用するには、以下の手順に従います。
[WordPress]で、カスタマイズされたサーバ全体のメンテナンスページテンプレートをどの WordPress インストールに適用するかを選択します。
インストールカードで[メンテナンスモード]の横の
アイコンをクリックし、[デフォルトを復元]をクリックします。
これにより、ウェブサイト固有のメンテナンスページが、サーバ全体のテンプレートに置き換えられます。
デフォルトのメンテナンスページを復元する
必要に応じて、デフォルトのメンテナンスページを復元できます。カスタマイズしたものがサーバ全体のテンプレートかどうかに応じて手順は異なります。
サーバ全体のテンプレートを変更していない場合にデフォルトのメンテナンスページを復元するには:
[WordPress]で、メンテナンスページをデフォルトにリセットする WordPress インストールを選択します。
インストールカードで[メンテナンスモード]の横の
アイコンをクリックし、[デフォルトを復元]をクリックします。
サーバ全体のテンプレートを変更した場合にデフォルトのメンテナンスページを復元するには:
-
サーバ全体のメンテナンスページテンプレートに加えた変更を元に戻すには、以下のファイルを...
(Plesk for Linux)
usr/local/psa/var/modules/wp-toolkit/maintenance/template.phtml(Plesk for Windows)
%plesk_dir%var\modules\wp-toolkit\maintenance\template.phtml
...以下のファイルに置き換えます。
(Plesk for Linux)
/usr/local/psa/admin/plib/modules/wp-toolkit/resources/maintenance/template.phtml(Plesk for Windows)
%plesk_dir%admin\plib\modules\wp-toolkit\resources\maintenance\template.phtml
初めて WordPress ウェブサイトをメンテナンスモードにすると、デフォルトのメンテナンスページテンプレートが自動的に適用されます。
デフォルトのサーバ全体のメンテナンスページテンプレートは、過去にメンテナンスモードにしたことがない WordPress ウェブサイトにのみ適用されます。既にメンテナンスモードにしたことがある WordPress ウェブサイトに適用するには、以下の手順に従います。
[WordPress]で、メンテナンスページをデフォルトにリセットする WordPress インストールを選択します。
インストールカードで[メンテナンスモード]の横の
アイコンをクリックし、[デフォルトを復元]をクリックします。
これにより、ウェブサイト固有のメンテナンスページが、デフォルトのサーバ全体のテンプレートに置き換えられます。
WordPress コアのチェックサム検証
注釈
この機能は WP Toolkit バージョン 5.6 以降でサポートされます。index.php、wp-config.php など、インストール固有のデータが含まれるファイルや、参照用チェックサムがないファイルは、チェックの対象となりません。
WordPress サイトが悪質なソフトウェアに感染すると、WordPress .php コアファイルにこのソフトウェア自体が埋め込まれる場合があります。その結果、検索エンジン最適化が悪影響を受けたり、暗号通貨の不正マイニングに悪用されたり、許可されないリダイレクトを強制されたりする可能性があります。コアファイルは変更されるべきではないため、WordPress が提供するオリジナルのコアファイルのチェックサムに対して MD5 チェックサムを照合することができます。
WordPress インストールのチェックサムを検証するには、以下の操作を実行します。
[WordPress]に移動します。
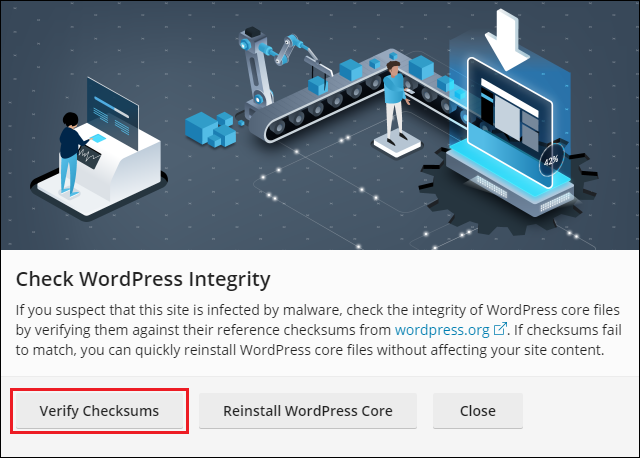
必要なサイトのフォームで、[WordPress の整合性チェック]をクリックします。
-
表示されるポップアップウィンドウで、[チェックサムを検証]をクリックします。
-
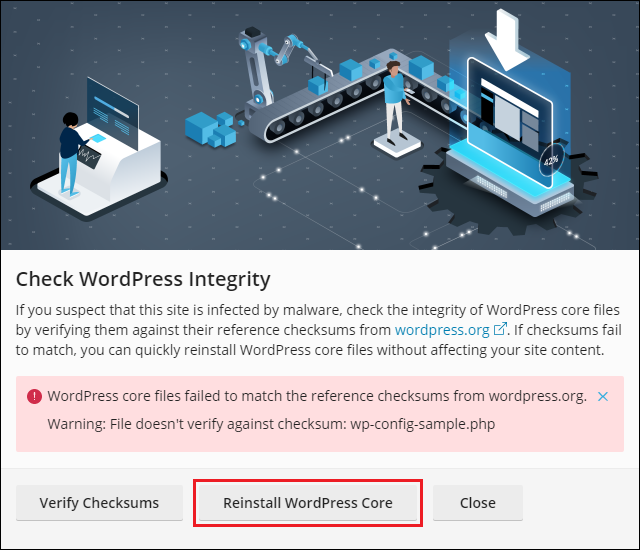
WP Toolkit がチェックサムを検証した後で、以下のいずれかを実行します。
WordPress コアファイルの検証が正常に完了した場合、[閉じる]をクリックします。
-
一部のコアファイルに差異があった場合、[WordPress コアを再インストール]をクリックします。
注釈
WordPress コアを再インストールしてもサイトのコンテンツに影響はありませんが、安全策としてサイトのファイルのバックアップを作成しておくことをお勧めします。
コアファイルを再インストールした後で、ポップアップウィンドウを閉じます。
その結果、WordPress インストールがチェックされ、保護されます。
WP-CLI へのアクセス
WP-CLI とは、WordPress ウェブサイトの管理に使用する公式の WordPress コマンドラインインターフェースです。WP-CLI について詳しくはこちらをご覧ください。
wp-toolkit ユーティリティを使用して Plesk コマンドラインインターフェースから直接 WP-CLI にアクセスでき、サーバに WP-CLI をインストールする必要はありません。
wp-toolkit ユーティリティの詳細を確認してください。
Plesk コマンドラインインターフェース経由で WP-CLI コマンドを呼び出すには:
Plesk サーバに SSH(Linux)または RDP(Windows)経由で接続し、コマンドラインで以下のコマンドを実行します。
plesk ext wp-toolkit --wp-cli -instance-id [ID] [command] [options]
ここで、
[ID]は、Plesk にインストールされた WordPress の ID です。この ID を確認するには、[WordPress]に移動し、WordPress インストール名をクリックします。ブラウザで URL の末尾に ID が表示されます。たとえば、URL が/id/2で終わる場合、ID は 2 です。[command]は、WP-CLI コマンドの前に--を付けたものです(たとえば--core)。[options]は、WP-CLI コマンドのオプションのリストです。
WP-CLI コマンドとそのオプションの完全版リストは こちら で確認できます。
例:
WordPress の主な情報(ブログ名、ウェブサイトの URL、バージョン、アップデートのバージョン、プラグイン、テーマ)を確認するには:
plesk ext wp-toolkit --wp-cli -instance-id 4 -- core info
core コマンドについてのヘルプを参照するには:
plesk ext wp-toolkit --wp-cli -instance-id 4 -- help core
wordpress.org から最新バージョンの bbPress プラグインをインストールし、アクティブにするには:
plesk ext wp-toolkit --wp-cli -instance-id 4 -- plugin install bbpress --activate
WordPress 管理者のパスワードをリセットするには:
plesk ext wp-toolkit --site-admin-reset-password
注釈
WP-CLI コマンドを実行して変更された内容を WP Toolkit で表示するには、該当の WordPress インストールを更新します。それには、[WordPress]に移動して、インストールカードの アイコンをクリックします。
Secure WordPress Websites With the Vulnerability Protection Feature
To reduce the risk of the hosted WordPress websites being compromised, we recommend that you keep them up to date and apply the WP Toolkit security measures. However, to provide the maximum possible level of protection for high value WordPress websites, we also offer the Vulnerability Protection (powered by Patchstack) feature.
The Vulnerability Protection feature acts as a lightweight web application firewall that all incoming requests pass through. For every WordPress website being secured, only the requests trying to exploit a vulnerability the website is succeptible to are being stopped, ensuring minimal impact on performance.
Note that the Vulnerability Protection feature is not meant to be an alternative or a replacement for the standard WP Toolkit security features. Both can and should work in tandem to maximize the hosted WordPress websites' protection. However, compared to the standard WP Toolkit security features, the Vulnerability Protection feature has some important advantages:
An official fix may take time to become available. The Vulnerability Protection feature aims to deliver fixes for high-risk vulnerabilities in a matter of hours.
WordPress updates must be installed manually, unless autoupdates are enabled. The Vulnerability Protection fixes are applied automatically as soon as they become available.
Since no updates or patches are installed on the website itself, there's no risk of something breaking as a result.
Thus, if there's no official fix yet, or you don't want to install the official fix before you've had the chance to test it and make sure that it is safe to deploy in production, the Vulnerability Protection feature gives you the time you need to plan and execute the deployment of the official fix with no rush, and no risk.
前提条件
Before you can secure WordPress websites with the Vulnerability Protection feature, the following prerequisites must be met:
A paid WP Guardian (Plesk addon) license must be purchased and installed in Plesk.
The maximum number of WordPress websites owned by a subscription must be specified on the service plan or subscription level. This can be done by configuring the "WordPress websites with vulnerability protection" parameter (found on the "Resources" tab) in the service plan or subscription settings.
注釈
To be able to secure a WordPress website with the Vulnerability Protection feature, the total number of hosted websites being secured must be fewer than the number of websites allowed by your WP Guardian (Plesk addon) license, and the number of websites owned by the same subscription must be fewer than the subscription's "WordPress websites with vulnerability protection" parameter value.
Securing a Website With the Vulnerability Protection Feature
To secure a WordPress website with the Vulnerability Protection feature:
Go to WordPress, and then find the WordPress website you want to secure.
Click the "Vulnerability Protection" toggle button so that it shows "Enabled", and then click Enable Protection.
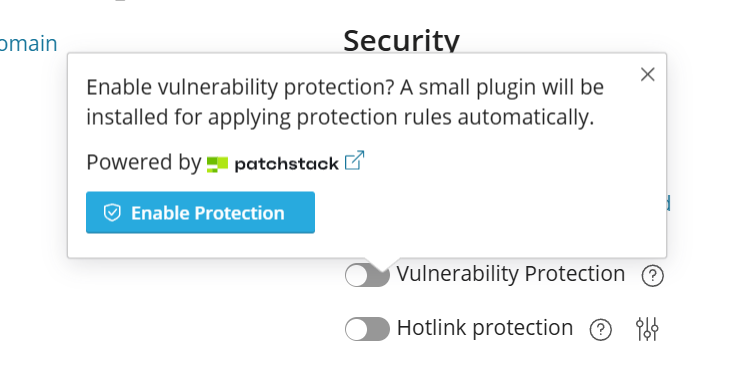
The website is now secured with the Vulnerability Protection feature.