(Plesk for Linux) スケジュール済みタスクのシェル設定
概要: サーバでコマンドを実行するスケジュール済みタスクを作成する権限を顧客に付与できます。Plesk for Linux では、シェルによって、スケジュール済みタスクがファイルシステムのどの領域にアクセスできるかが決まります。デフォルトで、アクセス対象は顧客のウェブスペースに制限されていますが、Plesk 管理者はこれを変更できます。
このトピックでは、スケジュール済みタスクのデフォルトのシェルを設定する方法、個々の契約のカスタムシェルを設定する方法、および顧客が自らの契約にカスタムシェルを設定することを許可する方法について学習します。また、スケジュール済みタスク「コマンドを実行」を顧客が使用できないようにする方法についても学習します。
注: Linux シェルの概念に精通していない場合は、このトピックで説明する設定を変更する前にシェルについて学習することをお勧めします。
スケジュール済みタスクの実行に使用されるシェル
「コマンドを実行」スケジュール済みタスクに使用されるシェルは、契約のシステムユーザに紐付けられています(つまり、ある契約の下で作成されるすべてのスケジュール済みタスクで、同じシェアが共有されます)。デフォルトで、このシェルは、サーバ設定に構成されており、サーバのすべての契約で使用されるデフォルトシェルと一致します。ただし、このルールには 2 つの例外があります。
- Plesk 管理者はサーバの任意の契約に対して 任意のシェルを選択 できます。
- Plesk 管理者は契約の所有者に、カスタムシェルを選択するパーミッション を付与できます。
いずれの場合も、契約の下で作成された「コマンドを実行」スケジュール済みタスクは、デフォルトシェルではなくカスタムシェルを使用するようになります。
異なるシェルを使用する理由
デフォルトでは、/bin/bash (chrooted) シェルがスケジュール済みタスクのデフォルトシェルとして構成されています。これにより、スケジュール済みタスクで実行されるコマンドは、契約に紐付けられたウェブスペース内のファイルにのみアクセスできます。これは、顧客がスケジュール済みタスクを使用してサーバの動作を妨害したり、Plesk 管理者や他の顧客に属するファイルに不正アクセスしたりできないようにする重要なセキュリティ対策です。
注釈: この設定は、Plesk 管理者が所有するものを含め、サーバのすべての契約に影響を与えます。ただし、Plesk 管理者が [ツールと設定] > [スケジュール済みタスク (Cron ジョブ)] ([ツールとリソース] の下) で作成し、 root ユーザーの下で実行するように構成した スケジュール済みタスク には影響を与えません。
スケジュール済みタスクのデフォルトシェルを変更することが役に立つ主な理由は、サーバ上のすべてのユーザが、サーバのファイルシステム全体にアクセスできるスケジュール済みタスクでコマンドを実行できるようにしたい場合です。
サーバを誰とも共有していない場合や、他のテナントを信頼している場合には、スケジュール済みタスク用に非 chroot シェルを選択できます。スケジュール済みタスクに非 chroot シェルを使用したい場合に、どのシェルを選ぶべきかわからなければ、/bin/bash を選択してください。
共用ホスティングサーバでは、スケジュール済みタスクのデフォルトシェルを /bin/bash (chrooted) のままにしておくことをお勧めします。顧客から非 chroot シェルを求められた場合、契約単位で 付与する ことができます。
警告: 顧客に /bin/bash (chrooted) 以外のシェルへのアクセス権を付与すると、この顧客はバイナリを実行し、自らに属していないファイルやデータにアクセスできるようになります。これはセキュリティ上のリスクとなり、サーバの悪用につながる可能性があります。
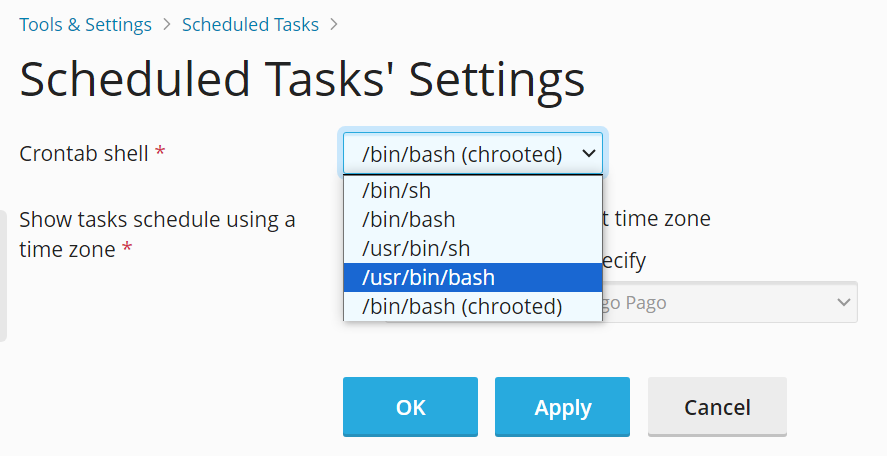
スケジュール済みタスクにデフォルトシェルを設定する
すべての「コマンドを実行」スケジュール済みタスクの実行時にデフォルトで使用されるシェルを設定するには、 [ツールと設定] > [スケジュール済みタスク (Cron ジョブ)] ([ツールとリソース] の下) > [設定] に進み、メニューから必要なシェルを選択します。
あるいは、サーバに ssh ログインして、以下のコマンドを実行します。
plesk bin server_pref -u -crontab-secure-shell "<shell>"
ここで <shell> は、必要なシェルです。例:
plesk bin server_pref -u -crontab-secure-shell "/bin/bash"
「コマンドを実行」スケジュール済みタスクの使用を禁止する
サーバ上で悪意ある活動(スパム送信など)を実行するスケジュール済みタスクを顧客が作成した疑いがある場合、調査中はすべての「コマンドを実行」スケジュール済みタスクを無効にしておくことができます。
Plesk サーバに ssh ログインし、以下のコマンドを実行します。
plesk bin server_pref -u -crontab-secure-shell "/bin/false"
これにより、スケジュール済みタスクのデフォルトシェルが /bin/false に設定されます。これにより、顧客が作成したすべての「コマンドを実行」スケジュール済みタスクが失敗するようになります。
注釈: 別のシェルを選択する権限が付与された顧客の場合、別のシェルを選択することにより、自らの契約でこの設定をオーバーライドできます。
個別の契約にカスタムシェルを設定する
個別の契約にカスタムシェルを設定するには、次の手順に従います。
- [契約] に移動し、必要な契約をクリックし、[ホスティングと DNS] タブに移動して [ホスティング] をクリックします。
- [SSH アクセス] メニューから必要なシェルを選択し、 [保存] をクリックします。
この契約のすべての「コマンドを実行」スケジュール済みタスクで、選択されたシェルが使用されるようになります。
顧客に対して契約へのカスタムシェルの設定を許可する
顧客に対し、この顧客が所有するいずれかの契約へのカスタムシェルの設定を許可するには、次の手順に従います。
- [契約]で必要な契約をクリックし、[カスタマイズ]をクリックします。
- [パーミッション]タブで、[ホスティング設定管理]チェックボックスと[プロバイダのポリシーをオーバーライドする潜在的に安全ではないウェブスクリプトオプションのセットアップ]チェックボックスをオンにして、[更新してロック]をクリックします。
これにより、顧客が [ウェブサイトとドメイン] > [ホスティングと DNS] タブ > [ホスティング] で別のシェルを選択できるようになります。これにより、顧客の契約のすべての「コマンドを実行」スケジュール済みタスクで、選択されたシェルが使用されるようになります。