
WP Toolkit
概要
WP Toolkit is a single management interface you can use to create, configure, and manage WordPress® in Plesk.
In this topic, you will learn how to install WordPress on websites in Plesk and how to register existing WordPress websites in WP Toolkit. You will also learn how to automatically pre-install WordPress on newly created websites, how to create and manage sets of WordPress plugins and themes, how to install plugins and themes on or remove them from WordPress websites, how to back up and restore WordPress websites, and also how to configure a variety of WordPress settings, such as the default database table prefix.
备注
WP Toolkit可安装、配置和管理 WordPress 4.9 或更新版本。
To manage the content of a WordPress website, read our Website Content documentation.
前提条件
Before you can start using WP Toolkit, the WP Toolkit extension must be installed on the Plesk server:
如果您是Plesk管理员,请 从扩展目录安装扩展。
否则,请联系您的主机提供商,并要求他们为您安装该扩展。
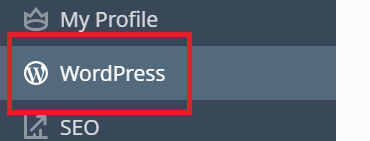
Once the extension is installed, you are ready to begin. You will see the WordPress option in the Navigation Pane
and also on the cards of domains with WordPress installed

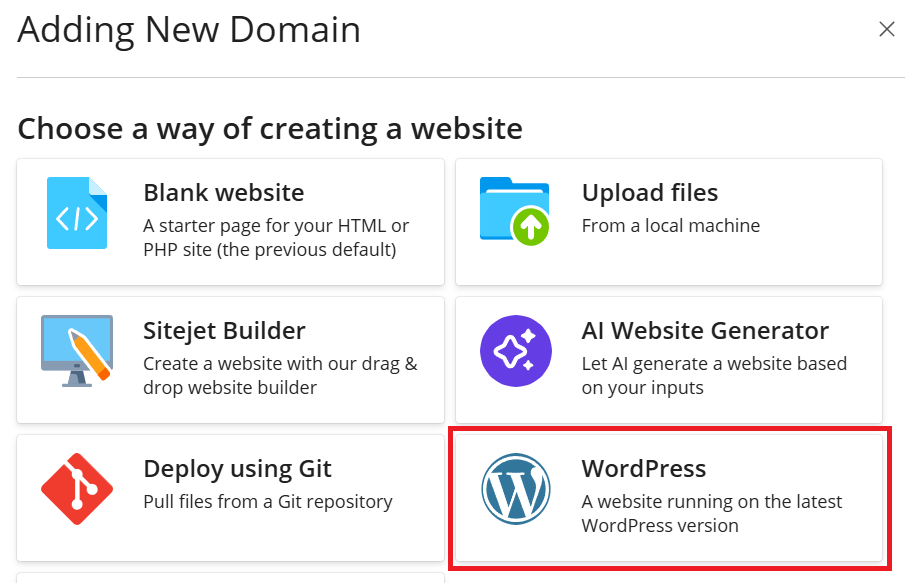
The “WordPress” option will also appear in domains’ Create Website drawers.
备注
WP Toolkit 扩展在 Web Pro 和 Web Host Plesk 版本中是免费的,而在 Web Admin 版本中付费的。
安装 WordPress
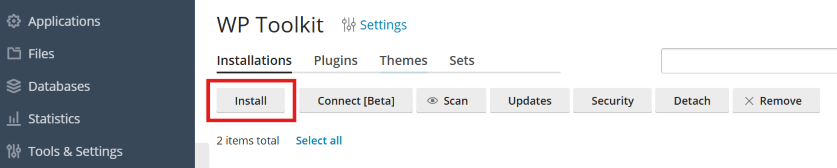
若要安装新的 WordPress 实例,请转到 WordPress 点击 安装。
您可以在此:
点击 安装 安装最新版本的 WordPress 并使用默认设置。
-
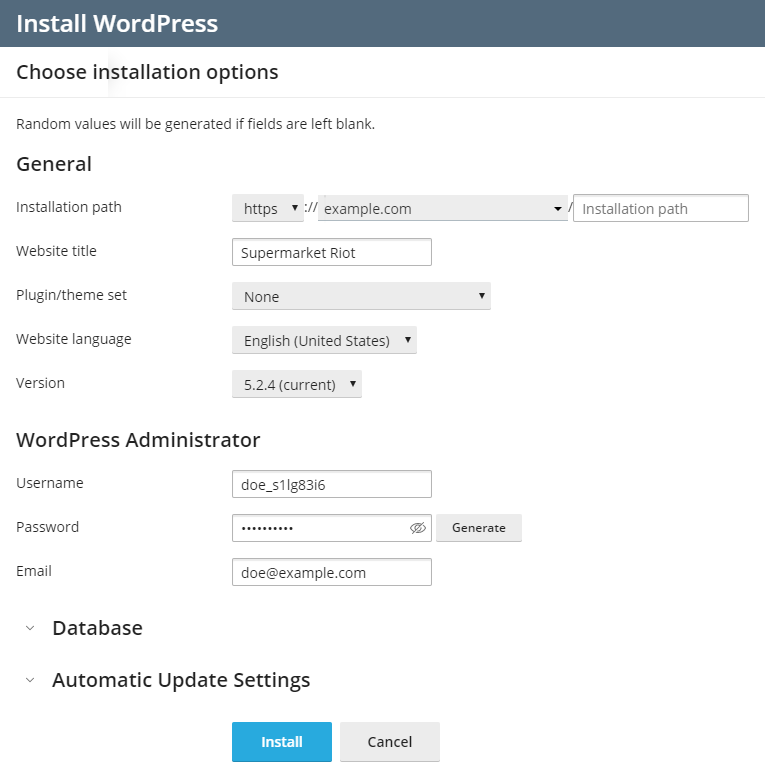
更改默认的设置(包括所需的 WordPress 版本、数据库名称、自动更新设置,等等)然后点击 安装。

备注
To install WordPress, WP Toolkit retrieves data from
wordpress.org. By default, if WP
Toolkit cannot establish connection in 15 seconds, wordpress.org
is considered to be unavailable. If you experience connectivity
issues (for example, due to the poor quality of the Internet
connection), consider increasing the timeout value. To do so, go to
WordPress, click “Settings”, specify the desired value in
the “HTTP timeout for retrieving data from wordpress.org (sec)” field,
and then click OK.
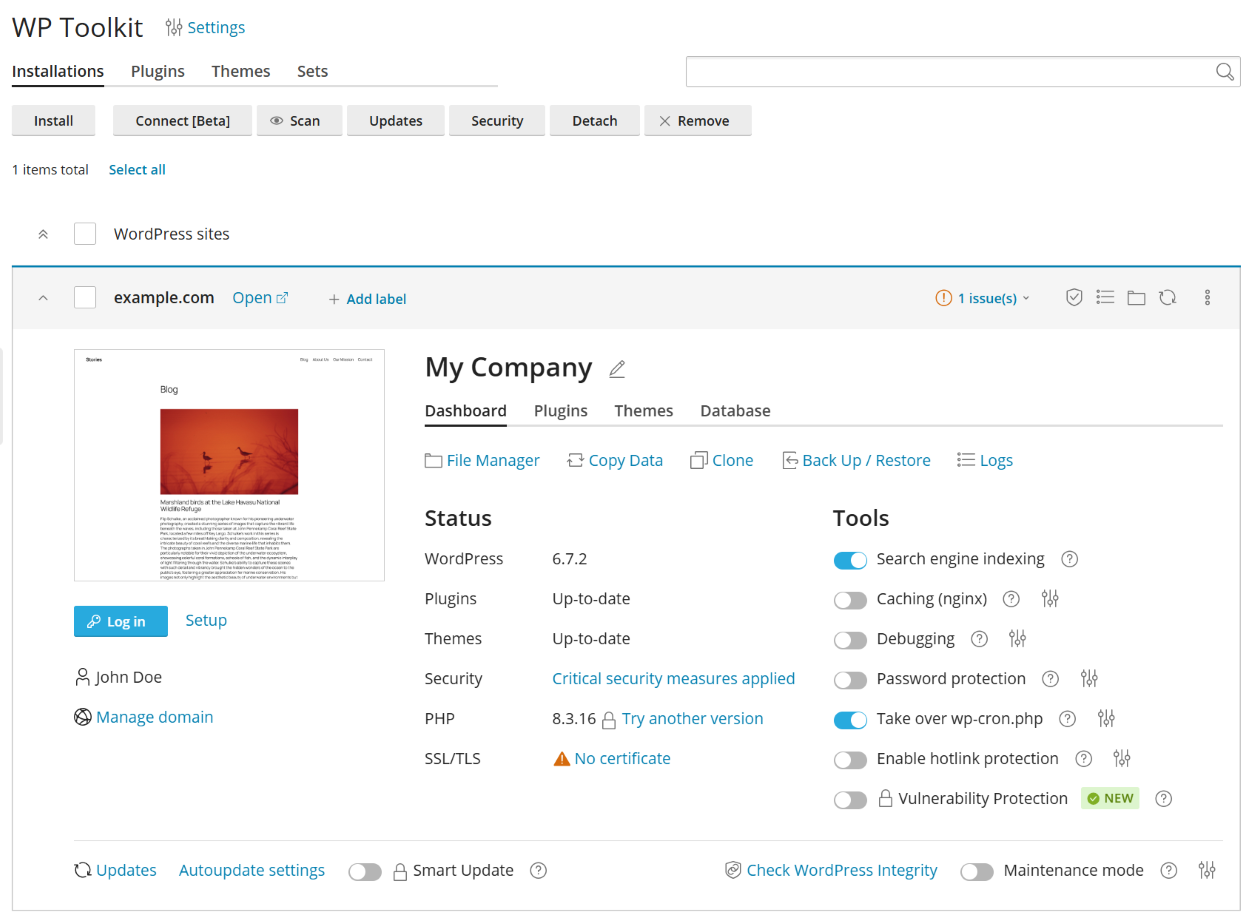
WordPress is now installed. You can find the new installation in the list of existing WordPress installations in WordPress.
添加现有的WordPress 安装实例到WP Toolkit
All WordPress installations added using WP Toolkit appear in WP Toolkit automatically. Those installed manually need to be attached to WP Toolkit. If you have upgraded from an earlier version of Plesk and you used WordPress, we recommend that you attach all existing WordPress installations to WP Toolkit.
若要将 WordPress 安装实例附加到 WP Toolkit,请如下操作:
转到 WordPress。
点击 扫描。
The WordPress installation is now attached. You can find it in the list of existing WordPress installations in WordPress.
导入WordPress安装实例
You can use the “Web Site Migration” feature to migrate WordPress websites owned by you but hosted elsewhere to Plesk. When you migrate a WordPress website, Plesk copies all its files and the database to your server. Once a website has been migrated, you can manage its WordPress configuration using WP Toolkit and its content with Plesk.
为服务器上的所有 WordPress 安装实例选择一种语言
当通过 WP Toolkit 安装 WordPress 时,WP Toolkit 会选择与为其安装 WordPress 的用户的 Plesk 界面语言相匹配的默认 WordPress 语言。例如,如果您有一个用户,其 Plesk 界面语言是意大利语,且您为其安装 WordPress,则将会选择意大利语作为默认的 WordPress 语言。
但是,您可能想要服务器上的所有 WordPress 安装实例都使用一种语言,而不考虑用户所选的 Plesk 界面语言。若要实现此目的,请转到 WordPress > 设置,选择默认的 WordPress 安装实例语言,然后点击 保存。选定的语言将成为服务器上所有新的 WordPress 安装实例的默认语言。用户在安装 WordPress 时,如果他们愿意,可以自由选择不同的语言。
若要返回到选择 WordPress 语言的默认方式,请转到 WordPress > 设置,选择“默认的 WordPress 安装实例语言” 旁的“与用户语言相同”,然后点击 保存。
为服务器上的所有 WordPress 安装实例指定一个数据库表前缀
WP Toolkit 会为您的 Plesk 服务器上的每个新的 WordPress 安装实例生成任意的数据库表前缀。您可能希望更改此设置而指定一个所有新的 WordPress 安装实例将要使用的默认前缀。
若要指定默认的数据库表前缀,请如下操作:
转到 WordPress > 设置。
-
Next to “Default database table name prefix”, specify the desired prefix and then click Save.
备注
If you want to specify the
wp_prefix, change it a bit (for example,wporwp__). Thewp_prefix is considered insecure and conflicts with WP Toolkit security measures. If you specify this prefix, new WordPress installations will receive the “Danger” security status. Any form different from the exactwp_does not trigger the security warning.
To return to random prefixes, clear the “Default database table name prefix” field and then click Save.
在用户域名上预安装 WordPress
观看视频教程
使用 Plesk WP Toolkit,您可以在新创建的域名上预安装 WordPress。您可以在这些域名上预定义一系列插件和主题。此外,您可以为您的客户和代理商启用 智能更新。
对于每个主机方案,您可以选择下面各选项:
不要预安装 WordPress。
仅预安装 WordPress。
预安装 WordPress 并预定义插件和主题组。
预安装 WordPress 带或不带预定义的插件和主题组,并给以启用智能更新的权限。
如果您选择最后三个选项中任一个选项,将会自动在基于主机方案的每个订阅的第一个域名(主域名)上安装 WordPress。
若要在新创建的域名上预安装 WordPress,请如下操作:
转入 服务方案 。
On the “Hosting Plans” tab, either click Add a Plan to create a new plan, or click the name of an existing plan to edit it.
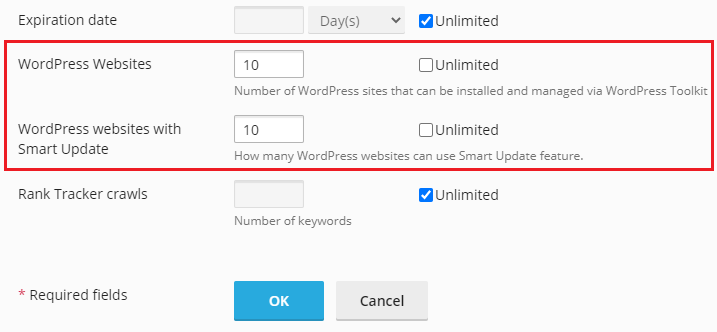
If you have installed the Smart Updates license, customers and resellers can also enable Smart Update. You can specify the exact number of customers’ and resellers’ installations that can use Smart Update. To do so, clear the “Unlimited” checkbox next to “WordPress websites with Smart Update” and specify the desired limit. Regardless of the specified number, customers and resellers cannot use Smart Update on more WordPress installations than your Smart Updates license allows.
Go to the “Additional Services” tab.
-
选择是否仅预安装 WordPress 或预安装 WordPress 和预定义插件和主题组:
To install WordPress only, select “Install WordPress” under “WP Toolkit”.
To install WordPress with a predefined set of plugins and themes, select “Install WordPress with the … set” under “WP Toolkit”.
点击 确定 (如果是编辑现有的方案则点击 更新并同步 )。
此后,您每次基于此主机方案创建一个订阅,都会在该订阅的主域名上自动安装 WordPress。基于此主机方案的现有订阅则不受影响。
管理插件和主题组
一个插件和主题组是一个预定义的 WordPress 插件和主题列表。WP Toolkit 配有数个预先配置的插件和主题组,您也可以创建更多插件和主题组。默认情况下,您创建的每一个插件和主题组都可供客户和代理商使用。您可以通过下列方式使用这些插件和主题组:
您可以在客户和代理商网站上预先安装插件和主题组。具体操作是,配置一个主机方案以预先安装 WordPress 并选择添加一个插件和主题组。您执行此操作时,包括在该组里的所有插件和主题都将与 WordPress 一起安装。
-
在执行自定义安装时您、您的客户和代理商都可以选择一个插件和主题组与 WordPress 一起安装。客户和代理商可以看到有哪些插件和主题包括在插件和主题组里。
备注
If you do not want customers and resellers to install sets on their WordPress installations, go to WordPress, click “Settings”, and clear the “Allow customers to use sets when they install WordPress” checkbox.
您可以在属于您、您客户和代理商的已有的网站上安装插件和主题组。
若要创建插件和主题组,请如下操作:
Go to WordPress, go to the “Sets” tab, and then click Create Set.
给该组命名然后点击 创建 。
-
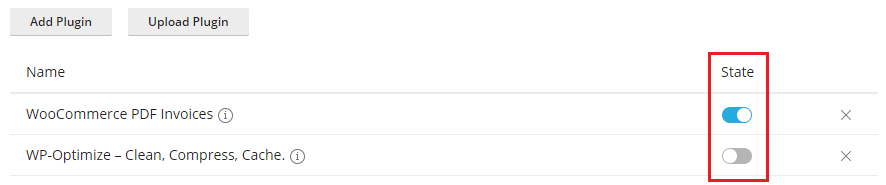
点击“添加插件”,然后点击 添加插件。搜索所需插件,从列表中选定它,然后点击添加。
备注
您可以选择当在 WordPress 网站上安装插件和主题组时激活和不激活哪些插件。可在“状态”栏下,关闭您不想激活的插件。
您已添加了所有所需插件时,关闭窗格。
-
若添加主题请重复之前的步骤。
备注
您可以选择当在 WordPress 网站上安装插件和主题组时激活哪些主题。可在“状态”栏下,开启您想要激活的主题。
现在您可以选择插件和主题组作为主机方案中的或自定义安装 WordPress 时的预安装选项。
若要给组添加插件和主题,请如下操作:
Go to WordPress, and then go to the “Sets” tab.
-
点击要修改的插件和主题组的“添加插件”,然后点击 添加插件 。搜索所需插件,从列表中选择它,然后点击 添加 。
备注
您可以选择当在 WordPress 网站上安装插件和主题组时激活和不激活哪些插件。可在“活动”栏下,关闭您不想激活的插件。
您已添加了所有所需插件时,关闭窗格。
-
若添加主题请重复之前的步骤。
备注
您可以选择当在 WordPress 网站上安装插件和主题组时激活哪些主题。可在“活动”栏下,开启您想要激活的主题。
给组添加插件和主题并不会影响已应用该组的现有的订阅。
若要在现有的 WordPress 安装实例上安装一个插件和主题组,请如下操作:
Go to WordPress, go to the “Sets” tab, and then click the
icon
corresponding to the set that you want to install.点击 安装插件和主题组,选择您要安装插件和主题组的网站,然后点击 安装。
 icon
corresponding to the set that you want to install.
icon
corresponding to the set that you want to install.插件和主题组将在选定的 WordPress 安装实例上安装。若您在创建该组时就已选定要激活组里的插件和主题则会将其激活。
若要从某组移除选定的插件和主题,请如下操作:
Go to WordPress, and then go to the “Sets” tab.
Click the number displayed under the “Plugins” or “Themes” columns (for example,
2 total) to show the list of plugins or themes currently included in the set.点击您要移除的插件或主题的名称旁的
图标。
 图标。
图标。若要从某组移除所有的插件和主题,请如下操作:
Go to WordPress, and then go to the “Sets” tab.
点击与您要修改的插件和主题组相对应的
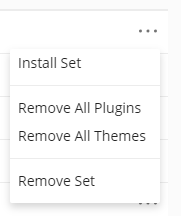
图标,点击 移除所有插件 或 移除所有主题,然后点击 是。
从组里移除插件和主题并不会影响已应用该组的现有的订阅。
若要重命名某个组,请如下操作:
Go to WordPress, and then go to the “Sets” tab.
点击您想要重命名的插件和主题组的名称,输入新的名称,然后点击
图标。
 图标。
图标。若要移除某个组,请如下操作:
Go to WordPress, and then go to the “Sets” tab.
-
点击与您想要移除的插件和主题组相对应的
图标,点击 移除插件和主题组,然后点击 是。
Removing a set does not affect existing subscriptions to which this set has been applied. For all hosting plans that used the removed set, WordPress preinstall settings are reset (on the “Additional Services” tab, “WP Toolkit” is set to “None”).
限制用户 WordPress 安装实例的数量
Plesk 管理员可以对客户和代理商能够安装和管理的 WordPress 安装实例的数量设限制。该限制会影响以下增加 WordPress 安装实例数量的方式:
Adding existing WordPress installations using the “Scan” feature.
备注
WP Toolkit 自身创建的技术安装实例(例如由 智能更新创建的克隆)不计入限制中。
若要对 WordPress 安装实例数量设置限制,请如下操作:
-
您可以在某个订阅或一个服务方案中设置限制:
转到 订阅,要么点击 添加订阅 以创建新的订阅或点击现有订阅的名称然后再点击右边工具栏中的 自定义。
Go to Service Plans. On the “Hosting Plans” tab, either click Add a Plan to create a new plan or click the name of an existing plan to edit it.
By default, no limits are set. Next to “WordPress Websites”, clear the “Unlimited” checkbox. You can also limit the number of WordPress websites that can use the “Smart Updates” feature. If so, clear the checkbox next to “WordPress websites with Smart Update” as well.
-
Specify the number of WordPress websites customers can manage and/or the number of WordPress websites that can use the “Smart Updates” feature.
点击 确定 (如果是编辑现有的方案则点击 更新并同步 )。
您已对用户的 WordPress 安装实例数量设置了限制。
备注
若您设置的限制少于客户所有的网站数量,将不会自动删除冗余的安装实例。用户现有安装实例的数量会保持不变,除非用户移除或分离一些安装实例。移除或分离后,将无法重新恢复这些安装实例,或无法以任何方式增加安装实例的数量以超过限制数量。
限制用户的 WP Toolkit 备份的数量
Plesk 管理员可以对客户和代理商能够创建的 WP Toolkit 备份数量设置限制。
此限制会阻止客户和代理商用完允许的磁盘空间配额。此限制会应用到属于订阅的每个网站。若要将 WP Toolkit 备份设置为不可供用户使用,可将限制设置为零。
若要对 WP Toolkit 备份的数量设置限制,请如下操作:
-
您可以在某个订阅或一个服务方案中设置限制:
转到 订阅,要么点击 添加订阅 以创建新的订阅或点击现有订阅的名称然后再点击右边工具栏中的 自定义。
Go to Service Plans. On the “Hosting Plans” tab, either click Add a Plan to create a new plan or click the name of an existing plan to edit it.
-
By default, no limits are set. Next to “WordPress Backups”, clear the “Unlimited” checkbox and then specify the number of backups customers and resellers can create.
点击 确定 (如果是编辑现有的方案则点击 更新并同步 )。

您已对用户的 WP Toolkit 备份的数量设置了限制。
备注
若您设置的限制少于用户所有的备份数量,将不会自动删除冗余的备份。用户现有备份的数量会保持不变,除非用户移除一些备份。移除后,将无法超过限制数量创建备份。
管理 WordPress 安装实例
进入 WordPress 查看托管在服务器上的所有 WordPress 实例。
WP Toolkit 会分组有关我们称为 卡片 的区块里每个实例的信息。
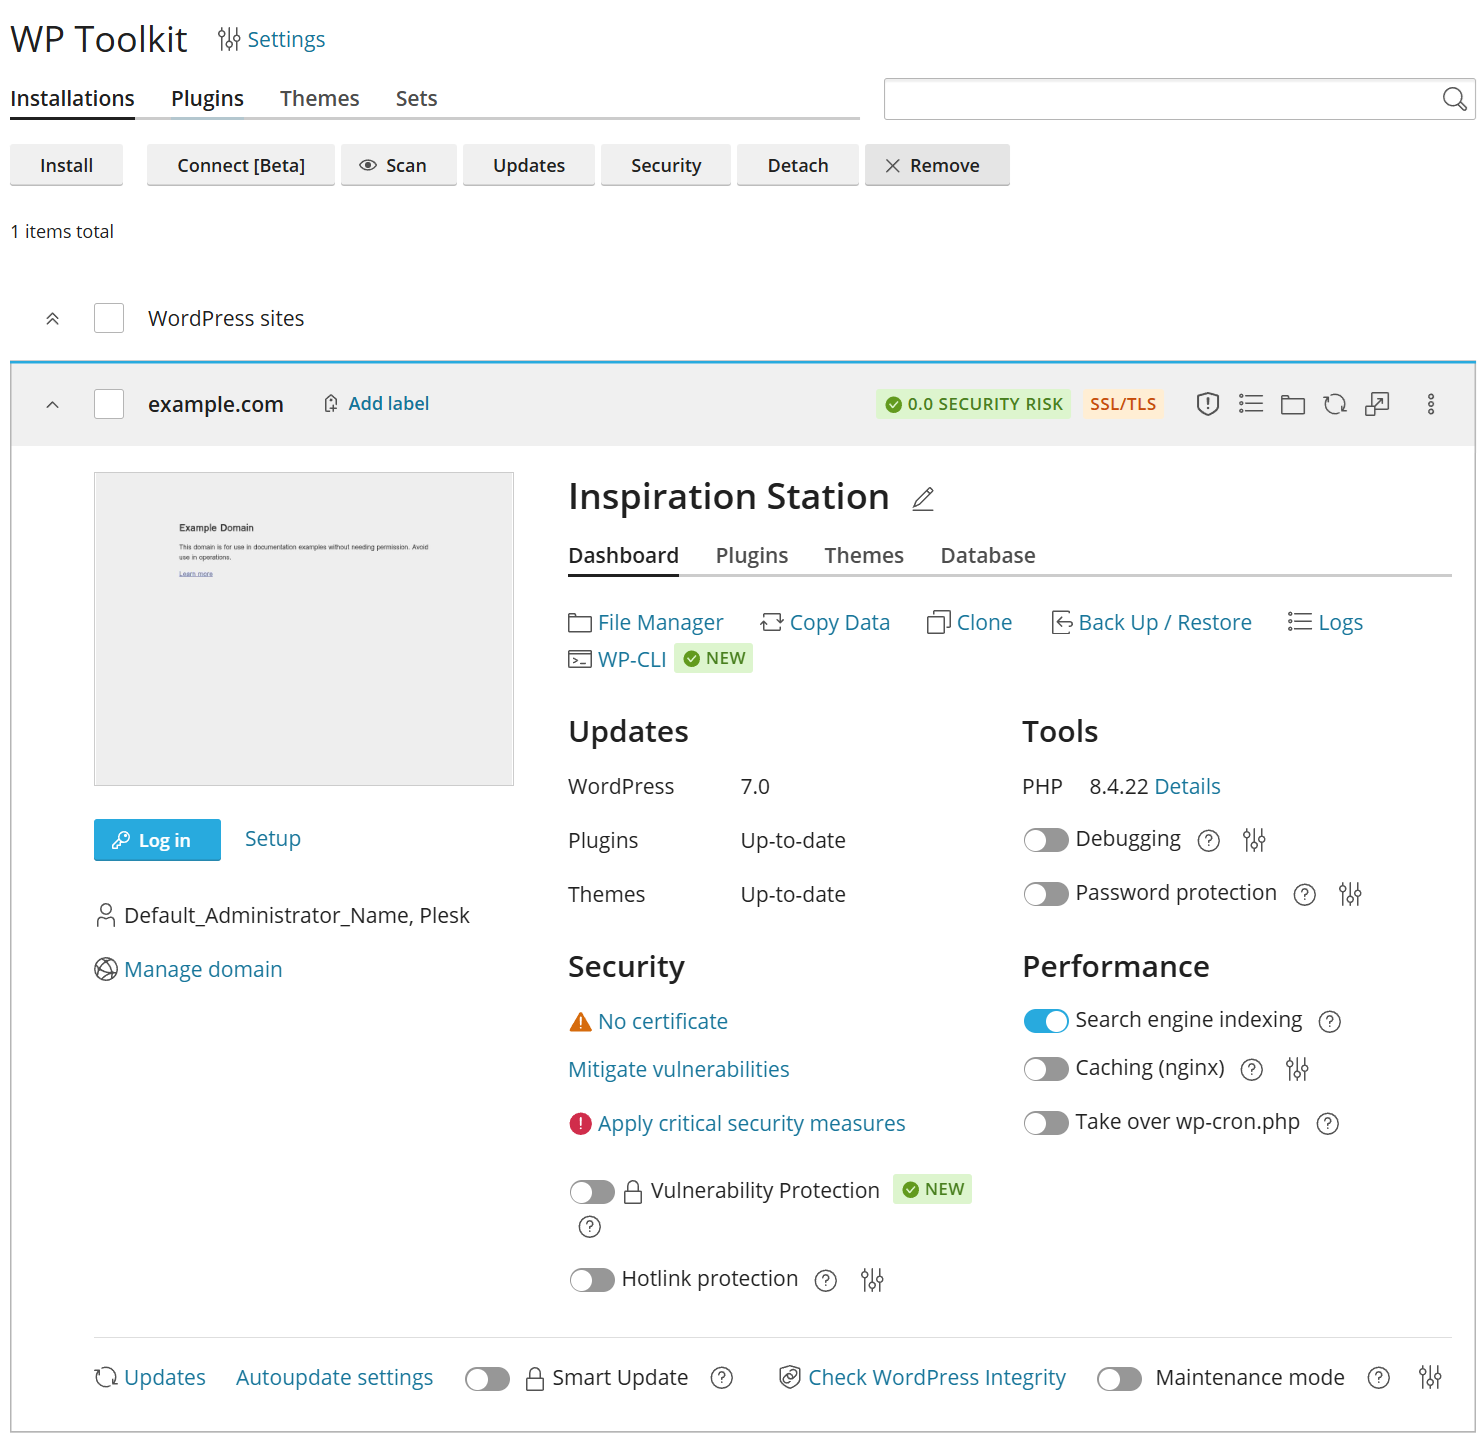
卡片会显示你的网站截图,并提供了许多控件,让您能够很容易地访问常用的工具。屏幕截图会实时变化,以反映您对您的网站所做的更改。例如,如果您打开维护模式或更改 WordPress 主题,网站的截图将立即变更。
备注
您直接在 WordPress 中所做的更改每 24 小时与 WP Toolkit 同步一次。要手动同步,请点击  图标。
图标。
当您将鼠标光标移动到网站的屏幕截图上时,您会看到以下内容:
打开网站按钮。若要在新的浏览器标签中打开该网站,请单击该按钮。
上次更新屏幕截图的日期和时间。要立即更新截图,在截图的右上角,单击
图标。
 图标。
图标。您还可在此进行以下操作:
-
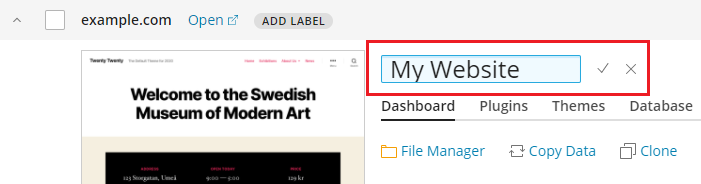
更改您的网站名称。具体操作是点击
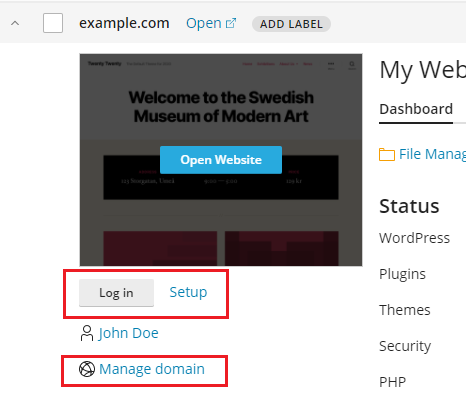
图标,给您网站一个名称,然后点击 。 以管理员的身份登录 WordPress。具体操作是点击网站截图下的 登录。
Change general WordPress settings. To do so, click “Setup” next to Log in.
-
转到 网站与域名 中的域名屏幕。若要实现此目的,请点击网站截图下的 管理域名。
 图标,给您网站一个名称,然后点击
  。
。
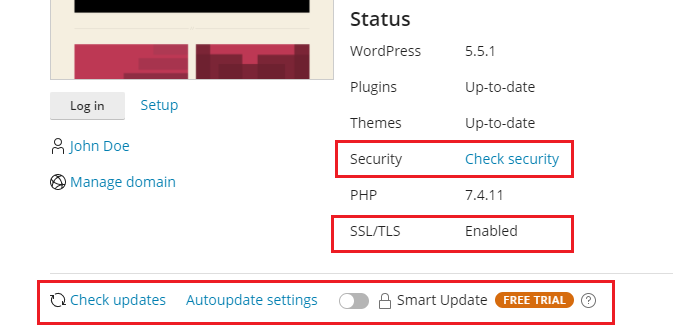
状态
WordPress 网站经常是黑客的攻击目标。过时的 WordPress 内核、插件和主题增加了安全风险。
In the “Updates” section, you can do the following:
查看 WordPress 内核以及已安装的插件和主题是否已更新,若有必要 将其更新。
In the “Security” section, you can do the following:
查看 SSL/TLS 支持是否已启用,若未启用,请 将其启用。
查看您的网站有多安全以及 提升其安全性。
Enable hotlink protection to prevent other websites from displaying, linking or embedding your images. This is called hotlinking and it can quickly drain your bandwidth and make your website unavailable.
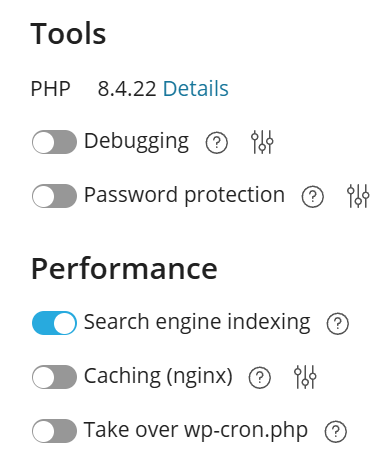
In the “Tools” section, you can do the following:
See the currently used PHP version, change the PHP version, and also access the smart PHP updates feature.
“Debugging” helps you debug a website that is not ready for viewing and being tested or developed.
“密码保护” 会指定您将用于从 Plesk 登录 WordPress 的密码。
In the “Performance” section, you can do the following:
“Search engine indexing” shows your website in search results of search engines.
“缓存 (nginx)” 会加速网站的加载并减少服务器负载。
“接管 wp-cron.php” 帮助您设置
wp-cron.php的常规运行。
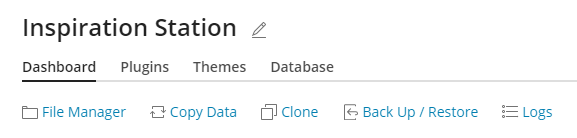
At the top of the card, you can find the following WP Toolkit features:
“File Manager” to manage the website’s files in File Manager.
“Copy Data” to copy the content of your website to another.
“Clone” to make a full copy of your website.
“Back Up / Restore” to create a backup of your website and restore it if necessary.
“Logs” to view WP Toolkit logs of the installation you need to troubleshoot.
“WP-CLI” to access WP-CLI from the Plesk interface.
在网站卡底部,您可以执行以下操作:
启用智能更新,这是一项高级功能,能够帮助您保持更新生产性网站,而不会破坏该网站。
Turn on “Maintenance mode”, which hides your website’s content from visitors.

在剩下的三个选项卡上,您可以管理安装实例的插件、主题以及更改数据库用户名和密码。
网站标签
Website labels are preconfigured identifiers that you can give to your websites (for example, “staging”, “production”, “testing”, and so on).
根据您的项目,可能会因多种用途而托管多个网站副本。使用标签则能够帮助您辨别各个网站。
By default, a website has no label. To label it, click Add label (on the website card next to the website name) and select the desired label. Labels are optional and you can change or remove a label at any time.

管理卡片视图
您可以选择 WP Toolkit 显示卡片的方式。默认的视图最适合少量的安装实例。如果您有很多个安装实例,请折叠卡片  。
。
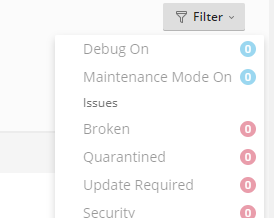
您还可以过滤 安装实例以更方便管理它们。
移除和解除附加安装实例
您可以解除附加您不想在 WP Toolkit 中看到和管理的 WordPress 安装实例。解除附加不会移除安装实例,只是对 WP Toolkit 隐藏而已。被解除附加的安装实例会在扫描 WordPress 安装实例后再次附加到 WP Toolkit。您可以单独解除附加 WordPwress 安装实例或一次多个安装实例一起进行。
要解除附加 WordPress 安装实例,请如下操作:
-
转到 WordPress 然后执行以下操作:
(To detach an individual installation) On the card of the installation you want to detach, click the
icon.(解除附加多个安装实例)选择您要解除附加的安装实例然后点击解除附加。
点击 解除附加 。
 icon.
icon.不像解除附加,彻底移除会删除 WordPress 实例。您可以移除任何安装实例,不管该实例是以何种方式安装的:使用 WP Toolkit,通过应用程序页面,或手动安装的。您可以单个移除 WordPress 安装实例或多个一起进行。
要移除 WordPress 安装实例,请如下操作:
-
转到 WordPress 然后执行以下操作:
(To remove an individual installation) On the card of the installation you want to remove, click the
icon.(移除多个安装实例)选择您要移除的安装实例然后点击移除。
单击 移除 。
搜索引擎索引和调试
默认情况下,在搜索引擎的搜索结果中会显示新创建的 WP Toolkit 网站。如果您的网站尚未准备好供公众浏览,请关闭 “搜索引擎索引” 。
If you are installing WordPress for testing or development, you can
enable “Debugging” to automatically find and fix errors in the website
code. To do so, click the  icon next to “Debugging”, select the WordPress
debugging tools you want to activate, and then click OK.
icon next to “Debugging”, select the WordPress
debugging tools you want to activate, and then click OK.
更新 WordPress 安装实例
为了确保您的网站安全,您需要定期更新 WordPress 核心,以及任何安装的插件和主题。您可以自动或手动执行此操作:
通过手动更新您可以控制何时进行更新。例如,您可以等待并查看安装某个更新是否会给其他 WordPress 用户带来问题。但是,您需要记住定期更新以避免落后。
自动更新能够让您的 WordPress 安装实例保持最新状态,让您放心。然而,更新有时会破坏您的安装实例,而且使用了自动更新,您可能不会立刻知道这一情况。
出于安全考虑,我们建议您配置自动更新。
若要手动更新 WordPress 安装实例,请如下操作:
-
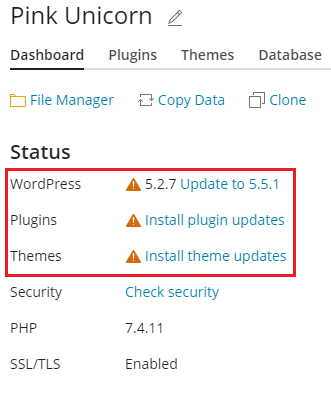
转到 WordPress。若您的 WordPress 安装实例需要更新,将会在”状态”部分看到相应的信息(例如,”安装插件更新”)。
-
单击有关可用更新的任何信息,等待 WP Toolkit 加载可用更新列表,然后选择要安装的更新。
备注
If an update of a WordPress core is available, you will see the “Restore Point” checkbox. Keep this checkbox selected to create a restore point you can use to roll back the update if something goes wrong.
点击 更新 。
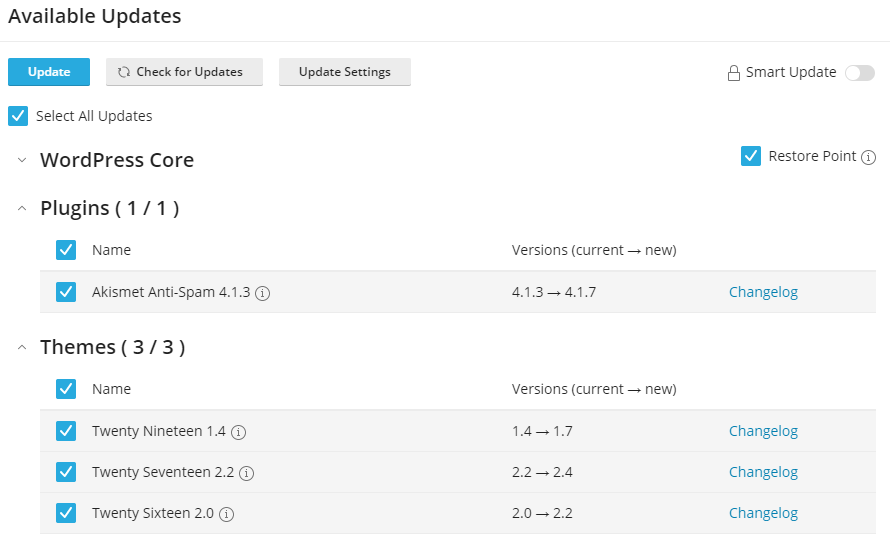
将应用选定的更新。
Although WP Toolkit regularly checks for updates itself, you can also check for updates at any time. To do so, click “Check for Updates”.
若要为 WordPress 安装实例配置自动更新,请如下操作:
-
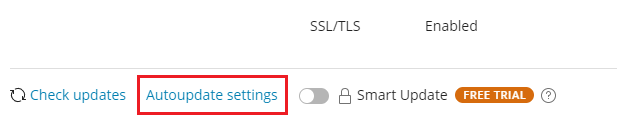
Go to WordPress and choose the WordPress installation that you want to update automatically and then, on the installation card, click “Autoupdate settings”.
-
选择所需的自动更新设置。
您可以分别为WordPress核心、插件和主题配置自动更新(例如,您可以选择为插件和主题启用自动更新,但不为WordPress核心启用自动更新)。
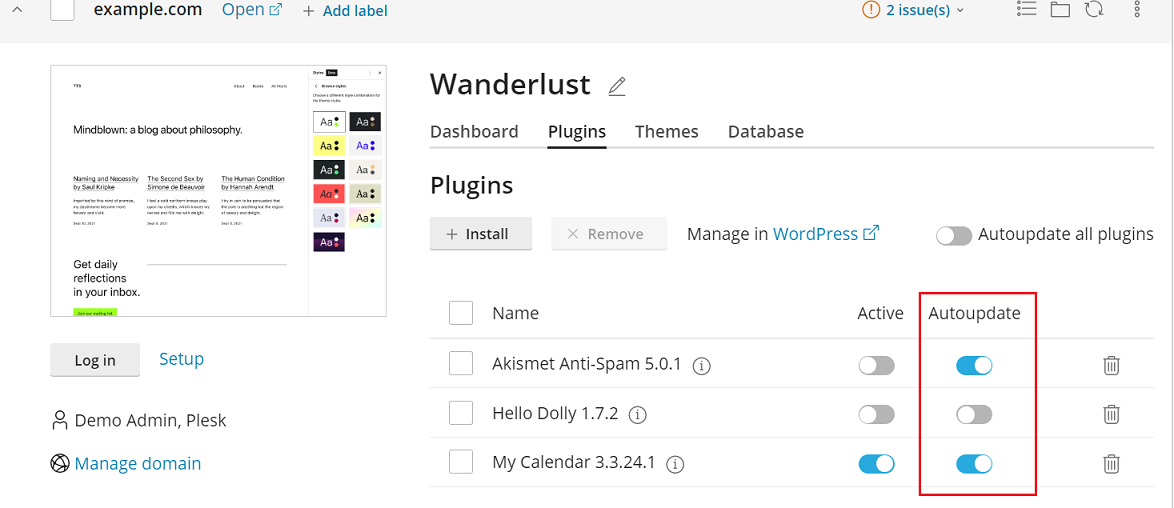
您还可以为所有插件和主题配置自动更新,或者为每个插件和主题单独配置。
要调整自动更新,请根据这些建议执行:
Selecting “No” next to “Update WordPress automatically” turns off autoupdates of WordPress core. This is insecure.
If your website is publicly available (production) and you are concerned that applying updates automatically may break it, keep “Yes, but only minor (security) updates” selected.
If your website is a non-public (staging) version of a WordPress website, select “Yes, all (minor and major) updates”. This will keep your staging website up-to-date and ensure that, should an update break something, it happens to the staging website and not to the production one.
-
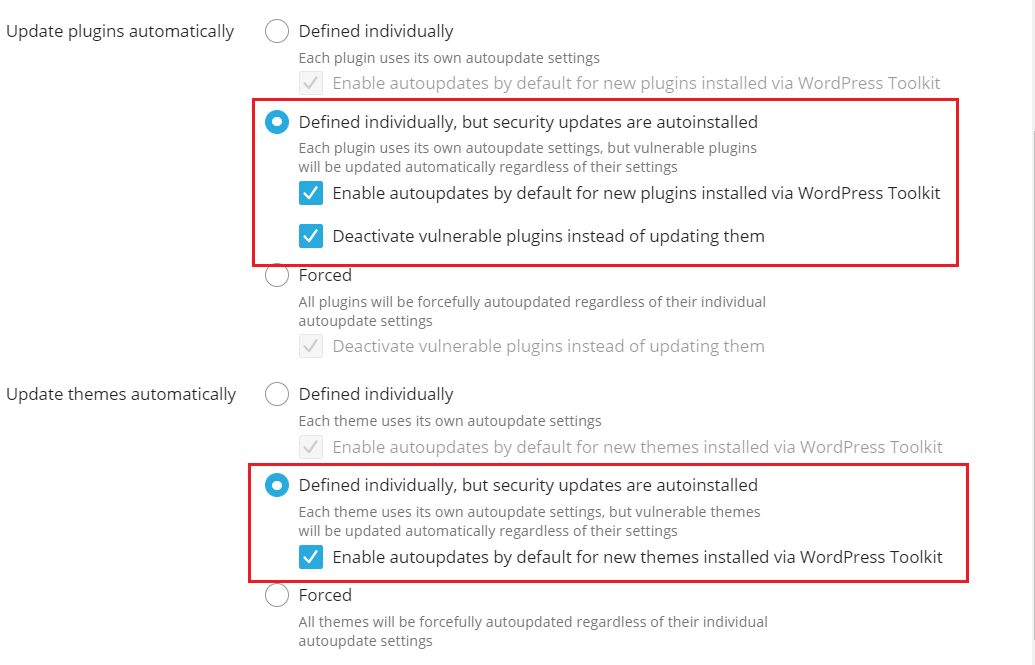
在大多数情况下,我们建议您同时为插件和主题选择“单独定义,但安全更新为自动安装”。然后,您需要在网站卡的“插件”和“主题”标签上为每个插件和主题单独配置自动更新。
然而,WP Toolkit 将自动为易受攻击的插件和主题安装安全更新,即使它们的自动更新被关闭。
如果您担心插件的安全更新会破坏您的网站,请选择“停用易受攻击的插件,而不是将其更新”复选框。然后您可以手动更新易受攻击的插件并再次将其激活(当您确定这些插件对您的网站是安全的时候)。
为了省去在“插件”和“主题”选项卡上为每个新插件和主题打开自动更新的麻烦,请选择“为通过WP Toolkit 安装的新插件默认启用自动更新”和“为通过 WP Toolkit 安装的新主题默认启用自动更新”。
要更好地控制自动更新,请为插件和主题选择“单独定义”。此方案与前一个方案非常相似,但是如果关闭了自动更新,WP Toolkit 将不会更新易受攻击的插件或主题。我们建议您监控 WP Toolkit 中关于易受攻击的插件和主题的电子邮件通知,并手动将其更新或停用。
为了确保所有的插件和主题总是最新的,请为插件和主题选择“强制”。在这种情况下,WP Toolkit 将自动更新所有插件和主题,而不考虑它们各自的自动更新设置。选择“强制”选项将覆盖“插件”和“主题”选项卡上显示的插件和主题的个别自动更新设置。
点击 确定 。
备注
如果您担心 WordPress 自动更新可能会破坏您的网站,请使用 智能更新。通过智能更新,WordPress安装实例总是可以保持安全地更新,而不会破坏您的网站。当您启用智能更新时,将会检查所有的自动更新,并只允许使用那些对您的网站不会造成问题的更新。
备份和恢复 WordPress 安装实例
若要防止数据丢失,可以备份和恢复网站。要实现此目的,您可以使用 WP Toolkit 功能或常规的 Plesk 备份工具,名叫 备份管理器。
因下面一些原因,在 WP Toolkit 中创建备份可能会比在备份管理器中创建备份更方便:
WP Toolkit 会备份单个网站,而备份管理器会备份整个订阅和所有的订阅网站及其数据。
若您需要备份单个网站,WP Toolkit 备份则需要更少的时间和磁盘空间。
在 WP Toolkit 中创建备份不需要任何设置。
若要备份一个 WordPress 网站,请如下操作:
-
转到 WordPress 然后点击您想要备份的 WordPress 安装实例的卡片上的备份 / 恢复。
单击 备份 。

备份一旦完成,则将在 WP Toolkit 备份列表中显示。

若要恢复 WordPress 网站,请如下操作:
转到 WordPress 然后点击您想要恢复其备份的 WordPress 安装实例的卡片上的 备份/恢复。
-
单击与您要恢复的备份相对应的
图标。备注
恢复备份会移除备份日期后您对网站所做的所有更改。因此 WP Toolkit 会建议您备份网站的当前状态并使用此备份进行恢复。
点击 恢复。
 图标。
图标。您已恢复您的备份。
出于安全考虑,您可能想要下载 WP Toolkit 备份文件以在其它任何地方进行存储。
若要下载 WP Toolkit 备份文件,请如下操作:
转到 WordPress 然后点击您想要下载其备份文件的 WordPress 安装实例的卡片上的 备份/恢复。
-
点击与您要下载其文件的备份相对应的
图标。您将会被重定向到存储 WP Toolkit 备份的文件管理器中的目录(网站主目录中的
/wordpress-backups)。 点击与您要下载的备份文件相对应的
图标然后点击 下载。
 图标。
图标。 图标然后点击 下载。
您已下载一个备份文件。
您可以删除您不再需要的 WP Toolkit 备份。
若要删除 WP Toolkit 备份,请如下操作:
转到 WordPress 然后点击您想要删除其备份文件的 WordPress 安装实例的卡片上的 备份/恢复。
Click the
icon corresponding to the backup you want to delete and then click Delete.
 icon corresponding to the backup you want to delete and then click Delete.
您已删除了一个备份。
智能更新
Smart Updates is a premium feature included in WP Toolkit Deluxe or bought as a standalone extension. It helps you keep your production websites up to date without the risk of breaking your website. Smart Updates analyses the potential consequences of installing updates and advises you whether doing so is safe.
为了确保您的网站安全,您需要定期更新 WordPress:主题、插件和核心。但是这些更新可能会破坏您的网站。手动更新需要您的注意,不能保证您的网站将继续工作。
Smart Updates makes sure a WordPress installation is always updated safely without breaking your website. It does the following:
Clones the installation and then analyses the clone for issues.
Updates the clone and analyses it again.
检测问题(PHP 问题、HTTP 相应代码错误、已更改的页面标题等其它):不仅是更新可能引起的问题还有在更新前就已存在的问题。
With manual updates, Smart Updates reports whether or not it is safe to update. You can view and download the detailed report about the issues found and then decide whether to update the production website or not.
With autoupdates, Smart Updates automatically updates the production website unless there is at least one issue caused by the update. Otherwise the update is not performed and you receive an email with the results of the analysis.
使用智能更新
智能更新是一项付费功能,您可以在每个安装实例的基础上购买该功能。智能更新包括手动和自动更新两种模式。
若要启用智能更新,请如下操作:
购买智能更新 并 安装收到的其它许可证密钥 。您为每个安装实例单独启用智能更新。
转到 WordPress 在安装实例卡上打开 “智能更新”。
您已启用了智能更新。现在您可以将其用于手动或自动更新。
备注
智能更新不是备份的替代选择。我们建议您定期对 WordPress 安装实例进行备份,尤其是在使用自动更新时。
若要手动使用智能更新,请如下操作:
确保您有足够多的磁盘空间来保存需要更新的安装实例的完整副本。
On the installation card, click Updates.
On the Available Updates card, click Check for Updates.
Select the updates you want to install, and then click Run Smart Update Tests.
等待智能更新克隆和分析您的网站(这可能需要一段时间,取决于网站的大小)。分析是在后台执行的,因此关闭窗口不会中断更新。
-
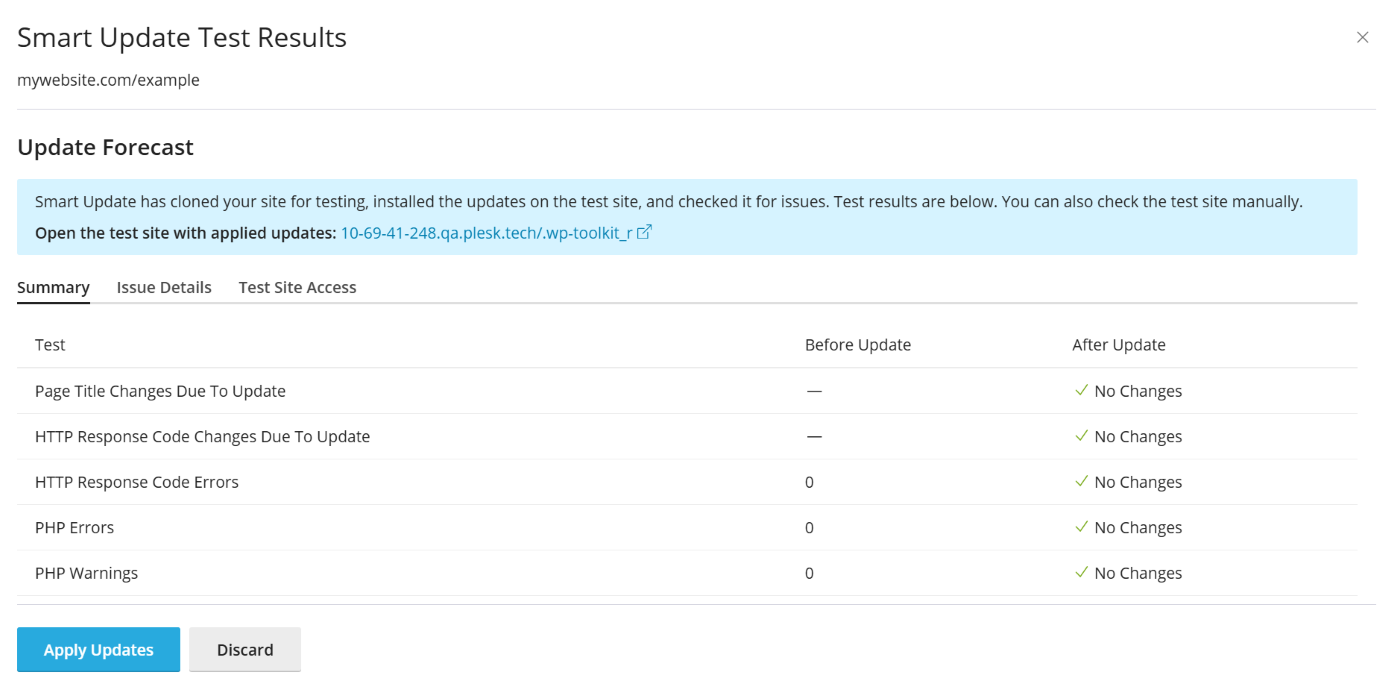
View the analysis report on your website. You can see issues found for the whole website. To download a report about them, click Download Summary.
-
If Smart Update did not detect any issues regarding the update and the screenshots appear to confirm it, click Apply Updates and then confirm your choice. Smart Update will update the production installation and delete the clone.
如果您不想更新生产性的安装实例,请点击 放弃 。
若要自动使用智能更新,请如下操作:
确保您有足够多的磁盘空间来保存需要更新的安装实例的完整副本。
当更新可用时,智能更新将对安装实例进行克隆、更新克隆以及在更新之后对克隆进行分析。
If the update causes no issues, Smart Update automatically updates the production installation. If Smart Update detects at least one issue the update may cause, the update is not applied and you will receive an email with the link. Follow the link to open a report on the issues.
智能 PHP 更新
For both security and performance reasons, it is recommended that websites that use PHP, including WordPress websites, always use the latest available PHP version. However, switching a website’s PHP version, especially when moving between major PHP versions (for example, switching from PHP 7.x to PHP 8.x), may cause issues with the website.
For your peace of mind, we offer the Smart PHP Updates feature. WP Toolkit can verify whether switching a WordPress website to a different PHP version is likely to cause issues, and warn you in advance, minimizing the chances of a production WordPress website failing due to PHP compatibility issues.
How It Works
With Smart PHP Updates you can, on demand, verify whether switching a WordPress website to a different PHP version is likely to cause issues. When you do, WP Toolkit creates a copy of that website, switches the copy to the selected PHP version, and then compares the original to the copy.
Afterwards, WP Toolkit reports any issues that were discovered, such as changes in HTTP response codes for the copy, or any HTTP response or PHP errors present for the copy, but not the original.
Once the report has been generated, you can either switch the original website to the selected PHP version, or to decline to do so. In either case, the copy of the website is automatically removed afterwards.
前提条件
Before you can use Smart PHP Updates, the following prerequisites must be met:
A paid WP Guardian (Plesk addon) license must be purchased and installed in Plesk.
The configured limits and permissions for the subscription owning the domain in question must allow for the creation of at least one additional domain or subdomain.
备注
Installing any WP Guardian (Plesk addon) license, no matter the number of sites on the license, allows you to use Smart PHP Updates for every WordPress website managed via WP Toolkit with no restrictions or limitations.
Using Smart PHP Updates
To use Smart PHP Updates:
Go to WordPress, and then find the desired WordPress website.
-
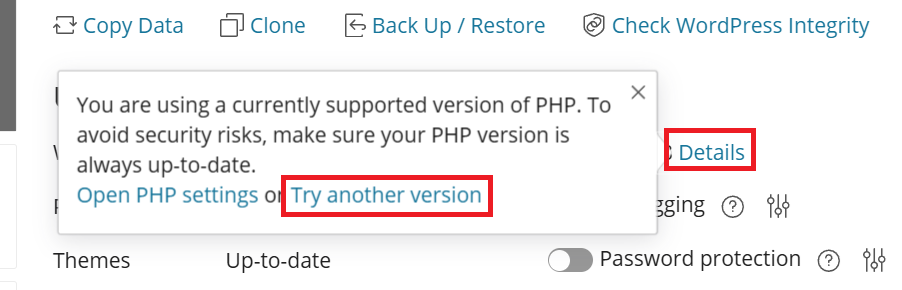
Under “Tools”, next to “PHP”, click Details, and then click Try another version.
Select the desired PHP version, and then click Check.
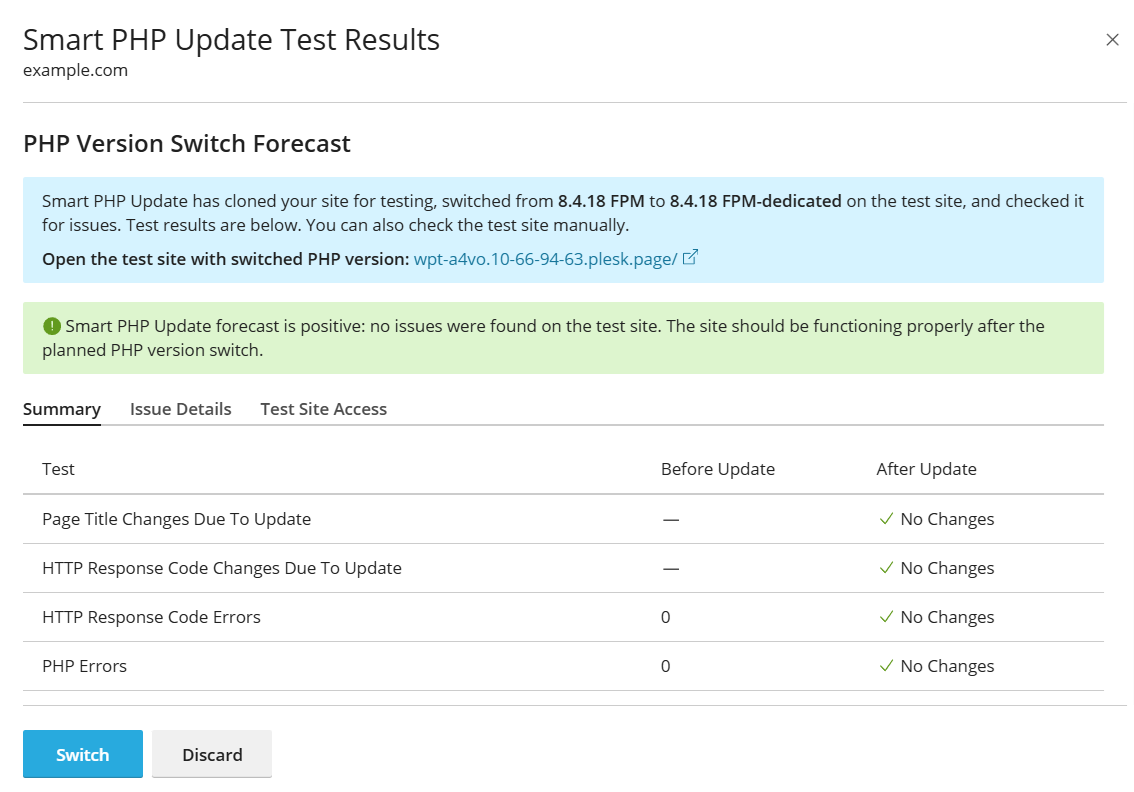
WP Toolkit will create a copy of the website and test it using the selected PHP version. This may take a few minutes. Once the process is complete, you will see a report page with the test results.
备注
You can close the report window with no issue. Once a report has been generated, you can return to it later by clicking Details > Review Smart PHP Update results.
If any issues are detected, they will most likely be related not to WordPress core, but to one or more plugins. Here’s what you can try to move forward:
Try using different plugins with similar functions.
Contact the plugin(s) author(s) and ask them to update those plugins, so that they are compatible with modern PHP versions.
Try a different minor PHP version (for example, if there are issues detected with PHP 8.4, try using PHP 8.2 instead).
Once you’ve made the decision whether to switch the production website to the selected PHP version, on the report page, click Switch > Switch PHP Version to perform the switch, or click Discard > Discard PHP Version Switch. In either case, the test site will be removed afterwards.
管理插件
一个 WordPress 插件 是给 WordPress 添加新功能的一个第三方软件。有了 WP Toolkit,你就可以在一个或多个 WordPress 安装实例上安装和管理多个插件。
安装插件
在 WP Toolkit 中,可以在一个或多个 WordPress 安装实例上安装插件。
您可以在 wordpress.org 插件 repository 中搜索插件并安装找到的插件。您还可以上传自定义插件,对以下几种情况有用:
您无法在 wordpress.org repository 中找到合适的插件。
-
您需要安装您自己的插件。
备注
您上传的任何插件都可供客户安装。
若要在特定的 WordPress 安装实例上安装插件,请如下操作:
-
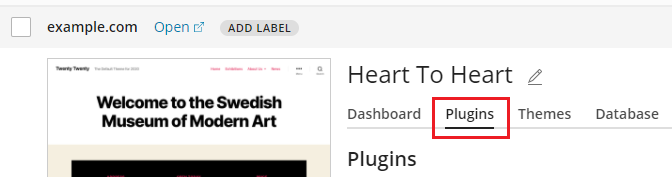
Go to WordPress, go to the “Plugins” tab of an installation card, and then click Install.
搜索插件,然后单击要安装的插件旁边的 安装 。已安装的插件立即被激活。
若要在多个 WordPress 安装实例上安装插件,请如下操作:
-
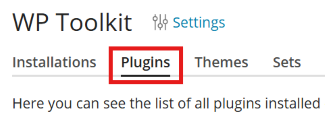
Go to WordPress > the “Plugins” tab, and then click Install.
-
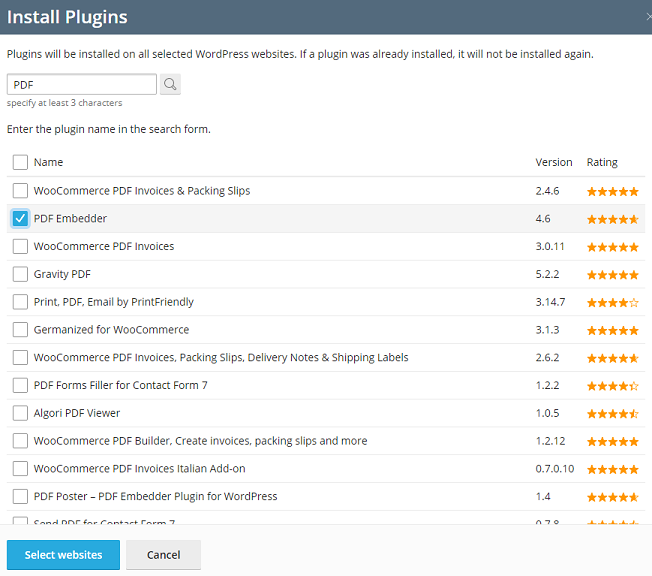
搜索插件,选择您要安装的插件,然后点击 选择网站。
备注
选择一个或多个插件然后执行新的搜索而不安装选定的插件会重设插件安装选项。
By default, newly installed plugins are activated immediately. You can prevent this by clearing the “Activate after installation” checkbox.
选择要安装插件的网站,然后点击 安装。
若要上传一个插件,请如下操作:
Go to WordPress > the “Plugins” tab, and then click Upload plugin.
-
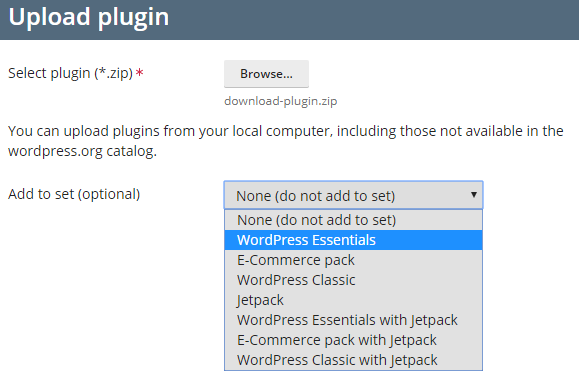
点击 浏览… 然后浏览到包含您要上传的插件的 ZIP 文件的位置。
您可以将上传的插件添加到插件和主题组。具体操作是,从下拉列表选择插件和主题组。如果您不想把上传的插件添加到插件和主题组,可保持选择 “无” 选项。您可以在 管理组 中了解更多有关插件和主题组的信息。
点击 确定 。
此时,已上传的插件则可供客户安装。您还可以在您自己的 WordPress 安装实例上安装已上传的插件。
若要安装已上传的插件,请如下操作:
Go to WordPress > the “Plugins” tab.
-
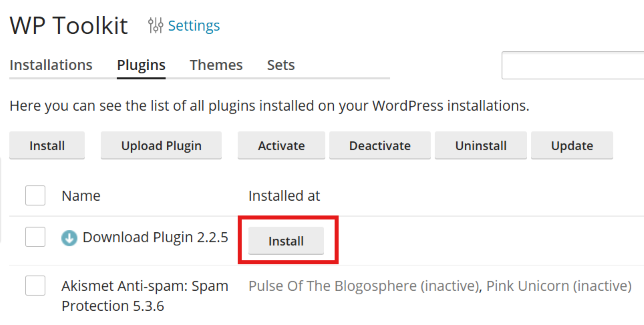
点击您已上传的插件旁的 安装 。
选择您要安装已上传的插件的 WordPress 安装实例。
By default, a newly uploaded plugin is not activated. You can activate it by selecting the “Activate after installation” checkbox.
点击 安装 。
激活和停用插件
您可以激活或停用某个安装实例或服务器上托管的所有安装实例上的插件。
若要激活或停用某个安装实例的插件,请如下操作:
Go to WordPress, and then go to the “Plugins” tab of an installation card.
-
在“活动”下,分别打开或关闭插件以激活或停用插件。
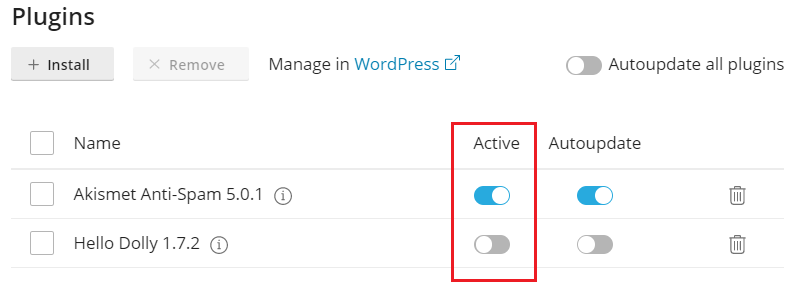
若要激活或停用服务器上托管的所有安装实例的插件,请如下操作:
Go to WordPress > the “Plugins” tab.
选定您要激活或停用的插件。
点击 激活 或 停用 。
更新插件
If a plugin needs updating, you will see “Updates” next to the plugin on the “Plugins” tab of an installation card. You can update not only free plugins but also paid ones if they can be updated in the usual way in the WordPress admin dashboard.
备注
WP Toolkit 可以更新需要许可证的付费插件(若有许可证)。WP Toolkit 无法更新使用非标准更新方式的付费插件。
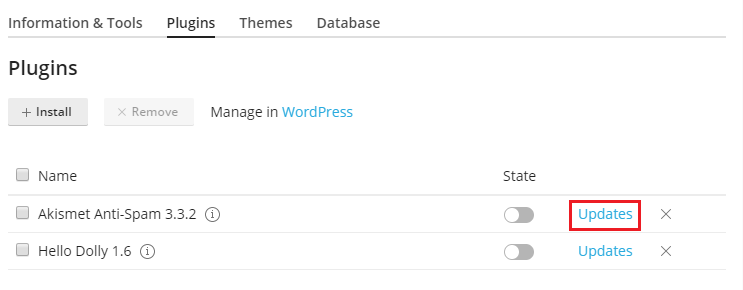
您可执行以下操作:
Update plugins for one particular installation. Read how to do so in the “To update a WordPress installation manually” procedure.
更新安装在多个安装实例上的插件。
Configure autoupdates for plugins. Read how to do so in the “To configure autoupdates for a WordPress installation” procedure.
若要更新在多个安装实例上的插件,请如下操作:
Go to WordPress > the “Plugins” tab.
-
点击您要更新的插件旁的 “更新到版本…”。欲了解更多有关更新的信息,请点击 更新日志 。将会带您进入 wordpress.org 上的插件页面。
点击 是 。
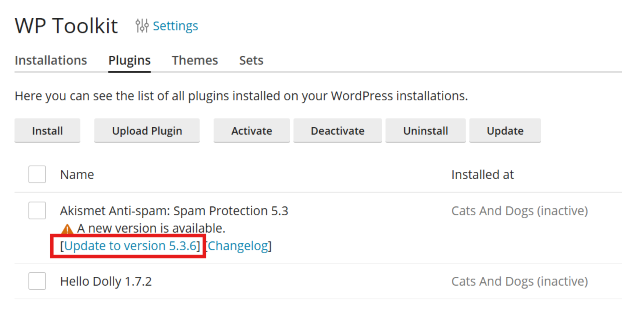
移除插件
您可以从某个安装实例或服务器上托管的所有安装实例移除插件。
若要从某个安装实例移除插件,请如下操作:
Go to WordPress, and then go to the “Plugins” tab of an installation card.
To remove one plugin, click the
icon corresponding to the plugin you want to remove.
To remove several plugins, select them and click Remove.点击 是 。
若要从服务器上托管的所有安装实例移除插件,请如下操作:
Go to WordPress > the “Plugins” tab.
选定您要移除的插件,点击 卸载 ,然后点击 是 。
Must-Use Plugins
You may notice one or more plugins installed on a WordPress website being marked as “Must-Use”. Such plugins are sometimes used to add support for important features. For example, WP Toolkit uses the must-use plugin “WP Toolkit plugin” to enable the “Vulnerability Protection” feature. Learn more about must-use plugins in WordPress.

备注
The “Must-Use” designation only means that one or more plugins are treated as must-use for all websites that belong to a specific WordPress installation. It does not mean that those plugins are in any way endorsed or promoted by either WordPress Foundation or WebPros.
There are a number of differences between the way regular and must-use plugins work:
Must-use plugins are loaded before the regular plugins.
Must-use plugins are always on for all websites that belong to the WordPress installation the plugins are installed on.
Must-use plugins cannot be updated, deactivated, or removed via either WP Toolkit or the WordPress admin dashboard.
WordPress 插件阻止列表
备注
WordPress 插件阻止列表适用于 WP Toolkit 5.6 或更高版本。
Some WordPress plugins can affect the server’s performance, interfere with other plugins, or cause security issues. The reason is that plugins are developed by various developers with various knowledge and skill. In the plugin blocklist, you can forbid particular plugins from being installed on the server and automatically disable them if they are already installed.
示例。一个插件会影响服务器的性能。
假设某个WordPress插件运行需要太多服务器资源。为了保障Plesk服务器的稳定和平稳运行,需要防止客户端安装该插件。以下是操作方法:
转到 WordPress。
单击 设置 。
-
在 WP Toolkit 设置 弹出窗口中,于 插件阻止列表 字段中,输入插件名称,每个词用破折号隔开:
备注
要在列表中添加另一个插件,请在前一个插件的名称后面加一个逗号,然后在逗号后面指定新插件的名称,不用空格。
单击 保存 。
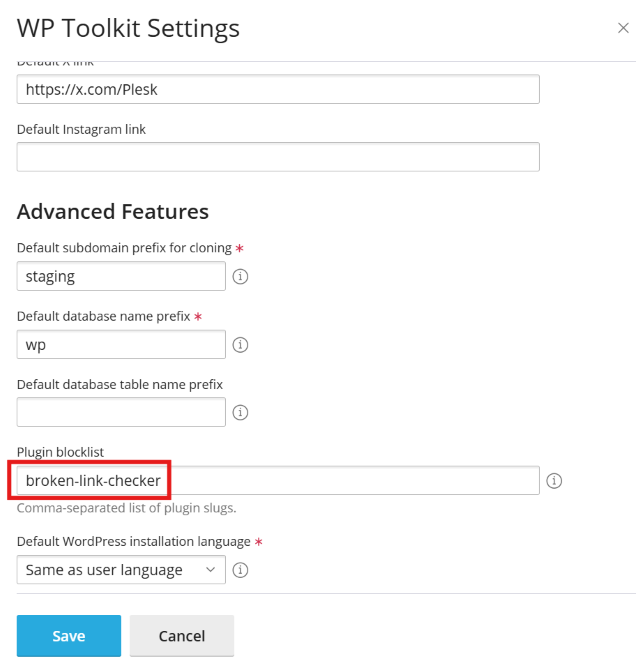
因此,客户端将无法使用 WP Toolkit 来安装、上传或激活指定的插件。若已安装该插件,WP Toolkit 将自动将其禁用。
管理主题
一个 WordPress 主题决定了您网站(包括颜色、字体和布局)的整体设计。您可以选择不同的主题来更改网站的外观感受,而不会对内容做任何变更。通过 WP Toolkit,您可以安装和管理主题。
安装主题
在 WP Toolkit 中,可以在一个或多个 WordPress 安装实例上安装主题。
您可以在 wordpress.org 主题 repository 中搜索插件并安装找到的插件。您还可以上传自定义主题,对以下几种情况有用:
您无法在 wordpress.org repository 中找到合适的主题。
-
您需要安装您自己的主题。
备注
您上传的任何主题都可供客户安装。
若要在特定的 WordPress 安装实例上安装主题,请如下操作:
-
Go to WordPress, go to the “Themes” tab of an installation card, and then click Install.
搜索主题,然后点击您想要安装的主题旁的 安装 按钮。默认不会激活新安装的主题。
若要在多个 WordPress 安装实例上安装主题,请如下操作:
-
Go to WordPress > the “Themes” tab, and then click Install.
-
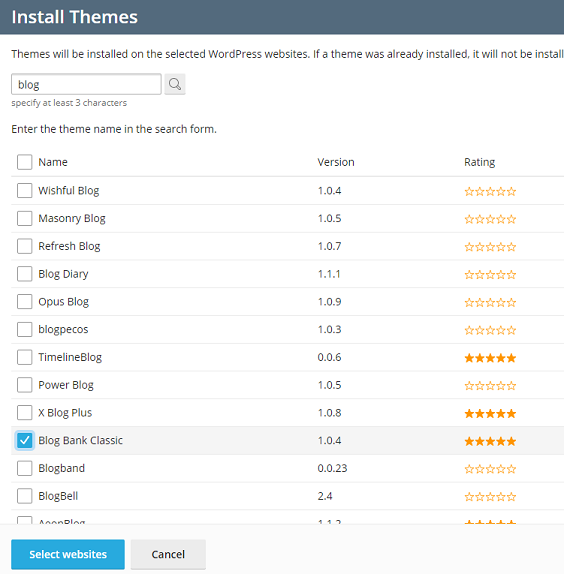
搜索主题,选择您要安装的主题,然后点击 选择网站。
备注
选择一个或多个主题然后执行新的搜索而不安装选定的主题会重设主题安装选项。
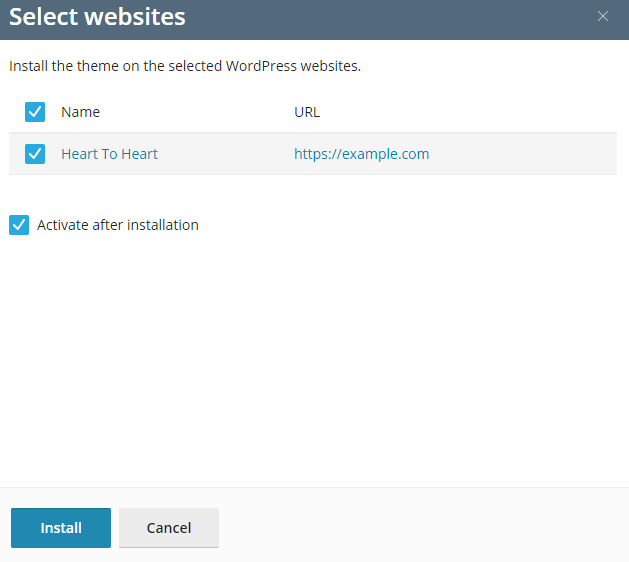
选择要安装主题的网站,然后点击 安装。
若要上传一个主题,请如下操作:
Go to WordPress > the “Themes” tab, and then click Upload theme.
点击 浏览… 然后浏览到包含您要上传的主题的 ZIP 文件的位置。
您可以将上传的主题添加到插件和主题组。具体操作是,从下拉列表选择插件和主题组。如果您不想把上传的主题添加到插件和主题组,可保持选择 “无” 选项。您可以在 管理组 中了解更多有关插件和主题组的信息。
点击 确定 。
此时,已上传的主题则可供客户安装。您还可以在您自己的 WordPress 安装实例上安装已上传的主题。
若要安装已上传的主题,请如下操作:
Go to WordPress > the “Themes” tab.
-
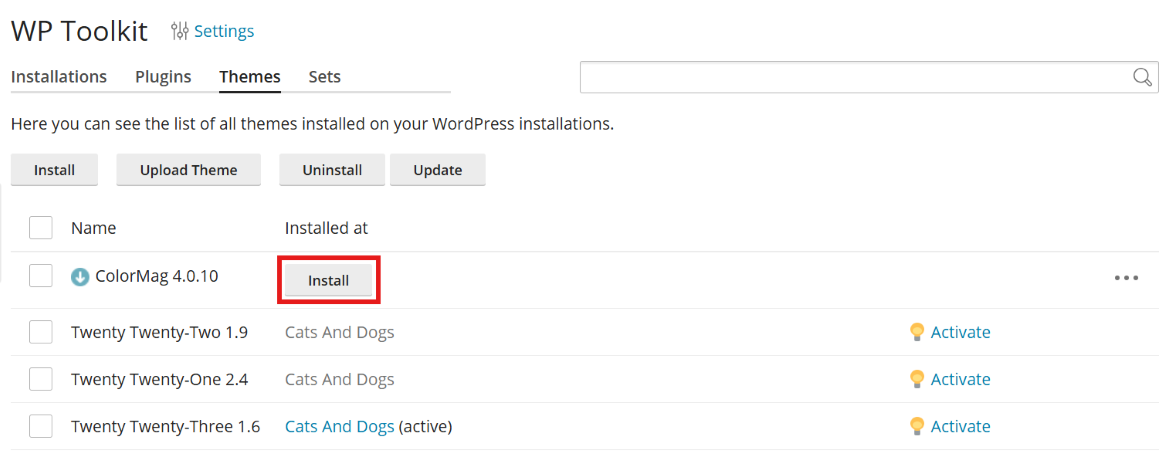
点击您已上传的主题旁的 安装 。
-
选择您要安装已上传的主题的 WordPress 安装实例。
By default, a newly uploaded theme is activated. You can deactivate it by clearing the “Activate after installation” checkbox.
点击 安装 。
激活主题
您可以激活安装在特定实例上或托管在服务器上的所有实例上的主题。一个 WordPress 实例一次只能有一个活动的主题。
若要激活某个安装实例的主题,请如下操作:
Go to WordPress, and then go to the “Themes” tab of an installation card.
在“活动”下,打开一个主题以激活它。之前活动的主题将自动停用。
若要激活服务器上托管的所有安装实例的主题,请如下操作:
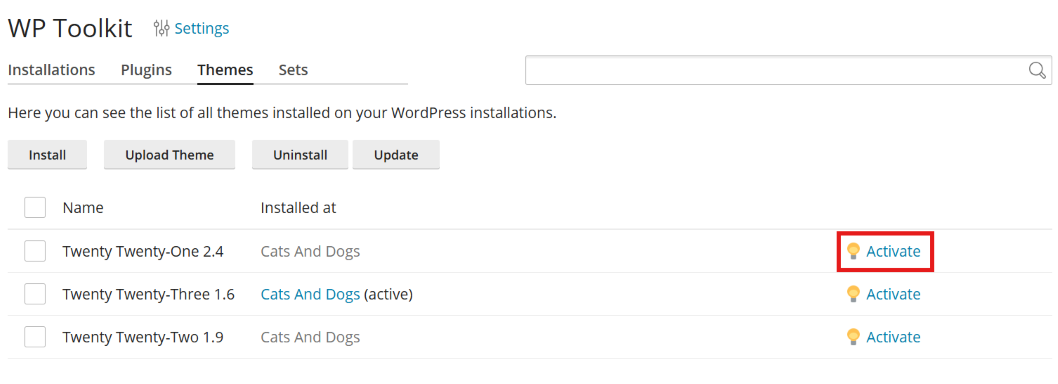
Go to WordPress > the “Themes” tab.
-
点击您要激活的主题旁的 激活 。
更新主题
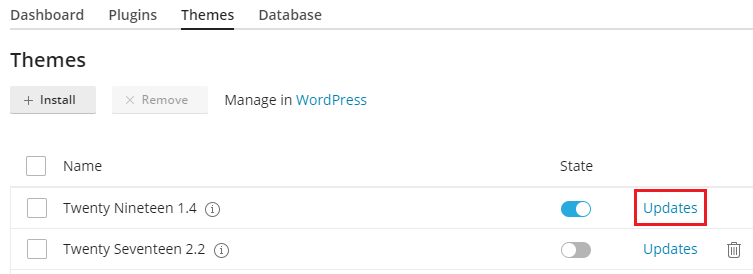
If a theme needs updating, you will see “Updates” next to the theme on the “Themes” tab of an installation card. You can update not only free themes but also paid ones if they can be updated in the usual way in the WordPress admin dashboard.
备注
WP Toolkit 可以更新需要许可证的付费主题(若有许可证)。WP Toolkit 无法更新使用非标准更新方式的付费主题。
您可执行以下操作:
Update themes for one particular installation. Read how to do so in the “To update a WordPress installation manually” procedure.
更新安装在多个安装实例上的主题。
Configure autoupdates for themes. Read how to do so in the “To configure autoupdates for a WordPress installation” procedure.
若要更新在多个安装实例上的主题,请如下操作:
Go to WordPress > the “Themes” tab.
点击您要更新的主题旁的 “更新到版本…” 。欲了解更多有关更新的信息,请点击 “更新日志” 。将会带您进入 wordpress.org 的主题页面。
点击 是 。
移除主题
您可以从某个安装实例或服务器上托管的所有安装实例移除主题。
备注
您无法移除活动的主题。在移除当前活动的主题之前,需要首先激活另一个主题。
若要从某个安装实例移除主题,请如下操作:
Go to WordPress, and then go to the “Themes” tab of an installation card.
Click the
icon next to theme you want to remove. To remove
several themes, select them and click Remove.点击 是 。
若要从服务器上托管的所有安装实例移除主题,请如下操作:
Go to WordPress > the “Themes” tab.
选定您要移除的主题,点击 卸载 ,然后点击 是 。
Managing the Database
On the Database tab of a WordPress installation card, you can view the database details for the installation, change the database username and password, and open the database in phpMyAdmin.
To view the database details of a WordPress installation:
Go to WordPress, go to the “Database” tab of the installation card, and then view the information in the “Database details” section.
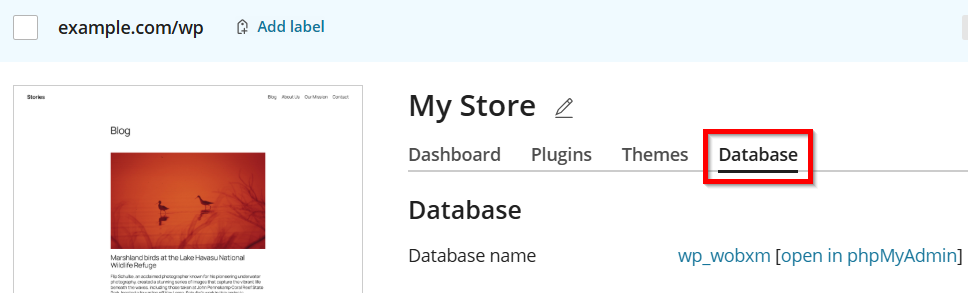
将会显示以下信息:
Database name — the name of the database used by this WordPress installation.
Database table prefix — the prefix applied to all WordPress database tables.
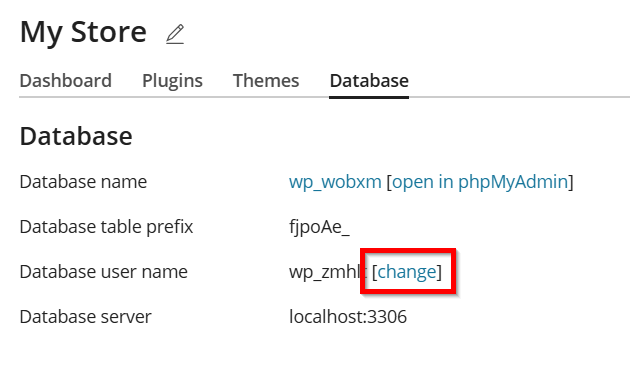
Database user name — the username WP Toolkit uses to connect to the database.
Database server — the address and port of the database server.
Changing the Database Username and Password
You can change the credentials WP Toolkit uses to connect to the database of a WordPress
installation at any time. WP Toolkit updates the wp-config.php file automatically.
To change the database username or password of a WordPress installation:
-
Go to WordPress, go to the “Database” tab of the installation card, and then click change next to “Database user name”.
Enter a new username, password, or both.
点击 确定 。
Opening the Database in phpMyAdmin
To open the database of a WordPress installation in phpMyAdmin:
Go to WordPress, go to the “Database” tab of the installation card, and then click open in phpMyAdmin next to “Database name”.
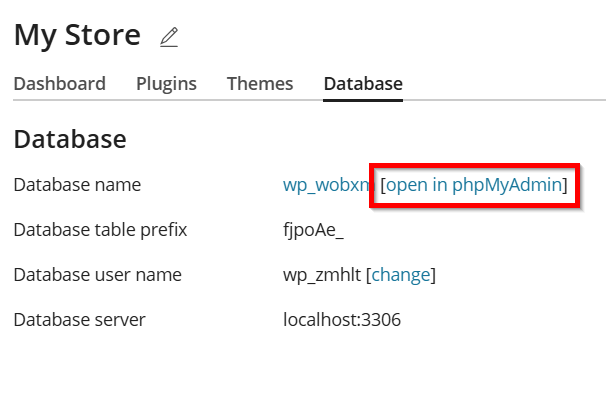
The database opens in phpMyAdmin in a new browser tab.
保护 WordPress 安装实例的安全
WP Toolkit 可以提升 WordPress 安装实例的安全性(例如,通过关闭 XML-RPC pingbacks、检查 wp-content文件夹的安全性等)。
We call individual improvements you can make to the installation’s security “measures”. We consider certain measures to be critical. For that reason, WP Toolkit applies them automatically to all newly created installations.
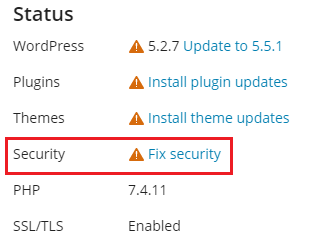
On an installation’s card, under “Security”, you can see the following security messages:
“Apply critical security measures” means that not all critical security measures were applied. We strongly recommend that you apply them all.
“Critical security measures applied” means that all critical security measures were applied, while some recommended measures were not.
“All security measures applied” means that all security measures (critical and recommended) were applied.
备注
Some security measures, once applied, can be reverted (they are marked with the “can be reverted” tag). Some cannot. We recommend that you back up a WordPress installation before securing it.
您可以单独保护 WordPress 安装实例的安全,也可以一次保护多个安装实例。
若要保护单个 WordPress 安装实例的安全,请如下操作:
Go to WordPress, choose the installation you want to secure, and then, on the installation card, click the message under “Security” (for example, “Apply critical security measures”).
等待 WP Toolkit 显示可以应用的安全措施。
Select the security measures you want to apply, and then click Secure. Alternatively, click Apply All to apply all available security measures.
将会应用所有选定的措施。
若要保护多个 WordPress 安装实例的安全,请如下操作:
Go to WordPress, click Security, and then go to the “Security Measures” tab.
您将会看到您的 WordPress 安装实例列表。对于每个安装实例,您都可以看到有多少关键的(有
图标指示)和推荐的( 图标)安全措施可以应用。若要查看可应用的措施列表,请单击相应的图标。如果应用了所有安全措施,您将看到 图标。(Optional) To see more information about all security measures and to manage them for an individual WordPress installation, click
next to the desired installation. To return to managing security of
multiple installations, close the drawer.选择您要应用安全措施的安装实例,然后单击 安全 。
-
默认情况下,只选择应用关键安全措施。您还可以选择:
您选择的安全性措施。具体操作是点击 “自定义选择” 按钮。
All security measures at once. To do so, click the “All (critical and recommended)” radio button.
点击 安全 。
 图标指示)和推荐的(
  图标)安全措施可以应用。若要查看可应用的措施列表,请单击相应的图标。如果应用了所有安全措施,您将看到
  图标。
图标。 next to the desired installation. To return to managing security of
multiple installations, close the drawer.
next to the desired installation. To return to managing security of
multiple installations, close the drawer.将会应用选定的措施。
恢复安全措施
In rare cases, applying security measures can break your website. In this case, you can revert security measures you have applied. Not all security measures can be reverted. Those that can be are marked with the “can be reverted” tag. You can revert security measures for an individual WordPress installation or for multiple WordPress installations at a time.
若要恢复应用于单个安装实例的安全措施,请执行以下操作:
-
Go to WordPress, choose the installation for which you want to revert an applied measure, and then, on the installation card, click the message under “Security” (for example, “All security measures applied”).
等待 WP Toolkit 显示安全措施的列表。
选择要恢复的安全措施,然后单击 恢复 。

将恢复已应用的安全措施。
若要恢复多个安装实例的已应用的安全措施,请如下操作:
Go to WordPress, click Security, and then go to the “Security Measures” tab.
您将看到服务器上托管的 WordPress 安装实例列表,以及是否对其应用了关键的和推荐的安全措施。
(Optional) To see more information about all security measures and to manage them for an individual WordPress installation, click
next to the desired installation.
To return to managing security of multiple installations,
close the drawer.选择您要恢复安全措施的安装实例,然后单击 恢复 。
选择要恢复的安全措施,然后单击 恢复 。
将恢复已应用的安全措施。
Mitigating WordPress Vulnerabilities
Like any other popular software, WordPress can suffer from vulnerabilities that find their way into its code. They range from harmless to critical in impact, and can be found in WordPress core, plugins, and themes. No matter the source, an unmitigated vulnerability can result in the hosted WordPress websites being compromised.
Detecting Vulnerabilities
To help you protect against this threat and keep the hosted WordPress websites secure, WP Toolkit detects known vulnerabilities and offers ways of mitigating them. WP Toolkit uses the information from the PatchStack and Wordfence vulnerability databases.
When one or more vulnerabilities are detected, notifications appear in the WP Toolkit interface:
-
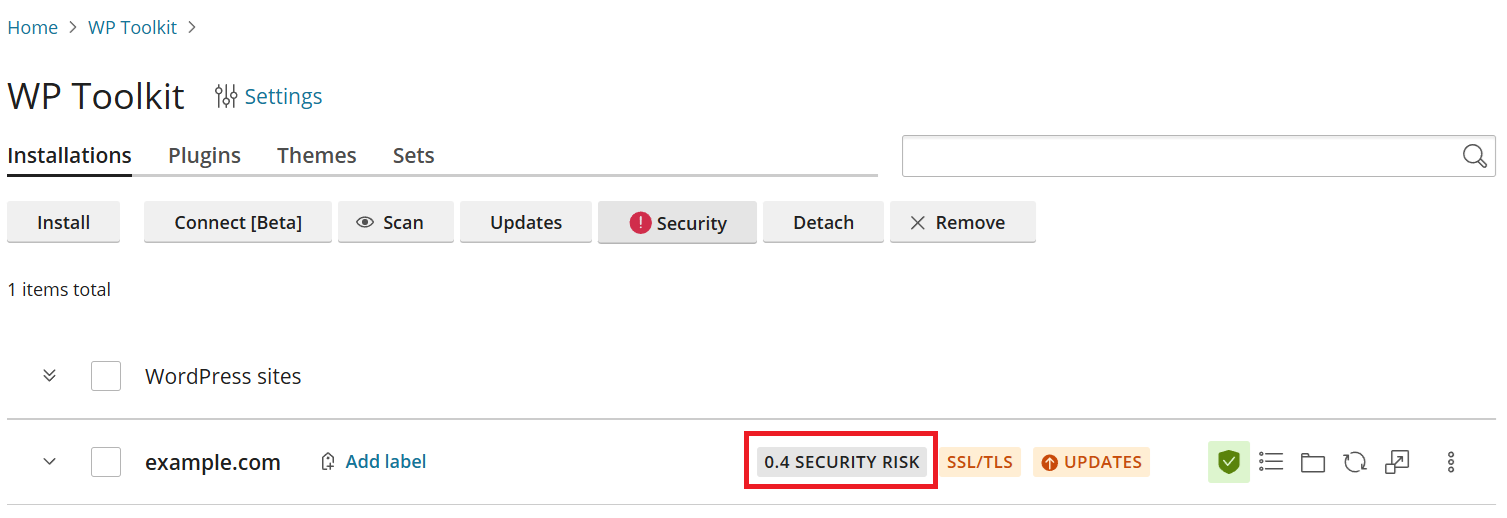
On the “WP Toolkit” page, the WordPress websites with one or more known vulnerabilities are tagged with the “Security risk” tag, together with a number. The number is an estimation of the severity of the threat posed by the vulnerabilities, where 0.1 is the mimimum threat, and 10 is the maximum.
-
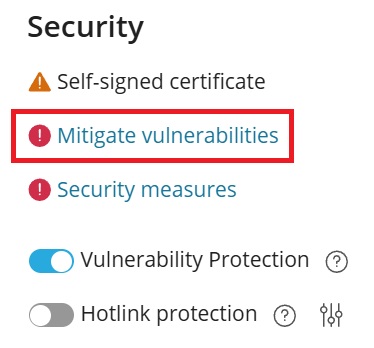
On the individual websites’ cards, on the “WordPress” tab, under “Security”, the Mitigate vulnerabilities call to action is shown.
-
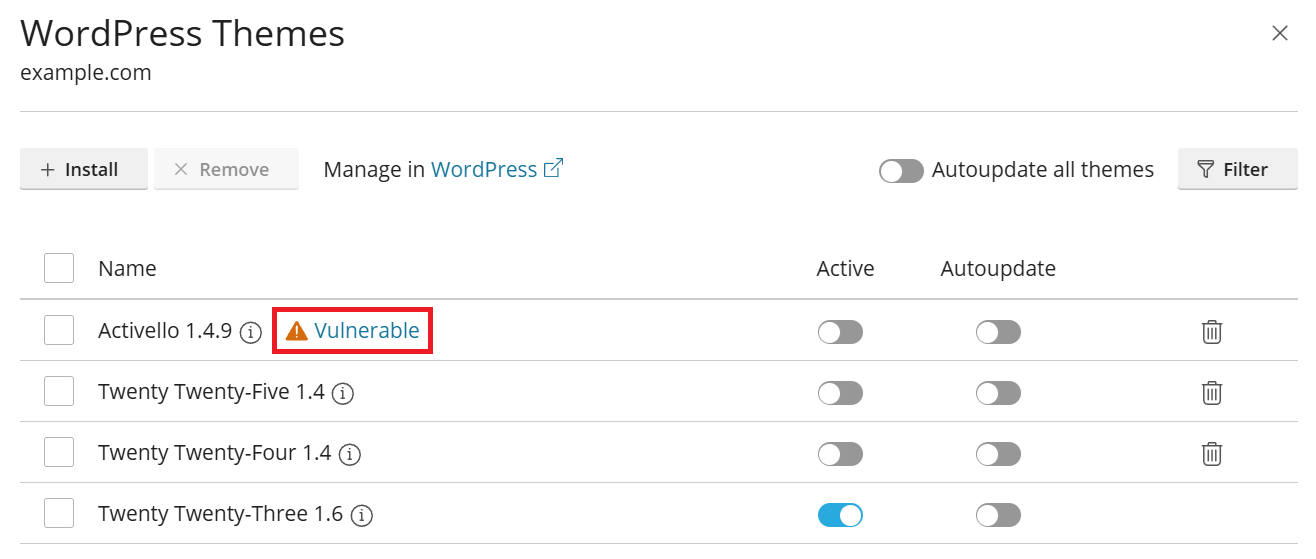
In the individual websites’ “WordPress Plugins” and “WordPress Themes” drawers, any installed plugins or themes that are vulnerable are marked with the
icon and the word “Vulnerable”. Any currently active plugins that are vulnerable, or the currently active theme if it is vulnerable, are marked with the icon and the word “Vulnerable”. Also, when activating a vulnerable plugin or theme, a separate confirmation is required.
 icon and the word “Vulnerable”. Any currently active plugins that are vulnerable, or the currently active theme if it is vulnerable, are marked with the
  icon and the word “Vulnerable”. Also, when activating a vulnerable plugin or theme, a separate confirmation is required.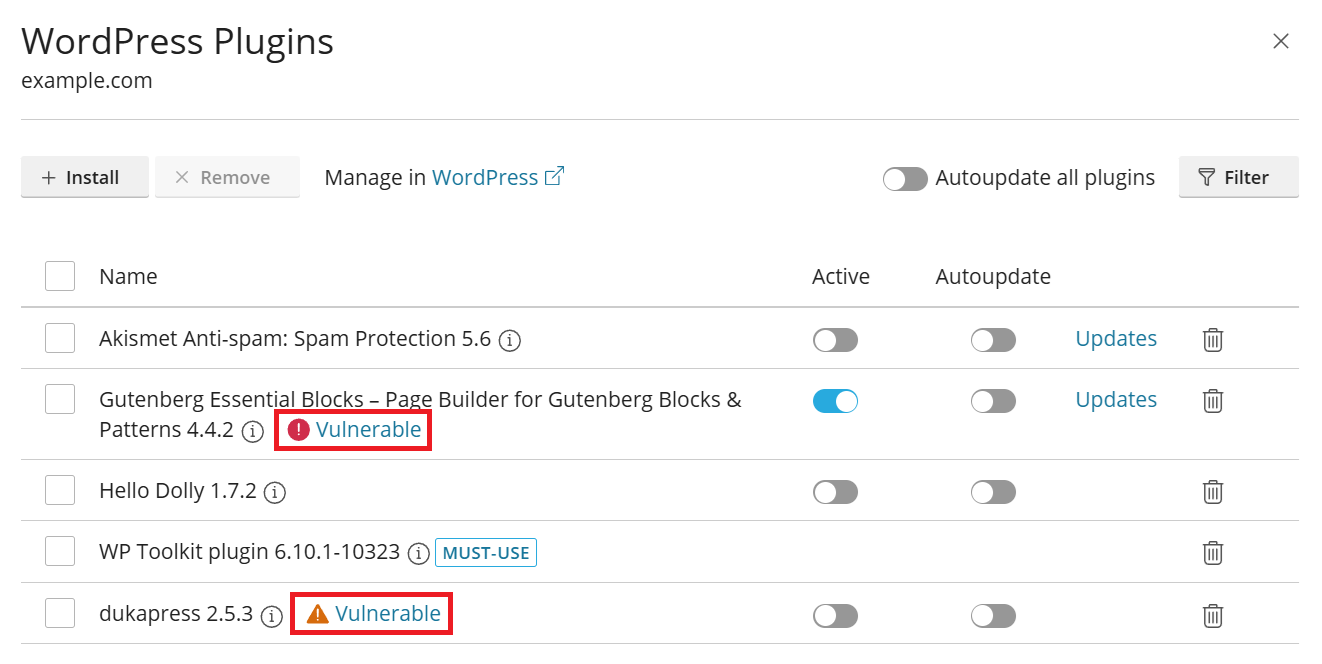
Mitigating Vulnerabilities
Clicking the element notifying you of the presence of vulnerabilities (the “Security risk” tag, the Mitigate vulnerabilities call to action, or the word “Vulnerable”) opens the “Security Status” drawer. Here you can find more information about the vulnerabilities and their potential impact, and also mitigate them.
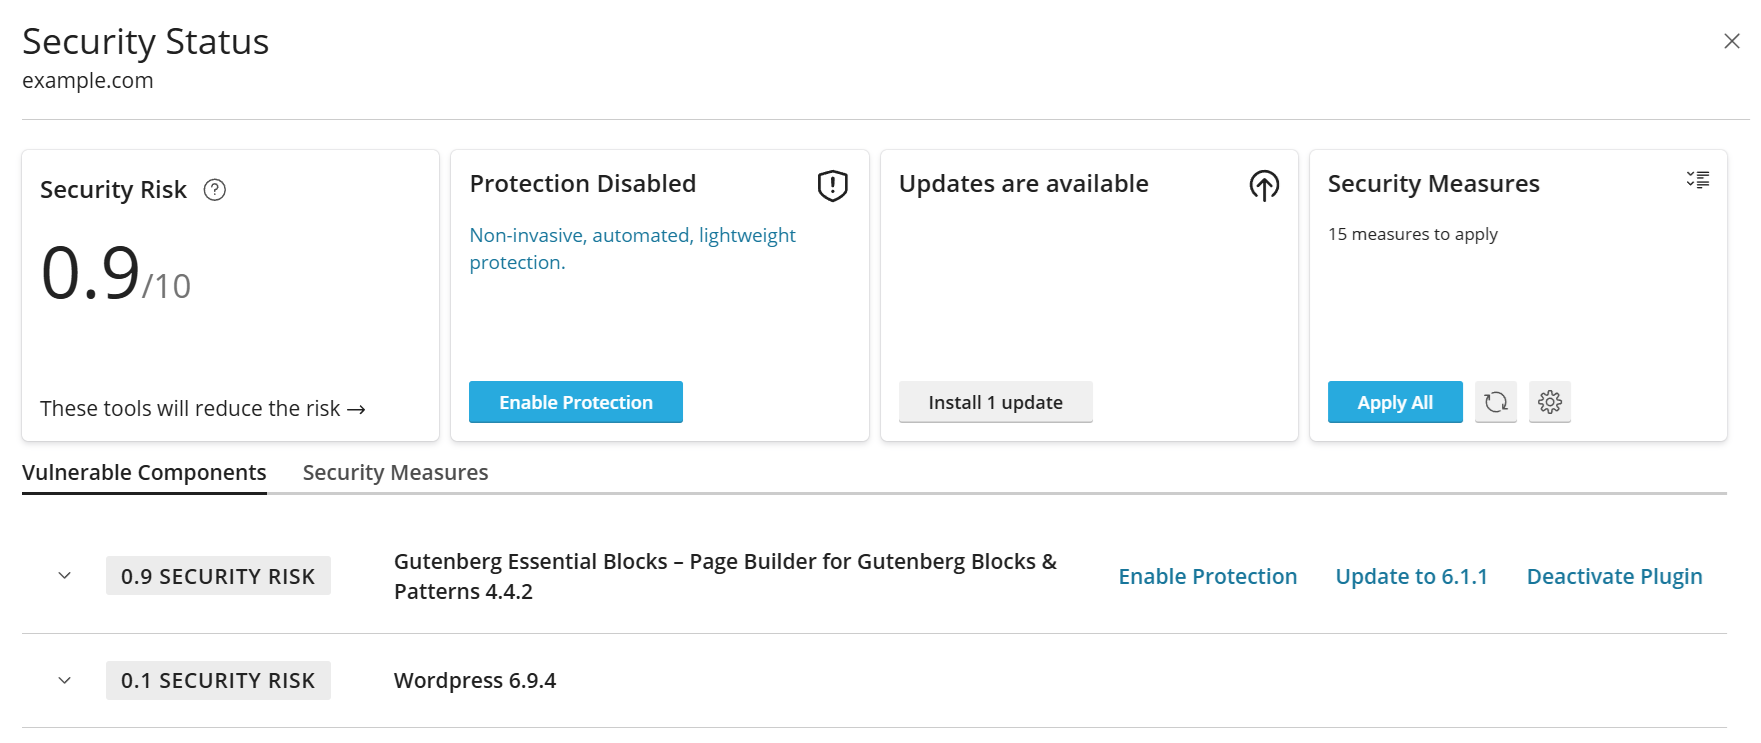
In the drawer, you can see the individual sources of vulnerabilities (WordPress core and/or any vulnerable plugins). You can click any item to expand it. If you do, you will see the list of specific vulnerabilities associated with that source, including its estimated impact and CVE identifier.
The possible methods of mitigating the vulnerabilities introduced by a specific source (if any) are shown to the right of the name of each source. You can choose what method to use, if any, on a per source basis. WP Toolkit offers four such methods:
Vulnerabilities are mainly mitigated by installing updates from the WordPress core team (if the vulnerability is in the WordPress core), or the plugin’s or theme’s maintainer or vendor (if the vulnerability is in a plugin or a theme). However, this approach requires an update to be available. In case of plugins and themes, an update may come with a delay, or not at all, depending on how actively they are maintained. Additionally, installing updates can interfere with the stable operation of the WordPress website.
Some vulnerabilities can be mitigated by applying certain security measures. However, this method is not applicable to all vulnerabilities.
Vulnerabilities found in plugins and themes can be mitigated by deactivating or removing the affected plugins, or by switching to a different theme. However, this method may not always be practical, as deactivating a vulnerable plugin a WordPress website relies on to function or changing the theme will change the website’s appearance and/or interfere with the stable operation of the website.
-
Vulnerabilities can also be mitigated using the “Vulnerability Protection” WP Toolkit feature. It offers a number of advantages compared to the other methods:
Vulnerabilities are mitigated automatically as soon as a fix from the PatchStack team is available.
There is no need to deactivate vulnerable plugins.
There is no need to install any updates on the server itself.
克隆 WordPress 网站
克隆一个 WordPress 网站是创建包括所有网站文件、数据库和设置在内的完整副本。
您可能需要在以下情况下克隆您的 WordPress 网站:
在某个域名或子域名上维护一个非公开(临时)版本的 WordPress 网站,想将其发布到一个生产域名上,令其公开可用。
有一个公开可用的(生产)WordPress 网站,想要创建一个该网站的非公开(临时)副本,以能够在该副本上进行修改却不影响生产网站。
You want to create a “master” copy of a WordPress website with preconfigured settings, plugins, and theme, and then clone it to start a new development project for a client.
您可能需要创建 WordPress 网站的多个副本并对每个副本进行不同的更改(例如,给客户展示这些不同的副本,让客户选择最适合自己的版本)。
备注
By default, on cloned WordPress installations, the “Search engine indexing” option is turned off. To turn this option on for cloned WordPress installations, go to WordPress, click “Settings”, and then clear the “Turn off Search Engine Indexing for cloned websites” checkbox.
克隆 WordPress 网站:
-
转到 WordPress 然后点击您想要克隆的 WordPress 安装实例的卡片上的 “克隆”。
-
选择您要克隆网站的目标:
保留选定 “创建子域名” 以令 WP Toolkit 使用默认的 “staging” 前缀创建一个新的子域名。您可以使用该前缀或键入一个所需的子域名前缀。
备注
您可以更改默认的子域名前缀。具体操作是,转到 WordPress,点击“设置”,在 “用于克隆的默认的子域名前缀” 文本字段中指定所需的前缀,然后点击“确定”。
勾选 “使用现有的域名或子域名” 然后从列表选择所需的域名或子域名。
小心
请确保被选为目的地址的域名或子域名没有被现有的网站使用。在克隆的过程中,目的地址上存在的网站数据会被覆盖并不可逆的丢失。
(备选)更改在克隆过程中自动创建的数据库名称。
选好目的地址和数据库名称后,请点击 开始 。

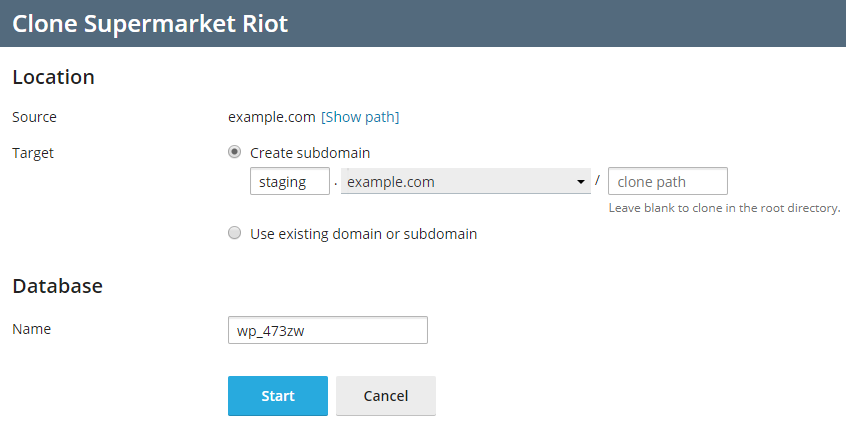
克隆完成后,将会在WordPress安装实例列表中显示新的克隆实例。
将数据从一个 WordPress 网站复制到其它网站
您可以将 WordPress 网站的内容,包括文件和数据库复制到另一个 WordPress 网站。
假设在某个独立域名或子域名上维护 WordPress 网站的一个非公开(过渡)版本以及在某个生产域名上维护该网站的一个公开可用(生产)的版本。您可能需要在以下情况下将数据从一个网站复制到另一个网站:
将对过渡版本所做的修改复制到生产版本。
从生产网站复制数据到过渡网站以观察所做的更改与生产数据会产生如何反应(例如,一个新插件)。在检查没有任何问题后,再将所做的更改复制到生产网站。
对过渡网站进行了某些更改(例如,安装了一个新的插件),而这些更改会导致向数据库新增数据表。那么需要只复制这些数据表到生产网站而不影响其它数据。
已将过渡网站升级到了 WordPress 新发布的版本,并修复了升级后的问题(如果存在)。那么需要将这些更改推送到生产网站。
您可以选择复制 WordPress 文件、WordPress 数据库,或复制文件和数据库两者。当复制数据库时,您可以选择复制所有数据表、出现在源服务器上但目的服务器上没有的数据表、或指定复制单个数据库表。
执行复制时,请记住以下事项:
从源网站将选定的数据复制到目的网站。任何同时出现在源服务器和目的服务器上的文件和/或数据库,不相同也会从源服务器复制到目的服务器。只出现在目的服务器上的文件和数据库不受影响,除非您在复制过程中选择”移除丢失的文件”选项 。
在复制的过程中,目标网站会进入 维护 模式而变得暂时不可用。
如果目的网站上的WordPress 版本早于源网站上的版本,WP Toolkit 会首先升级目的网站上的 WordPress以匹配安装在源网站上的版本,然后再运行复制。
如果源网站上的 WordPress 版本早于目的网站上的版本,复制则会终止。如要复制数据,则需将源网站上的 WordPress 版本升级为目的网站上的相同版本或更新版本。
如果源网站和目的网站上的数据库前缀不同,WP Toolkit 将会在复制过程中更改目的网站上的数据库前缀匹配源网站上的数据库前缀。
不支持在常规 WordPress 安装实例和多站点安装实例之间复制数据。我们建议使用克隆方案。
备注
在复制过程中,从源网站复制的文件和数据库表会覆盖目的网站上的文件和数据库表。在复制前对目的网站上的文件和数据库所做的任何更改都会丢弃且丢失,不予以警告。
备注
如果您在想要从其复制内容的 WordPress 网站上安装了缓存插件,请在复制之前清除源网站上的缓存。否则,目标网站可能运行不正常。
若要将数据从一个 WordPress 网站复制到另一网站,请如下操作:
-
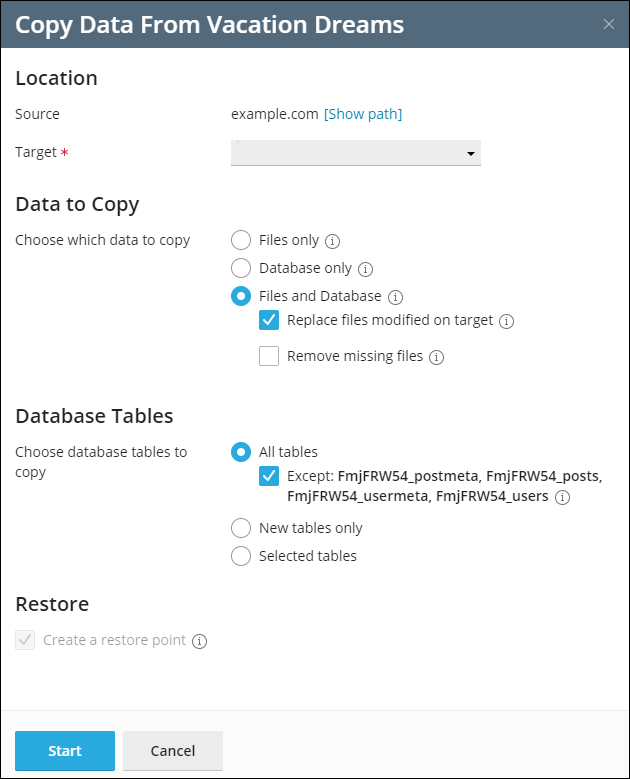
转到 WordPress 然后点击您想要复制数据的 WordPress 安装实例的卡片上的 “复制数据”。
-
在 “目标” 旁,选择您要将数据复制到的目标 WordPress 安装实例(在相同或另一订阅下)。
-
在 “要复制的数据” 下,选择您要复制到目标 WordPress 网站的数据:
-
“仅文件” - 仅复制包括 WordPress 核心文件以及与主题和插件相关的文件的网站文件。
备注
默认情况下,不会复制
htaccess、web.config和wp-config.php文件,因为修改这些文件可能会干扰 WordPress 的操作。您可以通过勾选 “复制 wp-config.php” 复选框令 WP Toolkit 复制wp-config.php文件。若要使复选框可见,请转到 WordPress,点击“设置”,勾选“允许在使用复制数据功能时复制 wp-config.php” 复选框,然后点击 确定。备注
即使您选择复制
wp-config.php文件,也不会复制与数据库相关的信息。这样可以防止目标 WordPress 安装实例受损。在目标安装实例上的wp-config.php文件中指定的自定义设置会被来自源安装实例的相应设置所覆盖。 “仅数据库” - 只复制数据库。您可以选择导入所有的、新的或选定的数据库表(详情请参阅下面的第 5 步骤)。
“文件和数据库” - 复制网站文件和数据库。您可以选择导入所有的、新的或选定的数据库表(详情请参阅下面的第 5 步骤)。
-
-
如果您在第 3 步选定了 “仅文件” 或 “文件和数据库”,则会出现另外两个选项:
“替换在目标上修改的文件” - 默认情况下,如果源和目标上都存在同名文件,则将复制源中的文件,即使源文件较旧,也将替换目标上的文件。若要禁止用旧源中的文件覆盖目标上的文件,请清空复选框。
-
“移除丢失的文件” - 默认情况下,如果目标上存在一个文件,但源中缺失该文件,则该文件将不受影响。选中此复选框可移除源中缺失的目标上的文件。
备注
您可以隐藏这些选项,这样您自己和您的客户则不可使用这些选项。具体步骤是,进入 WordPress,点击 “设置”,清空 “将 rsync 用于文件复制操作” 复选框,然后点击 确定。
-
如果在第 3 步骤中选择了“仅数据库”或“文件和数据库”,请选择要复制的数据库表:
“所有表”(默认选项)。如果要复制除页面、帖子和用户以外的所有更改,请保持选中”Except: _postmeta, _posts, _usermeta, _users” 复选框。
仅新数据表
选定的数据表。点击 “选择要复制的数据表”,选择您要复制的数据表,然后点击 选择。
-
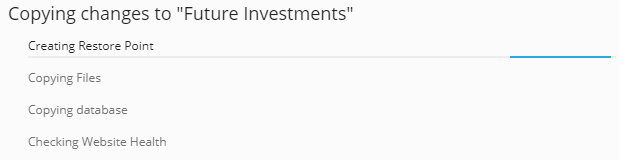
在复制数据之前,WP Toolkit 会建议您创建一个恢复点。您可以使用该恢复点回滚在复制过程中所做的更改。如果您不想创建恢复点,可清空 “创建恢复点” 复选框。欲了解如何使用恢复点恢复您的 WordPress 安装实例,可参阅下面的 “恢复 WordPress 安装实例” 小节。
备注
每个 WordPress 安装实例只能有一个恢复点。创建一个恢复点会覆盖现有的恢复点(如果有)。
如您对所选选项满意,请点击 开始 以开始复制数据。

从恢复点恢复 WordPress 安装实例
当您更新 WordPress 核心或从一个 WordPress 安装实例复制数据到另一个安装实例时,WP Toolkit 会在开始之前建议您创建一个恢复点。如果您对结果不满意,则可以使用该恢复点回滚更改,并将您的安装实例恢复到操作之前的状态。
备注
WP Toolkit 只有在您更新单个 WordPress 安装实例时建议创建一个恢复点。
创建完整的恢复点
默认情况下,一个恢复点只包含在复制数据或更新时将受到影响的数据。您可以令 WordPress 将所有的目标安装实例数据,包括文件和数据库,包含在恢复点中。具体步骤是,进入 WordPress ,点击 “设置”,勾选 “总是创建完整的网站快照” 复选框,然后点击 确定 。完整的恢复点会最大化成功恢复的几率,但是相比常规恢复点,创建需要更多时间,也将占用更多磁盘空间。
若要从恢复点恢复 WordPress 安装实例,请如下操作:
进入 WordPress 找到您要恢复的安装实例的卡片。
-
点击 “恢复点” 旁的
图标然后点击 继续。
 图标然后点击 继续。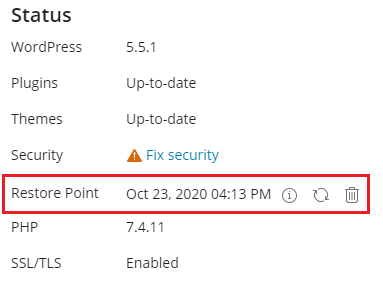
恢复将开始。您的安装实例将会恢复到操作之前的状态。
恢复点会占用磁盘空间,该空间包括在允许的磁盘空间配额中。在您恢复了 WordPress 安装实例之后,或者一旦您确定一切正常且不需要恢复时,可以删除该恢复点。
若要删除恢复点,请如下操作:
进入 WordPress 找到您要删除的恢复点。
Click the
icon next to “Restore Point”, and then click Remove.
备注
每个 WordPress 安装实例只能有一个恢复点。创建一个恢复点会覆盖现有的恢复点(如果有)。
我们需要注意的是恢复点不同等于备份。在您复制数据或更新目标安装实例后,对目标安装实例所做的任何更改都有可能导致无法从恢复点进行恢复。如果您正复制数据或更新一个实时进行的生产性的 WordPress 安装实例,我们建议您除创建恢复点之外,事先备份订阅。
更新网站 URL
如果您已从其它服务器移动了一个网站,网站 URL 可能会变更。在此种情况下,您迁移的 WordPress 安装实例将不工作运行,直到网站 URL 在 WordPress 中更新了。以前,必须要手动执行此此操作。现在 WP Toolkit 可以自动更新网站 URL。
若要更新网站 URL,请如下操作:
Go to WordPress, choose the card of the website that you have migrated, click the
icon,
and then click Update Site URL.-
WP Toolkit 会将实际的网站 URL 与在 WordPress 数据库和
wp-config.php中指定的进行对比:如果 URL 匹配,您的网站 URL 则是最新的。点击 返回 返回到网站卡片。
若 URL 不匹配,请点击 更新 使用实际的 URL 替换在 WordPress 中指定的 URL。
您已确定您的网站已在线。
Updating the Hire a Developer Link
The “Hire a Developer” menu lets you display a custom URL to hire WordPress developers in WP Toolkit. You can use this URL to, for example, streamline referral bonuses. By default, this link directs to Codeable.
To hide this menu with the panel.ini file:
-
Open the “panel.ini” file in your preferred text editor. The file is located here:
(Plesk for Linux)
/usr/local/psa/admin/conf/panel.ini(Plesk for Windows)
%plesk_dir%admin\conf\panel.ini
-
Add the following line and save the file:
[ext-wp-toolkit]
hireDeveloperFeature = false
To show this menu with the panel.ini file:
-
Open the “panel.ini” file in your preferred text editor. The file is located here:
(Plesk for Linux)
/usr/local/psa/admin/conf/panel.ini(Plesk for Windows)
%plesk_dir%admin\conf\panel.ini
-
Add the following line and save the file:
[ext-wp-toolkit]
hireDeveloperFeature = true
To change or hide this link for your server:
Go to WP Toolkit, then click the
icon. The WP Toolkit Settings menu will appear.-
In the General Settings menu, under Customization of “Hire a developer” link, select any of the following options:
Link hidden - The “Hire a Developer” link will not appear to any users.
Default link (Codeable) - The “Hire a Developer” link will take users to Codeable.
Link to custom URL - The “Hire a Developer” link will take users to your custom address.
使用密码保护网站
您可以使用一个密码来保护对您 WordPress 网站的访问权限。任何人访问有密码保护的网站,都必须要输入有效的用户名和密码才能查看网站内容。
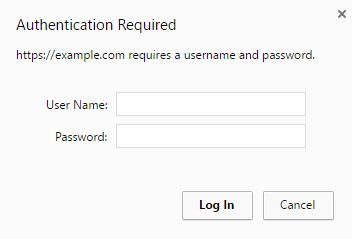
密码保护在以下几种情况下很有帮助:
网站正处于开发状态,您不希望任何其他人查看该网站。
您只想给某些访客显示网站的演示版本。
若要使用密码保护 WordPress 网站,请如下操作:
转到 WordPress ,选择您想要使用密码进行保护的安装实例,然后打开“密码保护”。
创建或生成密码。如果想要,您也可以更改用户名(默认使用安装实例管理员的用户名)。
点击 保护 。
若要禁用“密码保护”,请关闭它。
设置常规运行 wp-cron.php
wp-cron.php 文件是 WordPress 用于自动化某些操作的虚拟 cron 作业(或计划任务),例如,检查插件或主题更新,发送电子邮件通知,等等。默认情况下,WordPress 在每次有人访问您的网站时运行 wp-cron.php 任务。如果您想要按计划定期执行 WordPress 操作,则需要禁用默认的 wp-cron.php 执行。
若您的网站有高流量,计划的 wp-cron.php 执行还可能会增加网站加载时间。
若要禁用某个 WordPress 安装实例上的 wp-cron.php,请如下操作:
转到 WordPress 选择您要为其禁用默认的
wp-cron.php执行操作的 WordPress 安装实例:-
打开安装实例卡片上的 “接管 wp-cron.php”。
默认的
wp-cron.php执行现已被禁用。 -
默认情况下,WP Toolkit 会自动创建一个替代的 计划任务。自此将每隔30分钟运行一次
wp-cron.php。在以下情况下,您可能不需要替代任务:
您已经有或计划有您自己的替代任务。
您不需要任何替代任务因为运行
wp-cron.php对您的网站有负面影响。
To choose not to create a replacement task or delete the one already created by WP Toolkit, click the
icon and then turn off “Create a replacement task when takeover is initiated”. (Optional) If you want to run
wp-cron.phpon a different schedulem or do not wantwp-cron.phpto run at all, you can edit or remove the replacement task. To do so, click the icon next to “Take over wp-cron.php”. This will open a new Plesk tab with the scheduled task. There, you can make the desired changes, including deactivating the task.
您还可以在所有新的 WordPress 安装实例上禁用 wp-cron.php。要实现此目的,需转到 WordPress,点击“设置”,然后勾选“在所有新的 WordPress 安装实例上禁用 wp-cron.php” 复选框。
备注
若您误将替代任务移除了,可以重新创建。具体步骤是,点击 图标,关闭,然后重新打开“当接管开始时创建替代任务”。
前 wp-cron.php 配置
您可能在没有 WP Toolkit 的情况下使用以下方式已禁用了 wp-cron.php:
编辑
wp-config.php文件。在此情况下,WP Toolkit 将会检测到此更改而调整 “接管 wp-cron.php”切换。-
创建您自己的替代计划任务。在此情况下,WP Toolkit 会当在 WP Toolkit 界面中打开“接管 wp-cron.php“时另外创建一个任务。您可在以下选项中进行选择:
保留两个任务(将不太影响性能)
删除您的任务,保留 WP Toolkit 创建的任务。
保留您的任务,删除 WP Toolkit 创建的任务。要想实现此目的,请关闭“当开始接管时创建替代任务”。
WordPress 安装实例的日志记录事件
如果您的 WordPress 安装实例不能按预期工作,您可以查看其日志以排除故障。WP Toolkit 会记录在托管网站上执行的重要事件,例如:
更新网站主题。
应用安全措施。
克隆网站。
备注
WP Toolkit 5.5 版本(及更高版本)会记录在托管网站上执行的每个事件。若您有 WP Toolkit 5.4 版本,那么只能在列表中看到重要的事件。
WP Toolkit 为每个 WordPress 安装实例以纯文本形式写入日志。
若要查看 WordPress 安装实例的日志,请如下操作:
转到 WordPress。
-
单击您想要查看其日志的 WordPress 安装实例旁边的 日志:
-
在 <site’s name> 的日志 弹出窗口中,您可以查看有关记录事件的详细信息:

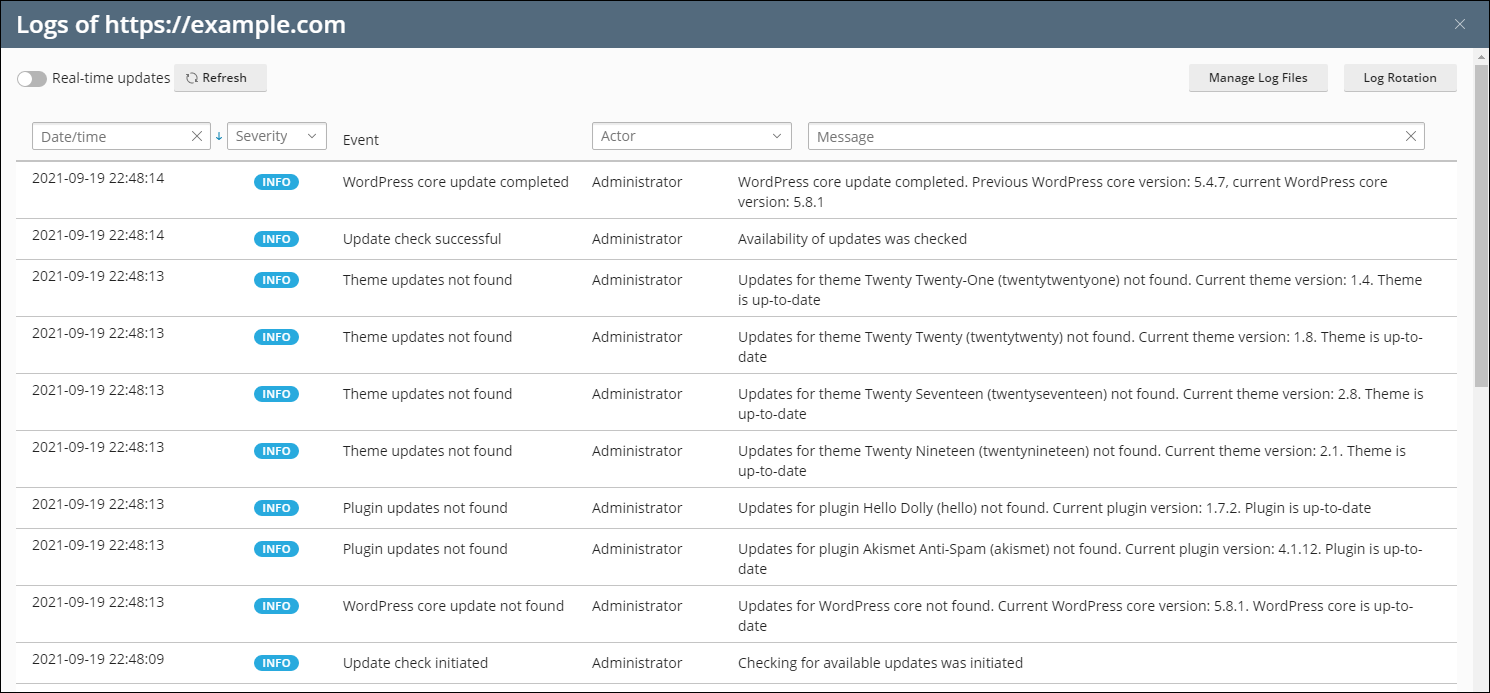
此时将出现带有站点日志的弹出窗口。默认情况下,列表仅在打开时会更新。您还可以通过执行以下操作来刷新该列表:
要一次性获取最新日志,请单击“刷新”。
-
要在查看列表时不断更新列表,请选择“实时更新”切换按钮:
备注
选择切换按钮后,每五秒钟会更新一次日志。您可以在
panel.ini配置文件中的actionLogRealTimeUpdatesPeriod变量中指定另一个更新时段。
筛选记录的事件
如果要在列表中找到指定事件,则可以应用以下过滤器:

事件的日期/时间。
事件的严重性。可能的值:错误、警告和 信息。
事件的操作者。既可以是一个特定的用户,也可以是系统本身。
信息用于描述事件。
应用过滤器后,将只显示匹配过滤条件的事件。
日志循环
从 WP Toolkit 5.5 版本开始,您可以为指定的 WordPress 安装实例配置日志循环。默认情况下,会对所有 WordPress 安装实例启用日志循环。但是,您可以将其禁用或为每个安装实例单独设置。方法如下:
转到 WordPress。
单击所需的 WordPress 安装实例旁边的日志。
在弹出窗口的右上角,单击“日志循环”。
-
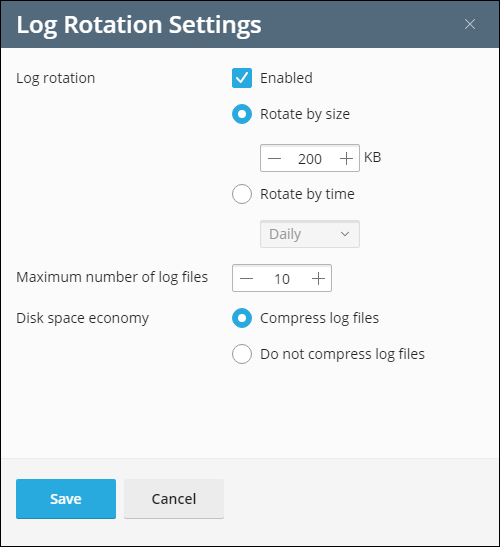
在“日志循环设置”弹出窗口中,配置以下参数:
启用复选框。默认情况下会选中该复选框。可以通过清空该复选框来手动禁用日志循环。
按大小循环 或 按时间循环的单选按钮。选择所需的选项,并指定最大日志大小或循环时间。
日志文件的最大数量。当日志文件数达到指定的值时,WP Toolkit 将在创建新的日志文件之前压缩最早的未压缩的日志文件。
Log files compression. To save disk space, select the Enabled radio button. If you want the log files to be available at any moment, select the Disabled radio button.
日志文件管理器
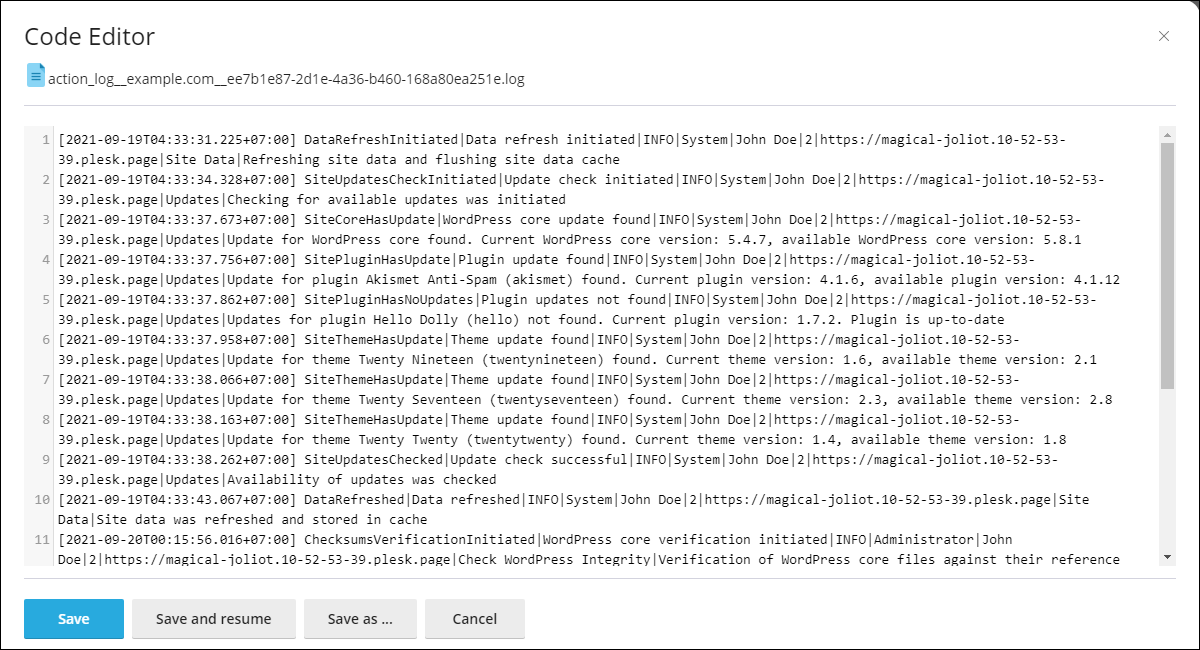
In the log file manager, you can view, copy, or delete particular lines of the recorded events. WP Toolkit stores the log files for all WP Toolkit installations in separate directories:
/var/log/plesk/modules/wp-toolkit/action-logs/{installation GUID}/{installation GUID}.log
where {installation GUID} is the installation’s unique identifier, for example, 03bc4edc-7a80-483e-8ae0-ab560e661c98.
日志编辑器如下:
维护模式
当 WordPress网站进入维护模式时,网站内容会对访客隐藏,访客不能对网站进行更改也不会产生任何影响。当您的网站处于维护模式时,访客访问时只会看到一个维护页面而不会看到实际的网站内容。
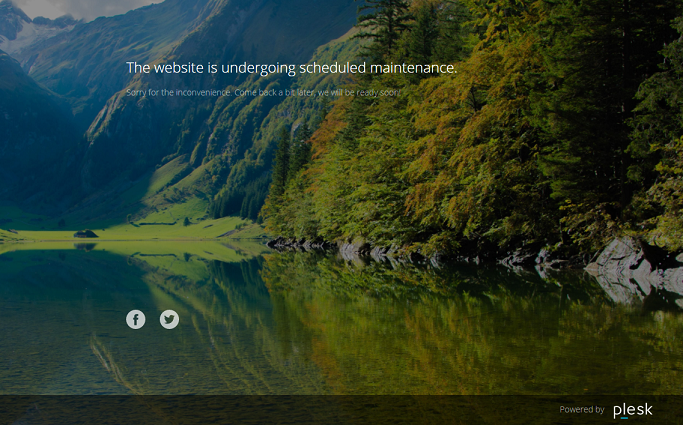
打开维护模式
当处于以下各种情况时,您的WordPress 网站会自动进入维护模式:
升级您的 WordPress 安装实例。
将数据从一个 WordPress 安装实例复制到另一安装实例。
如果您要对网站进行更改而希望暂时对访客隐藏,可手动将其切换到维护模式。
若要将WordPress 网站切换到维护模式,请如下操作:
转到 WordPress ,选择您想要切换到维护模式的 WordPress 安装实例。
-
打开安装实例卡上的“维护”模式。
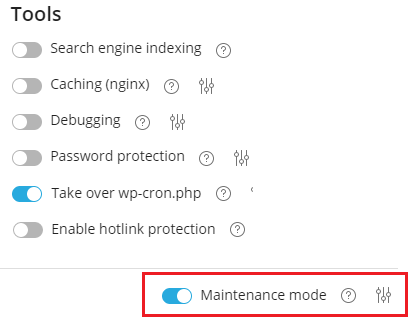
若要让您的网站脱离维护模式,请关闭“维护模式”。
自定义维护页面
通过 WP Toolkit,可更改维护页面的某些属性,以令增加其信息量:例如,您可以:
更改维护页面上显示的文本。
添加倒计时器。
提供或移除社交网络媒体的链接。
若要自定义维护页面,请如下操作:
转到 WordPress ,选择您想要为其维护页面进行自定义的 WordPress 安装实例,然后点击安装实例卡上“维护模式”旁的
图标。在 屏幕文本 部分可以更改显示的文本。使用 HTML 标记格式化文本的外观。
-
In the “Countdown timer” section, you can set up and turn on the countdown timer, which will be displayed on the maintenance page.
备注
倒计时器只会告知访客大约还剩多少时长。倒计时结束时您的网站不会结束维护模式,您必须要手动结束。
In the “Social Network Links” section, provide or remove links to social network pages (Facebook, X, and Instagram).
(备选)若要查看配置的维护页面如何,请点击 预览。
当您对维护页面所做的更改感到满意时,点击 确定。
如果您有编码技术,您可以对维护页面进行以上选项无法实现的自定义设置。您可以为某个 WordPress 网站或服务器上托管的所有 WordPress 网站执行该操作。
若要为某个网站自定义维护页面,请如下操作:
转到 WordPress ,选择您想要为其维护页面进行自定义的 WordPress 安装实例,然后点击安装实例卡上“维护模式”旁的
图标。点击 自定义 并在代码编辑器中编辑维护页面模板。
点击 确定 。
若要为服务器上托管的所有 WordPress 网站自定义维护页面,请如下操作:
-
编辑服务器范围的维护页面模板:
(Plesk for Linux)
/usr/local/psa/var/modules/wp-toolkit/maintenance/template.phtml(Plesk for Windows)
%plesk_dir%var\modules\wp-toolkit\maintenance\template.phtml
当您第一次将某个 WordPress 网站放入维护模式时,会自动应用已自定义的维护页面模板。
在服务器范围自定义的维护页面模板只会应用到从未进入维护模式的 WordPress 网站。若要将该模板应用到曾进入维护模式的 WordPress 网站,可进入下面的操作:
转到 WordPress 选择您要应用自定义的服务器范围的维护页面模板的 WordPress 安装实例。
点击安装实例卡上“维护模式”旁的
图标,然后点击 恢复默认值 。
这样将会使用服务器范围指定的模板替换在网站范围指定的维护页面。
恢复默认的维护页面
必要时,您还可以恢复默认的维护页面。恢复操作可能会因是否自定义过服务器范围的模板而有所不同。
如果未更改过服务器范围的模板,需执行下面步骤恢复默认的维护页面:
转到 WordPress ,选择您想要将其维护页面重置为默认的 WordPress 安装实例。
点击安装实例卡上“维护模式”旁的
图标,然后点击 恢复默认值 。
如果已更改过服务器范围的模板,需执行下面步骤恢复默认的维护页面:
-
通过替换下面的文件将所做的更改恢复为服务器范围的维护页面模板:
(Plesk for Linux)
usr/local/psa/var/modules/wp-toolkit/maintenance/template.phtml(Plesk for Windows)
%plesk_dir%var\modules\wp-toolkit\maintenance\template.phtml
使用下面的文件:
(Plesk for Linux)
/usr/local/psa/admin/plib/modules/wp-toolkit/resources/maintenance/template.phtml(Plesk for Windows)
%plesk_dir%admin\plib\modules\wp-toolkit\resources\maintenance\template.phtml
当您第一次将某个 WordPress 网站放入维护模式时,会自动应用默认的维护页面模板。
服务器范围默认的维护页面模板只会应用到从未进入维护模式的 WordPress 网站。若要将该模板应用到曾进入维护模式的 WordPress 网站,可进入下面的操作:
转到 WordPress ,选择您想要将其维护页面重置为默认的 WordPress 安装实例。
点击安装实例卡上“维护模式”旁的
图标,然后点击 恢复默认值 。
这样将会使用服务器范围默认的模板替换在网站范围指定的维护页面。
WordPress 核心校验和验证
备注
WP Toolkit 5.6 或更高版本支持该功能。请注意,该功能不会检查诸如**index.php**、wp-config.php和其他包含安装特定数据且没有参考校验和的文件。
当恶意软件感染 WordPress 站点时,可以将自己嵌入到 WordPress.php 核心文件中。因此,可能会损坏您的搜索引擎优化、非法挖掘加密货币或强制执行未经授权的重定向。核心文件不需要修改,所以您可以根据 WordPress提供的原始核心文件的校验和来检查它们的 MD5 校验和。
若要验证 WordPress 安装实例的校验和,请执行以下操作:
转到 WordPress。
在所需站点的形式下,单击“检查 WordPress 完整性”。
-
在出现的弹出窗口中,单击“验证校验和”。
-
在 WP Toolkit 验证校验和后,请执行以下操作之一:
如果已成功验证 WordPress 核心文件,请单击 关闭。
-
如果某些核心文件不同,请单击“重新安装 WordPress 核心:
备注
重新安装 WordPress 核心并不影响站点内容。但是,我们建议您为站点文件创建备份,作为一种防护措施。
重新安装核心文件后,关闭弹出窗口。
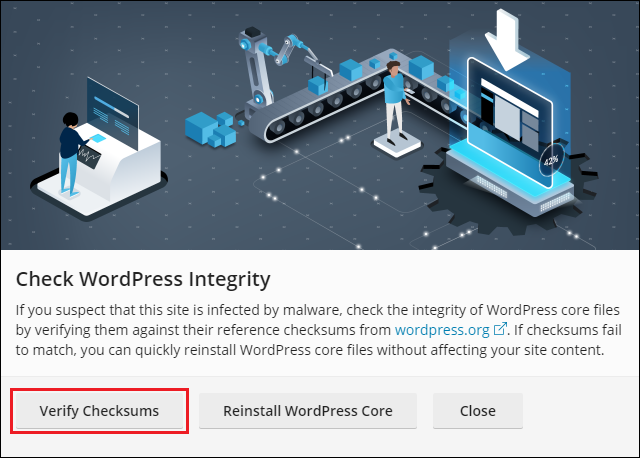
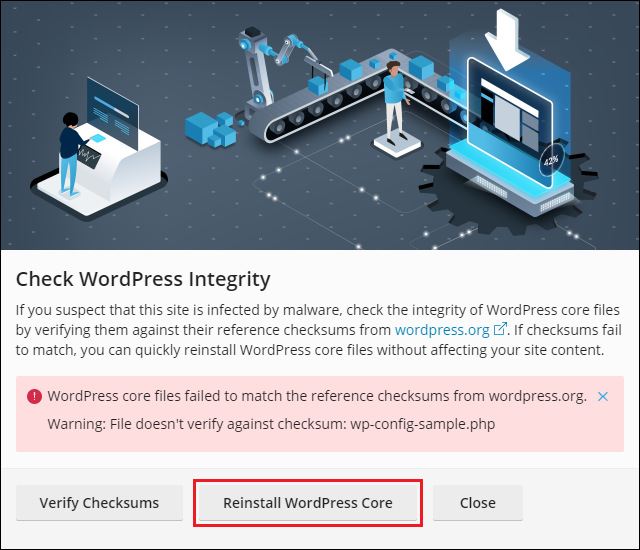
因此,将会检查和保护 WordPress 安装实例的核心文件。
访问 WP-CLI
WP-CLI 是管理 WordPress 网站的官方 WordPress 命令行界面。查看更多有关 WP-CLI的信息。
您可以直接从Plesk命令行界面使用 wp-toolkit 工具访问WP-CLI而无需在服务器安装 WP-CLI。
阅读更多 有关 wp-toolkit 工具的信息。
若要通过Plesk命令行界面调用WP-CLI 命令,请如下操作:
通过SSH (Linux) 或RDP (Windows) 连接Plesk 服务器,并在命令行中运行以下命令:
plesk ext wp-toolkit --wp-cli -instance-id [ID] [command] [options]
其中
[ID]是Plesk中的WordPress 安装实例的ID。若要获取该ID,请进入 WordPress 点击该WordPress 安装实例的名称。该 ID 将会出现在浏览器中的URL 的结尾处。例如,如果URL 以/id/2结尾,则 ID=2。[command]是以--为前缀的WP-CLI (例如,--core)。[options]是一系列WP-CLI 命令选项。
所有的WP-CLI 命令和其选项可进入 此处 查找。
示例:
获取主要的 WordPress 信息(博客名称、网站 URL、版本、更新版本、插件和主题):
plesk ext wp-toolkit --wp-cli -instance-id 4 -- core info
获取 核心 命令的帮助:
plesk ext wp-toolkit --wp-cli -instance-id 4 -- help core
从 wordpress.org 安装和激活 bbPress 插件的最新版本:
plesk ext wp-toolkit --wp-cli -instance-id 4 -- plugin install bbpress --activate
要重置 WordPress 管理员密码,请如下操作:
plesk ext wp-toolkit --site-admin-reset-password
备注
若要令通过运行 WP-CLI 命令执行的更改在 WP Toolkit 中显示,需刷新相应的 WordPress 安装实例。具体操作是转到 WordPress 然后点击安装实例卡上的 图标。
Secure WordPress Websites With the Vulnerability Protection Feature
To reduce the risk of the hosted WordPress websites being compromised, we recommend that you keep them up to date and apply the WP Toolkit security measures. However, to provide the maximum possible level of protection for high value WordPress websites, we also offer the Vulnerability Protection (powered by Patchstack) feature.
The Vulnerability Protection feature acts as a lightweight web application firewall that all incoming requests pass through. For every WordPress website being secured, only the requests trying to exploit a vulnerability the website is succeptible to are being stopped, ensuring minimal impact on performance.
Note that the Vulnerability Protection feature is not meant to be an alternative or a replacement for the standard WP Toolkit security features. Both can and should work in tandem to maximize the hosted WordPress websites’ protection. However, compared to the standard WP Toolkit security features, the Vulnerability Protection feature has some important advantages:
An official fix may take time to become available. The Vulnerability Protection feature aims to deliver fixes for high-risk vulnerabilities in a matter of hours.
WordPress updates must be installed manually, unless autoupdates are enabled. The Vulnerability Protection fixes are applied automatically as soon as they become available.
Since no updates or patches are installed on the website itself, there’s no risk of something breaking as a result.
Thus, if there’s no official fix yet, or you don’t want to install the official fix before you’ve had the chance to test it and make sure that it is safe to deploy in production, the Vulnerability Protection feature gives you the time you need to plan and execute the deployment of the official fix with no rush, and no risk.
前提条件
Before you can secure WordPress websites with the Vulnerability Protection feature, the following prerequisites must be met:
A paid WP Guardian (Plesk addon) license must be purchased and installed in Plesk.
The maximum number of WordPress websites owned by a subscription must be specified on the service plan or subscription level. This can be done by configuring the “WordPress websites with vulnerability protection” parameter (found on the “Resources” tab) in the service plan or subscription settings.
备注
To be able to secure a WordPress website with the Vulnerability Protection feature, the total number of hosted websites being secured must be fewer than the number of websites allowed by your WP Guardian (Plesk addon) license, and the number of websites owned by the same subscription must be fewer than the subscription’s “WordPress websites with vulnerability protection” parameter value.
Securing a Website With the Vulnerability Protection Feature
To secure a WordPress website with the Vulnerability Protection feature:
Go to WordPress, and then find the WordPress website you want to secure.
Click the “Vulnerability Protection” toggle button so that it shows “Enabled”, and then click Enable Protection.
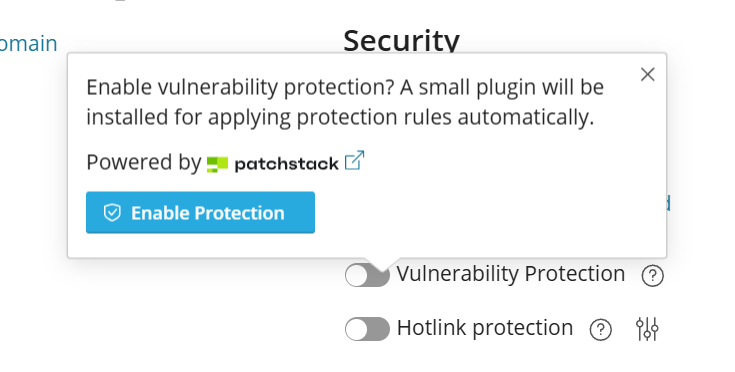
The website is now secured with the Vulnerability Protection feature.