Exercise 1. Tabs, Forms, Lists, Tools
In this exercise, you will construct a simple tabbed web interface integrated into Plesk. The first tab will contain a form, the second will contain a list of items, and the third - a toolbox with two actions. The exercise demonstrates the basics of building into the Plesk GUI.
We assume that the extension ID is example, and that you start with
the code inside the ex1 directory. This code is partly written by us
to help you focus only on certain areas. Additionally, we have populated
the directory with media content necessary for the exercise. To see the
completed exercise, examine the ex1complete directory.
Also, it is recommended to adjust your development environment to easily check the results of your work.
Step 1. Obtain the control flow from Plesk
Each extension has a single index file that is executed first when a
user navigates to the extension from Plesk (for example, when the
administrator goes to Server Management > Extensions and clicks
the extension name). This index file is called index.php and its
path is /htdocs/index.php relatively to the extension’s root
directory. From this start point, you can either write your own code
which renders the GUI in its own way, or use facilities for rapid
extensions development that the SDK provides.
One of these facilities is support for the MVC pattern. If you are
unfamiliar with the pattern, please read
http://framework.zend.com/manual/1.11/en/learning.quickstart.intro.html.
Applied to our example, the first thing we need to do is to select an
appropriate class for further processing of the request to the
index.php. Edit the file so that it looks as follows
(https://github.com/plesk/pm-exercises/blob/master/ex1/htdocs/index.php):
<?php

pm_Context::init('example');

$application = new pm_Application();
$application->run();
These two lines tell the system to load helpers for drawing the GUI
elements, load controllers, and pass the control to the default
controller for requests processing (which is in
/plib/controllers/IndexController.php under the extension’s root
directory).
If we open IndexController.php, we will see that it extends
pm_Controller_Action.
It is mandatory that you use this class or its extensions for
controllers.
As you can also see, this class has method stubs, for example,
formAction(). This method will be called when calling the following
URL:
http://<plesk-host-name>:<port>/modules/<extension id>/index.php/index/form
So the relations between requested URLs and methods can be represented this way:
| URL prefix after /index.php/ | Controller name | Method to call |
|---|---|---|
| index/form | IndexController | formAction |
| index/tools | IndexController | toolsAction |
| custom/call | CustomController | callAction |
In other words, the system processes request URLs, finds the
<controller name>/<action name> pair and passes the control flow to
the corresponding method. This mapping scheme comes from Zend, read more
about it at
http://framework.zend.com/manual/1.11/en/zend.controller.action.html.
Summing up, to draw the first GUI your users will see, we need to
implement the indexAction() method of IndexController. However,
as we are going to have a form in the first tab, we need to forward
requests from indexAction() to formAction() . To allow for
the forwarding, change indexAction so that it looks as follows:
public function indexAction()
{
    // Default action will be formAction
    $this->_forward('form');
}
We used the _forward() Zend method for this purpose. Now all
requests to the extension’s index successfully reach formAction().
Let’s check the result. If you visit the main page of the extension (Server Management > Extensions > Extension SDK Example), you will see a blank page. Not particularly impressive, so let us move to the next step.
Step 2. Add a form
We defined that a form will be the main page of the extension. According
to MVC, we need to create a form instance using the formAction()
method and render it in the form.phtml view.
Regarding form construction, we rely on the Zend framework. If you are
unfamiliar with Zend forms, read
http://framework.zend.com/manual/1.11/en/zend.form.quickstart.html. The
basic idea behind forms is that a form must be the
pm_Form_Simple
PHP class or its extension . You can add input fields and buttons to
a form by calling its addElement() (Zend method) and
addControlButtons() (the SDK method). The benefit of this approach
is that form validation and HTML rendering is done for you.
The form construction code is too long to present it here, refer to
IndexController.php, formAction() to view it. As you can see in
formAction() , a fter adding form elements, the code passes the
form to the view as a variable.
$this->view->form = $form;
Now you need to define the presentation of your form, or, in other
words, write its view. Read more about views at
http://framework.zend.com/manual/1.11/en/zend.view.introduction.html.
The views must be stored inside the extension’s root directory. So, for
formAction() you will need to edit
/plib/views/scripts/index/form.phtml and add the following line to
form.phtml:
<?php echo $this->form; ?>
You can see that the form is displayed and processed.
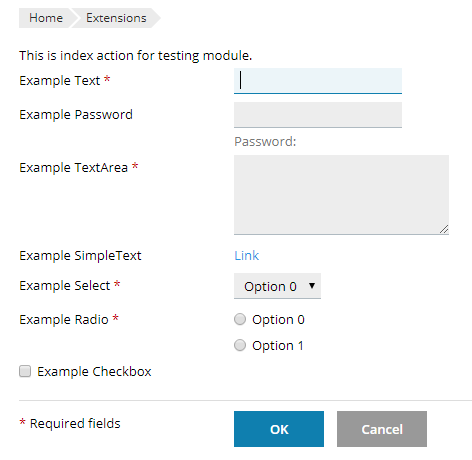
Look deeply on the implementation and check out how the fields are
added, their values are read and saved in the pm_Settings key-value
storage. Also, you can read more about implementing
forms.
Step 3. Add a tabbed view
You already have one-page extension with the form. Now, let us add
navigation using tabs. Instead of adding the tabs definition code to
each action (for the form, list, and toolbar), you can specify the tabs
once in the init() method and avoid code duplication. The init()
method runs before action methods. Change the method so that it looks as
follows:
public function init()
 {
        parent::init();
        // Init title for all actions
        $this->view->pageTitle = 'Example Extension';
        // Init tabs for all actions
        $this->view->tabs = [
            [
                'title' => 'Form',
                'action' => 'form',
            ],
            [
                'title' => 'Tools',
                'action' => 'tools',
            ],
            [
                'title' => 'List',
                'action' => 'list',
            ],
        ];
    }
As you can see, $this->view->tabs array binds the controller actions
to tabs. Loosely speaking, now, when a user navigates to the List tab,
the system will trigger the listAction() method.
You are already familiar with modifying the view. Let us render tabs
before the form. You will need to edit
/plib/views/scripts/index/form.phtml again and add the following
line to the beginning of the file:
<?php echo $this->renderTabs($this->tabs); ?>
The renderTabs() method should render the tabs. The rendered view
will be natively built into the Plesk interface. Read more about the
parameters you can pass to renderTabs()
here.
Great, now you have the tabs:

As you can see, the tabs are displayed only on Form but are not displayed on Tools and List. The reason of that is their views are empty. Let’s move forward and implement these tabs.
Step 4. Add a list
Similar to forms, we need to create a list instance in listAction()
and then render it in /plib/views/scripts/index/list.phtml. The list
instance must be the
pm_View_List_Simple
class or its extension. Learn how to create a list from the code in
IndexController.php,
_getListRandom(). The _getListRandom() method generates a
two-column list with some content.
Here are the most important steps of lists creation:
- Add the list data as an associative array.
- Create a list as a
pm_View_List_Simpleinstance and specify the view and request parameters in the constructor. - Add the data to the list by using the
setData()method. - Define the list columns by the
setColumnsmethod. The column names in your data array and insetColumnsmust match. - Specify the list action URL using
setDataUrl. This URL is actually the resource which is requested when a user performs operations with list controls (for example, when a user decides to change a page, or the order of rows). In our example, this URL islist-data. When a user requestshttp://<plesk host name>:<port>/modules/example/index.php/index/list-data, the system transforms hyphens to camel case and actually requests thelistDataAction()method ofIndexController.
Below is an example of the code that creates a list object:
private function _getListRandom()
    {
        $data = [];
        $iconPath = pm_Context::getBaseUrl() . 'images/icon_16.gif';
        for ($index = 1; $index < 150; $index++) {
            $data[] = [
                'column-1' => '<a href="#">link #' . $index . '</a>',
                'column-2' => '<img src="/' . $iconPath . '" /> image #' . $index,
            ];
        }
        $list = new pm_View_List_Simple($this->view, $this->_request);
        $list->setData($data);
        $list->setColumns([
            'column-1' => [
                'title' => 'Link',
                'noEscape' => true,
                'searchable' => true,
            ],
            'column-2' => [
                'title' => 'Description',
                'noEscape' => true,
                'sortable' => false,
            ],
        ]);
        // Take into account listDataAction corresponds to the URL /list-data/
        $list->setDataUrl(['action' => 'list-data']);
        return $list;
    }
Now, when you have the list, pass it to the view by changing
listAction() to look the following way:
public function listAction()
    {
        $list = $this->_getListRandom();
        // List object for pm_View_Helper_RenderList
        $this->view->list = $list;
    }
The next important step is to change listDataAction() to handle
changes in page numbers and results order. It is important to note that
in such case the list is re-rendered based on the AJAX request made to
listDataAction(). That is why the result is returned in JSON format.
public function listDataAction()
    {
        $list = $this->_getListRandom();
        // Json data from pm_View_List_Simple
        $this->_helper->json($list->fetchData());
    }
After you add these lines, the list paging and ordering will be self-serviced by the platform.
Finally, render the tabs and the list by adding the following lines to
/plib/views/scripts/index/list.phtml:
<?php echo $this->renderTabs($this->tabs); ?>
<?php echo $this->renderList($this->list); ?>
As you can see, renderList fetches the list instance and transforms it into HTML.

Let us make some improvements to the list. First of all, let us specify the default column for sorting via the options on creation of a pm_View_List_Simple class object.
$options = [
    'defaultSortField' => 'column-1',
    'defaultSortDirection' => pm_View_List_Simple::SORT_DIR_DOWN,
];
$list = new pm_View_List_Simple($this->view, $this->_request, $options);
In addition, it is possible to implement group operations. Add one line in setColumns parameters:
$list->setColumns([
      pm_View_List_Simple::COLUMN_SELECTION,
      'column-1' => [
          'title' => 'MyTest',
      ],
  ]);
And then specify how the list toolbar should look like using the setTools method:
$list->setTools([
    [
        'title' => 'Hide',
        'description' => 'Make selected rows invisible',
        'class' => 'sb-make-invisible',
        'execGroupOperation' => [
            'submitHandler' => 'function(url, ids) {
                $A(ids).each(function(id) {
                    $("' . $list->getId() . '")
                        .select("[name=\'listCheckbox[]\'][value=\'" + id.value + "\']")
                        .first()
                        .up("tr")
                        .hide();
                });
            }'
        ],
    ], [
        'title' => 'Remove',
        'description' => 'Remove selected rows',
        'class' => 'sb-remove-selected',
        'execGroupOperation' => $this->_helper->url('remove'),
    ],
]);
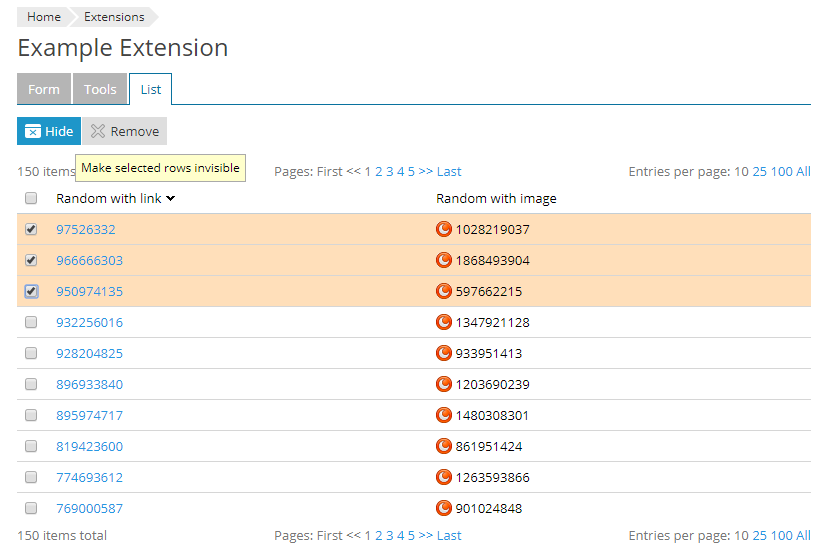
As you can see, you can directly handle the action in JavaScript as in the Hide button example. Or submit the values (selected rows) to some action, where they will be processed as in the Remove button example. Also, you can read more details how to implement the list.
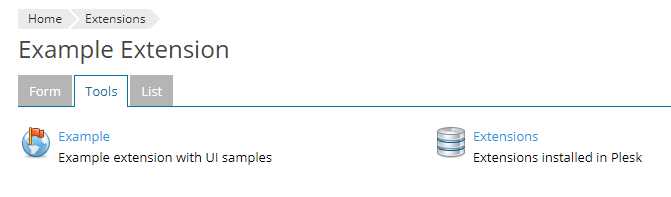
Step 5. Add a toolbar
Let us add a toolbar with two buttons to the third tab by changing the
toolsAction() method in IndexController.php so that it looks
like this:
public function toolsAction()
    {
        // Tools for pm_View_Helper_RenderTools
        $this->view->tools = [
            [
                'icon' => pm_Context::getBaseUrl() . "images/hosting-setup.png",
                'title' => 'Example',
                'description' => 'Example extension with UI samples',
                'link' => pm_Context::getBaseUrl(),
            ],
            [
                'icon' => pm_Context::getBaseUrl() . "images/databases.png",
                'title' => 'Extensions',
                'description' => 'Extensions installed in Plesk',
                'link' => pm_Context::getModulesListUrl(),
            ],
        ];
    }
The code demonstrates that to add a toolbar item, you need to specify
its properties - icon, title, description, and link. Here, the
context
(pm_Context)
is used to generate the link URLs. Make sure to initialize the context
before using it - usually, it is done in htdocs/index.php (in this
example the context is initilaized at the very beginning, at step 1).
Another thing to note is that
pm_Context::getBaseUrl()
generates the path to the /htdocs directory of the extension. In our
example, the first icon will be retrieved from
/htdocs/img/site-aps_32.gif
Once the toolbar is ready, render it together with tabs by adding the
following lines to /plib/views/scripts/index/tools.phtml:
<?php echo $this->renderTabs($this->tabs); ?>
<?php echo $this->renderTools($this->tools); ?>
The renderTools method will render the toolbar to HTML.
Congratulations! You are almost done with Exercise 1, the only thing left is to add the extension description.
Step 6. Describe the extension
You have the meta.xml file in the extension’s root directory. This
file contains information about your extension which is visible to Plesk
administrators in the extension catalog and after they install the
extension in Plesk the system. Feel free to change it according to your
needs (keep in mind that the extension ID in your code and in the meta
file must match). Read more details about the possible values in
meta.xml here.
Step 7. Install and test the extension
Congratulations! You have completed the exercise. To install your extension in Plesk:
-
Add the contents of the
ex1directory (not the directory itself) to a ZIP archive using your favorite software.Note: Ensure that
meta.xmlresides in the root of the unpacked archive. This is a very important requirement, otherwise Plesk will return an error on adding your extension to Plesk. -
Log in to Plesk as the administrator, go to Server Management > Extensions, remove the current version of the extension, then add the extension.
Re-check the implemented functionality to make sure everything is available in the extension archive. You can use the completed extension available here for reference.