Changing File and Directory Access Permissions in File Manager
If you have files or web pages that you want to make inaccessible on the Internet, change these files’ access permissions in File Manager.
(Plesk for Linux) To change permissions of a file or a directory:
-
Go to Websites & Domains > domain name > File Manager.
-
Click the row corresponding to the file or directory whose permissions you want to change and then click Change Permissions.
Note: File Manager does not show the Change Permissions button for files and directories owned by a non-subscription user (for example, the
rootorapacheuser). It is not possible to change permissions of those files and directories. -
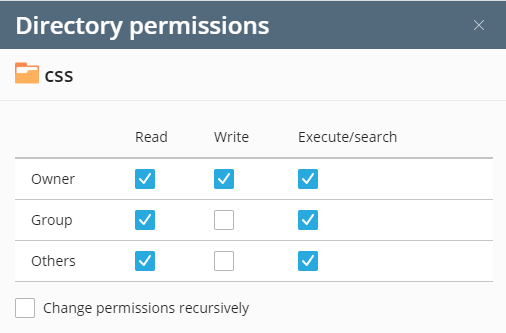
Select the permissions you want to grant or deny to the user groups.
-
If you are changing permissions of a directory, you can make its children files and directories inherit the changed permissions. To do so, select the “Change permissions recursively” checkbox.
-
When you have finished changing permissions, click Save.

(Plesk for Windows) To change permissions of a file or a directory:
-
Go to Websites & Domains > domain name > File Manager.
-
Click the row corresponding to the file or directory whose permissions you want to change and then click Change Permissions.
-
Do the following:
-
To make the file or folder inherit permissions from a parent folder (if it does not), select the checkbox Allow inheritable permissions from the parent to propagate to this object and all child objects. Include these with entries explicitly defined here.
-
To make the files and folders, which are contained in this folder, inherit the folder permissions you define, select the checkbox Replace permission entries on all child objects with entries shown here that apply to child objects.
-
To change or remove permissions from a group or a user, click the required name in the Group or user names list. If the group or user is not listed in the Group or user names list, select the required user or group name from the menu located above the list and click
: the user/group appears in the list.
Select it.To allow or deny permissions to a selected group/user, select the Allow or Deny checkboxes corresponding to permissions listed under Permissions for <user/group name>. If the checkboxes in the Allow or Deny columns are shown in grey, it means that the corresponding permissions are inherited from a parent folder.
-
To deny the permissions, which are inherited from a parent object as allowed, select the required checkboxes under Deny. This will override inherited permissions for this file/folder.
-
To allow the permissions, which are inherited from a parent object as denied, clear the Allow inheritable permissions from the parent to propagate to this object and all child objects. Include these with entries explicitly defined here checkbox: this removes the inherited permissions. Then select the required checkboxes under Allow and Deny.
-
To remove access permissions from a group or user, select the required name in the Group or user names list and click the icon
next to it.
-
-
To fine-tune permissions, click “Advanced” and do the following:
- To create a permission entry for a group or user, select the
required name from the Group or user names list and click
.
- To set or change file/folder permissions for a group or user, select the required name from the Group or user names list, select the required Allow and Deny checkboxes corresponding to permissions listed under Permissions for <user/group name>.
- To remove a permission entry for a group or user, select the
required name from the Group or user names list and click
.
- To make child objects of a folder inherit its permissions defined under Permissions for <user/group name>, select the Replace permission entries on all child objects with entries shown here that apply to child objects checkbox, and select checkboxes in the Apply to list which correspond to the objects that must inherit the permissions.
- To create a permission entry for a group or user, select the
required name from the Group or user names list and click
-
Click OK.
 : the user/group appears in the list.
Select it.
: the user/group appears in the list.
Select it. next to it.
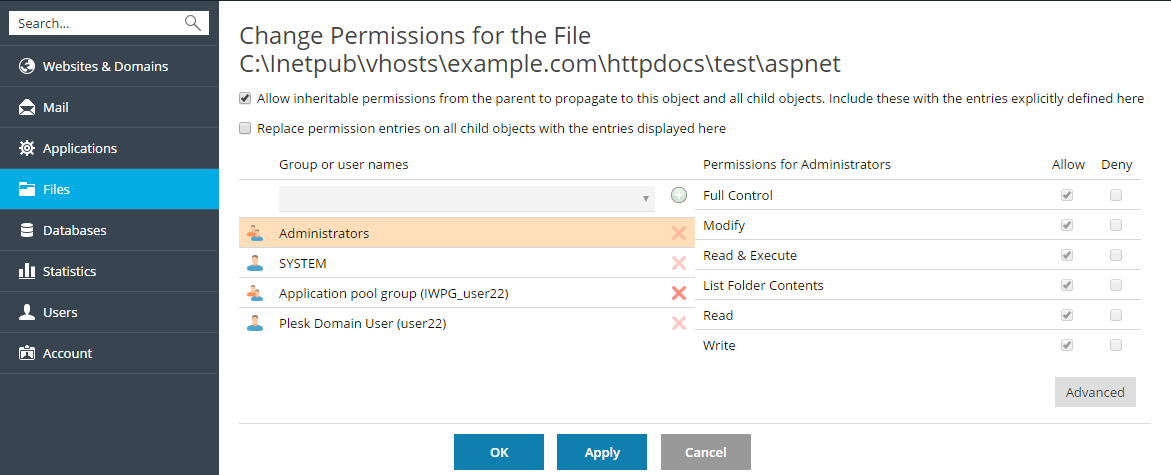
 .
. .
.