Advanced Migration Mode
As opposed to the regular migration, advanced migration is less suited for migrating subscriptions in bulk. However, it allows for a greater degree of control over the migration settings.
-
To begin, log in to Plesk on the destination server as the Plesk administrator.
-
Go to Server Management > Extensions > Plesk Migrator > Start a New Migration. If Plesk Migrator is unavailable, install it following the instructions here.

-
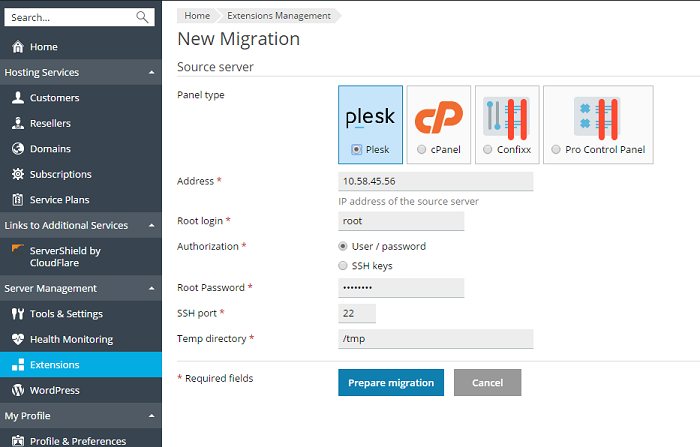
Select the hosting panel installed on the source server from the Panel type menu.
-
Specify the following:
- The source server’s IP address. If migrating from a Linux server, specify the SSH port as well (22 by default).
- (Plesk for Linux) The login and password of a root user on the source server. Alternatively, you can choose to authenticate via SSH keys. For details, refer to Authentication by SSH (Linux).
- (Plesk for Windows) The login and password of the built-in administrator accounts on both the source and the destination servers.
- The directory for storing temporary files on the source server (make sure there is enough free disk space available to store the dump of the largest database that will be migrated).
-
If migrating from a Windows-based server, specify the method for installing the RPC agent (an application enabling Plesk Migrator to gather data):
- Automatic (recommended). Plesk Migrator will try to deploy and start RPC agent on the source server using the built-in administrator account. In some cases, automatic deployment may fail (for example, due to firewall settings, or the File and Printer Sharing or RPC services being disabled). If this happens, deploy the agent manually.
- Manual. A link to download the RPC agent package will be provided. Download the package and install the agent on the source server manually.
-
Click Prepare Migration to proceed to the next step. Plesk Migrator will attempt to fetch the data about the different objects (domains, subscriptions, customer/reseller accounts, and hosting plans) found on the source server. If the connection fails, double-check the source server information, make sure that the connection is not blocked by firewall, and try again.
Note that from this point onwards, you can leave the Migrator interface without losing your progress - the migration will remain in progress until you finish it explicitly. To continue from where you left off, click Server Management > Extensions > Plesk Migrator and then click the corresponding migration in the list.
-
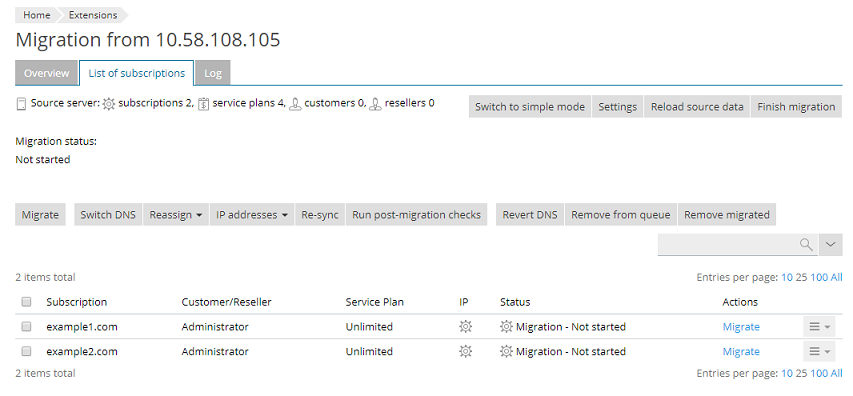
Click Switch to advanced mode to proceed.
Here you must select the subscription(s) to be migrated (note that you cannot migrate individual domains, the fewest number of objects you can migrate is a single subscription and all its domains). You can also change certain subscription settings, as described below.
-
To reassign one or more subscriptions to a different owner, select the corresponding checkboxes, select Customer / Reseller from the Reassign menu, then select the desired customer or reseller that will own the subscription on the destination server (otherwise, the customer/reseller account(s) owning the subscription(s) being migrated will be migrated as well).
-
To reassign one or more subscriptions to a different hosting plan, select the corresponding checkboxes, select Service plan from the Reassign menu, then select the desired hosting plan on which the subscription will be based on the destination server (otherwise, the hosting plan(s) the subscription(s) are based on will also be migrated.).
-
To assign a shared, a dedicated, or even a specific IP address to one or more subscriptions, select the corresponding checkboxes, select Change IP mapping from the IP addresses menu, then select one of the available options:
- Automatic selection. The IP address will be selected based on the general IP mapping rules (you can read about them here).
- Any shared IP. The subscription(s) will be assigned a random shared IP address from the destination server’s IP pool.
- Any dedicated IP. The subscription(s) will be assigned a random dedicated IP address from the destination server’s IP pool.
- Selected IP. The subscription(s) will be assigned the specific IP address, dedicated or shared, that you select from the list of available IP addresses.
-
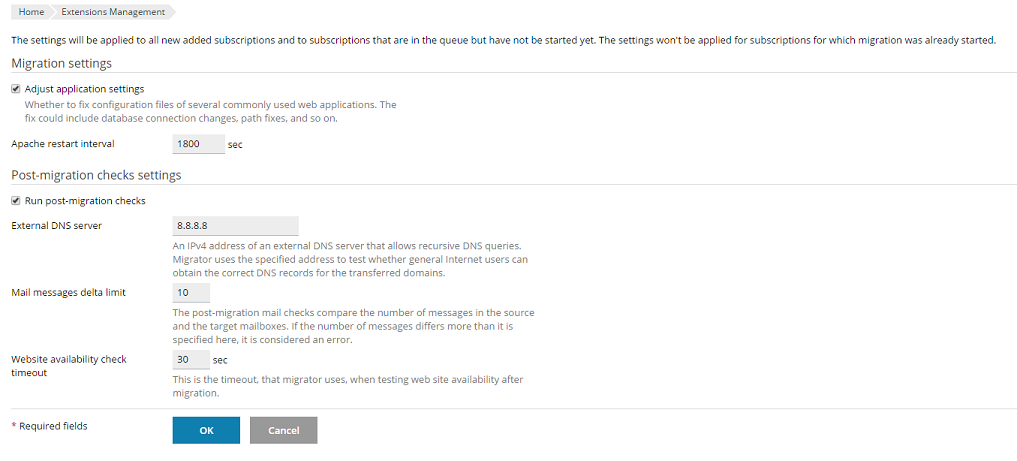
To change the migration settings, click Settings in the upper-right corner.
Here, the following controls are available:
- Adjust application settings. By default, during migration Plesk attempts to make changes to the configuration files of a number of popular web applications to make them operable on the destination server. Clear the checkbox if you want to make the changes manually. Leaving this option enabled will increase the migration time.
- Apache restart interval (Plesk for Linux only). Restarting the web server on the destination server is necessary for the migrated domains to become available over the network. Make sure not to set this value too low (less than 300 seconds is not recommended), as all hosted domains become temporarily unavailable every time the web server is restarted.
- Run post-migration checks. By default, after the migration is finished, Plesk performs a number of automated tests to identify potential issues with the migrated domains. Clear the checkbox if you do not want the tests to be run. Leaving this option enabled will increase the migration time. Here you can see the detailed description of all post-migration checks.
-
When you are satisfied with the migration options, select the subscription(s) you want to migrate, then click Migrate.
-
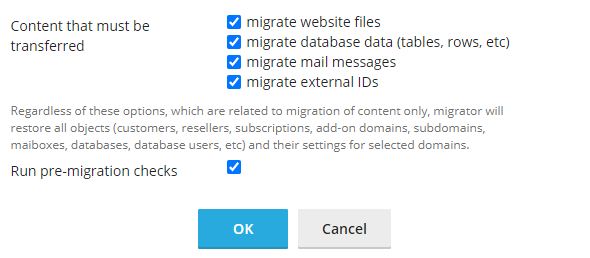
By default, Plesk also migrates additional content (email messages, website files, database tables, and external IDs). If you do not want to migrate any of that, clear the corresponding checkboxes.
Note: External IDs are IDs that link Plesk objects (for example, subscriptions, customers, or resellers) with external services. External IDs exist only if your Plesk is integrated with an external service (for example, a billing service like WHMCS). If such integration exists or you are not sure about it, keep the “Migrate external IDs” checkbox selected to migrate external IDs to the destination. Even if you actually have no external IDs, it will not hinder the migration in any way.
-
The subscription(s) will be added to the migration queue. If you change your mind on migrating a subscription that is in the queue, select it and click Remove from queue.
When the migration process begins for a subscription, its status changes to “In progress”.
And once a subscription is migrated, its status changes to “Success”.
When migrating, you may encounter issues. In this case, the affected subscription’s status will change to “Warnings”.
In case of major issues (for example, domains failing to migrate due to service plan restrictions on the destination server), the affected subscription’s status will change to “Errors”.
Click “Details” to learn more about the issues that occurred during the migration.
-
When a subscription has been migrated to the destination server, a number of additional options become available:
- If you want to run an automated test to check the basic functionality of the websites owned by a migrated subscription, select it and click Run post-migration checks. Here you can see the detailed description of all post-migration checks.
- If you believe that the content of an already migrated subscription may have changed on the source server after the migration was finished, select it and click Re-sync to perform an additional sync of the subscription’s content.
- (Only when migrating from Plesk) If you are ready to make the subscription live on the destination server, select it and click Switch DNS. This will configure the DNS server on the source to act as a secondary, and the DNS server on the destination to act as the primary. In a few hours, the domain names of websites owned by the subscription will begin resolving to the destination server. If you want to undo this change, select the subscription and click Revert DNS.
-
If you want to migrate additional subscriptions from the source server, return to step number seven. Otherwise, unless you plan to migrate from the same source server again in the near future, you can click Finish migration to remove it from the list of ongoing migrations.