(Plesk para Linux) Mejora de la protección de las conexiones al servidor usando DANE
resumen: Si las conexiones al servidor de correo están protegidas mediante un certificado SSL/TLS, puede mejorar el nivel de protección frente a ataques de man-in-the-middle y degradación activando DANE. DANE también ofrece protección frente a posibles suplantaciones de sitios web como consecuencia de la afectación de autoridades de certificación.
En este tema aprenderá a mejorar el nivel de protección de las conexiones al servidor mediante el uso de DANE: automáticamente con SSL It! y manualmente. Tenga en cuenta que este tema no pretende imponerse como una completa fuente de información sobre registros DNS TLSA o DANE.
En Plesk, puede reforzar las conexiones al servidor utilizando DANE de las siguientes maneras:
- Automáticamente usando la extensión SSL It!
- De forma manual, generando un hash de la clave pública del certificado SSL/TLS y, a continuación, añadiendo un registro DNS de TLSA.
Cada método tiene sus ventajas y sus inconvenientes.
La implementación automática de DANE mediante SSL It! es sencilla y solo necesita unos pocos clics. Sin embargo, con DANE solo se puede reforzar un tipo de conexión: la del servidor de correo de un dominio individual. Además, solo puede usar DANE con los certificados de Let’s Encrypt. Si desea usar DANE con certificados SSL/TLS de otras autoridades de certificación, elija la implementación manual.
La implementación manual de DANE es un procedimiento de varios pasos que requiere tiempo y esfuerzo (aunque a continuación le proporcionamos una guía paso a paso). En cuanto a las ventajas, puede reforzar las conexiones no solo al servidor de correo, sino también a otras conexiones protegidas con certificados SSL/TLS. También puede usar DANE con los certificados SSL/TLS de cualquier autoridad certificadora, sin limitarse a Let’s Encrypt únicamente.
Independientemente de la forma que elija, tendrá que asegurarse de que su servidor o los dominios alojados cumplan con ciertos requisitos necesarios para usar DANE.
(Modo automático) Refuerzo de las conexiones de correo usando DANE
Antes de poder reforzar de forma automática una conexión al servidor de correo usando DANE, asegúrese de que su servidor y los dominios alojados tienen la siguiente configuración:
- Para el servidor Plesk:
- El servicio de correo está habilitado.
- DKIM está habilitado.
- Plesk es el servidor DNS primario.
- Para el dominio cuya conexión al servidor de correo desea reforzar mediante DANE:
- El servicio de correo está habilitado.
- DKIM está habilitado.
- El registro MX existe y resuelve a la dirección IP del servidor Plesk.
- DNSSEC está habilitado.
Si se cumplen todas las condiciones anteriores, puede reforzar la conexión con el servidor de correo usando DANE con la ayuda de la extensión SSL It!.
Reforzar una conexión de correo usando DANE a través de SSL It!
-
Vaya a Sitios web y dominios y localice el dominio en cuestión.
-
Haga clic en Certificados SSL/TLS.
-
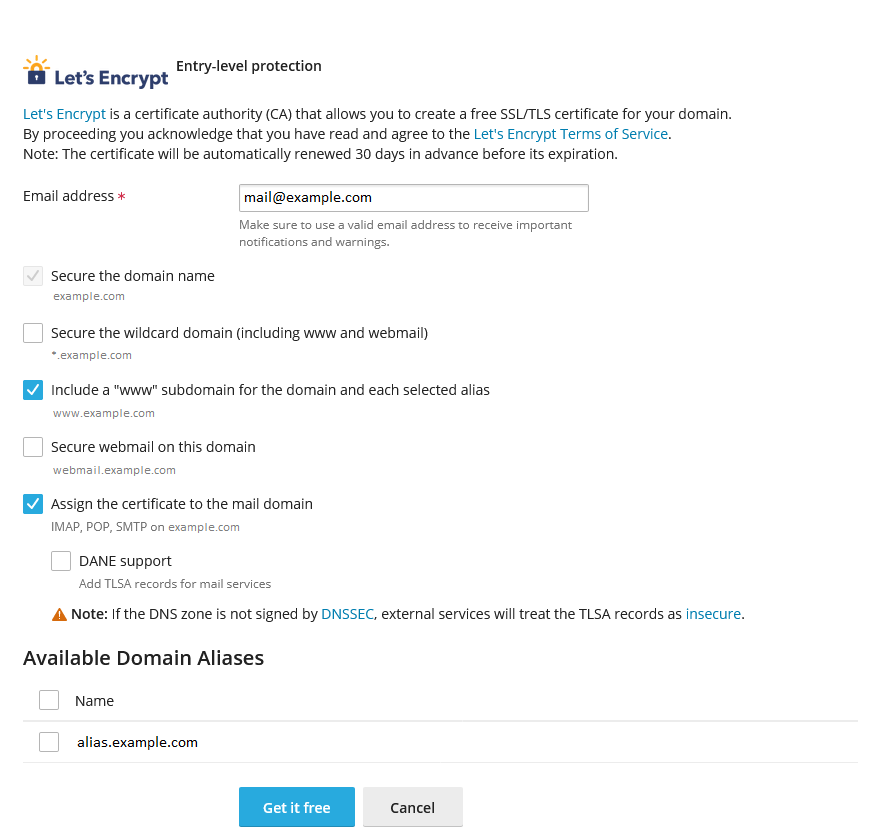
En «Instalar un certificado básico gratuito de Let’s Encrypt», haga clic en Instalar.
-
Mantenga seleccionada la casilla «Proteger el nombre de dominio».
-
(Opcional) Seleccione otras casillas en función de los subdominios que desee proteger.
-
Seleccione las casillas «Asigne el certificado al dominio de correo» y «Soporte de DANE».

-
Haga clic en Obténgalo gratis.
-
Espere un momento hasta que los registros TLSA creados necesarios para el DANE se propaguen al servidor DNS y, a continuación, haga clic en Instalar.
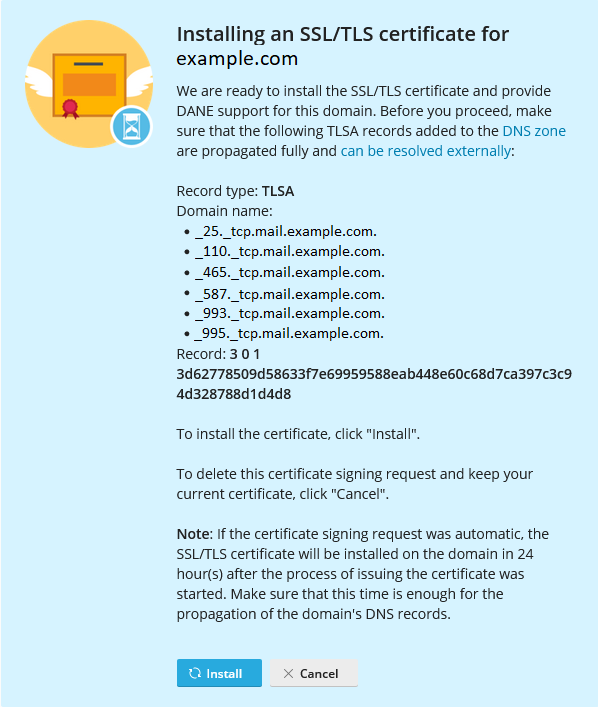
SSL It! ha protegido tu dominio con un certificado Let’s Encrypt y también ha reforzado la conexión del dominio con el servidor de correo usando DANE.
Renovación automática de certificados con DANE
SSL It! renueva de forma automática los certificados SSL/TLS gratuitos de Let’s Encrypt 30 días antes de que caduquen. Si se emitió un certificado con soporte para DANE, SSL It! también lo configurará para un certificado nuevo.
Cuando haya un nuevo certificado listo para instalarse en el dominio, SSL It! crea un conjunto correspondiente de registros TLSA y establece un temporizador de 24 horas (es el valor predeterminado). Cuando el temporizador acabe, la próxima vez que ejecute SSL It! la tarea «Conservar los sitios web protegidos» instalará el nuevo certificado y eliminará los registros TLSA antiguos. En función de la configuración seleccionada, Plesk también envía una notificación por correo electrónico sobre la renovación del certificado.
Si lo desea, puede cambiar el intervalo predeterminado de 24 horas entre la creación de registros TLSA y la instalación de un nuevo certificado añadiendo líneas del siguiente patrón al archivo panel.ini:
[ext-sslit]
dane-confirmation-interval-in-hours = <the number of hours>
Por ejemplo:
[ext-sslit]
dane-confirmation-interval-in-hours = 12
Desactivación del soporte de DANE en SSL It!
De forma predeterminada, la compatibilidad con DANE está habilitada en SSL It! si el servidor Plesk y los dominios alojados cumplen los criterios de configuración necesarios para DANE. Esto significa que usted y sus clientes pueden ver y seleccionar la casilla «Soporte de DANE» situada debajo de «Asigne el certificado al dominio de correo» al proteger un dominio con un certificado Let’s Encrypt.
Para proteger a sus clientes, puede desactivar el soporte de DANE en SSL It! desmarcando la casilla correspondiente. Para hacerlo, añada las siguientes líneas al archivo panel.ini:
[ext-sslit]
daneEnabled = false
(Modo manual) Refuerzo de las conexiones al servidor usando DANE
Puede mejorar el nivel de protección de las conexiones mediante cualquier protocolo de aplicación que ya esté protegido usando un certificado SSL/TLS a través de la combinación correspondiente de puerto y protocolo de transporte (como por ejemplo «TCP/25» para SMTP, «TCP/443» para HTTPS, etc).
La mejora de la protección de conexiones mediante un determinado protocolo de aplicación consiste en dos pasos:
- En primer lugar debe generar un hash de la clave pública del certificado SSL/TLS. Si bien también puede usar una clave pública sin hash o el hash de todo el certificado, en este ejemplo usaremos un hash de clave pública.
- A continuación debe añadir un registro DNS TLSA que indique distintos parámetros necesarios, incluyendo el hash.
Debe repetir estos pasos para cada protocolo de aplicación cuyo nivel de protección desee mejorar.
En el ejemplo que se muestra a continuación proporcionamos los pasos necesarios para mejorar el nivel de protección de conexiones SMTP al servidor de correo para un dominio en concreto. Puede usar dichos pasos como referencia para mejorar la protección de otras conexiones, si así lo desea.
Requisitos mínimos
Antes poder mejorar el nivel de protección de las conexiones SMTP mediante DANE para un dominio en concreto, deberá hacer lo siguiente:
Protección de las conexiones SMTP del servidor
Nota: En el siguiente ejemplo, usaremos el hash SHA-256 de la clave pública del certificado SSL/TLS, y no el certificado completo. De esta manera, no será necesario actualizar el registro TLSA al renovar el certificado, a menos que la clave pública también cambie.
Generación del hash de clave pública del certificado
-
Vaya a Sitios web y dominios y localice el dominio en cuestión.
-
Haga clic en Certificados SSL/TLS.
-
Localice el certificado que protege el servidor de correo (el marcado con «Protege el correo») y haga clic en el icono
para descargar el certificado como un archivo *.pem. -
Sitúe el archivo
*.pemen una máquina Linux y ejecute el comando detallado a continuación. Compruebe que de antemano ha cambiado el directorio de trabajo al que contiene el archivo y que ha reemplazado «certificate.pem» por el nombre de archivo actual:openssl x509 -in certificate.pem -pubkey -noout | openssl rsa -pubin -outform der | sha256sum | awk '{print $1}'
 para descargar el certificado como un archivo
 La salida resultante (por ejemplo, 499e42e36d7b04529725a1f8036e0f7cf1030b4e25a3fa1988f2572e1ce70d28) es el hash SHA-256 que usará cuando cree el registro DNS TLSA.
Adición de un registro DNS TLSA
- Acceso a Plesk.
- Vaya a Sitios web y dominios y localice el dominio en cuestión.
- Vaya a la pestaña Hosting y DNS y haga clic en DNS.
- Haga clic en Añadir registro.
- Seleccione «TLSA» en el menú desplegable «Tipo de registro».
- (Opcional) Indique un TTL para el registro. Si no está seguro sobre el TTL óptimo, deje el campo «TTL» en blanco. En este caso, se usará el valor TTL predeterminado.
- Indique el puerto «25». No añada el guion bajo, puesto que se añadirá automáticamente.
- Indique el protocolo «tcp». No añada el guion bajo, puesto que se añadirá automáticamente.
- Indique «mail» en el campo «Nombre de dominio».
- Seleccione «3, DANE-EE» en el menú desplegable «Uso».
- Seleccione «1, SPKI» en el menú desplegable «Selector».
- Seleccione «1, SHA-256» en el menú desplegable «Tipo de coincidencia».
- Pegue el hash de la clave pública del certificado generado anteriormente al campo «Datos de asociación del certificado».
- Haga clic en ACEPTAR y a continuación haga clic en Actualizar para aplicar los cambios a la zona DNS.
Se añade un registro DNS TLSA y se aplican los cambios efectuados en la zona DNS. Una vez propagados los cambios (esto suele tardar unas 24 horas), DANE pasará a estar activo para las conexiones SMTP al dominio.