(Plesk per Linux) Il Firewall Plesk
Riassunto: Il firewall di Plesk è uno strumento utilizzabile per migliorare la sicurezza del server Plesk per Linux limitando le connessioni di rete verso e/o dal server.
In questa sezione impareremo ad aggiungere e rimuovere le regole e le norme del firewall, a bloccare le connessioni in entrata da determinati paesi e a esportare e importare le regole del firewall per replicare facilmente la configurazione del firewall tra server diversi.
Attenzione: Il firewall di Plesk e firewalld sono strumenti concepiti per gestire il firewall di iptables. L’uso simultaneo dei due strumenti può causare conflitti e determinare la chiusura delle porte necessarie a Plesk per funzionare. Si consiglia di utilizzare solo uno strumento alla volta.
Prerequisiti
Prima di poter cominciare, è necessario che l’estensione «Firewall» sia installata sul server. Se non lo è, installare l’estensione dal Catalogo estensioni.
Gestione delle regole e delle norme del firewall
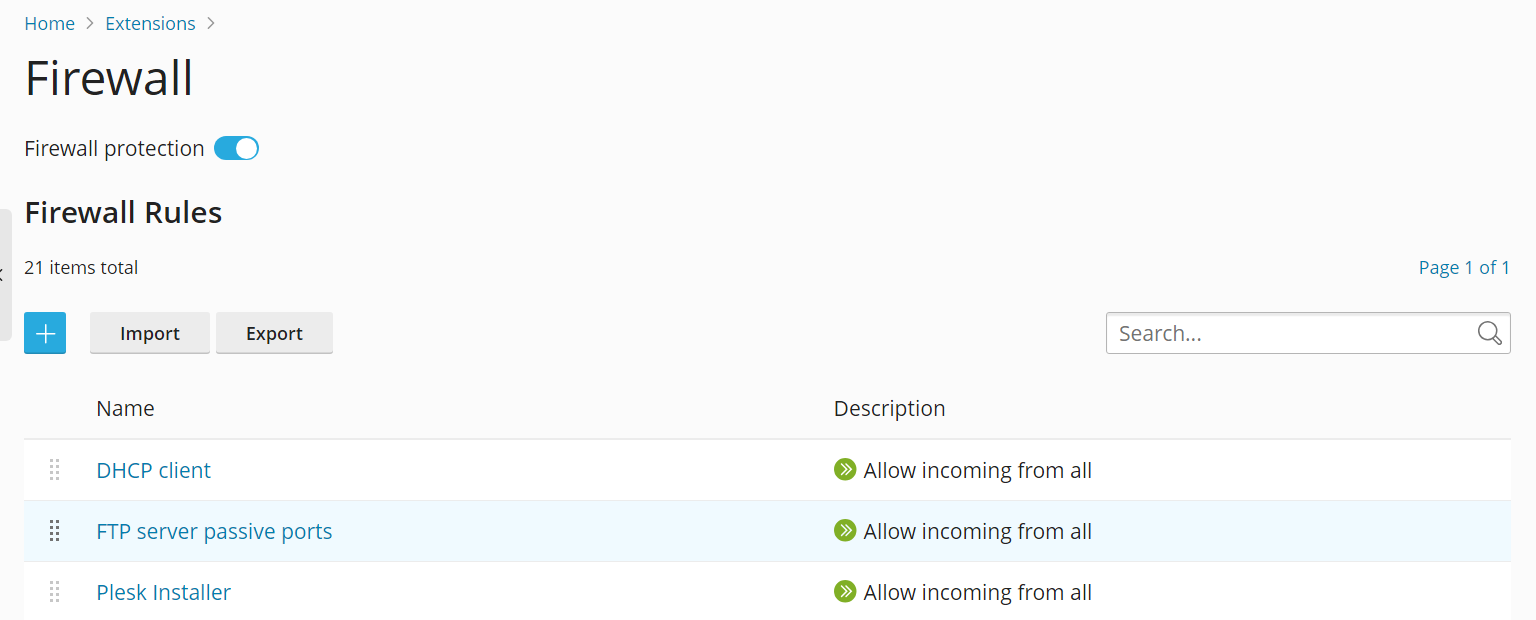
Per impostazione predefinita, la configurazione del firewall Plesk è composta da politiche e regole:
- Le politiche hanno un’ampia portata e influenzano tutte le connessioni da e verso il server, a seconda della politica stessa. Ad esempio, è possibile utilizzare «Criteri di sistema per il traffico in entrata» per bloccare completamente tutte le connessioni in entrata nel server.
- Le regole hanno una portata più ristretta e regolano le connessioni in entrata ai singoli servizi di Plesk, come SMTP o MySQL/MariaDB.
Le regole prevalgono sulle politiche. Ad esempio, se la politica globale prevede di negare tutto il traffico in entrata, ma una regola consente il traffico in entrata da un IP specifico, la regola ha la precedenza. È possibile utilizzare questo meccanismo per rafforzare o allentare la sicurezza del server.
Ad esempio, l’impostazione di politiche che vietano tutte le connessioni da e verso il server, ad eccezione di alcuni indirizzi IP o porte, comporterà una maggiore sicurezza, ma alcune applicazioni potrebbero non essere in grado di funzionare a causa delle restrizioni di rete. Al contrario, consentire per impostazione predefinita tutte le connessioni e utilizzare regole per bloccare l’accesso a singoli servizi o da singoli indirizzi IP renderà il tuo server meno sicuro, ma ti garantirà di non incorrere in problemi di connessione. Sperimenta per trovare il compromesso ottimale tra usabilità e sicurezza.
È possibile gestire il firewall in due maniere:
- Modificare le politiche e le regole esistenti, comprese quelle predefinite.
- Creare e rimuovere regole personalizzate.
Modificare una politica o una regola esistente:
- Accedi a Plesk.
- Vai su Strumenti e impostazioni > Firewall (sotto «Sicurezza»).
- Fare clic sul pulsante di attivazione/disattivazione «Protezione del firewall» affinché indichi «Abilitato». Se la protezione del firewall è già attiva, saltare questo passaggio.
- Fai clic sulla politica o sulla regola che desideri modificare.
- Apporta le modifiche desiderate, fai clic su Salva, poi su Applica modifiche, quindi su Applica.
Le modifiche alla configurazione del firewall sono ora effettive.
Creazione di una regola personalizzata:
- Accedi a Plesk.
- Vai su Strumenti e impostazioni > Firewall (sotto «Sicurezza»).
- Fare clic sul pulsante di attivazione/disattivazione «Protezione del firewall» affinché indichi «Abilitato». Se la protezione del firewall è già attiva, saltare questo passaggio.
- Fare clic sul pulsante
 .
. - (Opzionale) Dare un nome alla regola.
- Configura la regola. Ad esempio, per bloccare tutte le connessioni in entrata verso il servizio SSH dall’indirizzo IP 198.51.100.1 (supponendo che venga utilizzata la porta SSH predefinita), imposta «Tipo di connessione» su «In arrivo», imposta «Azione» su «Nega», imposta » Porta» su «TCP 22», quindi inserisci «198.51.100.1» nel campo «Sorgenti».
- Una volta configurata la regola, fai clic su Salva, poi su Applica modifiche, quindi fai clic su Applica.
Le modifiche alla configurazione del firewall sono ora effettive. Quando crei regole personalizzate, fai attenzione a non bloccare per errore le connessioni alle porte utilizzate dai servizi Plesk.
Nota: Se utilizzi i container Docker, le regole del firewall Docker non vengono aggiunte alle regole del firewall Plesk.
Rimuovere regole personalizzate:
- Accedi a Plesk.
- Vai su Strumenti e impostazioni > Firewall (sotto «Sicurezza»).
- Fare clic sul pulsante di attivazione/disattivazione «Protezione del firewall» affinché indichi «Abilitato». Se la protezione del firewall è già attiva, saltare questo passaggio.
- Seleziona una o più regole personalizzate che desideri rimuovere. È possibile rimuovere solo le regole personalizzate.
- Fai clic su Rimuovi, quindi su Sì, rimuovi. Dopodiché, fai clic su Applica modifiche, quindi su Applica.
Le modifiche alla configurazione del firewall sono ora effettive.
Blocco per paese
È possibile utilizzare il firewall di Plesk per bloccare l’accesso verso o da indirizzi IP appartenenti a un determinato paese.
Blocco dell’accesso da un determinato paese:
- Accedi a Plesk.
- Vai su Strumenti e impostazioni > Firewall (sotto «Sicurezza»).
- Fare clic sul pulsante di attivazione/disattivazione «Protezione del firewall» affinché indichi «Abilitato». Se la protezione del firewall è già attiva, saltare questo passaggio.
- Fare clic sul pulsante .
- (Opzionale) Dare un nome alla regola.
- Impostare «Azione» su «Nega».
- Sotto «Fonti», inserire il codice ISO 3166 di due lettere del paese che si vuole bloccare (ad esempio, per bloccare tutte le connessioni in entrata dall’Afghanistan, inserire AF).
- (Opzionale) Fare clic su «Aggiungi ancora» e ripetere il passaggio precedente per bloccare un ulteriore paese. È possibile bloccare tutti i paesi che si desidera.
- Quando sono stati aggiunti tutti i paesi che si desidera bloccare, fare clic su Salva.
- Fare clic su Applica modifiche e fare clic su Applica.
Una volta applicata la configurazione del firewall, verranno negate tutte le connessioni in entrata al server dal paese o dai paesi bloccati.
Per impostazione predefinita, Plesk utilizza il database gratuito «IP to Country Lite» di DB-IP. È possibile utilizzare invece un database gratuito o a pagamento di MaxMind. Prima di fare ciò, è necessario ottenere una licenza gratuita o a pagamento da MaxMind e ricevere la chiave della licenza.
Passare al database GeoIP2 a pagamento:
-
Aggiungere le seguenti righe al file panel.ini:
[ext-firewall]
geoipDataSource = maxmind-lite
per usare il database gratuito GeoLite2, o
[ext-firewall]
geoipDataSource = maxmind
per usare il database a pagamento GeoIP2.
-
Accedere al server tramite SSH ed eseguire questo comando:
LICENSE_KEY=<enter your license key here> plesk sbin modules/firewall/ipsets --configure --data-source maxmind-lite --force
oppure
LICENSE_KEY=<enter your license key here> plesk sbin modules/firewall/ipsets --configure --data-source maxmind --force
per utilizzare rispettivamente il database gratuito o a pagamento di MaxMind.
Nota: Il comando può terminare con l’avviso
Set cannot be destroyed(Il set non può essere distrutto). L’avviso può essere ignorato tranquillamente. -
Vai su Strumenti e impostazioni > Firewall (sotto «Sicurezza»).
-
Fare clic su Applica modifiche e fare clic su Applica.
Nota: Se il pulsante Applica modifiche non c’è, creare una nuova regola del firewall per attivare la possibilità di applicare le modifiche. In seguito sarà possibile rimuovere tale regola.
Quando la configurazione del firewall è stata applicata, verrà usato il database GeoIP2 al posto di quello GeoLite2.
Per tornare al database gratuito di DB-IP, rimuovere la linea geoipDataSource = maxmind-lite o geoipDataSource = maxmind dal file panel.ini e riapplicare la configurazione del firewall.
Importare ed esportare la configurazione del firewall
È possibile duplicare la configurazione di un firewall del server Plesk per Linux su altri server Plesk per Linux. Il modo più semplice per farlo è esportare la configurazione del firewall in un file, quindi importarlo su ciascun server Plesk per Linux. È possibile importare ed esportare la configurazione del firewall sia tramite l’interfaccia grafica che da riga di comando.
Esportare la configurazione del firewall tramite la GUI:
- Accedere a Plesk sul server del quale si vuole copiare la configurazione del firewall.
- Vai su Strumenti e impostazioni > Firewall (sotto «Sicurezza»).
- Fare clic sul pulsante di attivazione/disattivazione «Protezione del firewall» affinché indichi «Abilitato», quindi fare clic su Applica. Se la protezione del firewall è già attiva, saltare questo passaggio.
- Fare clic su Esporta.
La configurazione del firewall viene salvata in un file .json. È possibile trovarlo nella cartella di download del browser.
Importare la configurazione del firewall tramite la GUI:
- Accedere a Plesk sul server sul quale si vuole copiare la configurazione del firewall di un altro server.
- Vai su Strumenti e impostazioni > Firewall (sotto «Sicurezza»).
- Fare clic sul pulsante di attivazione/disattivazione «Protezione del firewall» affinché indichi «Abilitato», quindi fare clic su Applica. Se la protezione del firewall è già attiva, saltare questo passaggio.
- Fare clic su Importa e trovare il file
.jsonesportato sul server del quale si vuole copiare la configurazione del firewall.
Verrà applicata la configurazione del firewall presente nel file.
Esportare la configurazione del firewall tramite CLI:
-
Accedere tramite SSH al server del quale si vuole copiare la configurazione del firewall.
-
Eseguire il seguente comando per esportare la configurazione del firewall:
plesk ext firewall --export > rules.jsonPuoi dare al file il nome che desideri, «rules.json» è solo un esempio.
La configurazione del firewall verrà salvata nel file specificato.
Importare la configurazione del firewall tramite CLI:
-
Accedere tramite SSH a un server sul quale si vuole copiare la configurazione del firewall di un altro server. Per importare la configurazione del firewall è necessario aprire due sessioni SSH distinte.
-
Nella prima sessione SSH, eseguire il seguente comando per attivare la protezione del firewall. Se la protezione del firewall è già attiva, saltare questo passaggio.
plesk ext firewall --enable -
Nella seconda sessione SSH, eseguire il seguente comando per confermare la protezione del firewall. Se la protezione del firewall è già attiva, saltare questo passaggio.
plesk ext firewall --confirm -
Nella prima sessione SSH, eseguire il seguente comando per importare e applicare la configurazione del firewall:
plesk ext firewall --import -config <the file's URL or local path> && plesk ext firewall --applyPer esempio
plesk ext firewall --import -config https://example.com/rules.json && plesk ext firewall --applyoppure
plesk ext firewall --import -config /tmp/rules.json && plesk ext firewall --apply -
Verifica di poterti connettere al server tramite SSH dopo aver applicato la nuova configurazione del firewall. Se è possibile, nella seconda sessione SSH, esegui il comando seguente per confermare la configurazione del firewall importato.
plesk ext firewall --confirmNota: Se non confermi la configurazione del firewall importata entro 60 secondi dall’esecuzione del comando
plesk ext firewall --apply, le modifiche apportate verranno annullate automaticamente e verrà ripristinata la configurazione precedente del firewall.
Verrà applicata al server la configurazione del firewall presente nel file.