(Plesk for Linux)DANE を使用してサーバ接続を堅牢化する
概要: メールサーバへの接続が SSL/TLS 証明書で保護されている場合、DANE(DNS-based Authentication of Named Entities)を有効にすることでダウングレード攻撃や中間者攻撃への耐久性を高めることができます。 DANE はまた、認証局が侵害を受けたことによるウェブサイトのなりすましからも保護します。
このトピックでは、DANE を使用して (SSL It! 経由で自動的に、または手動で) サーバへの接続を堅牢化する方法について説明します。このトピックは、DANE や TLSA DNS レコードに関する情報を網羅するものではないことにご注意ください。
Plesk では、DANE を使用して次の方法でサーバへの接続を堅牢化できます。
- SSL It! 拡張を使用して自動的に行う。
- SSL/TLS 証明書の公開鍵のハッシュを手動で生成し、TLSA DNS レコードを追加する。
それぞれの方法には、利点と欠点があります。
SSL It! を使用した DANE の自動実装は簡単で、数回クリックするだけで完了します。ただし、DANE で堅牢化できるのは 1 つのタイプの接続、つまり個々のドメインのメールサーバへの接続のみです。また、DANE は Let's Encrypt 証明書でのみ使用できます。他の認証局の SSL/TLS 証明書で DANE を使用する場合は、手動実装を選択してください。
DANE の手動実装は複数のステップから成る手順であり、時間と労力がかかります (ただし、以下に手順を追うガイドを用意しています)。メリットとしては、メール サーバへの接続だけでなく、SSL/TLS 証明書で保護された他のサーバへの接続も堅牢化できることです。また、DANE は、Let's Encrypt に限らず、任意の認証局の SSL/TLS 証明書で使用できます。
どの方法を選択する場合でも、サーバおよび/またはホストドメインが DANE を使用するために必要な特定の要件を満たしていることを確認する必要があります。
(自動) DANE を使用してメール接続を堅牢化する
DANE を使用してメールサーバへの接続を自動的に堅牢化する前に、サーバおよびホストされているドメインが次のように構成されていることを確認してください。
- Plesk サーバの場合:
- メールサービスが有効になっている。
- DKIM が有効になっている。
- Plesk がプライマリ DNS サーバである。
- DANE を使用してメールサーバへの接続を堅牢化するドメインの場合:
- メールサービスが有効になっている。
- DKIM が有効になっている。
- MX レコードが存在し、Plesk サーバの IP アドレスに解決される。
- DNSSEC が有効になっている。
上記の条件がすべて満たされている場合は、 SSL It! 拡張により、DANE を使用してメールサーバへの接続を堅牢化できます。
SSL It! 経由で DANE を使用してメール接続を堅牢化する
-
[ウェブサイトとドメイン]に移動して、必要なドメインを探します。
-
[SSL/TLS 証明書]をクリックします。
-
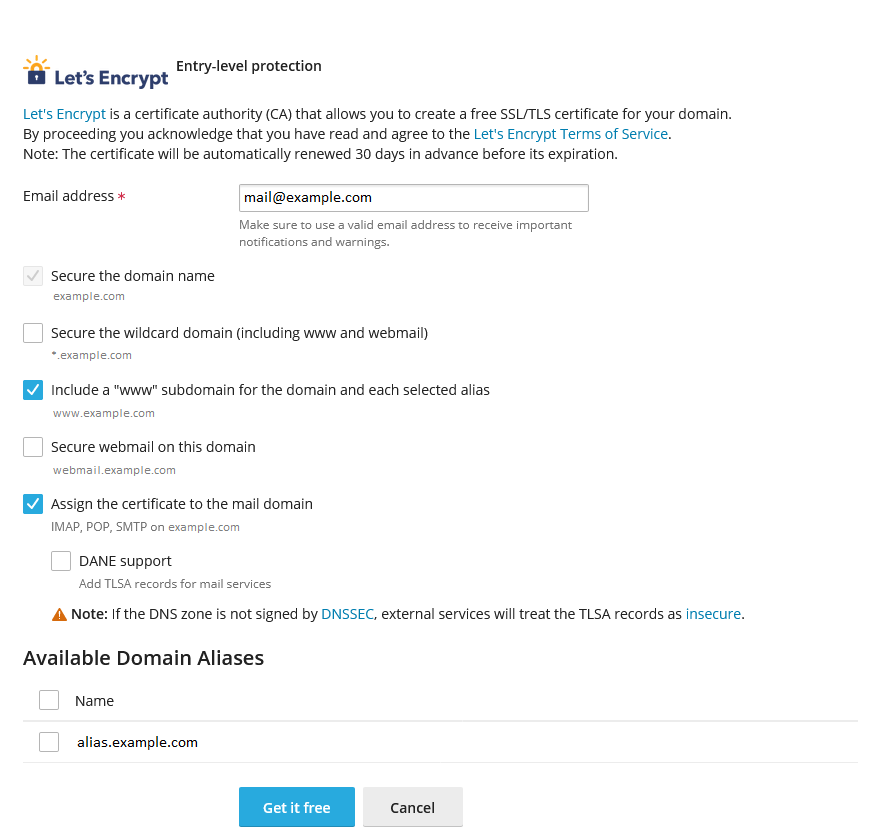
「Let's Encrypt で提供される基本の無料証明書をインストールする」の下で [インストール] をクリックします。
-
[ドメイン名を保護] チェックボックスはオンのままにします。
-
(オプション) 保護するサブドメインに応じて他のチェックボックスをオンにします。
-
[メールドメインに証明書を割り当てる] チェックボックスと [DANE サポート] チェックボックスをオンにします。

-
[無料で取得]をクリックします。
-
DANE に必要な TLSA レコードが作成された後 DNS サーバに伝播されるまでしばらく待ってから、[インストール] をクリックします。
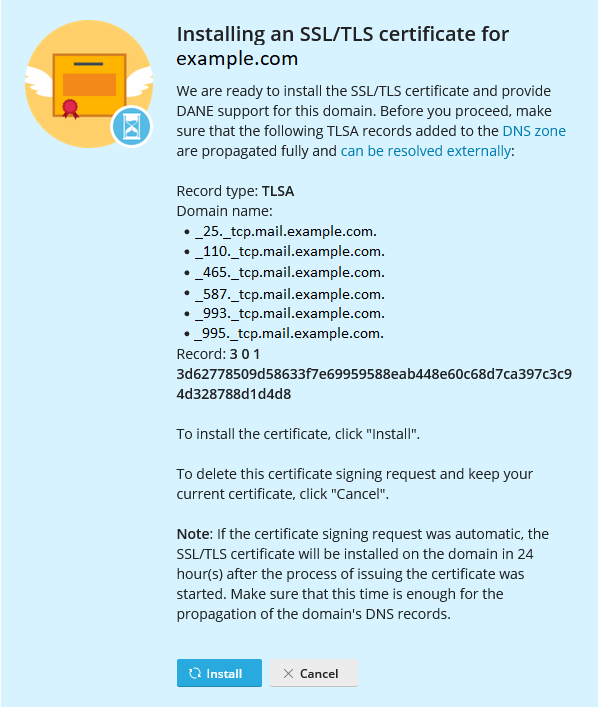
SSL It! により、Let's Encrypt 証明書を使用してドメインを保護し、DANE を使用してドメインとメールサーバの接続を堅牢化しました。
DANE で証明書を自動更新する
SSL It! は、Let's Encrypt の無料 SSL/TLS 証明書を有効期限の 30 日前に自動更新します。証明書が DANE サポート付きで発行された場合、SSL It! は新しい証明書でも DANE サポートを構成します。
新しい証明書をドメインにインストールする準備ができると、SSL It! は対応する TLSA レコードのセットを作成し、タイマーを 24 時間 (デフォルト値) に設定します。タイマーの期限が切れると、SSL It! の「ウェブサイトを保護」タスクの次回の実行で新しい証明書がインストールされ、古い TLSA レコードが削除されます。構成された設定に応じて、Plesk は証明書の更新に関するメール通知も送信します。
必要に応じて、panel.ini ファイルに次のパターンの行を追加することで、TLSA レコードの作成と新しい証明書のインストールの間隔をデフォルトの 24 時間から変更できます。
[ext-sslit]
dane-confirmation-interval-in-hours = <the number of hours>
たとえば、
[ext-sslit]
dane-confirmation-interval-in-hours = 12
SSL It! で DANE サポートを無効にする
デフォルトでは、Plesk サーバおよびホストされているドメインが DANE に必要な構成基準を満たしている場合、SSL It! で DANE サポートが有効になります。つまり、Let's Encrypt 証明書を使用してドメインを保護するときに、管理者および顧客に [メールドメインに証明書を割り当てる] の下に [DANE サポート] チェックボックスが表示され、オンにすることができます。
顧客への保護対策として、SSL It! で対応チェックボックスを非表示にして DANE サポートを無効にすることをお勧めします。これを行うには、panel.ini ファイルに次の行を追加します。
[ext-sslit]
daneEnabled = false
(手動) DANE を使用してサーバ接続を堅牢化する
トランスポートプロトコルとポートの適切な組み合わせ(たとえば「TCP/25」と SMTP、「TCP/443」と HTTPS など)を介して SSL/TLS 証明書で既に保護されているアプリケーションプロトコル経由の接続を堅牢化することができます。
特定のアプリケーションプロトコル経由の接続を堅牢化するのは、2 ステップのプロセスです。
- まず、SSL/TLS 証明書の公開鍵のハッシュを作成する必要があります。ハッシュ化されていない公開鍵や証明書全体のハッシュを使用することもできますが、この例では公開鍵ハッシュを使用します。
- 次に、ハッシュを含め、多数の必須パラメータを指定する TLSA DNS レコードを追加する必要があります。
堅牢化したいアプリケーションプロトコルごとに、上記の手順を繰り返す必要があります。
以下の例では、個別ドメイン用にメールサーバへの SMTP 接続を堅牢化する手順を説明します。必要に応じて、これを参考に、他の接続を堅牢化することができます。
SMTP サーバの接続を保護する
注釈: 以下の例では、証明書全体ではなく、SSL/TLS 証明書の公開鍵の SHA-256 ハッシュを使用します。こうすることで、公開鍵も変更した場合を除き、証明書を更新するときに TLSA レコードを更新する必要はありません。
証明書の公開鍵のハッシュを生成する
-
[ウェブサイトとドメイン]に移動して、必要なドメインを探します。
-
[SSL/TLS 証明書]をクリックします。
-
メールサーバを保護するための証明書を探して(「メールをセキュリティ強化」と記されているもの)、
アイコンをクリックして証明書を *.pemファイルとしてダウンロードします。 -
Linux マシンに
*.pemファイルを保存して、次のコマンドを実行します(作業ディレクトリをこのファイルが含まれるディレクトリに変更しておき、"certificate.pem" を実際のファイル名に置き換えてください)。openssl x509 -in certificate.pem -pubkey -noout | openssl rsa -pubin -outform der | sha256sum | awk '{print $1}'
 アイコンをクリックして証明書を
 その結果、TLSA DNS レコードの作成時に使用される SHA-256 ハッシュが出力されます(例: 499e42e36d7b04529725a1f8036e0f7cf1030b4e25a3fa1988f2572e1ce70d28)。
TLSA DNS レコードを追加する
- Plesk にログインします。
- [ウェブサイトとドメイン]に移動して、必要なドメインを探します。
- [ホスティングと DNS]タブに移動して、[DNS]をクリックします。
- [レコードを追加]をクリックします。
- [レコードタイプ]ドロップダウンメニューから「TLSA」を選択します。
- (オプション)レコードに TTL を指定します。最適な TTL がわからない場合は[TTL]フィールドを空欄にしておいてください。この場合、デフォルトの TTL 値が使用されます。
- ポート「25」を指定します。アンダースコア文字は自動的に追加されるため、追加しないでください。
- プロトコル「tcp」を指定します。アンダースコア文字は自動的に追加されるため、追加しないでください。
- [ドメイン名]フィールドに「mail」と入力します。
- [使用状況]ドロップダウンメニューから「3, DANE-EE」を選択します。
- [セレクタ]ドロップダウンメニューから「1, SPKI」を選択します。
- [一致タイプ]ドロップダウンメニューから「1, SHA-256」を選択します。
- 先ほど生成した証明書の公開鍵のハッシュを[証明書関連付けデータ]フィールドに貼り付けます。
- [OK]をクリックしてから[更新]をクリックして、DNS ゾーンへの変更を適用します。
TLSA DNS レコードが追加され、DNS ゾーンへの変更が適用されます。DNS の変更がプロパゲートされたら(通常約 24 時間)、このドメインの SMTP 接続に対して DANE がアクティブになります。