Security.txt Standard Compliance
security.txt is a widely spread standard of reporting security vulnerabilities to the service owners.
The main goal of security.txt is to help both your clients and security researchers easily get in touch with you when they
find a vulnerability in a Plesk domain.
Starting from version 18.0.62, Plesk Obsidian is fully compatible with the standard:
The
security.txtfile is generated for all domains hosted on a Plesk server.Plesk will continuously maintain the
security.txtfile once it is created and the feature is enabled.Plesk takes into account the custom
security.txtfile of a domain and never applies the security policies from the server file to the domain.Plesk automatically updates the expiration date of the file.
To make your Plesk server security.txt compliant:
Log in to Plesk.
Once the extension is installed, click Open.
-
Select the “Enable compliance with the “security.txt” standard in Plesk” checkbox.

(Optional) To modify the default
security.txtfile generated by Plesk, select the “Use the custom security.txt text” checkbox, and then specify what needs to be changed in the “Security.txt text” field that becomes available. You can also change the file from the command line.Save your changes by clicking:
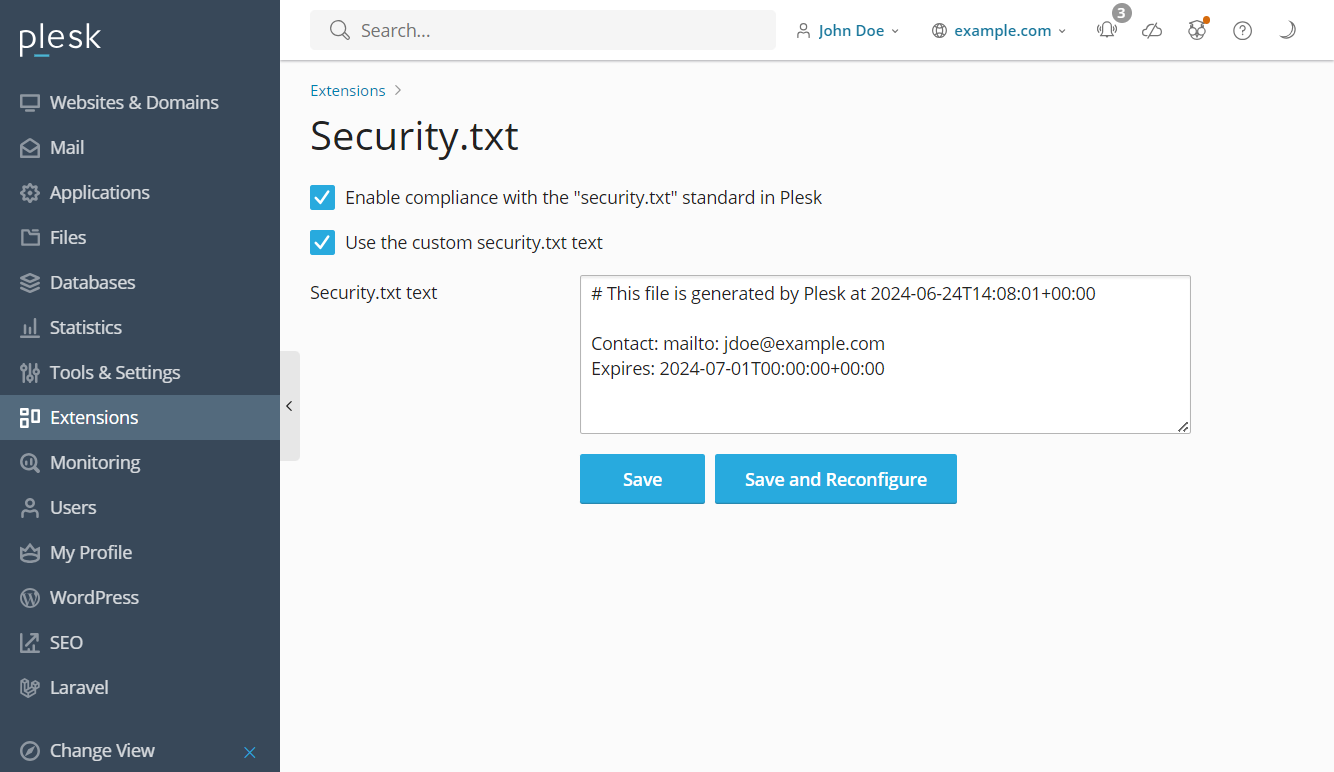
Save to save the configuration and apply the changes manually later. For example, you may do it to give your clients extra time to reconfigure their domains in accordance with the changes to avoid possible issues. You can reconfigure the server manually by running the
plesk repair webCLI command.Save and Reconfigure if you want to apply the changes and reconfigure the Plesk server right now.
Now your Plesk server is security.txt-compliant.
Using the Command Line Utility
You can use the plesk ext security-txt-plesk command line utility to update your security.txt configuration.
The utility accepts the following commands:
--help- This prints all availablesecurity-txt-pleskcommands.--status- This shows whether the Plesk server uses thesecurity.txtpolicies. If you have enabled the defaultsecurity.txtpolicy, this will returnvalue: on. If you have enabled a customsecurity.txtpolicy or used a custom file path, this will returnvalue: custom.--enable- This sets all domains on your Plesk server to use the defaultsecurity.txtpolicies. It will disable any custom file paths and the “Use the custom security.txt text” option in the extension menu.--disable- This sets all domains on your Plesk server to ignore allsecurity.txtpolicies.-
-
-path- This sets a new file path for thesecurity.txtfile. To set a new path for asecurity.txtfile, you must first have asecurity.txtfile in the new file location. -
Note
For this command to work, you must first enable the “Use the custom security.txt text” option in the “Native security.txt compliance” extension menu. Then, you must include the
--reconfigure-allcommand. For example, to use a customsecuritydirectory for yoursecurity.txtfile, create the new file and directory, then use the following command:plesk ext security-txt-plesk -path /security/security.txt --reconfigure-all.
-
--reconfigure-all- This updates all domains on the Plesk server to use the newsecurity.txtconfiguration.