Protecting Against Spam
summary: Spam (or junk mail) distracts you and can make you a victim of scammers, phishers, and other malicious actors.
In this topic, you will learn how to protect against spam using the tools that come with Plesk.
The topic provides a short description of each tool’s function and clear instructions for using it. It does not provide information about configuring the tools for maximum effectiveness, because doing so requires specialist knowledge.
Overview
Plesk comes with a number of tools designed to protect against spam:
- SpamAssassin spam filter
- DNS blackhole lists
- (Plesk for Linux) SPF, DKIM, and DMARC
- (Plesk for Linux) Greylisting
- (Plesk for Linux) Mail server black and white lists
Different tools use different methods of detecting spam, have different drawbacks, and also differ in the amount of server resources they consume. You can use multiple tools in tandem. This makes it more likely that each individual spam message would be detected, but also increases resource usage and the likelihood of false positives.
When choosing which tool(s) to use, consider your scenario:
- You are receiving spam from one or more specific email addresses and/or domains.
- You are receiving spam from various email addresses and/or domains.
- You want to make sure mail from specific email addresses and/or domains is never marked as spam.
- You want to make sure that mail sent from your server is not treated as spam, or that your domain name cannot be spoofed.
Depending on your scenario, some tools may be more useful than others. The tools you can use in each of these scenarios are described in more detail below.
If every tool described in this topic is enabled, they take effect in the order shown on the illustrations below. Here, a green arrow means that the check is passed, and a red one means that the check is failed.
Plesk for Linux
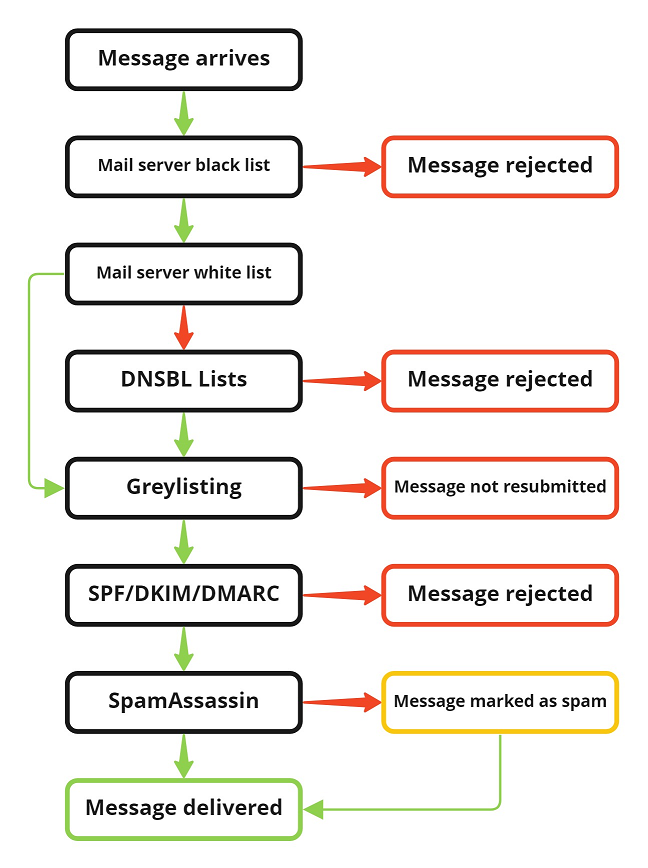
- The sender’s domain name is checked against the mail server black list. If it is there, the message is rejected.
- The sender’s IP address is checked against the mail server white list. If it is there, the message skips the DNSBL check.
- If the sender’s IP address is not on the mail server white list, it is checked against the configured DNSBL lists. If it is there, the message is rejected.
- If it is the first time the message is submitted for delivery, greylisting rejects it temporarily.
- If the message is resubmitted for delivery, it subjected to an SPF check, a DKIM check, and then a DMARC check.
- If the message has passed all the previous checks, it is scanned by SpamAssassin (unless the sender’s email address or domain is on the SpamAssassin’s white list or the message’s size exceeds the maximum size that can be checked by SpamAssassin).
After that, the message is delivered to the recipient’s mailbox.
Plesk for Windows
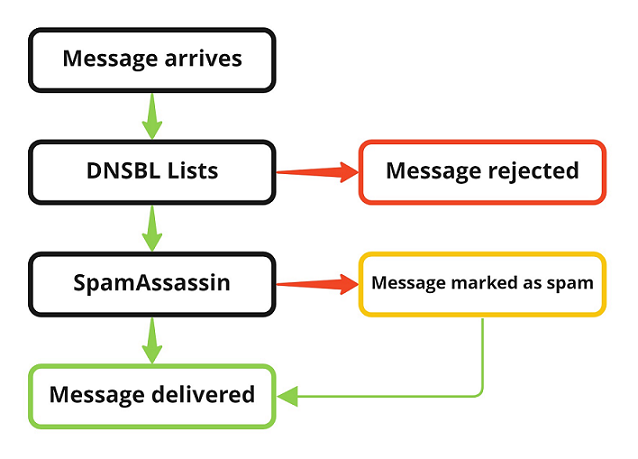
- The sender’s IP address is checked against the configured DNSBL lists. If it is there, the message is rejected.
- The message is scanned by SpamAssassin (unless the sender’s email address or domain is on the SpamAssassin’s white list or the message’s size exceeds the maximum size that can be checked by SpamAssassin).
After that, the message is delivered to the recipient’s mailbox.
Protecting Against Spam From a Specific Email Address or Domain
If you are receiving no legitimate mail from one or more specific email addresses and/or domains, only spam, the easiest option is to block all incoming mail from them.
(Plesk for Linux) Blocking all mail from a specific domain:
- Log in to Plesk.
- Go to Tools & Settings, and then click Mail Server Settings (under “Mail”).
- Go to the “Black List” tab.
- Click Add Domain (or the
 icon if there are already one or more domains included in the list).
 - Specify the name of the domain (for example, example.com), and then click OK.
All incoming mail from the specified domain will now be rejected by the mail server. This includes both spam and legitimate mail.
(Plesk for Linux) Marking all mail from a specific email address or domain as spam:
- Log in to Plesk.
- Go to Tools & Settings, and then click Spam Filter (under “Mail”).
- Make sure that the “Switch on server-wide SpamAssassin spam filtering” checkbox is selected.
- Go to the “Black List” tab.
- Click Add Address, specify the email address (for example, “example@example.com”, or “*@example.com” to mark all mail from example.com as spam), and then click Save.
All incoming mail from the specified email address or domain will now be marked as spam by SpamAssassin for all mail accounts that have SpamAssassin enabled. This includes both spam and legitimate mail. Once a message is marked as spam by SpamAssassin, the specific action taken against it will depend on SpamAssassin settings (whether to simply mark the message as SPAM, move it to the “Spam” folder, or delete it).
(Plesk for Windows) Marking all mail from a specific email address or domain as spam:
- Log in to Plesk.
- Go to Tools & Settings, and then click Spam Filter (under “Mail”).
- Make sure that the “Turn on server-wide SpamAssassin spam filtering” checkbox is selected.
- Go to the “Black List” tab.
- Click Add Domain (or the icon if there are already one or more email addresses included in the list), specify the email address (for example, “example@example.com”, or “*@example.com” to mark all mail from example.com as spam).
- Specify what is to be done with messages from email addresses included in the list (mark as spam or delete), and then click OK.
All incoming mail from the specified email address or domain will now be marked as spam or deleted by SpamAssassin for all mail accounts that have SpamAssassin enabled. This includes both spam and legitimate mail.
Protecting Against Spam From All Sources
If you are receiving spam from various email addresses and/or domains, you can use a number of tools to protect against it. They can all work in tandem, as different tools use diferent methods of identifying spam.
(Plesk for Linux) Blocking Mail With Forged Sender Address
Spam often comes disguised, as if it were sent from a legitimate business or organization. It is reasonable to assume that any mail that does not originate from the sender it pretends to originate from is not legitimate. SPF (Sender Policy Framework), DKIM (DomainKeys Identified Mail), and DMARC (Domain-based Message Authentication, Reporting and Conformance) are three mechanisms used to identify such mail. For optimal results, it is recommended that all three are used in tandem.
- SPF relies on the domain owners to create a TXT DNS record listing all domain names and IP addresses that are authorized to send mail. The receiving mail server verifies that the sender’s IP address corresponds to an A or AAAA record for one of the authorized domains and/or looks for the sender’s IP address among those listed in the TXT record. If there is no match, the SPF check fails.
- DKIM relies on the domain owners to configure their mail servers to sign all outgoing mail. The “From” field must be signed, and other parts of the message may be signed as well (for example, to detect tampering with the message’s content while en route). It also relies on the owner to create a TXT DNS record containing the corresponding public key. The receiving mail server verifies the signature against the public key. If the verification is unsuccessful, the DKIM check fails.
- DMARC relies on the domain owners to create a TXT DNS record specifying the actions that the receiving mail server should take if the SPF and/or DKIM check fails.
Thus, SPF and DKIM are used to identify illegitimate mail, and DMARC recommends what is to be done with it.
Learn more about using DKIM, SPF, and DMARC in Plesk.
The upside of this approach:
- It effectively filters out mail with forged sender addresses.
The downsides of this approach:
- It relies on domain owners to properly configure their mail servers and DNS records, and also to specify their DMARC policy.
- It may interfere with the delivery of legitimate mail (for example, when mail is forwarded via a mail server not configured to correctly rewrite the sender address).
- It does nothing to stop spam sent from properly configured mail servers (for example, popular free email providers such as Gmail or Outlook).
Blocking spam using SPF checks:
- Log in to Plesk.
- Go to Tools & Settings, and then click Mail Server Settings (under “Mail”).
- Select the “Enable SPF spam protection to check incoming mail” checkbox, and then click OK.
All incoming mail will now be subject to SPF checks based on the local SPF policy, local SPF guess rules, and the SPF policy of the domain the email claims to originate from. For every incoming email, the Plesk mail server will either reject it or add an SPF header to it, depending on the result of the check.
Blocking spam using DKIM checks:
- Log in to Plesk.
- Go to Tools & Settings, and then click Mail Server Settings (under “Mail”).
- Under “DKIM spam protection”, select the “Verify incoming mail” checkbox, and then click OK.
All incoming mail will now be subject to DKIM checks. The Plesk mail server will add a DKIM header to every incoming email. Note that by itself this does not prevent an email from being delivered, even if the DKIM check fails. For further action to be taken, DMARC checks must be enabled on the Plesk server, and the domain the email claims to originate from must have published its DMARC policy.
Blocking spam using DMARC policy:
- Log in to Plesk.
- Go to Tools & Settings, and then click Mail Server Settings (under “Mail”).
- Enable both SPF and DKIM checks, as described above.
- Select the “Enable DMARC to check incoming mail” checkbox, and then click OK.
All incoming mail will now be subject to SPF and DKIM checks, and the outcome for each individual email will depend on the published DMARC policy of the domain it claims to originate from.
(Plesk for Linux) Rejecting Mail With Forged Sender Address
By default, when an incoming email fails the DMARC check, and the DMARC policy advises that the email should not be accepted for delivery, it is dropped silently. That is, the Plesk mail server replies to the client with a 2yz response code, and then discards the email without trying to deliver it to the recipient(s). You can configure the Plesk mail server to explicitly reject emails that fail the DMARC check with a 5yz response code.
Rejecting emails that fail the DMARC check:
-
Log in to the Plesk server via SSH.
-
Run the following command:
plesk bin settings -s mail_dmarc_reject_at_smtp=true && plesk repair mail -y
The Plesk mail server will now reject emails that fail the DMARC check with a 5yz response code.
Blocking Spam Using DNS Blackhole Lists (DNSBL)
A number of organizations are maintaining lists of IP addresses spam was known to originate from. You can configure Plesk to use one or more such lists to block all mail from those IP addresses.
Note: Plesk makes no recommendations regarding which DNSBL list(s) you should use.
Learn more about using DNSBL lists in Plesk.
The upside of this approach:
- You can use ready-made lists of known spammers.
The downsides of this approach:
- DNSBL lists are updated manually. Once a server starts sending out spam, some time may pass before its IP address becomes listed.
- DNSBL lists make no exceptions for mail servers that are sources of both legitimate mail and spam. Using a DNSBL list may result in legitimate mail not being delivered.
- By using a DNSBL list you are handing over the control over which mail is accepted or rejected to a third party.
Blocking spam using a DNSBL list:
- Log in to Plesk.
- Go to Tools & Settings, and then click Mail Server Settings (under “Mail”).
- Select the “Turn on spam protection based on DNS blackhole lists” checkbox.
- Specify the DNS zone of the desired DNSBL list(s) (for example, “dnsbl.example.com”), and then click OK.
All incoming mail from all servers included in the configured black list(s) will now be rejected by the mail server. This includes both spam and legitimate mail.
(Plesk for Linux) Blocking Spam Using Greylisting
When greylisting is enabled, the Plesk mail server “temporarily rejects” all incoming mail without attempting to differentiate between legitimate mail and spam. Legitimate, properly configured mail servers will try delivering temporarily rejected mail again after some time (on the second delivery attempt, the message will be accepted by the Plesk mail server). Malicious or hacked PHP scripts sending out spam will not.
Learn more about using greylisting in Plesk.
The upside of this approach:
- Greylisting can filter some of the incoming spam with low chances of blocking any legitimate mail.
The downsides of this approach:
- Using greylisting means that all legitimate mail is delivered after a delay. The length of the delay is configured on the source mail server side and cannot be managed in Plesk. This may prove detrimental in case of emails containing time-sensitive information, and may also raise concerns whether an email would be delivered at all.
- In some cases, greylisting may cause the delivery of legitimate mail to fail (for example, when legitimate mail is sent from a mail server not configured to re-attempt delivery after a temporary rejection).
- Greylisting does nothing to stop spam sent from properly configured mail servers (for example, popular free email providers such as Gmail or Outlook).
Blocking spam using greylisting:
- Log in to Plesk.
- Go to Tools & Settings, and then click Spam Filter (under “Mail”).
- Select the “Switch on server-wide greylisting spam protection” checkbox, and then click OK.
All incoming messages, both legitimate and spam, will now be temporarily rejected by the Plesk mail server the first time they reach it.
Blocking Mail Using SpamAssassin
SpamAssassin identifies spam by running a message’s content through a large number of preconfigured filters (for example, whether the message includes specific words associated with spam emails). Every time an individual filter is triggered, the message’s SpamAssassin score increases. If the score reaches or exceeds a certain threshold, the message is marked as spam or deleted.
Learn more about using SpamAssassin in Plesk.
The upside of this approach:
- SpamAssassin does not rely on the behavior of third parties. A spam email that pretends to originate from a domain with no SPF/DMARC policy and is coming from a server not listed in any DNSBL lists can still be recognized as spam.
- SpamAssassin is highly configurable, though fine-tuning it requires specialist knowledge.
The downsides of this approach:
- SpamAssassin checks are resource intensive. If you receive large amounts of incoming mail, running a SpamAssassin check for each incoming email may prove costly in terms of server resources, especially RAM.
- SpamAssassin is usually configured to only check emails of certain size. While you can increase the maximum size of email to be checked with SpamAssassin, scanning large emails takes time and consumes a large amount of RAM.
- SpamAssassin is not infallible. Both false positives and false negatives are possible.
Blocking spam using SpamAssassin:
- Log in to Plesk.
- Go to Tools & Settings, and then click Spam Filter (under “Mail”).
- Select the “Switch on server-wide SpamAssassin spam filtering” checkbox (“Turn on server-wide SpamAssassin spam filtering” in Plesk for Windows).
- (Optional) To be able to enable, disable, and configure SpamAssassin for individual mail accounts, select the “Apply individual settings to spam filtering” checkbox.
- (Optional) To make the filter more strict, decrease the value of the “The score that a message must receive to qualify as spam” field. Increase it if you want to make the filter less strict. Making the filter more strict both decreases the probability of spam getting through and increases the chance of false positives (and vice versa when making the filter less strict). The default value of “7.0” is optimal in most cases.
- (Optional, Plesk for Linux) To reduce the amount of RAM SpamAssassin will consume on average, decrease the value of the “The maximum number of worker spamd processes to run” field. This may increase the time incoming mail sits in the queue waiting to be scanned by SpamAssassin before delivery. “One” is the lowest possible value, “five” is the highest.
- Click OK.
All incoming mail of certain size (by default, 256 kB or less) will be scanned. Mail suspected to be spam will have its subject line modified (by default, the text “***SPAM***” will be added to it).
Preventing Incoming Mail From Being Marked as Spam
Tools used to fight spam are not infallible. Sometimes, legitimate mail may be rejected or marked as spam. If you are facing repeated situations where legitimate mail from certain email address, domain, or IP address or subnet gets rejected or marked as spam, you can fine-tune your tools to decrease the likelihood of such events.
Note: If SPF, DKIM, and/or DMARC checks are enabled on the server, there is no way to selectively disable them for individual domains or email addresses. The same applies to greylisting.
Whitelisting IP Addresses and Subnetworks
You can add individual IP addresses or whole subnetworks to the mail server white list. Here is what that means:
- Mail from a whitelisted IP address is always accepted for delivery. It is not rejected even if the IP address can be found in one or more DNSBL lists.
- Mail from a whitelisted IP address can still be rejected based on the result of SPF/DKIM/DMARC checks, temporarily rejected by greylisting, or marked as spam by SpamAssassin.
(Plesk for Linux) Adding IP addresses to the mail server white list:
- Log in to Plesk.
- Go to Tools & Settings, and then click Mail Server Settings (under “Mail”).
- Go to the “White List” tab.
- Click Add Network (or the icon if there are already one or more IP addresses included in the list).
- Specify an IP address or a range of IP addresses, and then click OK.
Mail from the added IP addresses will no longer be rejected unless the sender’s domain has been added to the mail server black list and will skip the DNSBL check. It can still be rejected or marked as spam by other tools.
Whitelisting Domains and Email Addresses
Even if you have added an IP address to the mail server white list, emails may still be marked as spam by SpamAssassin. To stop SpamAssassin from scanning mail from specific email addresses or domains (email addresses, domains, and IP addresses in Plesk for Windows), add them to the SpamAssassin white list.
(Plesk for Linux) Adding email addresses and domains to the SpamAssassin white list:
- Log in to Plesk.
- Go to Tools & Settings, and then click Spam Filter (under “Mail”).
- Go to the “White List” tab.
- Click Add Address.
- Upload a file containing the list of email addresses you want to whitelist. Alternatively, you can select the “From a list” radio button and enter one or more email addresses (for example, “example@example.com” or “*@example.com”), and then click Save.
Mail from the added email addresses and domains will no longer be scanned by SpamAssassin.
(Plesk for Windows) Adding email addresses and domains to the SpamAssassin white list:
- Log in to Plesk.
- Go to Tools & Settings, and then click Spam Filter (under “Mail”).
- Go to the “White List” tab.
- Click Add Network (or the icon if there are already one or more IP addresses included in the list).
- Specify an IP address, a range of IP addresses, an email address (for example, mail@example.com), or a domain (for example, *@example.com), and then click OK.
Mail from the added IP addresses, email addresses, and domains will no longer be scanned by SpamAssassin.
Protecting Outgoing Mail From Being Treated as Spam
You can use SPF and DKIM to decrease the chance outgoing mail would be rejected by the recipient or treated as spam. It also protects your domain name from being spoofed by others. Both tools can be used out of the box with no need for further configuration.
SPF for outgoing mail is configured by default. This prevents spammers from spoofing any of the domain names hosted on the Plesk server, and also decreases the chances that the receiving mail server will treat outgoing mail as spam (provided that the receiving mail server is configured to run SPF checks).
The corresponding TXT DNS record is included in the Plesk DNS zone template, and is thus included in the DNS zone of every domain created in Plesk. The default SPF record has the following value:
v=spf1 +a +mx +a:<hostname> -all
It instructs the recipient mail server to reject incoming mail from a domain hosted in Plesk unless it comes from the IP address associated with the domain’s A and MX records, or with the A record of the Plesk server itself.
Note: You can change this policy both for an individual domain (by editing that domain’s SPF record) and for all domains hosted on the server (by editing the DNS template and propagating the changes to all domains). However, it is not recommended that you do that unless you are familiar with the SPF record syntax. A misconfigured SPF record may result in mail servers rejecting mail coming from the domain.
To disable SPF for outgoing mail for an individual domain, remove that domain’s SPF record. To disable SPF for outgoing mail for all domains hosted on the server, remove the SPF record from the DNS template and propagate the changes to all domains.
By default, DKIM signing for outgoing mail is enabled on the server. It is also enabled for new domains that have their DNS and mail hosting in Plesk.
The corresponding TXT DNS record is included in the Plesk DNS zone template, and is thus included in the DNS zone of every domain created in Plesk. All mail sent from mail accounts belonging to the domain in question are signed with the DKIM private key found in the corresponding TXT DNS record. This decreases the chances that the receiving mail server will treat such mail as spam (provided that the receiving mail server is configured to run DKIM checks).
Note: Domains that use an external DNS server cannot have DKIM enabled by default. For those domains, you need to enable DKIM manually.