(Plesk pour Linux) Renforcer les connexions serveur à l’aide de DANE
Résumé: Lorsque les connexions au serveur de messagerie sont sécurisées à l’aide d’un certificat SSL/TLS, vous pouvez renforcer leur résistance face aux attaques de type man-in-the-middle (l’homme du milieu) ou aux downgrade attack (attaque par repli). Pour cela, activez DANE (DNS-based Authentication of Named Entities). Le protocole DANE protège également contre l’emprunt d’identité d’un utilisateur causé par les autorités de certificat compromises.
In this topic, you will learn how to harden connections to the server using DANE: automatically via SSL It! and manually. Note that this topic is not meant to be an exhaustive source of information about DANE or TLSA DNS records.
In Plesk, you can harden connections to the server using DANE in the following ways:
- Automatically by using the SSL It! extension.
- Manually by generating a hash of the SSL/TLS certificate’s public key, and then adding a TLSA DNS record.
Each way has its own advantages as well as downsides.
The automatic implementation of DANE using SSL It! is easy and needs just a few clicks. However, you can harden only one connection type with DANE: to the mail server for an individual domain. Additionally, you can use DANE only with Let’s Encrypt certificates. If you want to use DANE with SSL/TLS certificates of other certificate authorities, choose the manual implementation.
The manual implementation of DANE is a multistep procedure, which requires time and effort (even though we provide you with a step-by-step guide below). As for the benefits, you can harden connections not only to the mail server but also other ones secured with SSL/TLS certificates. You can also use DANE with SSL/TLS certificates of any certificate authorities, not limited to Let’s Encrypt only.
Regardless of the way you choose, you will need to make sure your server and/or hosted domains meet certain requirements necessary for using DANE.
(Automatically) Hardening Mail Connections Using DANE
Before you can automatically harden a connection to the mail server using DANE, make sure your server and hosted domains have the following configuration:
- For the Plesk server: - The mail service is enabled. - DKIM is enabled. - Plesk is the primary DNS server.
- For the domain whose connection to the mail server you want to harden using DANE: - The mail service is enabled. - DKIM is enabled. - The MX record exists and it resolves to the IP address of the Plesk server. - DNSSEC is enabled.
If all the conditions above are fulfilled, you can harden a connection to the mail server using DANE with the help of the SSL It! extension.
Hardening a Mail Connection Using DANE via SSL It!
-
Allez sous Sites web et domaine. Ensuite, cherchez le domaine concerné.
-
Cliquez sur Certificats SSL/TLS.
-
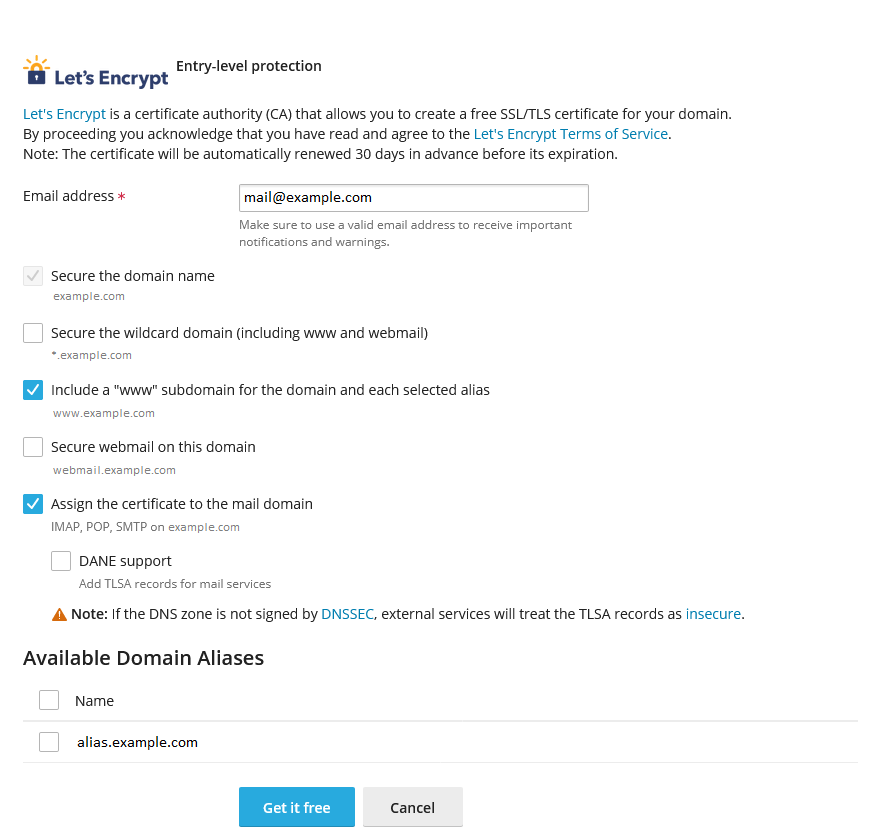
Under « Install a free basic certificate provided by Let’s Encrypt », click Install.
-
Keep the « Secure the domain name » checkbox selected.
-
(Optional) Select other checkboxes depending on subdomains you want to secure.
-
Select the « Assign the certificate to the mail domain » and « DANE support » checkboxes.

-
Cliquez sur Obtenir gratuitement.
-
Wait a while until the created TLSA records necessary for DANE are propagated to the DNS server, and then click Install.
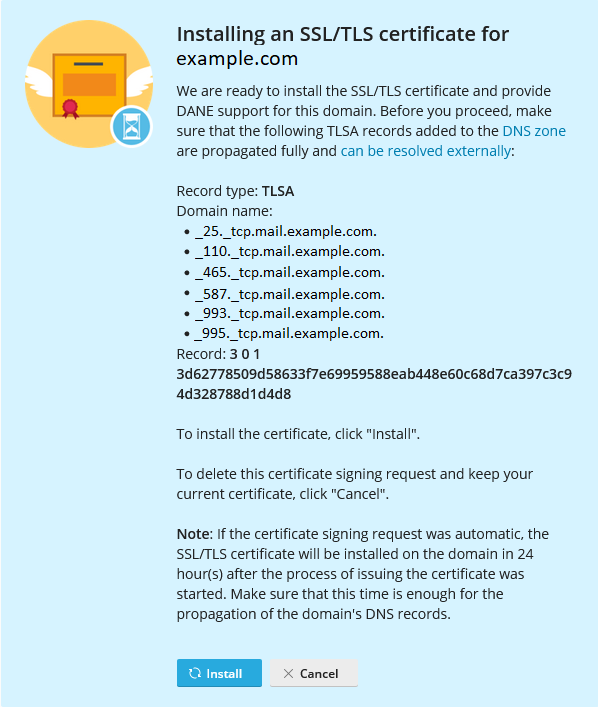
SSL It! has secured your domain with a Let’s Encrypt certificate and also hardened the domain’s connection to the mail server using DANE.
Automatically Renewing Certificates with DANE
SSL It! automatically renews free SSL/TLS certificates from Let’s Encrypt 30 days in advance of their expiration. If a certificate was issued with DANE support, SSL It! will configure it for a new certificate as well.
When a new certificate is ready to be installed on the domain, SSL It! creates a corresponding set of TLSA records and sets a timer for 24 hours (it is the default value). After the timer expires, the next run of the SSL It! « Keep websites secured » task installs the new certificate and removes old TLSA records. Depending on the configured settings, Plesk also sends an email notification on the certificate renewal.
If desired, you can change the default 24-hour interval between the creation of TLSA records and the installation of a new certificate by adding lines of the following pattern to the panel.ini file:
[ext-sslit]
dane-confirmation-interval-in-hours = <the number of hours>
Par exemple :
[ext-sslit]
dane-confirmation-interval-in-hours = 12
Disabling DANE Support in SSL It!
By default, DANE support is enabled in SSL It! if the Plesk server and hosted domains meet the configuration criteria necessary for DANE. It means that you and your customers can see and select the « DANE support » checkbox under « Assign the certificate to the mail domain » when securing a domain with a Let’s Encrypt certificate.
To safeguard your customers, you may want to disable DANE support in SSL It! by hiding the corresponding checkbox. To do so, add the following lines to the panel.ini file:
[ext-sslit]
daneEnabled = false
(Manually) Hardening Server Connections Using DANE
You can harden connections via any application protocol that is already secured using an SSL/TLS certificate via the corresponding combination of transport protocol and port (for example, « TCP/25 » for SMTP, « TCP/443 » for HTTPS, and so on).
Renforcer les connexions via un protocole d’application spécifique est un processus en deux étapes :
- D’abord, vous devez générer un hash de la clé publique du certificat SSL/TLS. Vous pouvez bien entendu aussi utiliser une clé publique sans hash ou le hash du certificat complet, mais dans cet exemple, nous utiliserons le hash de la clé publique.
- Ensuite, vous avez besoin d’un enregistrement DNS TLSA qui spécifie le nombre de paramètres nécessaires, dont le hash.
Vous devez répéter l’étape ci-dessus pour chaque protocole d’application que vous voulez renforcer.
Dans l’exemple ci-dessous, nous fournissons les étapes pour renforcer les connexions SMTP au serveur de messagerie pour un domaine individuel. Vous pouvez les utiliser comme référence pour renforcer d’autres connexions si vous le souhaitez.
Prérequis
Avant de pouvoir renforcer les connexions SMTP à l’aide de DANE pour un domaine individuel, vous devez :
- Sécuriser les connexions au serveur de messagerie à l’aide d’un certificat SSL/TLS.
- Activer DNSSEC pour le domaine.
Sécuriser les connexions serveur SMTP
Note: Dans l’exemple ci-dessous, nous utiliserons le hash SHA-256 de la clé publique du certificat SSL/TLS et non le certificat complet. Ainsi, vous n’aurez pas besoin de mettre à jour l’enregistrement TLSA lors du renouvellement du certificat, sauf si la clé publique change également.
Générer le hash de la clé publique du certificat
-
Allez sous Sites web et domaine. Ensuite, cherchez le domaine concerné.
-
Cliquez sur Certificats SSL/TLS.
-
Cherchez le certificat qui sécurise le serveur de messagerie (celui marqué avec « Protège la messagerie »). Ensuite, cliquez sur l’icône
pour télécharger le certificat en tant que fichier *.pem. -
Ajoutez le fichier
*.pemsur une machine Linux. Ensuite, exécutez la commande suivante (assurez-vous de remplacer au préalable le répertoire de travail par celui qui contient le fichier et aussi de remplacer « certificate.pem » par le nom réel du fichier) :openssl x509 -in certificate.pem -pubkey -noout | openssl rsa -pubin -outform der | sha256sum | awk '{print $1}'
 pour télécharger le certificat en tant que fichier
 Le résultat (par exemple : 499e42e36d7b04529725a1f8036e0f7cf1030b4e25a3fa1988f2572e1ce70d28) est le hash SHA-256 que vous utiliserez lors de la création de l’enregistrement DNS TLSA.
Ajouter un enregistrement DNS TLSA
- Connectez-vous à Plesk.
- Allez sous Sites web et domaine. Ensuite, cherchez le domaine concerné.
- Allez dans l’onglet Hébergement et DNS et cliquez sur DNS.
- Cliquez sur Ajouter un enregistrement.
- Sélectionnez « TLSA » dans le menu déroulant « Type d’enregistrement ».
- (Facultatif) Spécifiez un TTL pour l’enregistrement. Si vous avez un doute quant au TTL optimal, n’ajoutez rien au champ « TTL ». Dans ce cas, la valeur TTL par défaut sera utilisée.
- Spécifiez le port « 25 ». N’ajoutez pas de tiret bas, celui-ci s’ajoute automatiquement.
- Spécifiez le protocole « tcp ». N’ajoutez pas de tiret bas, celui-ci s’ajoute automatiquement.
- Dans le champ « Nom de domaine », indiquez « mail ».
- Dans le menu déroulant « Utilisation », sélectionnez « 3, DANE-EE ».
- Dans le menu déroulant « Sélecteur », sélectionnez « 1, SPKI ».
- Dans le menu déroulant « Méthode de correspondance », sélectionnez « 1, SHA-256 ».
- Dans le champ « Données d’association de certificat », collez le hash de la clé publique du certificat que vous avez généré auparavant.
- Cliquez sur OK. Ensuite, cliquez sur Mettre à jour pour appliquer les modifications à la zone DNS.
Un enregistrement DNS TLSA est ajouté et ces changements sont appliqués à la zone DNS. Une fois que les modifications DNS sont été propagées (cela prend en général 24 heures), DANE devient actif pour les connexions SMTP au domaine.