(Plesk for Linux) Hardening Server Connections Using DANE
概要: If connections to the mail server are secured using an SSL/TLS certificate, you can make them more resistant to downgrade and man-in-the-middle attacks by enabling DNS-based Authentication of Named Entities (DANE). DANE also protects against website impersonation caused by certificate authorities being compromised.
In this topic, you will learn how to harden connections to the server using DANE: automatically via SSL It! and manually. Note that this topic is not meant to be an exhaustive source of information about DANE or TLSA DNS records.
In Plesk, you can harden connections to the server using DANE in the following ways:
- Automatically by using the SSL It! extension.
- Manually by generating a hash of the SSL/TLS certificate’s public key, and then adding a TLSA DNS record.
Each way has its own advantages as well as downsides.
The automatic implementation of DANE using SSL It! is easy and needs just a few clicks. However, you can harden only one connection type with DANE: to the mail server for an individual domain. Additionally, you can use DANE only with Let’s Encrypt certificates. If you want to use DANE with SSL/TLS certificates of other certificate authorities, choose the manual implementation.
The manual implementation of DANE is a multistep procedure, which requires time and effort (even though we provide you with a step-by-step guide below). As for the benefits, you can harden connections not only to the mail server but also other ones secured with SSL/TLS certificates. You can also use DANE with SSL/TLS certificates of any certificate authorities, not limited to Let’s Encrypt only.
Regardless of the way you choose, you will need to make sure your server and/or hosted domains meet certain requirements necessary for using DANE.
(Automatically) Hardening Mail Connections Using DANE
Before you can automatically harden a connection to the mail server using DANE, make sure your server and hosted domains have the following configuration:
- For the Plesk server: - The mail service is enabled. - DKIM is enabled. - Plesk is the primary DNS server.
- For the domain whose connection to the mail server you want to harden using DANE: - The mail service is enabled. - DKIM is enabled. - The MX record exists and it resolves to the IP address of the Plesk server. - DNSSEC is enabled.
If all the conditions above are fulfilled, you can harden a connection to the mail server using DANE with the help of the SSL It! extension.
Hardening a Mail Connection Using DANE via SSL It!
-
Go to Websites & Domains, and then locate the required domain.
-
Click SSL/TLS Certificates.
-
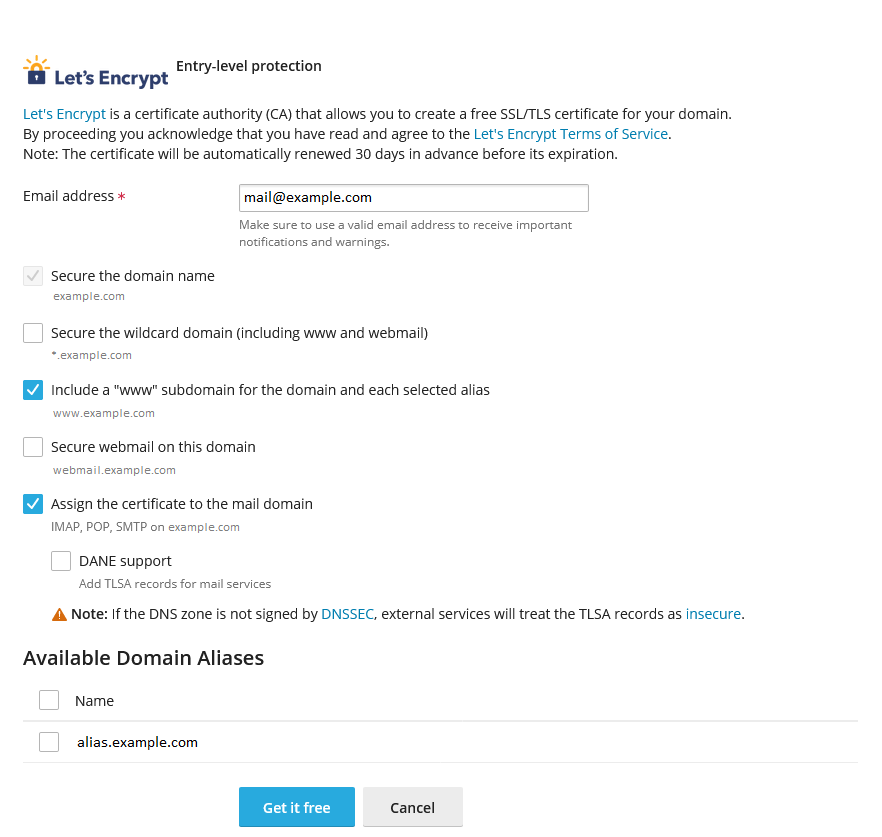
Under 「Install a free basic certificate provided by Let’s Encrypt」, click Install.
-
Keep the 「Secure the domain name」 checkbox selected.
-
(Optional) Select other checkboxes depending on subdomains you want to secure.
-
Select the 「Assign the certificate to the mail domain」 and 「DANE support」 checkboxes.

-
點按 免費獲取。
-
Wait a while until the created TLSA records necessary for DANE are propagated to the DNS server, and then click Install.
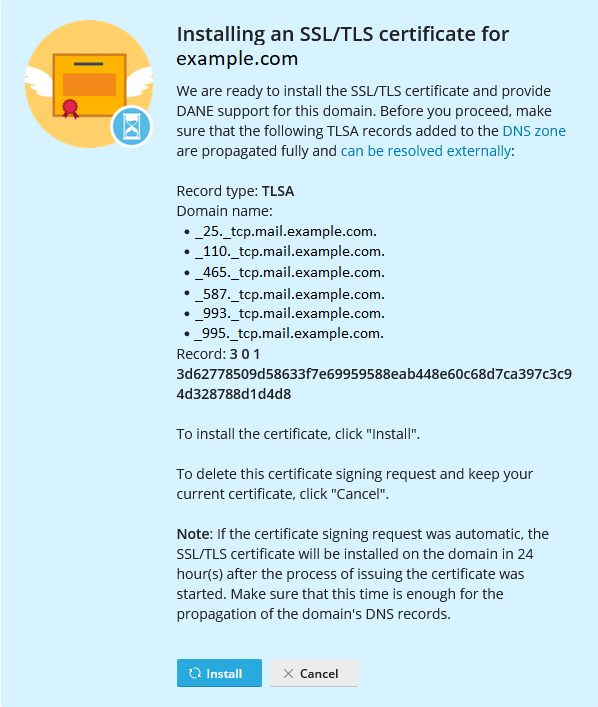
SSL It! has secured your domain with a Let’s Encrypt certificate and also hardened the domain’s connection to the mail server using DANE.
Automatically Renewing Certificates with DANE
SSL It! automatically renews free SSL/TLS certificates from Let’s Encrypt 30 days in advance of their expiration. If a certificate was issued with DANE support, SSL It! will configure it for a new certificate as well.
When a new certificate is ready to be installed on the domain, SSL It! creates a corresponding set of TLSA records and sets a timer for 24 hours (it is the default value). After the timer expires, the next run of the SSL It! 「Keep websites secured」 task installs the new certificate and removes old TLSA records. Depending on the configured settings, Plesk also sends an email notification on the certificate renewal.
If desired, you can change the default 24-hour interval between the creation of TLSA records and the installation of a new certificate by adding lines of the following pattern to the panel.ini file:
[ext-sslit]
dane-confirmation-interval-in-hours = <the number of hours>
例如:
[ext-sslit]
dane-confirmation-interval-in-hours = 12
Disabling DANE Support in SSL It!
By default, DANE support is enabled in SSL It! if the Plesk server and hosted domains meet the configuration criteria necessary for DANE. It means that you and your customers can see and select the 「DANE support」 checkbox under 「Assign the certificate to the mail domain」 when securing a domain with a Let’s Encrypt certificate.
To safeguard your customers, you may want to disable DANE support in SSL It! by hiding the corresponding checkbox. To do so, add the following lines to the panel.ini file:
[ext-sslit]
daneEnabled = false
(Manually) Hardening Server Connections Using DANE
You can harden connections via any application protocol that is already secured using an SSL/TLS certificate via the corresponding combination of transport protocol and port (for example, 「TCP/25」 for SMTP, 「TCP/443」 for HTTPS, and so on).
Hardening connections via a specific application protocol is a two-step process:
- First, you need to generate a hash of the SSL/TLS certificate’s public key. Although you can also use the unhashed public key or the hash of the entire certificate, in this example we will be using a public key hash.
- Then, you need to add a TLSA DNS record specifying a number of necessary parameters, including the hash.
You need to repeat the above steps for every application protocol you want to harden.
In the example below, we provide the steps to harden SMTP connections to the mail server for an individual domain. You can use them as reference to harden other connections, if desired.
前提條件
Before you can harden SMTP connections using DANE for an individual domain, you need to do the following:
Securing SMTP Server Connections
備註: In the example below, we will be using the SHA-256 hash of the SSL/TLS certificate’s public key, and not the entire certificate. This way, you do not need to update the TLSA record when renewing the certificate unless the public key changes as well.
Generating the certificate public key hash
-
Go to Websites & Domains, and then locate the required domain.
-
Click SSL/TLS Certificates.
-
Locate the certificate securing the mail server (the one marked with 「Secures mail」), and then click the
icon to download the certificate as a *.pemfile. -
Place the
*.pemfile on a Linux machine, and then run the following command (make sure to change the working directory to the one containing the file beforehand, and also to replace 「certificate.pem」 with the actual file name):openssl x509 -in certificate.pem -pubkey -noout | openssl rsa -pubin -outform der | sha256sum | awk '{print $1}'
 icon to download the certificate as a
 The resulting output (for example, 499e42e36d7b04529725a1f8036e0f7cf1030b4e25a3fa1988f2572e1ce70d28) is the SHA-256 hash you will use when creating the TLSA DNS record.
Adding the TLSA DNS record
- 登錄到 Plesk。
- Go to Websites & Domains, and then locate the required domain.
- Go to the Hosting & DNS tab, and then click DNS.
- 按一下 添加記錄 。
- Select 「TLSA」 from the 「Record type」 drop-down menu.
- (Optional) Specify a TTL for the record. If you are not sure about what the optimum TTL may be, leave the 「TTL」 field blank. In this case, the default TTL value will be used.
- Specify port 「25」. Do not add the underscore character, it will be done automatically.
- Specify protocol 「tcp」. Do not add the underscore character, it will be done automatically.
- Enter 「mail」 into the 「Domain name」 field.
- Select 「3, DANE-EE」 from the 「Usage」 drop-down menu.
- Select 「1, SPKI」 from the 「Selector」 drop-down menu.
- Select 「1, SHA-256」 from the 「Matching type」 drop-down menu.
- Paste the certificate public key hash you generated earlier into the 「Certificate association data」 field.
- Click OK, and then click Update to apply the changes to the DNS zone.
A TLSA DNS record is added, and the changes to the DNS zone are applied. Once the DNS changes have propagated (this usually takes around 24 hours), DANE will become active for SMTP connections to the domain.