Laravel Toolkit
概要: Laravel Toolkit 是一個免費的Plesk擴展,您可以用來簡化與託管Laravel應用程式相關的日常任務。
在本主題中,您將學習如何在Plesk中上傳、配置和運行 Laravel 應用程式。注意,本主題假設您已經準備好應用程式,或者正在計畫創建應用程式。這並不是關於如何創建 Laravel 應用程式的指南。
前提條件
在您可以託管Laravel應用程式之前,必須在Plesk伺服器上安裝免費的`Laravel Toolkit擴展 <https://www.plesk.com/extensions/laravel/>`__:
- 如果您是Plesk管理員,請 從擴展目錄安裝擴展。
- 否則,請聯繫您的主機提供商,並要求他們為您安裝該擴展。
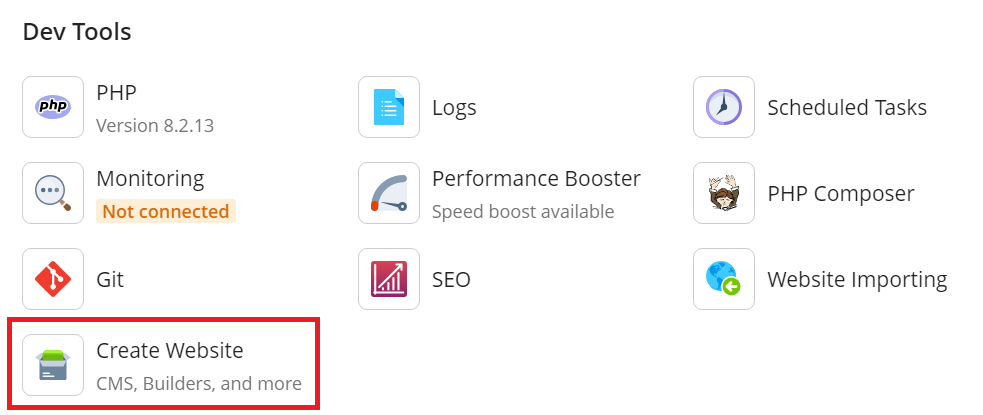
Once the extension is installed, you are ready to begin. You will see the Laravel button in the Navigation Pane, and also in the 「Create Website」 drawer on the domain cards of all your domains.

更新您的應用程式
在配置和運行應用程式之前,您需要將其上傳到Plesk伺服器,並在Laravel Toolkit中將其註冊。有三種方法可實現:
- 創建 Laravel 框架。如果您的應用程式存儲在電腦上的資料夾或壓縮檔中,或者您希望從頭創建應用程式,Laravel Toolkit 可以創建必要的目錄結構,還可以創建本地Git repository。
- 從遠程 Git repository 安裝。如果您的應用程式存儲在遠端repository中,那麼您可以將其部署到Plesk伺服器上。
- 掃描現有的應用程式。如果您已經將您的應用程式上傳到Plesk,您可以通過掃描方式在 Laravel Toolkit 中註冊您的應用程式。
備註: 要能夠創建Laravel 框架或從遠端 Git repository 進行安裝,必須在Plesk伺服器上安裝免費的`Git 擴展 <https://www.plesk.com/extensions/git/>` __。
創建 Laravel 框架:
- 登錄到 Plesk。
- Go to Websites & Domains, find the domain that will host your application, and then click Create Website > Laravel.
- 選擇」安裝框架」,然後按一下 安裝應用程式。
- 一旦安裝了框架,您需要將應用程式檔案上傳到Plesk(例如,使用 FTP 或 檔案管理員),必要時替換默認文件。
從遠處 Git repository 安裝:
- 登錄到 Plesk。
- Go to Websites & Domains, find the domain that will host your application, and then click Create Website > Laravel.
- 選擇 「從遠端 repository 安裝」。
- 鍵入或粘上包含應用程式檔案的遠程 repository 的URL。
- 如果遠端repository需要驗證,請將您在此頁面上看到的公開金鑰添加到repository中。
- 點按 安裝應用程式。
掃描現有應用程式:
- 登錄到 Plesk。
- 轉到 網站與域名,找到將託管您的應用程式的域名,然後打開」主機與 DNS」 標籤。
- Click Hosting.
- 更改“文檔根目錄”值以匹配應用程式的公共目錄(預設情況下,
/httpdocs/public)的路徑,然後按一下 保存。 - Go back to the 「Dashboard」 tab, click Create Website > Laravel, click Cancel, and then click Scan.
Once you have uploaded or deployed your application’s files and your application has been registered in Laravel Toolkit, the Laravel button will appear on the card of the domain hosting your application.

現在可以繼續下一步。
運行 Artisan、Composer 和 Node.js 命令
要管理Laravel應用程式,您可能需要運行Artisan、Composer 和/或 Node.js 命令。通過Laravel Toolkit 可以方便地從Plesk介面運行這些命令,而不需存取shell。
如果您不確定是否需要運行任何Artisan、Composer 和/或 Node.js 命令才能使應用程式正常運行,請諮詢向您提供該應用程式的人員或機構。
備註: 若要能夠運行 Node.js 命令,必須在 Plesk伺服器上安裝免費的 Node.js 擴展。
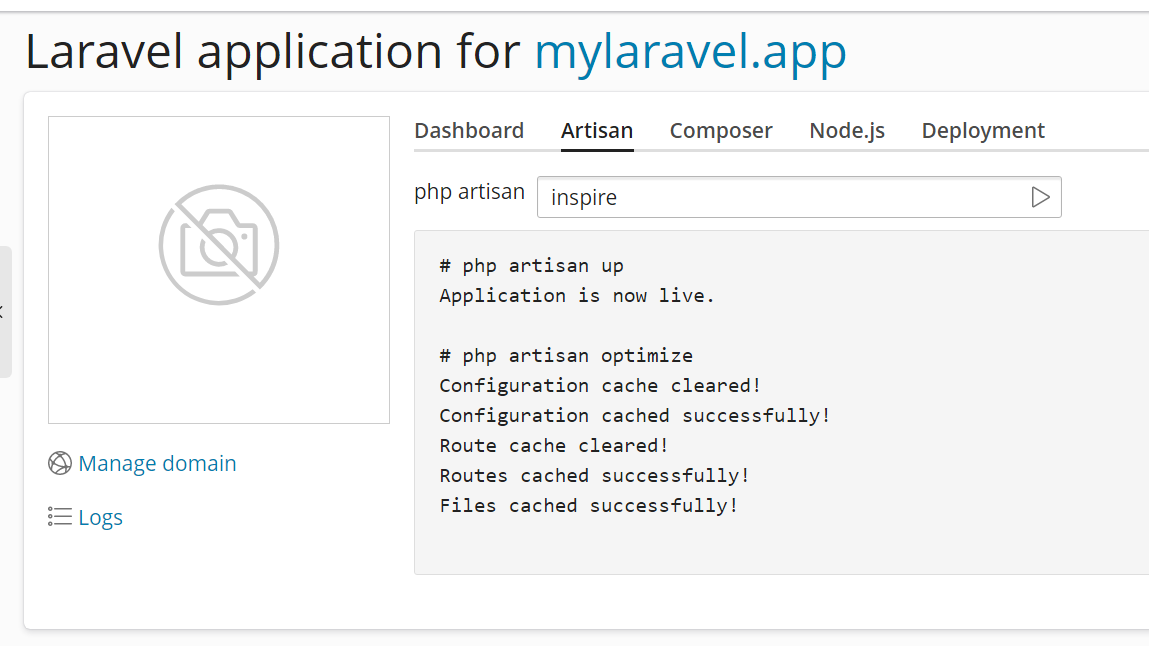
運行 Artisan、Composer 或 Node.js 命令:
-
Go to Websites & Domains, find the domain hosting your application, and then click Laravel.
-
轉到相應的選項卡,鍵入您要運行的命令或從列表中選擇一個,然後按Enter鍵或按一下|image-ui-lib-start| 按鈕。
備註: 在運行Node.js命令時,您可能需要指定一個特定的Node.js版本和/或套裝程式管理器,以使該命令達到預期的效果。如果您不確定該選擇什麼,請諮詢向您提供該應用程式的個人或機構。
查看應用程式的日誌檔
當它運行時,Laravel應用程式會將其日誌寫入一個單獨的日誌檔。您可以直接從Laravel Toolkit 介面看到該檔的內容,從而不管可能會出現什麼問題時都能實現更容易地監控應用程式和故障排除。
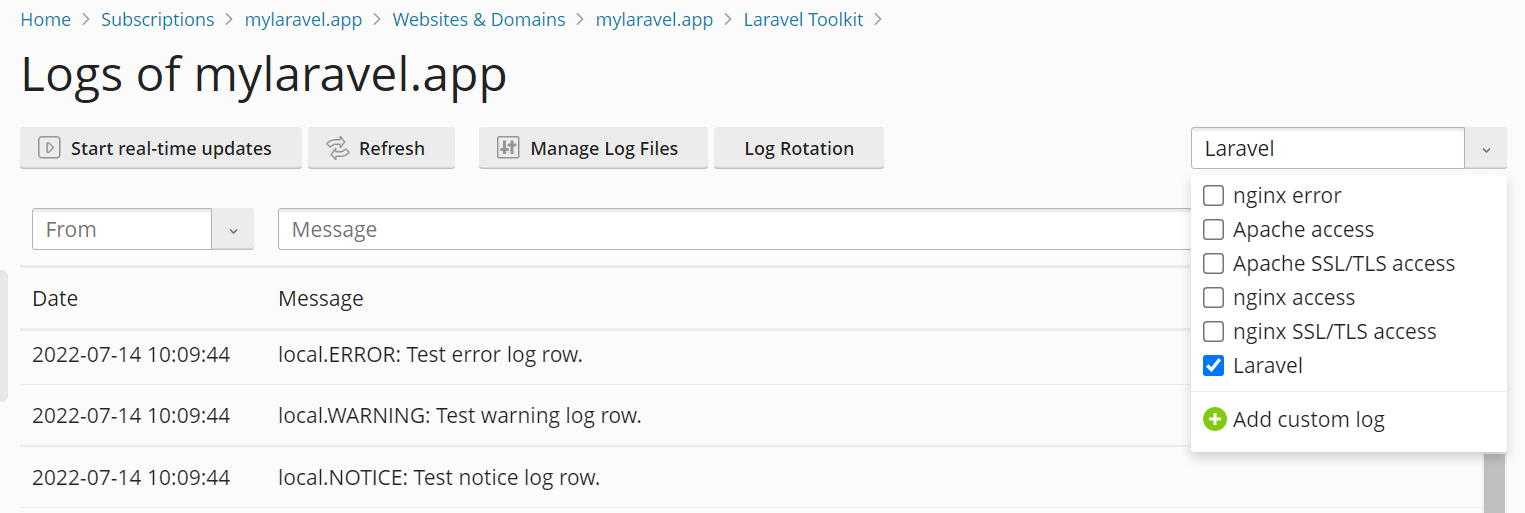
查看應用程式的日誌檔:
- 登錄到 Plesk。
- Go to Websites & Domains, find the domain hosting your application, and then click Laravel.
- 點按 日誌。
這將打開 域名日誌瀏覽器只顯示來自Laravel日誌的日誌條目。
查看應用程式的計畫任務
使用Laravel,您可以在應用程式的代碼中計畫任務,而不是使用外部計畫程式,如cron。使用Laravel Toolkit,您可以直接從Laravel Toolkit介面看到所有當前配置的計畫任務,還可以啟用或禁用Laravel計畫任務。
備註: 您無法從Laravel Toolkit 介面中添加、移除或編輯Laravel計畫任務。瞭解如何在應用程式的代碼內計畫任務
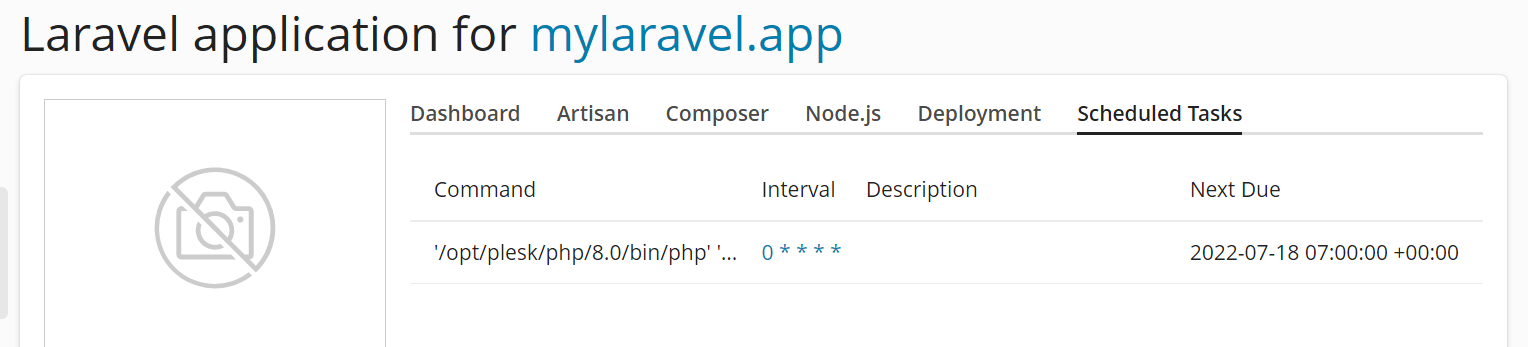
查看應用程式的計畫任務:
- 登錄到 Plesk。
- Go to Websites & Domains, find the domain hosting your application, and then click Laravel.
- 轉至“計畫任務”選項卡(僅在配置了一個或多個計畫任務時,該選項卡才可見)。
備註: 為了能夠啟用或禁用應用程式的計畫任務,您需要首先執行一個特定的操作,具體操作取決於您運行的是 Plesk for Linux 或 Plesk for Windows。您需要對每個託管要運行其計畫任務的Laravel應用程式的域名執行此操作。
Enabling scheduled tasks management:
- 登錄到 Plesk。
- Enable the 「Scheduler management」 permission (found on the 「Permissions」 tab) for the subscription to which the domain hosting your application belongs.
- (Plesk for Linux) 轉到 網站與域名,找到託管您的應用程式的域名,轉到 「主機與 DNS」 標籤,然後點按 主機。
- (Plesk for Linux) 在」SSH 存取」下,選擇除」禁止」以外的任何選項,然後按一下 保存。
您現在可以啟用或禁用應用程式的計畫任務。
啟用應用程式的計畫任務:
- 登錄到 Plesk。
- Go to Websites & Domains, find the domain hosting your application, and then click Laravel.
- 點按“計畫任務”切換按鈕,以顯示“啟用”。
現在已為Laravel應用程式啟用了計畫任務。
編輯環境變數
您的應用程式可能需要一個或多個自訂環境變數才能正常運行,或者可能會根據已設定的環境變數更改其行為。如果您不確定應用程式是否需要任何環境變數才能正常運行,請諮詢向您提供該應用程式的人員或機構。
編輯環境變數:
- 登錄到 Plesk。
- Go to Websites & Domains, find the domain hosting your application, and then click Laravel.
- 點按 「環境變數 (.env)」 旁的 編輯 按鈕。
- 根據需要編輯環境變數,然後按一下 更新。
更新後的環境變數現在已經生效了。
將您的應用程式置於維護模式
為了防止網站存取者在您正在工作或更新您的應用程式時看到錯誤,您可以將其置於維護模式。當您的應用程式處於維護模式時,網站存取者將看到一個頁面顯示“503服務不可用”的錯誤。
將您的應用程式置於維護模式:
- 登錄到 Plesk。
- Go to Websites & Domains, find the domain hosting your application, and then click Laravel.
- 點按 維護模式 切換按鈕,以顯示」啟用」。
您的 Laravel 應用程式現在處於維護模式。
備註: 在完成工作或更新後,不要忘記將應用程式退出維護模式。
更新您的應用程式
不管您的Laravel應用程式檔案是在本地或遠端Git repository中存儲,都需要確保將對應用程式碼所做的更改傳播到Plesk伺服器。您可以選擇手動或自動部署更改。
如果您需要精確控制更新應用程式的時間,我們建議手動更新。這樣,在您準備好進行更改之前,對repository中的應用程式碼所做的更改都不會傳播到Plesk伺服器。這種方法的缺點是,每次需要更新應用程式時,您都必須執行手動操作。
手動更新您的應用程式:
- 登錄到 Plesk。
- Go to Websites & Domains, find the domain hosting your application, and then click Laravel.
- 轉到“部署”選項卡,在“部署模式”下,選擇“手動”選項按鈕。
- 在」部署方案」下,清空與不希望在部署期間運行的步驟對應的核取方塊,然後按一下 部署。
一旦Laravel Toolkit運行完了所有的部署步驟,您的應用程式及其依賴項將會被更新。
如果您希望將對應用程式的代碼所做的更改自動傳播到Plesk伺服器,具體方法取決於應用程式的代碼是存儲在本地還是遠端Git repository中。
自動更新應用程式(本地repository):
- 登錄到 Plesk。
- Go to Websites & Domains, find the domain hosting your application, and then click Laravel.
- 進入“部署”選項卡,並在“部署模式”下選擇“自動”選項按鈕。
- 在」部署方案」下,清空與不希望在部署期間運行的步驟對應的核取方塊。
現在,每次commit 操作被push到存儲應用程式碼的本地 repository的 master branch時,您的應用程式及其依賴項都將被更新。
自動更新應用程式(遠端repository):
- 登錄到 Plesk。
- Go to Websites & Domains, find the domain hosting your application, and then click Laravel.
- 複製您在此處看到的 webhook URL,然後將其添加到遠端repository中。有關具體說明,請參見repository提供商的文檔。
- 進入“部署”選項卡,並在“部署模式”下選擇“自動”選項按鈕。
- 在」部署方案」下,清空與不希望在部署期間運行的步驟對應的核取方塊。
現在,每次觸發webhook的事件發生在存儲應用程式碼的遠端repository 中時,您的應用程式及其依賴項都將被更新。
配置部署腳本
您的應用程式可能需要在部署期間在伺服器上運行某些命令才能正常運行。為了避免手動運行這些命令,您可以配置每次更新應用程式時都運行的部署腳本。
如果您不確定應用程式在部署期間是否需要運行任何命令才能正常運行,請諮詢向您提供該應用程式的人員或機構。
備註: 在Plesk for Linux中,您需要先啟用SSH存取,然後才能從Laravel Toolkit介面編輯部署腳本。您只需執行一次此操作。
(Plesk for Linux) Enabling the ability to edit the deployment script:
- 登錄到 Plesk。
- 轉到 網站與域名,找到託管您的應用程式的域名,轉到 「主機與 DNS」 標籤,然後點按 主機。
- 在」SSH 存取」下,選擇除」禁止」以外的任何選項,然後按一下 保存。
現在可以從 Laravel Toolkit 介面編輯部署腳本。
編輯部署腳本:
- 登錄到 Plesk。
- Go to Websites & Domains, find the domain hosting your application, and then click Laravel.
- 轉到 「部署」 選項卡,然後按一下 編輯腳本。
- 鍵入或粘上部署腳本,然後按一下 更新。
部署腳本現在已生效,並且將在每次更新應用程式時運行。
Managing Queues
Queues in Laravel make it possible to process time-consuming tasks, such as parsing an uploaded file, asynchronously in the background. If your application supports queues, you can enable them in Plesk to configure the queue worker process.
To use queues, you need to enable them for your subscription, and also to create a database for the queue worker to use. This is a one time procedure.
Laravel queues can use a variety of queue backends. However, in this guide we will only cover using a MySQL/MariaDB database as backend. This is the simplest way to enable queues in Plesk, and it should be sufficient for most users. Other backends may provide advantages, such as improved access times, but they require expertise to implement and maintain, and may also incur additional costs.
Enabling queues:
-
Log in to Plesk, and then locate the domain hosting your application.
-
Enable scheduled tasks for your application. This is necessary for queues to function.
-
In your application’s Git project repository, add the following line to the 「require」 section of the
composer.jsonfile:"plesk/ext-laravel-integration": "^7.0"
備註: In each section of the
composer.jsonfile, every line except the last one must end with a comma.If you use a local Git repository, do not make this change via File Manager. Instead, commit changes to the repository. This is to avoid the changes being overwritten the next time you deploy your application.
-
Click Laravel, go to the 「Deployment」 tab, and then click Deploy. This will result in changes being made to the contents of the
composer.lockfile. Commit those changes to the repository to avoid the changes being overwritten the next time you deploy your application. -
After committing the changes, click Deploy once again.
-
(Optional) Return to the domain card, click Databases, and then click Add Database.
備註: If your Laravel application is already using a MySQL/MariaDB database, you can use that database to enable queues. In that case, skip this step, and also the following step.
-
(Optional) Create a MySQL or MariaDB database, and a database user.
-
Return to the domain card, click Laravel, and then click the Edit button next to 「Environment variables (.env)」.
-
Add the following lines to the
.envfile, replacing the placeholders with the information about the database you want to use (either the one just created, or the one already being used by your Laravel application):DB_CONNECTION=mysql DB_HOST=<database server IP address or hostname> QUEUE_CONNECTION=database DB_DATABASE=<database name> DB_USERNAME=<database user name> DB_PASSWORD=<database user password>
and then click 「Update」.
-
Go to the 「Artisan」 tab, and then run the following commands, in this order:
queue:tablemigrate -
Go to the 「Dashboard」 tab, take your Laravel application out of maintenance mode, and then click the Queue toggle button so that it shows 「Enabled」.
Queues are now enabled for your Laravel application.
To make the queue worker process use server resources more efficiently, there is a number of settings you can configure in Plesk. They mostly deal with conditions under which the queue worker process may exit, freeing the memory it has been using.

Configuring the queue worker process:
-
Log in to Plesk, and then locate the domain hosting your application.
-
Click Laravel, and then go to the 「Queue」 tab.
-
(Optional) Select the 「Stop Worker When Empty」 checkbox to configure the worker process to stop when there are no jobs in the queue. If you do, the worker process will start every 60 seconds, process all jobs currently in the queue, and then exit.
If you do not select the 「Stop Worker When Empty」 checkbox, the worker process will remain running even when there are no jobs in the queue.
-
(Optional) Set a custom 「Timeout」 value to configure the worker process to exit with an error if job has been running for a length of time exceeding the configured value. Make sure that the 「Timeout」 value allows enough time for a typical job created by your Laravel application to finish.
If you do not set a custom 「Timeout」 value, the worker process will not exit even if an individual job has been in the queue being processed for a long time (for example, because the job has become stuck).
警示: Setting too low a value may result in jobs failing because of insufficient time to process (for example, when uploading a large file). If you start experiencing failed jobs after setting a custom 「Timeout」 value, consider increasing it or returning the parameter to its default value (「0」, indicating no limit on job processing time).
-
(Optional) Set a custom 「Max Jobs」 value to configure the worker process to exit once it has processed a certain number of jobs.
If you do not set a custom 「Max Jobs」 value, the worker process will not stop, even if it has processed a large number of jobs.
-
(Optional) Set a custom 「Max Time」 value to configure the worker process to exit once it has been running for the specified number of seconds (the worker process will not exit while in the middle of processing a job).
If you do not set a custom 「Max Time」 value, the worker process will keep running even if it has been running for a long time.
The queue worker process has been configured and should now use server resources more efficiently.
Jobs may fail due to many reasons. Plesk keeps track of failed jobs, which you can restart or dismiss.
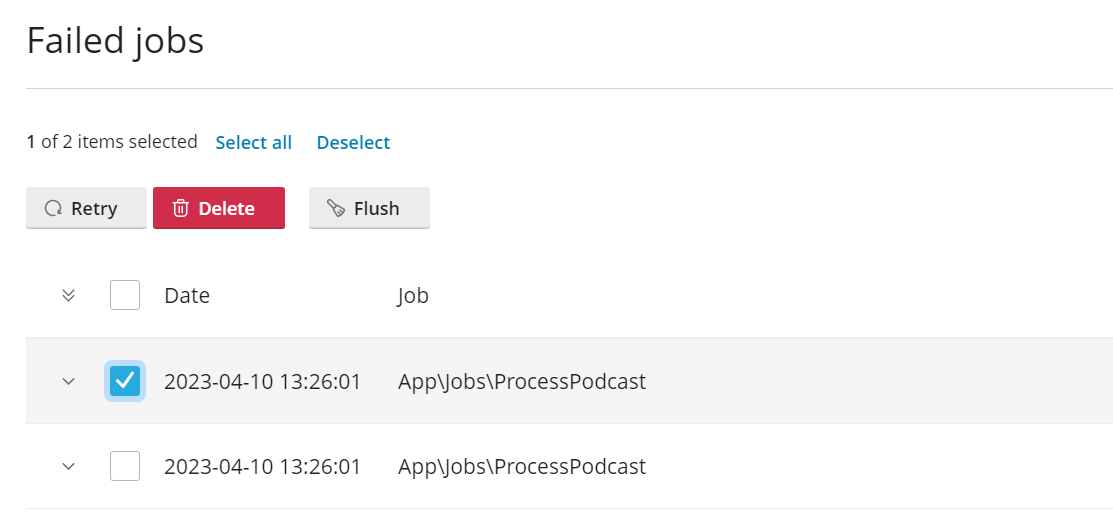
Viewing, restarting, and dismissing failed jobs:
- Log in to Plesk, and then locate the domain hosting your application.
- Click Laravel, go to the 「Queue」 tab, and then click Show failed jobs to see the list of failed jobs.
- (Optional) Select one or more failed jobs, and then click Retry to restart them.
- (Optional) Select one or more failed jobs, and then click Delete to remove them from the list.
- (Optional) Click Flush to remove all failed jobs from the list.
Failed jobs have now been restarted and/or dismissed.