使用 Docker
概要: Docker is a platform used to run applications in containers. It enables you to use specific software, such as Redis or MongoDB, or a specific version of software, which might not be supported by your operating system or might need compiling.
Docker is available as a Plesk extension. With it, you can run and manage containers based on specific Docker images, and to use Docker both on the local host and on remote servers.
In this topic, you will learn how to create, configure, and manage Docker containers in Plesk. You will also learn how to control remote Docker hosts from Plesk.
要求和局限性
警告: Docker 擴展會從 Docker Hub 按原樣下載鏡像而不會以任何方式進行預先配置。其中的某些Docker 容器或軟體僅用於可信的環境可能需要額外的安全設定。在Plesk中啟動這些下載的鏡像之前,需要自行增強其安全性。具體的說明,請參閱容器或軟體供應商的文檔。例如查看 Redis 文檔中的安全章節。
-
Docker is supported in Plesk for the following operating systems: CentOS 7, Red Hat Enterprise Linux 7, Debian 10, Debian 11, Debian 12, Ubuntu 18.04, Ubuntu 20.04, Ubuntu 22.04, Ubuntu 24.04, AlmaLinux 8.x, AlmaLinux 9.x, Rocky Linux 8.x, and Virtuozzo 7 with Update 1 Hotfix 1 (7.0.1-686) or later.
在 Plesk for Windows 中,您可以使用安裝在遠端機器上的 Docker(請參閱 **使用遠端的 Docker**)。
-
您無法在於 Docker 容器內部署的 Plesk 中使用 Docker。
-
要在Plesk中使用遠端的Docker服務,需要額外的許可證。可 單獨購買 或將其作為 Hosting Pack、Power Pack 或 Developer Pack 的一部分進行購買。
-
Docker 只能在x64 系統上運行。
-
不能遷移或備份 Plesk 中的 Docker 容器。但是您可以備份容器使用的資料(請查看 卷宗映射 )並下載快照。
-
支援安裝有 Update 1 Hotfix 1 (7.0.1-686) 或更新版本的Virtuozzo 7。注意從此次更新起,創建基於CentOS 7的新容器會默認啟用防火牆,因為 Virtuozzo 著力推動增強安全性。Plesk 管理員應手動配置防火牆以確保將 Plesk正常運行所需的埠 打開。
前提條件
Before you can start using Docker, the Docker extension must be installed on the Plesk server:
- 如果您是Plesk管理員,請 從擴展目錄安裝擴展。
- 否則,請聯繫您的主機提供商,並要求他們為您安裝該擴展。
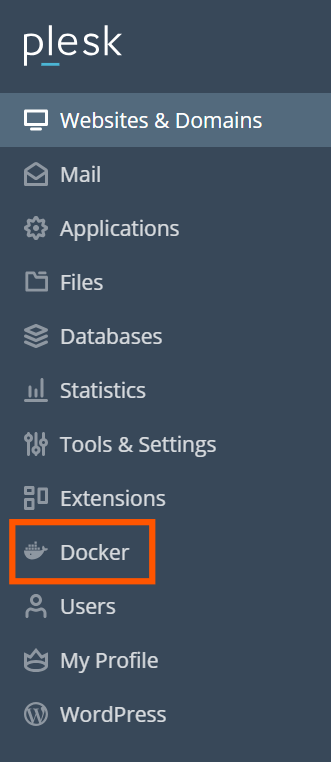
Once the extension is installed, you are ready to begin. You will see the Docker option in the Navigation Pane.
Containers
You can access images from Docker Hub in the Run Container catalog (Docker > Containers > Run Container).
To access the catalog:
- if you have not previously installed a container, in Docker > Containers, click Run Container.
- if you have previously installed a container, in Docker > Containers, click the plus icon
.
To view available images, use the search box.
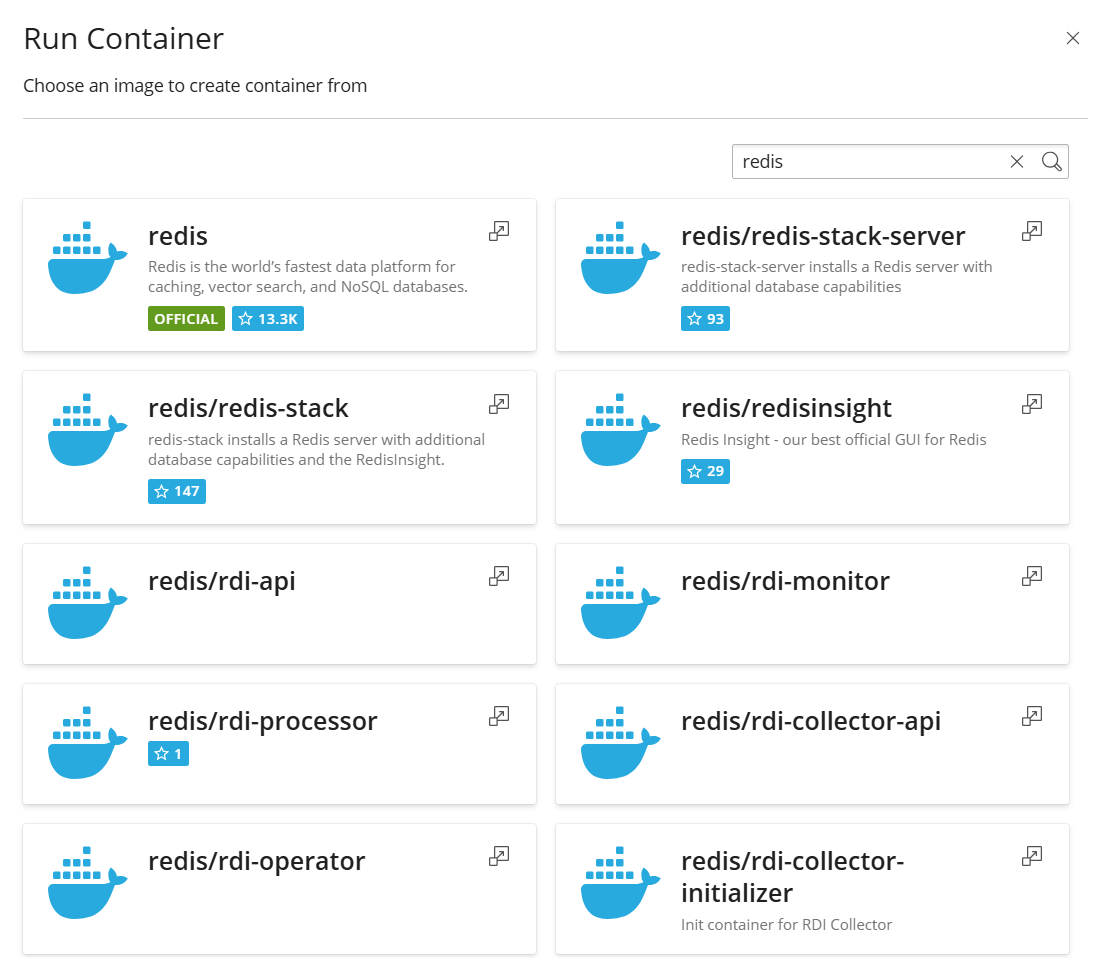
Specify the image name, the repository, or both.
These repositories are available to search:
- 本地 repository - 包含本地鏡像。這些鏡像已下載好且存儲在帶有Docker的伺服器上。詳情請查看 管理本地鏡像 。
- Docker Hub.
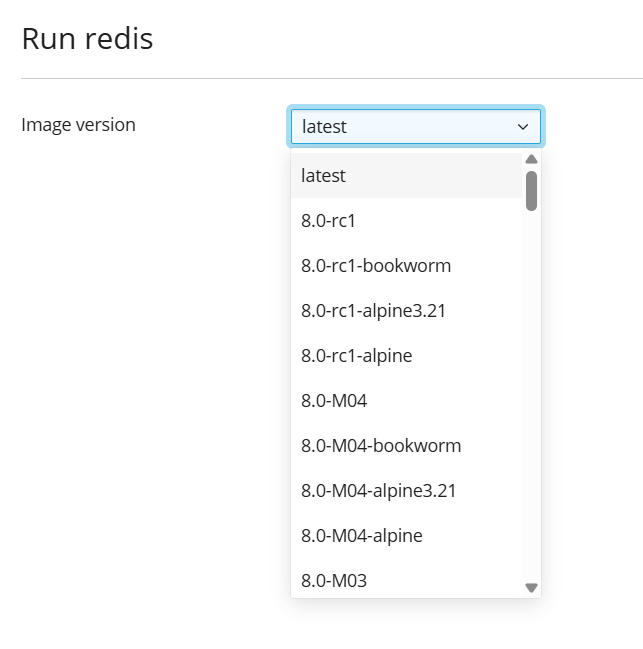
Multiple versions may be available for each application. You can run a specific version by selecting the appropriate tag, as shown below:
若要運行容器:
-
Go to Docker > Containers > Run Container.
-
Use the search box to find images in the catalog. If the image is stored locally, (local) appears after the version.
-
To view the image description and documentation on Docker Hub, click the more info icon
.
This does not apply to local images. -
Click the image card.
- To run a specific version, select the image version you want to run from the Image version drop-down and click Next.
- To run the latest version of the selected application, click Next.
Plesk 會創建一個容器並提示您指定其設定,例如環境變數,然後運行該容器。您可以點按 取消 (在 設定 頁面上)來取消運行。有關設定的詳情請參閱 容器設定 。
-
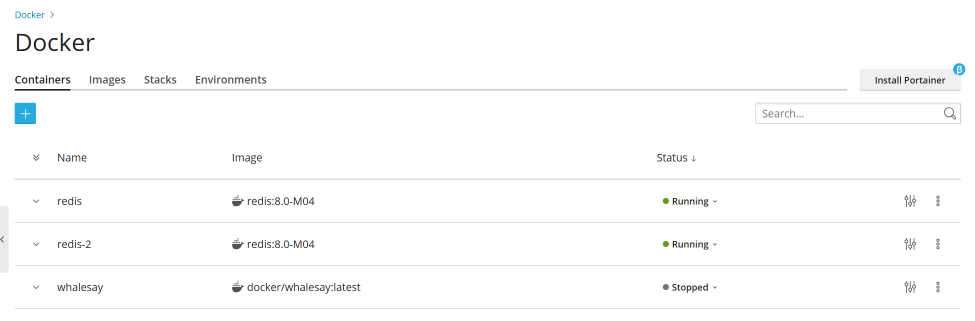
After you tweak the settings, click Run. The container appears in the list of containers in the Containers tab.
See the Console Log to find out if the container runs without issues.
容器設定
備註: 如果您想要更改容器設定,您則需要停止運行容器:當您保存新設定時,Plesk 會重新創建容器。
To edit container settings, go to the Containers tab and click the
settings icon ![]() next to the container you want to edit.
next to the container you want to edit.
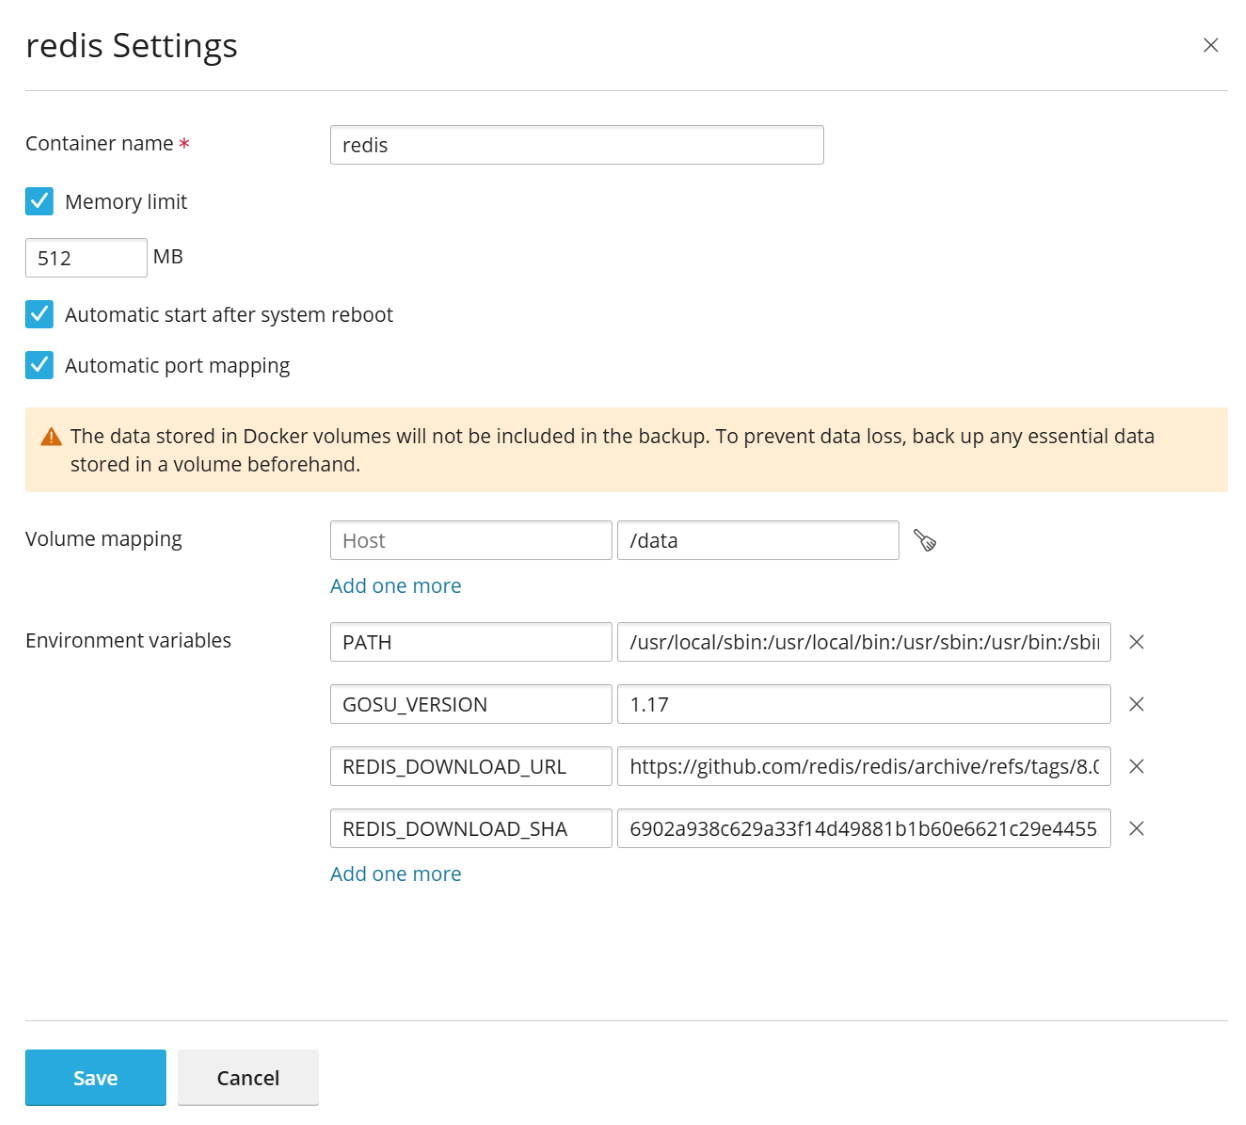
限制記憶體
By default, using RAM in a Docker container is unlimited. To limit using RAM, select the Memory limit checkbox and enter the limit value in megabytes in the MB field.
備註: 目前還不能限制Docker 容器的CPU和磁片使用量。
備註: Docker容器是管理員級別的對象,不受訂閱級別的cgroup限制 (CPU、RAM和磁片使用量)的控制。
自動啟動
如果沒有選中 系統重啟後自動啟動 選項,那麼在系統重啟後,使用該容器的網站可能會中斷,您則需要手動啟動容器。
埠映射
默認會啟用 自動埠映射 選項,容器的內部埠會被映射到主機系統上的任意埠(例如,32768)。
To change the port on the host system, deselect Automatic port mapping and specify another external port in Manual mapping. If Manual mapping does not appear when you deselect the option, it means that the container does not expose ports.
When using manual mapping, by default Docker only binds to the specified port on the host system’s localhost interface (127.0.0.1). This way, the port is inaccessible from the Internet, and the application inside the container is safe from attacks. To have Docker bind to the specified port on all network interfaces of the host system, deselect Make the port inaccessible from the Internet. If you do this, the application inside the container becomes accessible from the Internet, and can be reached on the specified port via any of the host system’s IP addresses.
警告: Docker presumes that authentication is carried out by the application itself, but sometimes it is not so (for example, MySQL/MariaDB does not allow anonymous access by default, but redis does). Making the application inside a container accessible from the Internet may result in the application being attacked by a malicious actor.
卷映射
Docker volumes are directories on your server mounted to a Docker container. This is how you have persistent storage that can be accessed from your host system. The data in Docker volumes is not deleted when you stop or delete a container.
警告: The data stored in Docker volumes will not be included in the Plesk backup. To prevent data loss, back up any essential data stored in a volume with a third-party backup tool.
欲瞭解更多有關容器中的資料的資訊,請參閱 Docker 文檔。
若要添加卷宗映射,請指定以下項:
- In the Host field - the absolute path to the directory on the server that you want to mount in the container.
- In the Container field - the absolute path to a directory inside the container.
To map more directories, click Add one more.
設定環境變數
容器內的應用會使用環境變數。您可能需要添加更多變數或編輯現有的變數。Plesk 允許您添加任意數量的變數。
對容器的操作
您可對容器執行以下操作:
-
Stop (Stop), start (Start) or restart (Restart) a container. In these cases, the container will be recreated with the current settings.
備註: 如果資料沒有保存到掛載的卷宗(請參閱 卷宗映射 部分),將會丟失。
-
Click the arrow
next to the container to view logs and resource consumption. -
Click the settings icon
next to the container to change container settings, such as environment variables or volume mapping (Settings). -
重命名容器( 設定 > 容器名稱 )。
Click the more options icon ![]() next to the container to do one or more of the following:
next to the container to do one or more of the following:
- Recreate a container using the same or another version of the image (Recreate).
- Create an image based on a container with your custom settings (Save as Image).
- Take a snapshot of a container (Download Snapshot).
- Remove a container (Remove).
重新創建容器
通常在您想要更新應用到更新的版本時需要重新創建容器。實際上就是您可以使用目錄中的任何應用版本而非更新的版本重建容器。
重新創建過程中會保留自訂設定。若要保留容器內應用所使用的資料,需要在重新創建容器之前指定卷宗映射。通過卷宗映射能夠存取容器內使用的目錄(請參閱容器設定中的 卷映射 部分)。
若要重新創建容器:
#. Go to Docker and click the more options icon ![]() next to
the container you want to recreate.
#. Click Recreate in the container settings and specify the image
version and whether to use default environment variables.
next to
the container you want to recreate.
#. Click Recreate in the container settings and specify the image
version and whether to use default environment variables.
使用遠端 Docker
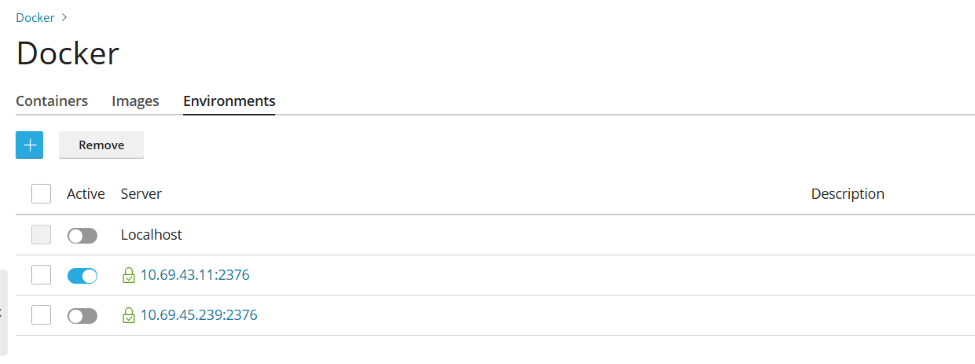
By default, Plesk uses Docker installed as a local service. However, you can use one or more Docker services installed outside of Plesk. Note that you can use only one service at a time. You can see which server is active in the Environments tab of the Docker settings page in Plesk.
備註: 管理遠端Docker服務需要Plesk附加許可證金鑰。若沒有,則只能管理在Plesk伺服器上運行的本地Docker服務。
配置遠端服務
請根據 Docker 文檔 配置運行Docker的遠端伺服器以在 Plesk 中使用該 Docker 作為遠端伺服器。
管理遠端服務
You can establish a connection between a Plesk server with the Docker extension and a remote node with Docker service.
以下步驟同時適用於 Plesk for Linux 和 Plesk for Windows。
These steps must be performed on the remote host:
#. Create the /etc/docker/daemon.json configuration file for Docker
with the following content:
1 2 3 4 5 6 7 8 |
{ "hosts": ["tcp://0.0.0.0:2376", "unix:///var/run/docker.sock"], "tls": true, "tlsverify": true, "tlscacert": "/root/ca.pem", "tlscert": "/root/server-cert.pem", "tlskey": "/root/server-key.pem" } |
#. Prepare .pem files. You can use the following example. Replace the IP on
line 4 with the IP address of your remote node and run each command:
1 2 3 4 5 6 7 8 9 10 |
openssl genrsa -aes256 -out ca-key.pem 4096 openssl req -new -x509 -days 365 -key ca-key.pem -sha256 -out ca.pem openssl genrsa -out server-key.pem 4096 openssl req -subj "/CN=192.0.2.1" -new -key server-key.pem -out server.csr openssl x509 -req -days 365 -sha256 -in server.csr -CA ca.pem -CAkey ca-key.pem -CAcreateserial -out server-cert.pem openssl genrsa -out key.pem 4096 openssl req -subj '/CN=client' -new -key key.pem -out client.csr openssl x509 -req -days 365 -sha256 -in client.csr -CA ca.pem -CAkey ca-key.pem -CAcreateserial -out cert.pem chmod 0400 ca-key.pem server-key.pem key.pem chmod 0444 ca.pem server-cert.pem cert.pem |
- Run the following commands to modify the current Docker service so it starts after host configuration:
1 2 3 4 |
cp /lib/systemd/system/docker.service /etc/systemd/system/ sed -i 's/\ -H\ fd:\/\///g' /etc/systemd/system/docker.service systemctl daemon-reload systemctl restart docker |
- Save the outputs of the following files on your local machine for use by the client to connect remotely:
1 2 3 |
cat key.pem cat cert.pem cat ca.pem |
On the local server, configure the Docker remote host:
- Go to Docker > Environments.
- Click Add Server and specify the settings of the remote server
with Docker.
- 若要開始在 Plesk 中使用該 Docker,請選定 設為活動 選項。
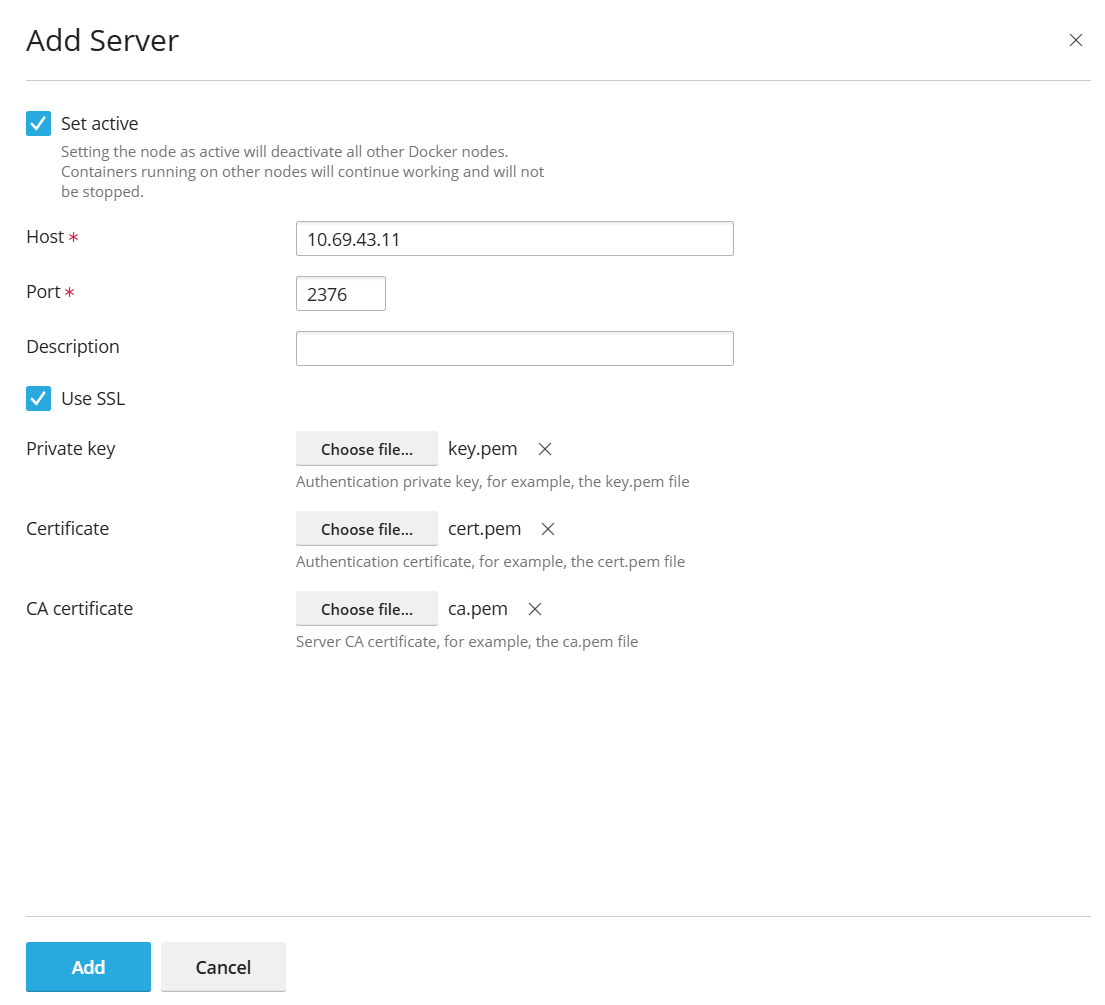
The link to Docker will appear in the Navigation Pane.
若要在 Docker 服務之間切換:
- Go to Docker > Environments.
- In the list of servers, select the Docker node that you are going to use and click Set Active.
Alternatively, you can set the Docker node as active while editing its settings.
使用自訂設定創建鏡像
如果您想要基於您對容器所做的修改創建新鏡像,請使用 另存為鏡像 命令。會創建容器的快照,作為新的鏡像在鏡像目錄中出現。因此,您可以使用自訂設定(例如環境變數)創建鏡像。
若要基於您的容器創建鏡像:
Go to Docker > Containers, click the more options icon ![]() next to the container and click > Save as Image. In the Save <container name> as Image
side panel, specify:
next to the container and click > Save as Image. In the Save <container name> as Image
side panel, specify:
- Image name.
- An optional Tag. You can specify the image version here. By default, the version will be 「latest」.
The created image appears in the Images tab and is marked Local image.
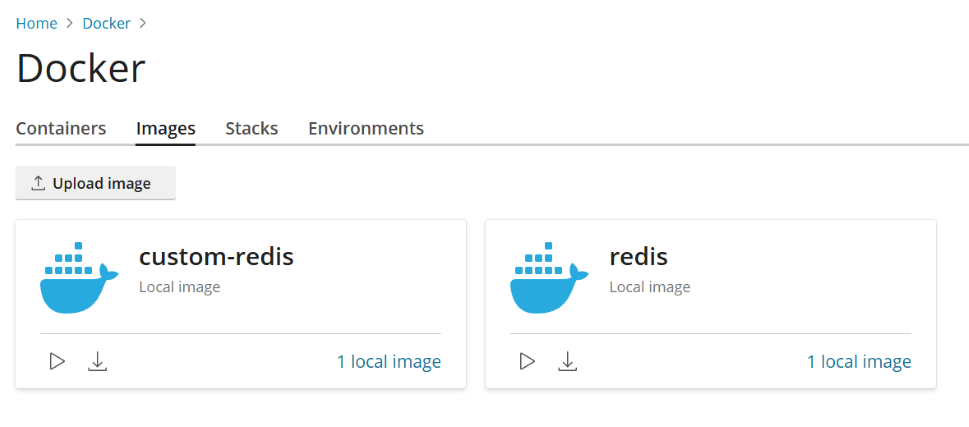
管理本地鏡像
本地鏡像是由 Docker 在本地磁片上存儲的鏡像,對於此類鏡像無需從鏡像目錄中下載。
鏡像可通過以下方式成為本地鏡像:
- 選定鏡像的任何版本(標籤),鏡像即開始下載。不過您是稍後運行容器還是取消運行(在 設定 頁面上),鏡像都會本地保存。
- You upload an image to Docker in Plesk (Upload image in the Docker Images tab).
- 從容器創建一個自訂鏡像(參閱 使用自訂設定創建鏡像 )。
- 使用命令列介面創建鏡像。
To download another version of an image from the online catalog, click
the Pull icon ![]() , choose the version you want to pull from the drop-down,
and click Pull.
, choose the version you want to pull from the drop-down,
and click Pull.
If Docker has at least one downloaded version from a group of versions belonging to an image, this image is marked Local image in the catalog. Plesk also shows how many local images exist for a product.
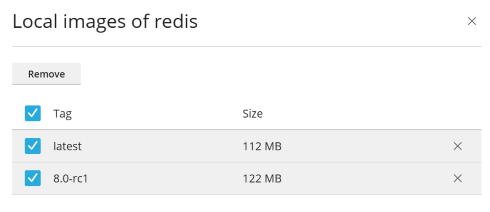
若要查看本地鏡像和移除過期的本地鏡像:
-
Go to Docker > Images.
-
To find a specific local image, use the Search bar.
-
若要查看某個產品的所有本地鏡像,請點按產品名稱下的連結。將會顯示所有本地鏡像的標籤和已佔據的磁碟空間。
-
Select the specific image(s) you want to remove and click Remove.
設定 nginx 處理從域名到容器的代理請求
某些 Docker 容器會顯示埠,因此可通過這些埠存取容器中的應用。
當您在網站上使用 Docker 容器中的應用時,您會發現不方便在其 URL 中指定非標準的埠。為了避免該不方便情況出現,您可以設定 nginx 處理從域名到該埠的代理請求,因而域名可以使用一個標準的埠(例如 80),無需在 URL 中明確指定該埠。
要求
- 必須在 Plesk 中運行 Nginx。
- You must map the port inside a container to a port on the host system (for example, 32768) manually
To map the port inside a container:
- Go to Docker > Containers and click the settings icon
next to the container you want to edit.
- Turn off Automatic port mapping.
- Map the port inside the container manually to a specific port on your system (for example, 32768). You can make this port inaccessible from the Internet.
You can set up nginx to proxy requests from domains to that port, so domains can use a standard port on nginx (for example, 80). To make this possible, add a rule for nginx in the domain settings.
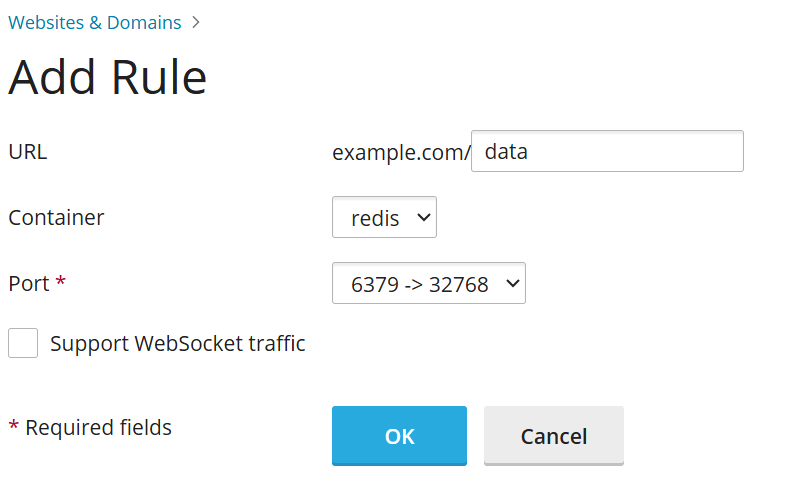
To add a rule for nginx in the domain settings:
進入 網站與域名 > 域名> Docker 代理規則 > 添加規則 並指定以下項:
- URL 。指定使用在容器中運行的應用的網站的 URL。可以是主網站也可以是其中一部分。
- 容器 。選擇以 Docker 容器形式運行的應用。
- 埠 。選擇在容器設定中指定的某個映射(某個容器內的一個埠映射到您的系統上的一個埠)。Nginx 將會代理到系統上該埠的請求。
代理規則在web伺服器配置中實現,例如在網站的 nginx.conf 檔中(在 /var/www/vhosts/system/$domain/conf/ 目錄中):
#extension docker begin
location ~ ^/.* {
    proxy_pass http://0.0.0.0:9080;
    proxy_set_header Host             $host;
    proxy_set_header X-Real-IP        $remote_addr;
    proxy_set_header X-Forwarded-For  $proxy_add_x_forwarded_for;
}
#extension docker end
代理規則在NAT後的伺服器上應運行良好。
備註: 通過代理規則連接到某網站的Docker容器不計入訂閱的磁碟空間使用量。如果網站目錄以卷的形式掛載到 Docker 容器則例外,因為這樣位於容器的所有檔都將計入網站的磁碟空間使用量。
Deploying Docker Compose YAML files
You can deploy Docker Compose YAML files using the online text editor, uploading a file from
local storage, or using a Docker Compose file stored inside a website’s Home directory. Typical
operations on stacks are supported, such as up (including pull and force-recreate),
stop, and down. You can modify and update the stacks after creation.
備註: You cannot deploy Dockerfiles or any other files required by an application using this section.
To deploy a Docker Compose file:
-
Go to Docker > Stacks > Add Stack.
-
Fill in a project name and choose one of the methods for deploying the docker-compose file:
- Editor: Define or paste the content of your Compose file.
- Upload: Upload a Compose file from local storage.
- Webspace: Select a Compose file stored in a domain’s Home directory. For Webspace, choose the domain where the file is located. For Compose File, browse to the Compose file location.
You can declare and build custom containers. Any artifacts created during the build process will be placed inside the website’s Home directory.
For more information about the Compose file format, refer to the Docker documentation.
Deploying Portainer containers in Docker
Portainer is a container management software that makes it easier to deploy containers and stacks, view a container’s status and logs, create users and teams, secure your environments, and more.
To install Portainer, go to Docker > Install Portainer. After installation is complete, to manage Portainer containers inside Docker, go to Docker > Go to Portainer.
備註: Portainer is currently a beta feature.
For more information about Portainer, refer to the Portainer documentation.