Adding and Removing Domains
Watch the video tutorial
If your hosting package includes more than one domain name (website), then you can easily add domains to the server. Before you start adding a new domain that will use a second-level domain name, like example.com, be sure to register this domain name. If your hosting provider provides the domain name registration service, you can do this from the Customer Panel as described below. Otherwise, you should register your domain name with another domain name registration authority.
You can set up the following types of site configurations through Plesk:
-
Website addressed by a second-level domain name. The following
services are available for websites:
- A unique Internet address (domain name), like example.com.
- Additional domain names (domain aliases).
- Subdomains - divisions of a site accessible by easy-to-remember addresses that are added to the main site, like mail.example.com.
- Separate FTP accounts for collaboration on the site content. For every FTP account, you can specify which directories can be accessed.
- Creating content using Sitejet Builder.
- Simplified deployment of applications, such as content management systems, photo galleries, shopping carts, blogging platforms, and many more.
- Secure data exchange implemented by SSL/TLS protocol. This requires that a site be hosted on a dedicated IP address, which is not shared among other users and sites.
- Mailboxes and mailing lists.
- Viewing statistics on site visits.
-
Website or a division of a website addressed by a third-level
domain name (subdomain). This is usually a division of an existing
site. It has an Internet address comprising of three parts separated
by dots. The following services are available for subdomains:
- Separate document root from the main site. Document root is a directory on the server where web pages of a site are stored.
- Access over FTP for content management.
- Creating content using Sitejet Builder.
- Simplified deployment of applications.
- Secure data exchange implemented by SSL/TLS protocol.
- Viewing statistics on site visits.
Adding More Domains
To host a new website with a second-level domain name:
-
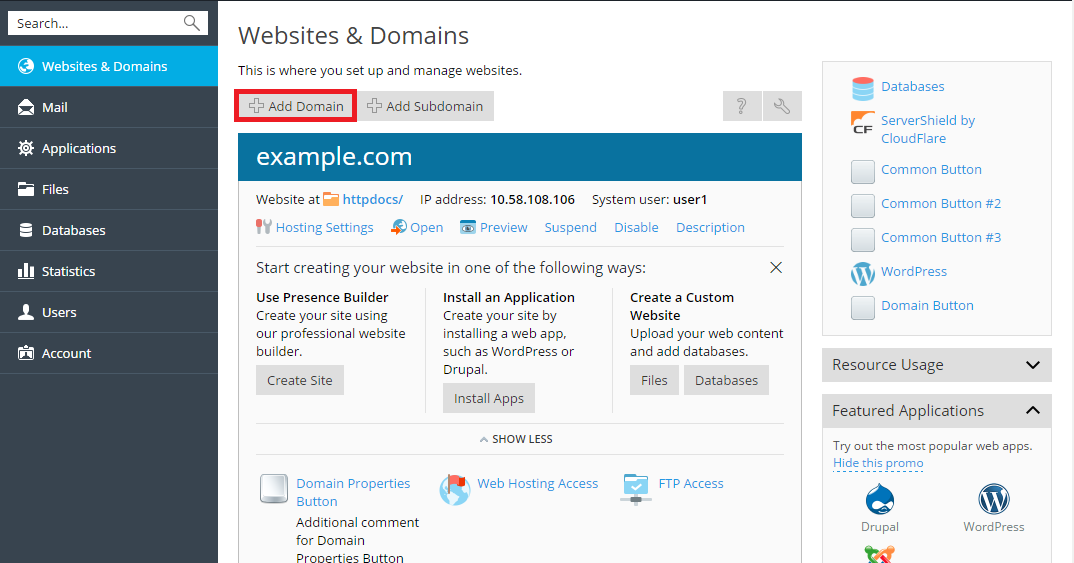
Go to Websites & Domains, click Add Domain and follow on-screen instructions.
Note: Depending on the Plesk edition, the information that you can specify on the Add Domain screen might differ.

Note: If you select the recommended option, you should connect the DNS settings related and your domain name with the domain name at the registrar’s side. To achieve this, enter the Plesk name server IP address into the respective NS record of the registrar. The instruction on how to obtain the IP is as follows: go to Websites & Domains > domain name > DNS Settings, find the NS record, and then find the A record corresponding to the NS record value.
For example, if your NS record is
example.com. NS ns.example.com*,
find the A record with
ns.example.com, for example,ns.example.com. A 192.0.2.12
The resulting value,
192.0.2.12, is the Plesk name server’s IP that you need. -
Click OK.
The new domain name is now shown in the list at the bottom of the screen.
-
If the operation of changing hosting settings is available for your account, then you can click the domain name of the new website to view or change the hosting settings, as described in the section Changing Hosting Settings.
You can now start creating your website with Sitejet Builder or upload your web content to the subscription of the new website, as described in the section Website Content.
Choosing a Domains View Mode
The “Websites & Domains” screen looks differently (the layout, visible controls, and the overall UX) depending on the domain view mode you choose:
- Dynamic List is the best choice because it combines advantages of two other view modes: the laconic layout with a large number of domains and an expandable list containing all available controls. Dynamic List is also the only mode that shows domain favicons.
- The Active List mode is best suited if you have several domains and want to have access to all available controls.
- The Classic List mode fits if you have a large number of domains (more than 100). However, not all necessary controls will be visible.
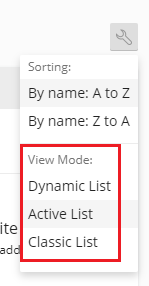
To choose the view mode, go to Websites & Domains, click the  icon,
and then select the desired mode.
icon,
and then select the desired mode.
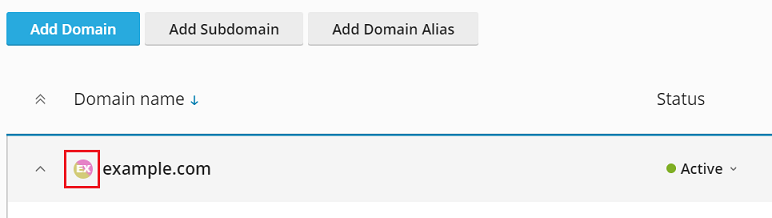
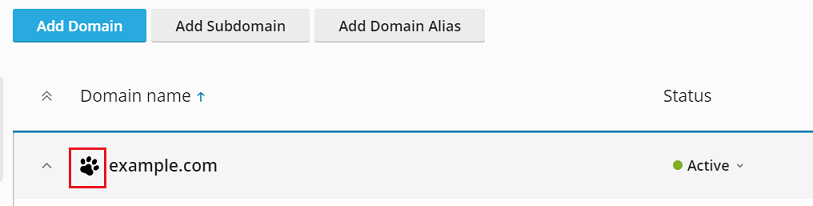
Adding a Domain Favicon
A domain favicon is a small image Plesk shows next to a domain name if you use the Dynamic List view. You can see favicons on the Websites & Domains screen.
Once you create a domain, Plesk generates and shows a default favicon based on the first two characters of the domain name.
However, you can add your custom favicon, for example, the same one you use as your website favicon shown on the browser tab. Custom domain favicons help you to do the following:
- Find the desired website more easily.
- Tell one domain from another.
To add a Dynamic List domain favicon:
-
Choose a PNG, SVG, or ICO image you will use as the favicon.
-
Give the favicon image any of the following names:
favicon.svgfavicon-32x32.pngfavicon.pngfavicon-16x16.pngapple-touch-icon.pngfavicon.ico
-
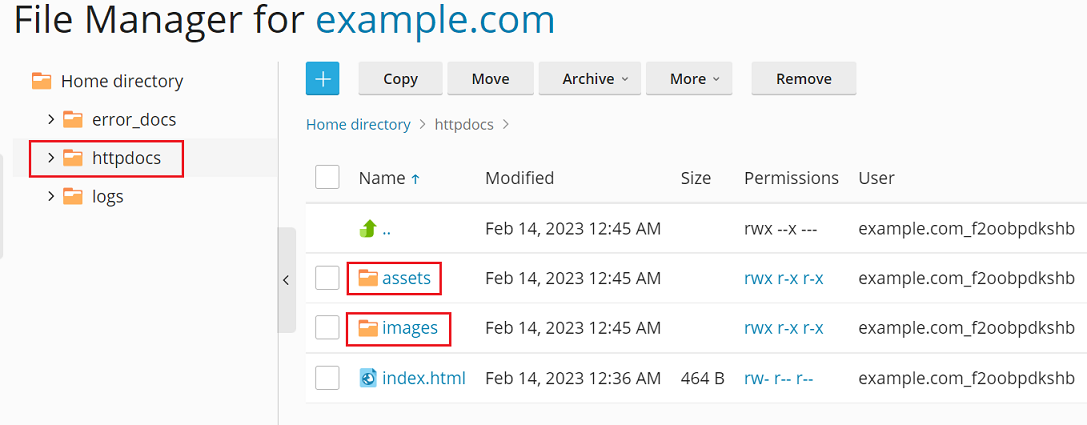
Using File Manager, upload the image to one of the following website directories:
- The document root directory, which is, by default,
httpdocs(unless your hosting provider set a custom document root) -
/imagesin the document root directory -
/assets/imagesin the document root directory
Note: It is essential that you upload a favicon to one of the directories mentioned above. To show a custom favicon, Plesk non-recursively searches for exact file name matches in the directories. If you upload the
favicon.svgfile to the/images/favicondirectory, Plesk will not find the image because/images/faviconis a subdirectory of the required directory. - The document root directory, which is, by default,
You have uploaded your custom favicon image. To have Plesk show your favicon, wait a while or refresh the Plesk page.
Note: If your website runs on WordPress, you can create both the website and domain favicon at the same time using the Favicon by RealFaviconGenerator plugin. Plesk detects a website favicon created by the plugin wizard and automatically sets the favicon for the domain in Dynamic List view.
Moving Domains
You can move add-on domains (which are domains created after the first domain of a subscription) between existing subscriptions. It is useful if you want, for example, to keep staging websites separately from production ones and then move websites from development to production.
A domain is moved to another subscription with its content, configuration files, log files, PHP settings, APS applications, plus subdomains and domain aliases (if any).
Note: The target subscription, where you want to move your domain to, must have enough resources (websites, subdomains, domain aliases, or mail names).
To move an add-on domain to another subscription:
-
Go to Websites & Domains, find an add-on domain that you want to move, click the
icon,
and then click Move Domain. -
Select an available subscription and then click Move.
 icon,
and then click Move Domain.
icon,
and then click Move Domain.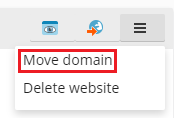
Once the moving has finished, your domain will be assigned to the chosen subscription.
Note: Moving a domain that has a web application installed (WordPress, Joomla!, or any other) does not automatically move the application’s database. It does not affect the website but you may want to move the database manually to the subscription the domain is now assigned to.
Known Issues and Limitations
-
The following cannot be moved:
- The default domain (a domain created first under the subscription).
- A subdomain without its parent domain.
- A domain alias without its parent domain.
-
A domain cannot be moved to a subscription without hosting.
-
A domain with mail service cannot be moved to a subscription without one.
-
You cannot move a domain if there is already a domain with the same document root owned by the target subscription. To move the domain, change its “Document root” value (in Hosting Settings).
-
If a domain with custom additional Apache or nginx directives was moved to another subscription, the directives are preserved and you may need to review them.
-
If a domain was moved to a target subscription whose PHP settings differ from those of the domain, the target subscription will be locked and the notification about it will be shown.
-
If you move a domain that has both:
- A web application installed (WordPress, Joomla!, or any other other).
- And a Plesk additional user set as the application’s administrator,
The additional user will lose access to the application. The login and password of the application’s administrator will be changed (you can see them in the application’s settings).
-
If you move a domain with a mail user to a subscription that belongs to another owner, the email address will be detached from the mail user.
Removing Domains
When you delete a domain from Plesk, all data related to the corresponding site are deleted from the server.
Note: The main domain of your subscription - that is, the first domain name (default domain) that was created for your account, cannot be deleted; however, it can be renamed.
To remove a domain:
- Go to Websites & Domains and locate the name of the domain or subdomain you want to remove.
- Click Remove Website or Remove Subdomain.
- Confirm removal and click OK.
Note: Removing domain names from the Customer Panel does not cancel the registration of these names. If you registered these domain names, you can still use them for your websites in the future.