Mailing Lists
A mailing list is a means to send an email message to multiple recipients at once. Mailing lists are commonly used for sending newsletters and organizing email discussion forums.
In Plesk for Linux, the mailing list feature is provided by the Mailman component, in Plesk for Windows, by the MailEnable Standard Edition component.
(Plesk for Linux) Mailman Limitations
- By default, the Mailman web interface in Plesk is secured with a self-signed SSL/TLS certificate. It protects the connection but triggers a self-signed SSL/TLS certificate warning. You can safely ignore the warning when you access the Mailman web interface. At the moment, it is not possible to secure the Mailman web interface with a valid SSL/TLS certificate.
- At the moment, neither Mailman 2 nor Mailman 3 support ARC headers. As a result, emails sent via Mailman cannot pass ARC checks. Some mail services (for example, Gmail) may treat such emails as unauthenticated.
- The operating system dist-upgrade (for example, from Debian 10 to Debian 11) does not upgrade Mailman 2 to Mailman 3.
(Plesk for Linux) Mailman Version
Depending on the operating system your Plesk runs on, you have or do not have the mailing list feature. And if you have, it can be provided either by Mailman 2 or Mailman 3, which have differences.
Mailman is written in Python. Mailman 2 depends on Python 2 and is officially deprecated. Mailman 2 continues working on legacy OSes but not on modern ones. Mailman 3 depends on Python 3 and is a part of modern OSes (for example, Debian 11 and Debian 12).
Compared to Mailman 2, Mailman 3 requires more RAM, and also installs more packages and dependencies. With Mailman 3, it also takes more time to create a mailing list.
To find out if your Plesk provides mailing lists and which Mailman version it uses, see the table below.
| Operating system Plesk runs on | Mailman version | Comment |
|---|---|---|
| RHEL 7 and RHEL 7-based | 2.1.15-30.el7_9.2 | CentOS 7 reaches end of life in June 30, 2024. To continue using Mailman on a RHEL-based OS, we recommend that you upgrade to AlmaLinux 8 using the conversion tool. AlmaLinux 8 supports Mailman 2 until the OS end of life in 2029. |
| RHEL 8 and RHEL 8-based | 2.1.29 | |
| RHEL 9 and RHEL 9-based | Mailman is not supported. | These OSes do not support any Mailman version (neither Mailman 2 nor Mailman 3). |
| Ubuntu 20 | 2.1.29 | |
| Ubuntu 22 | Mailman is not supported. | This OS does not support any Mailman version (neither Mailman 2 nor Mailman 3). |
| Ubuntu 24 | Mailman is not supported. | This OS does not support any Mailman version (neither Mailman 2 nor Mailman 3) at the moment. |
| Debian 10 | 2.1.29 | |
| Debian 11 | 3.3.3 | |
| Debian 12 | 3.3.8 |
Setting up the Mailing List Feature
To set up the mailing list feature:
-
If the operating system your Plesk runs on supports mailing lists, but they are missing from your server, you can add the feature using the Plesk Installer. To do so, go to Tools & Settings > Updates (under Plesk) > “Add/Remove Components”, and install the following:
- (Plesk for Linux) “Mailman” (under “Mail hosting”)
- (Plesk for Windows) “MailEnable Standard Edition”
-
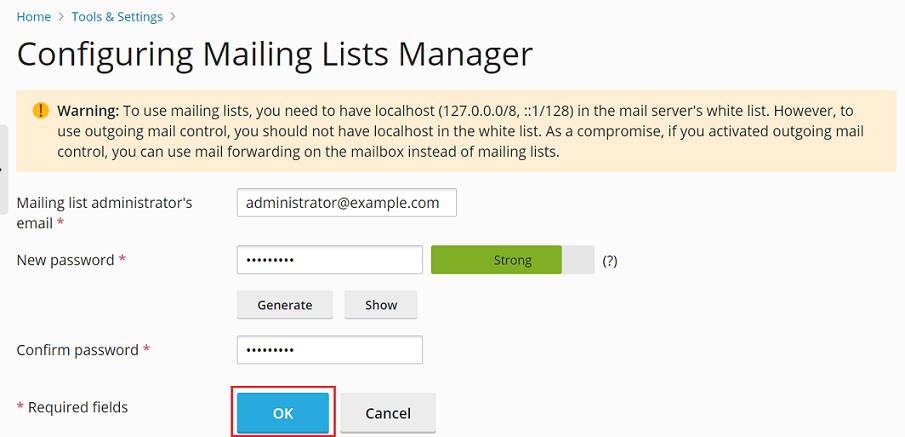
(Plesk for Linux with Mailman 2) Configure the Mailman component. To do so, go to Tools & Settings > Set Up Mailing Lists Server (under “Mail”), specify the mailing list administrator’s email and password, and then click OK.
Note: Once you have configured Mailman, Set Up Mailing Lists Server will no longer be displayed on the Tools & Settings screen. Afterwards you can configure the mailing list software or change your administrative username and password by browsing
https://lists.<your Plesk server hostname>/mailman/admin/mailman.
-
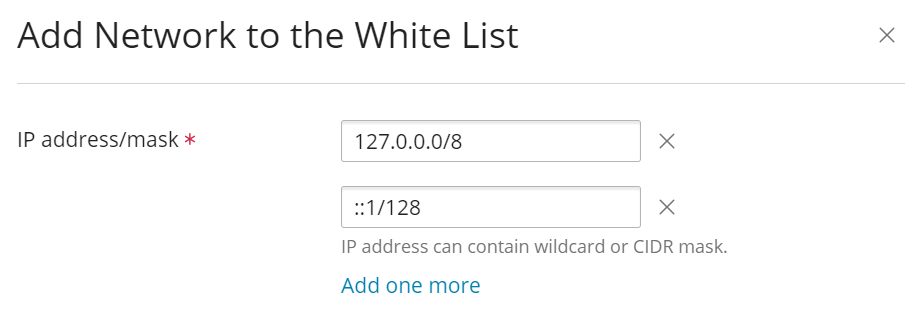
Add localhost to the mail server’s white list. To do so, go to Tools & Settings > Mail Server Settings (under “Mail”) > the “White List” tab. Then click Add Network (if you have no entries) or the
icon, add 127.0.0.0/8and::1/128, and then click OK.Caution: It is not possible to use mailing lists and limit outgoing email messages at the same time. To use mailing lists, you need to have localhost in the mail server’s white list, which makes it impossible to enable limitations on outgoing email messages. As a compromise, if you have set limits on outgoing mail, you can use mail forwarding on the mailbox instead of mailing lists.
Creating a Mailing List
As a prerequisite, we assume that you have already created mail accounts of the mailing list administrator and recipients.
To create a mailing list:
-
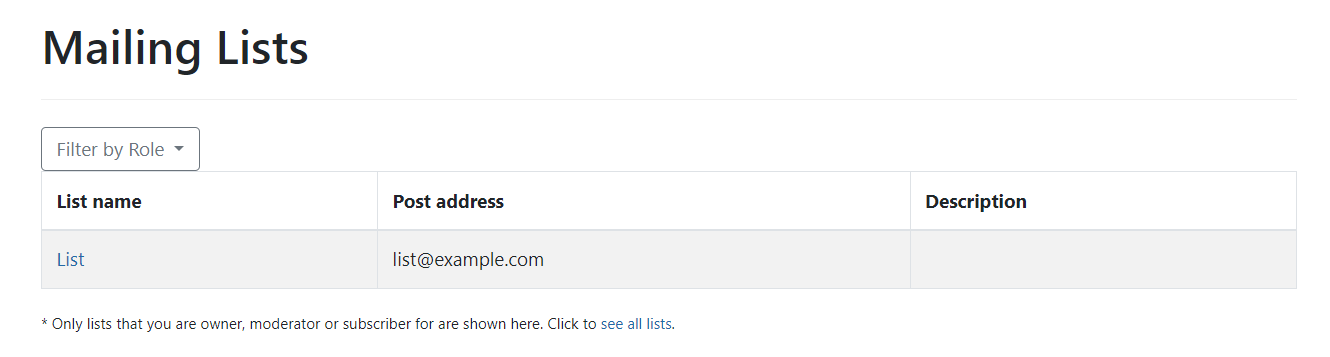
Go to Websites & Domains > domain multiple emails will be sent from > the “Mail” tab > Mailing Lists.
-
Click Create Mailing List.
-
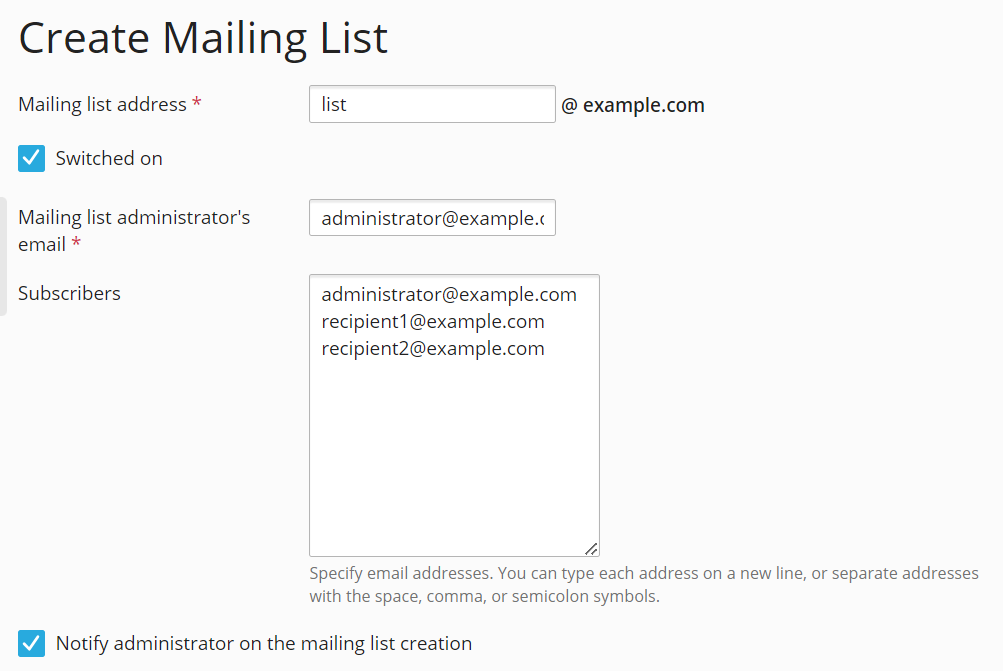
Name your mailing list by specifying the local part of the address (before the
@character). -
Keep the “Switched on” checkbox selected.
-
Specify the email address of the mailing list administrator.
-
(Plesk for Linux with Mailman 2) Specify the password of the mailing list administrator.
Note: Copy and save the mailing list administrator’s password. You will need it later to log in to the Mailman 2 web interface.
-
In the “Subscribers” text field, specify the email addresses of the mailing list administrator and recipients.
-
Keep the “Notify administrator on the mailing list creation” checkbox selected.
-
Click OK.
You have created a mailing list.
(Plesk for Linux) Managing Mailing Lists
To manage your mailing lists, you need to log in to the Mailman web interface. The web interface and the logging in procedure differ between Mailman 2 and Mailman 3.
To log in to the Mailman 2 web interface:
-
Go to Websites & Domains > domain > the “Mail” tab > Mailing Lists.
-
Click “Manage the list” on the row corresponding to the mailing list you want to manage.
This will open the Mailman 2 web interface in a new tab.
-
Specify the password of the mailing list administrator you have saved earlier, and then click Let me in.
You have logged in to the Mailman 2 web interface. You can now see and manage the mailing list you have created earlier.
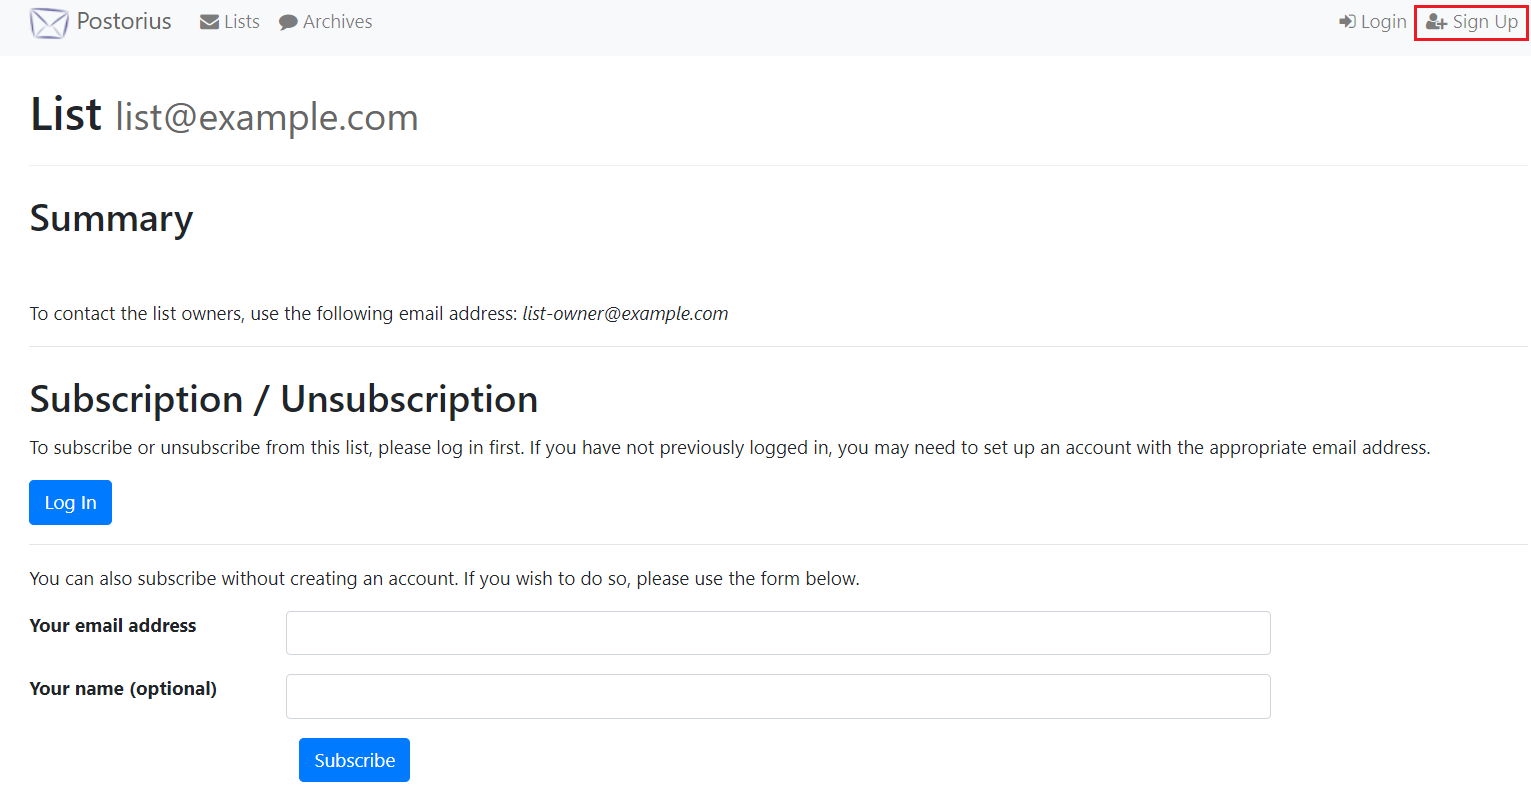
To log in to the Mailman 3 web interface:
-
Go to Websites & Domains > domain > the “Mail” tab > Mailing Lists.
-
Click “Manage the list” on the row corresponding to the mailing list you want to manage.
This will open the Mailman 3 web interface in a new tab.
-
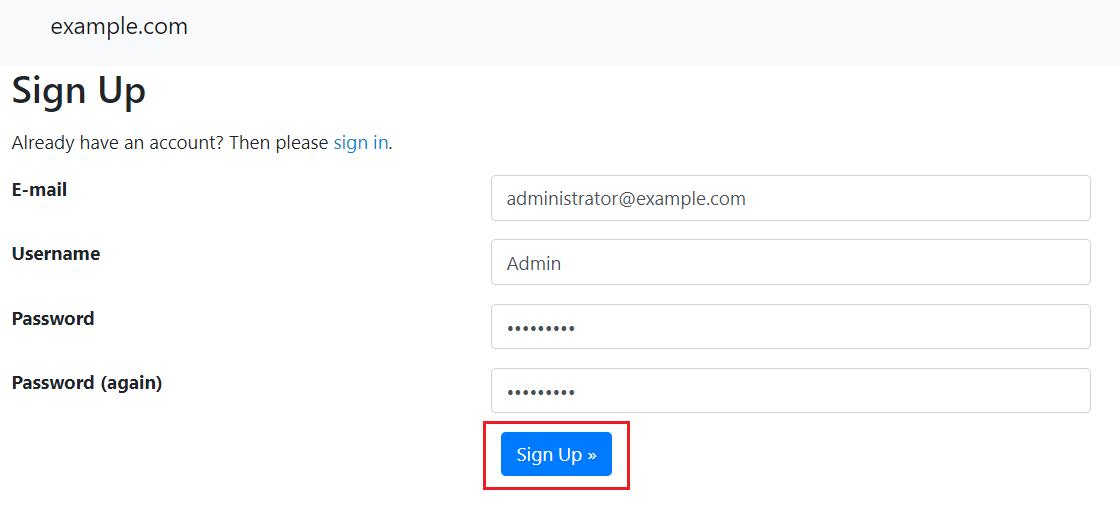
In the upper right corner of the screen, click Sign Up.
-
Create an account for the mailing list administrator. To do so, specify their email address, username, and password, and then click Sign Up. You will later use these email address and password to log in to the Mailman web interface.
Note: Make sure that the email address of the account in Mailman matches the email address of the mailing list administrator in Plesk.
Mailman will send a confirmation email to the mailing list administrator email address.
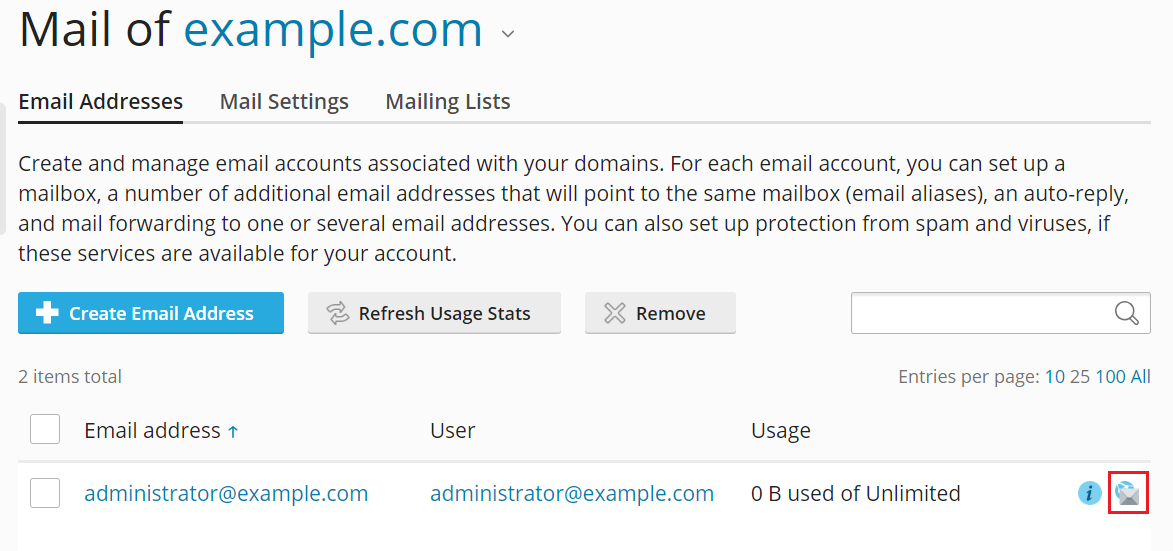
-
Return to Plesk and go to the “Email Addresses” tab.
-
Click the
icon corresponding to the mailing list administrator email address.This will open webmail in a new tab.
-
In the mailbox, find the confirmation email from Mailman, and then click the link in this email.
This will open the Mailman 3 web interface in a new tab.
-
Click Confirm.
-
Mailman has created an account for your mailing list administrator. You can now use their credentials to log in to the Mailman 3 web interface.
To do so, specify the mailing list administrator’s email address and password, and then click Sign In.

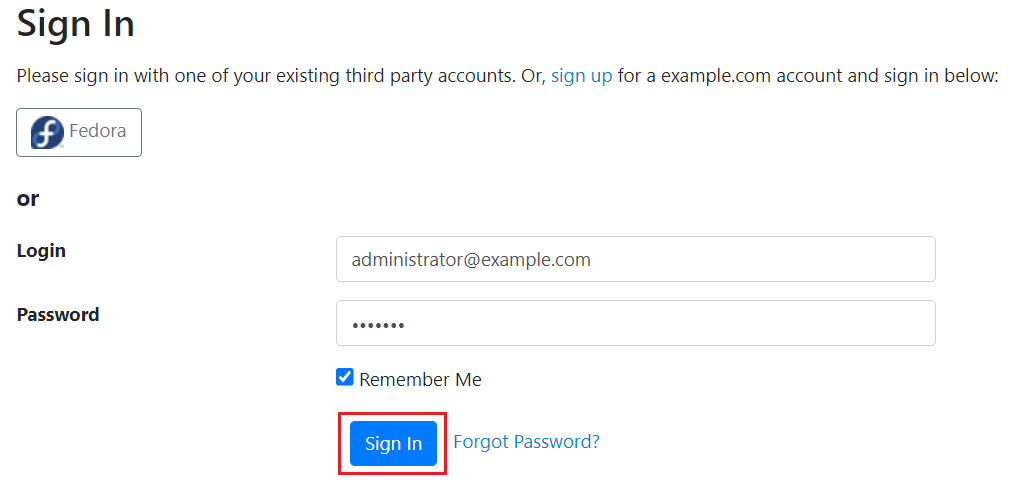
You have logged in to the Mailman 3 web interface. You can now see and manage the mailing list you have created earlier.