Date et heure du système
Résumé: Vous pouvez définir manuellement la date et l’heure de votre serveur Plesk. Vous pouvez également configurer une synchronisation automatique avec les serveurs NTP (Network Time Protocol) pour vous assurer que la date et l’heure de votre serveur sont toujours correctes.
Dans cette section, vous découvrirez comment définir manuellement la date et l’heure sur votre serveur Plesk. Vous découvrirez également comment configurer la synchronisation automatique de l’heure à l’aide de NTP.
Définir manuellement la date et de l’heure
Utilisez cette technique pour définir manuellement la date et l’heure sur votre serveur Plesk.
Note: Veillez à configurer correctement la date et l’heure. Cela pourrait entraîner des problèmes avec Plesk ou les services Plesk. Par exemple, l’authentification 2FA peut cesser de fonctionner, les tâches planifiées peuvent ne pas s’exécuter quand vous le souhaitez, ou vous risquez même de ne plus pouvoir vous connecter à Plesk.
Pour définir manuellement la date et l’heure sur un serveur Plesk :
- Connectez-vous à Plesk.
- Allez dans Outils & Paramètres > Date/Heure du système (dans « Paramètres généraux »).
- Cochez la case « Actualiser l’heure du système ».
- Définissez la date et l’heure souhaitées. Vous pouvez aussi sélectionner votre fuseau horaire.
- (Plesk pour Windows) Si vous ne voulez pas que Plesk ajuste automatiquement l’heure du serveur, décochez la case « Régler l’heure automatiquement pour les passages à l’heure d’été / d’hiver ».
- Cliquez sur Enregistrer.
Les modifications apportées à la date, à l’heure et au fuseau horaire du serveur prennent effet immédiatement.
Configurer la synchronisation automatique de la date et de l’heure à l’aide de NTP
Pour vous assurer que la date et l’heure de votre serveur sont toujours correctes, vous pouvez configurer une synchronisation automatique avec un ou plusieurs serveurs NTP.
Dans Plesk pour Linux, vous devez d’abord installer l’extension gratuite NTP Timesync sur le serveur Plesk :
- Si vous êtes l’administrateur de Plesk, installez l’extension depuis le Catalogue des extensions.
- Si vous n’êtes pas administrateur, contactez votre hébergeur et demandez-lui d’installer l’extension pour vous.
(Plesk pour Linux) Pour configurer la synchronisation automatique avec les serveurs NTP par défaut :
- Connectez-vous à Plesk.
- Allez sous Extensions, accédez à l’onglet « Mes extensions », localisez l’extension « NTP Timesync », puis cliquez sur Ouvrir.
- Sélectionnez l’implémentation NTP souhaitée dans le menu « Service NTP ». Si vous ne savez pas lequel choisir, sélectionnez celui marqué comme « recommandé ».
- (Facultatif) Si un ou plusieurs serveurs NTP par défaut ont été supprimés de la liste, cliquez sur Définir les serveurs NTP par défaut du système d’exploitation* pour réinitialiser la liste des serveurs à ceux par défaut.
- Cliquez sur Appliquer.
La date et l’heure du serveur seront désormais synchronisées avec les serveurs NTP par défaut toutes les 64 secondes. Cela annulera toutes les modifications manuelles de la date et de l’heure que vous avez pu apporter.
Si vous le souhaitez, vous pouvez remplacer tout ou partie des serveurs NTP par défaut par des serveurs personnalisés. Le cas échéant, nous vous recommandons d’avoir entre quatre et neuf serveurs NTP sur la liste.
Note: Il est de votre responsabilité de vous assurer que les serveurs personnalisés que vous ajoutez sont des serveurs NTP valides.
(Plesk pour Linux) Pour configurer la synchronisation automatique avec les serveurs NTP personnalisés :
- Connectez-vous à Plesk.
- Allez sous Extensions, accédez à l’onglet « Mes extensions », localisez l’extension « NTP Timesync », puis cliquez sur Ouvrir.
- Sélectionnez l’implémentation NTP souhaitée dans le menu « Service NTP ». Si vous ne savez pas lequel choisir, sélectionnez celui marqué comme « recommandé ».
- (Facultatif) Supprimez un ou plusieurs serveurs NTP par défaut. Pour supprimer un serveur de la liste, cliquez sur l’icône
 correspondante.
 - Ajoutez un ou plusieurs serveurs NTP personnalisés. Pour cela, cliquez sur Ajouter un autre serveur, puis entrez le nom d’hôte ou l’adresse IP d’un serveur NTP valide dans le champ vide qui apparaît au bas de la liste.
- Une fois que vous avez terminé de supprimer et d’ajouter des serveurs, cliquez sur Appliquer.
La date et l’heure du serveur seront désormais synchronisées avec les serveurs NTP personnalisés toutes les 64 secondes. Cela annulera toutes les modifications manuelles de la date et de l’heure que vous avez pu apporter.
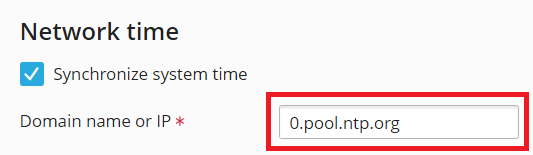
(Plesk pour Windows) Pour configurer la synchronisation automatique avec un serveur NTP personnalisé :
-
Allez dans Outils & Paramètres > Date/Heure du système (dans « Paramètres généraux »).
-
Cochez la case « Synchroniser l’heure du système ».
-
Saisissez le nom d’hôte ou l’adresse IP d’un serveur NTP valide dans le champ « Nom de domaine ou IP ».
Note: Si vous ne savez pas quel serveur NTP utiliser, vous pouvez spécifier l’un des serveurs NTP Pool Project. À savoir, « 0.pool.ntp.org », « 1.pool.ntp.org », « 2.pool.ntp.org » ou « 3.pool.ntp.org ».
-
Cliquez sur Enregistrer.
La date et l’heure du serveur seront désormais synchronisées avec les serveurs NTP spécifiés toutes les heures. Cela annulera toutes les modifications manuelles de la date et de l’heure que vous avez pu apporter.
(Plesk pour Linux) Pour désactiver la synchronisation automatique avec les serveurs NTP :
- Connectez-vous à Plesk.
- Allez sous Extensions, accédez à l’onglet « Mes extensions », localisez l’extension « NTP Timesync », puis cliquez sur Ouvrir.
- Sélectionnez « Aucun » dans le menu « Service NTP », puis cliquez sur Appliquer.
La date et l’heure du serveur ne seront plus synchronisées avec les serveurs NTP.
(Plesk pour Windows) Pour désactiver la synchronisation automatique avec un serveur NTP :
- Connectez-vous à Plesk.
- Allez dans Outils & Paramètres > Date/Heure du système (dans « Paramètres généraux »).
- Décochez la case « Synchroniser l’heure du système », puis cliquez sur Enregistrer.
La date et l’heure du serveur ne seront plus synchronisées avec les serveurs NTP.